Computer configuration where it is located on Windows 7. Enabling Flip3D - displaying windows at an angle. Configuring Windows using msconfig
Do you know what it is msconfig and what is it used for? Yes, yes, according to statistics, many users are not even aware of the presence of such a utility in the operating system. Of course, you might say that this is some kind of system program that an ordinary user does not need to know about. But here, I don’t agree with you.
msconfig is a very useful utility to use simple user. I'll bring a couple simple examples, computer problems that can be resolved using the System Configuration window.
- One of the most popular problems is not correct installation Windows. That is: when, without formatting the hard drive or partition on which the old system is located, I start a new installation and, as a result, every time the computer is turned on, a request appears asking which system to boot from. However, the msconfig utility will not remove old system, but it will help you find a temporary solution by disabling this request, if you suddenly do not want to reinstall everything again with a complete formatting of the hard drive.
- The next thing this utility can help us with is cleaning up startup. Every day you go to various sites, install applications and programs. But you don’t even suspect that under the “easy installation” button may be hiding additional software, which does not always benefit our computer. For me, such software is the recently appeared Amigo browser, which is installed without our agreement and is subsequently loaded into the tray (the tray is the lower right corner of the screen where the date, time, network connection, etc. are displayed), using a computer resource. And it also happens that the computer cannot boot at all, but simply freezes when launching some program from the startup list.
- And the last example is (Let me remind you that in Windows 8, when you press F8, nothing happens and the system boots as usual)
How MSCONFIG works
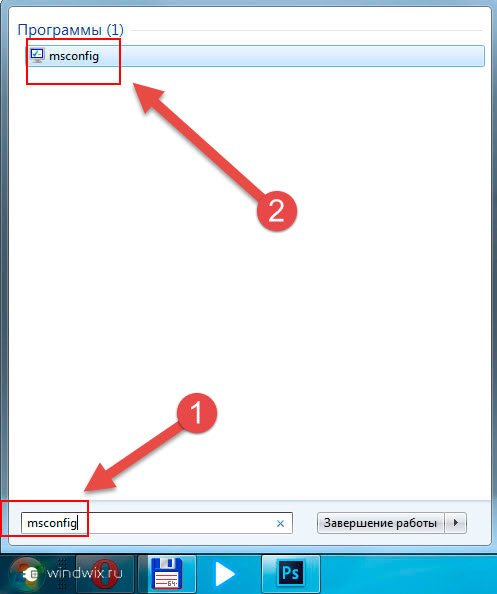
To launch this utility, we need to press the “Windows + R” button combination. A window called “Run” will open in front of us, where we need to enter next command: msconfig, and click “OK”
The “System Configuration” window will open, where on the first “General” tab we see several options for starting the system.
- Normal launch– the name speaks for itself; this option is the default after installing Windows.
- Diagnostic run– this is a download of only basic drivers and services, used for diagnostics in case of system malfunction. But, if after starting in this option, the problems have not disappeared, then it is most likely that the system files are damaged.
- Selective launch- also used for system diagnostics. But, in this option, it is possible to check separately the loading with a set of services and separately with the autoloading of third-party applications. This will help you easily determine the cause of the problem. Use original boot configuration – resets all settings to default if changes have been made on the “Boot” tab.

The next tab is “Download”. As you can see, I have two operating systems. If you have similar situation, we can simply remove the display of the OS we do not need, for ease of loading. To do this, mark which system you will remove and click “Delete”. Also, you can boot into safe mode by checking the box next to “Safe Mode”. But, do not forget to change everything back, because every time you reboot the computer will turn on in “Safe Mode”.
Also, there are “Advanced options” where you can change the number of cores or the size of RAM that will be used when the system boots, but not experienced users I recommend not changing anything.

“Services” is a tab where we can see the entire list of services in the system. It is also used to diagnose the operating system and find the cause of problems by disabling and enabling certain services.
By checking the “Do not display Microsoft services” checkbox, we can see the services that are used third party applications and they are the ones that need to be checked first.

Here is the most interesting part of the msconfig utility, the “Startup” tab. Startups, as a rule, contain a lot of garbage that is installed along with various applications. Now I have only one program in startup: CCleaner. In order to disable it, we just need to uncheck the box and click on the “Apply” button.
Let's take a closer look at the contents of the line. The first column indicates the name of the program, then the manufacturer, the next location of the file that is launched and the registry key that is responsible for autoloading this application. The shutdown date shows when autoloading of a program we didn’t need was disabled.
You can safely remove from startup various browsers or utilities that you don’t need that appeared on their own, as well as those elements that do not display “Manufacturer”.

This tab will allow you to quickly launch some settings, diagnostics and administration of our system.
If you don’t know how to view system properties in the usual way, you can do this here by simply highlighting the desired item and clicking “Launch”.

Personally, I constantly use msconfig at work and I hope that this article will help you become better acquainted with this wonderful system utility to configure the system. You can also find out about and
Good day, dear readers of my blog.
Each PC or laptop, in addition to user-installed software, also has built-in software. There are often situations when, for some reason, the client needs to configure the operation of the device. For this purpose, developers at Microsoft have provided a useful and convenient utility MSConfig Windows 7.
The program is powerful tool, which allows you to debug autorun in detail and remove some errors that interfere with the correct operation of the system.
The application "" has ample opportunities in the settings segment personal computer or laptop. For easy use, the developer has divided the working window into several key tabs.
Important! You should not disable/enable parameters if you are not sure of your actions.
This tool is designed for detailed settings systems. In most cases, this is done to speed up its work.
Tabs( )
As mentioned above, the window is divided into several segments:

After you change something, you need to confirm your actions with the “ Ok" And for the changes to take effect, you need to reboot, which the system itself will notify immediately after closing. For convenience, the restart can be postponed.
Launching "System Configuration"( )
So, how do we access the tool we need? There are several different options to see the menu you want.
Let's go to " Start" and enter "" in the search bar. We wait for the results to appear and select the appropriate application. Usually it occurs alone. How to open the program? Just click on the icon with the left mouse button.
We also go to the menu “ Start", and then select " All programs" Let's go to the catalog " Service" And " Standard" We need " Command line».
A new window will open where you need to enter “” and then confirm by pressing “ Enter».

We go back to the same place Start"to the team" Execute" To do this, you can also press the combination “ Win+R».
A small window will appear where we enter “” and then confirm our actions.

It must be said right away that this method is the longest. Almost no one uses it. But in any case, you should know about it. So where is the right program? We need to open " Computer», system disk, go to " Windows", and then go to "". Here we are looking for the application “”. It starts up simply double click mice.

Sometimes one of the path nodes may be hidden and simply not visible. To restore you need to click " View», « Options» and on the second tab uncheck the necessary checkboxes at the end of the list.
The program doesn't work( )
Some users may encounter a situation where the required utility does not start. A message appears stating that the required file simply does not exist at the specified address.
In most cases, this happens as a result of a virus entering the computer, which simply deletes the application. What to do?
First, let's check the system good antivirus with new bases. Otherwise, you simply don’t have to do the rest.
Next, we look to see if a suitable file exists in its usual place. If it is not there, we try to copy the element from the same operating system installed on another PC. It is also extracted from the disk where the OS image is located.
To do this, run “ Execute" by using " Win+R"or in any other way. In the window that opens, write the following:
Expand "image location"\i386\MSCONFIG.EX_C:\Windows\system32\msconfig.exe, and confirm our intentions. Wherein " image location"—the drive letter where the system files are located or the path to them (if located directly on the computer).
There is also an option to simply download “ msconfing.exe» from the Internet and place this file in a folder located along the path that I mentioned earlier.
Of course, more effective and precisely effective is complete reinstallation Windows. This will also speed up your computer overall. But not everyone can do this on their own or simply don’t want to.
Sometimes, for some reason, a required system component does not start due to restricted access rights. To check, we try to open the program with Administrator rights. This usually helps.
In addition, we try to launch the application in "". To do this, reboot and before the OS starts loading, press “ F8" Then select the appropriate item.

Next, it is advisable to check “ Registry Editor" To do this, go to “ Execute" and write " regedit" Next we go to “ HKEY_LOCAL_MACHINE", folder "". Then we go to " Microsoft», « Windows», « CurrentVersion" And " AppPaths" We are interested in the msconfig file with the extension *.exe. Or rather, simply its presence. Additionally, the value of REG_SZ should be: C:\Windows\system32\msconfig.exe. If this line or even the corresponding mark does not exist, all this needs to be created.

You also need to see if the corresponding service is running. To do this via " Start"we get to " Control Panel" and then in " Administration" There we go to " Services", where we are interested in the string "". If it doesn't work, it needs to be started.

In addition, there is a verification mechanism system files operating system. To do this, go to “ Execute"(we already know how this can be done). In the window that opens, write “ sfc /scannow" We confirm our intentions. Should open " Protection Windows files ”, which will be accompanied by the message “ Checking in progress..." If the tool manages to determine that the files have changed, it will report this and offer to restore everything to the original version using the installation disk.
Settings( )
If the system component is working correctly or you have fixed possible mistakes, you can start using it directly. How to properly configure the operating system using this tool? It all depends on what components a particular user uses.
If we talk about what can be disabled in msconfig in general, you can find out from what I wrote earlier. In particular, it talks about the tab “ Services».
Moreover, if you disable all the components described above, and also clean the “” section as much as possible,” you can even go to maximum performance of your equipment. It is important to remember, however, that any system changes usually lead to consequences. So, if you are not sure of the correctness of your actions, you should not change anything.
Well, it turns out the MSConfig tool is - useful element systems. If you use it correctly, you can significantly increase the speed of your device. In this case, incorrect handling can damage the system.
I hope this article helps you. Subscribe and tell your friends about my blog.
Launching the System Configuration utility
As in Windows XP, the System Configuration utility in Windows 7 can be launched from the Run window: press +[R], enter the command
msconfig.exe in the Open field and click OK. But it’s much easier to type msconfig.exe in the Start menu search bar and click .
The utility window (Fig. A), as you can see, has changed significantly from Windows times XP. In particular, the number of tabs has decreased. Let's take a closer look at the updated "System Configuration". And don't forget that detailed information All options can be found by clicking the Help button.

Figure A: The selection of tabs in the System Configuration window has changed since Windows XP.
General Tab
The General tab (Figure A) still has three startup options, just like in Windows XP. By default, Normal Startup is selected, which loads all services and device drivers. During Diagnostic Startup, only the most necessary Download driver and services are loaded, and the Selective Startup option allows you to select services and programs to load. In this case, the option “Use Original Boot Configuration” is checked by default if standard parameters on the “Boot” tab are not changed.
The Boot tab (Figure B) allows you to enable Safe Boot Mode and configure other startup options that can be useful in diagnosing startup-related problems. For example, when you select the “Boot Log” option, the entire startup process is documented in detail in the file “ C:WindowsNtbtlog.txt", and the option "OS Information" (OS Boot Information) displays the names of the drivers being launched as they boot.
When you select the “Safe Boot” option, you can configure the safe mode settings that will be used the next time the system starts. If the Alternate Shell option is selected, only the command line and critical system services are loaded, and the GUI and network access are switched off.

Figure B You can use the options on the Boot tab to help diagnose problems.
In the lower right corner of the window there is an option “Make All Boot Settings Permanent”. Use it with great caution, because if you select this option, the utility does not provide the ability to automatically cancel changes made by selecting the "Normal Startup" option on the "General" tab. You will have to manually restore the default settings from memory.
By clicking the “Advanced Options” button, you can open the “Boot Advanced Options” window, shown in Fig. C. In most cases these options are not needed, but sometimes they can be useful. For example, if you are experiencing boot problems due to the use of multiple processors, you can limit the number of processors by specifying the required number in the Number of Processors field.

Figure C In most cases, additional boot options are not needed.
Services Tab
The Services tab (Figure D) lists all the services that start when the system boots, and their current state - Stopped or Running. As in Windows XP, individual services can be excluded from startup to diagnose startup problems. Besides, in new version utility indicates when a particular service was disabled.

Figure D: The Services tab now indicates when a service has been disabled.
The Startup tab (Fig. E) lists all applications that start when Windows startup 7. The new version of the utility indicates the manufacturer (Manufacturer), which helps to identify the application, as well as the date the program was disabled (Date Disabled).

Figure E. The Startup tab lists all the applications that start when Windows 7 starts.
Service tab
The “Service” tab (Tools, Fig. F and G) contains all the tools necessary for diagnostics. For each utility there is detailed description, and to launch a particular tool, just select it in the list and click the “Launch” button.
System setup allows you to set Windows 7 startup parameters, as well as identify the causes of errors in the operation of your computer and system. The System Configuration program will help you identify drivers, programs, and components that cause errors to occur when Windows 7 starts up and operates incorrectly.
Open the Start menu and type in the search bar msconfig, confirm with Enter. You can use a keyboard shortcut Windows + R. On the tab Are common select the operating system startup option:

1. Normal - used if there are no problems when booting the system or after they have been eliminated,
2. Diagnostic - simultaneously with Windows, basic services and drivers are launched that ensure the functioning of the system and computer. If the problem persists with this option, there is a high probability that the main files and Windows drivers damaged. If there are no problems, you need to use the following option,
3. Selective startup - the main services and drivers are used, additional options are available:
Load system services, if the option is enabled, the operating system is loaded along with standard set services that are necessary for its functioning,
Load startup items, in this case, programs that are marked on the Startup tab start running simultaneously with the operating system,
Use original boot configuration - By default, this option is enabled and grayed out. He restores initial settings Windows 7 startup when making changes on the tab.
Selective startup must be used if the diagnostic test passed without errors. Turn on one by one additional programs and services, monitor the operation of the system until the cause of the errors becomes apparent.

If your computer has several operating systems, you can designate any of them as the default boot one. To do this, mark the operating system and click Use as default. In addition, you can set the delay time for the multiboot menu; to do this, set it in the field Time-out. To remove an operating system, highlight it and click Delete.
Safe mode - the operating system works with services and devices that are necessary for the computer to operate. In this mode the following are launched:
Devices and drivers start in safe mode:
Check Safe Mode and Boot Option:
minimum- Windows 7 Explorer starts in safe mode, only basic devices, drivers and Windows services, without network support;
another shell- the command line, basic devices, drivers and services of Windows 7 are loaded. Explorer and network components are disabled.
recovery Active Directory - Windows 7 Explorer starts in safe mode, basic services, devices and drivers are used, as well as Active Directory directory services;
net - Windows Explorer 7 starts in safe mode, the main components of the operating system are present, as well as network components: adapters ( wired ethernet and wireless 802.11x), dynamic host configuration protocol DHCP, DNS, Network connections, NetBIOS over TCP/IP support module, Windows Firewall.
Without GUI- boot Windows animation 7 is disabled.
Download log- all process data Windows boot 7 are saved to the file %SystemRoot%/Ntbtlog.txt.
Basic video- instead of drivers corresponding to the video card, standard VGA drivers are loaded.
OS information- When loading Windows 7, the names of the loaded drivers are visible.
Make boot options permanent- when this option is enabled, changes in the system can only be canceled manually. Mode " Normal launch" on the " tab Are common" will not work. Also, changes cannot be undone using the function Use original boot configuration on the tab Are common.

To set up additional parameters download Windows 7, on the Download tab, click the corresponding button.
Number of processors
This setting allows you to limit the number of real and virtual processors used in the system. Select the checkbox and a list will appear in which you indicate the number of required processors.
Maximum memory capacity
You can change the amount of physical random access memory, which is necessary for the operating system to work. Check the box and enter the maximum amount of RAM (in megabytes) in the text field. From the next launch it will be used by the system. PCI blocking
When this option is enabled, the operating system does not allocate I/O and interrupt resources to PCI bus. The I/O and memory resources specified in the BIOS are retained.
Debugging
If you enable this option, you can set global kernel-mode debugging options for device driver developers.
Setting up services
The Services tab displays a list of services that start automatically when Windows 7 boots. These services are divided into two categories:

To establish the causes of errors that occur when starting or operating Windows 7, you need to perform a number of actions:
1. General tab:
2. Services tab:
3. Restart your computer.
If after this there are no problems, then system components Windows 7 is working fine, but the reason for the errors is incorrect work third party services. To determine which service is causing the errors, enable one service at a time, restart the computer, and monitor the system status.
If you still receive errors after following these steps, it is likely that major components of the operating system are damaged. To understand why, do the following:
1. Uncheck the box Don't display Microsoft services.
2. Disable all Microsoft services, enable them one by one, restart your computer and watch for changes until you install all the services causing the crash.

If you are experiencing problems with Windows 7, you can determine the cause of the problem by disabling it step by step. automatic start programs. Disable autoloading of all programs, and then enable the programs one by one, restart the computer and monitor the system status.
To cancel the launch of a program with Windows 7, you should uncheck the box next to its name and confirm the action.
Service
Using the tab Service You can quickly launch tools to configure, administer, and diagnose Windows. Check the right remedy and press Launch.

About the program- information about the version of Windows 7 installed on the computer will appear on the screen.
Change User Account Control settings - UAC setup is a component Windows security 7, which asks for confirmation of actions that require administrator rights.
Support Center- here you can view alerts and a list of completed actions that contribute to the proper operation of Windows 7. The Action Center specifies security and computer maintenance settings that require user participation.
Elimination Windows problems - tools that automatically solve common problems that arise when working with hardware, networks, devices needed to use the Internet, as well as program compatibility problems.
Computer management- tools designed to configure hardware, software and network components of Windows 7.
System Information- provide detailed information about equipment, components and software computer, including drivers.
Event Viewer- allows you to view important events occurring in the system (for example, incorrect launch of automatically downloaded programs or updates). This information will be useful for troubleshooting errors in Windows 7 and installed programs.
Programs- Windows 7 Programs and Features turns Windows 7 features on and off, and uninstalls programs or changes their configuration.
Properties of the system- here you can find out information about the hardware and operating system: Windows 7 version, computer name, domain and settings working group, performance index.
Internet Options- browser options Internet Explorer.
IP protocol configuration- allow you to view and configure network address computer (in command line).
System Monitor- a diagnostic and performance monitoring tool. It's built into Windows 7.
Resource Monitor- allows you to view processor usage information in real time, hard drive, network and memory.
Task Manager- Shows applications, processes and services running on the computer. With its help, you can monitor your computer's performance and close applications that are not responding.
Command line - Windows function 7, you can use it to enter MS-DOS commands and other commands without GUI user.
Registry Editor- a tool with which you can view and change parameters in system registry, contains information about the operation of the computer.
Despite the fact that Microsoft marketers are tearing their hair out, assuring users that their next new operating system is simply superb and does not have a single flaw or jamb and does not require absolutely any additional configuration, few people believe them.
Moreover, practice shows that operating Windows systems- like Russian cars: in order to drive it normally and not break down for a long time, you still need to tinker!
Let's not remember the problems of Windows 95, 98, Me, XP, Vista - they are already in the past, let's look at "tuning" for the Windows 7 operating system. So, a few tips:
1. How to increase the loading speed of the operating system Windows 7 for multi-core processors
1. Open dialog menu Start -> Run(or press the key combination Win+R);
2. Enter the command in the line msconfig and press OK;;
4. Press Extra options;


5. Check the box next to the value Number of processors;
6. Select the number of cores of your processor in the activated drop-down menu (Default 1);
7. It is not recommended to set a value less than the actual number of cores of your processor, since the system may continue to use the number of cores you specified even after the boot is completed;
8. Click OK and restart the computer;
9. It is recommended to enable (set to Enabled) V BIOS function ACPI APIC Support (entering the BIOS is usually done by pressing Delete keys, immediately after the computer starts booting). This function is located in the Power tab.
2. Speed up Windows 7 boot - Automatic login:
If you want to speed up the Windows 7 boot process, you can set up automatic login. This feature was created for situations where one person uses the computer. By setting up automatic login, you won't have to enter a password every time your operating system boots.
For settings automatic login in Windows 7 you need to do the following:
1. Press Win+R on the keyboard (or Run in the Start menu);
2. In the window that appears, enter control userpasswords2 and press Enter;
3. In the window User Accounts on the bookmark Users Highlight your account and uncheck the " Users must enter a user name and password to use this computer";
4. Press Apply;
5. In the window that opens Automatically Log On there will be three fields - User name, Password And Confirm Password;
6. Enter your password in the fields Password And Confirm Password;
After the system restarts, you will no longer need to enter your password and login to Windows will occur automatically;
P.S. Sometimes there may be a side effect of this setting: after rebooting the panel quick launch - "Quick Launch
" is not saved - after a restart it is not there.
3. Unlock 5 additional themes for Windows 7:
1. Go to the folder %windir%\Globalization\MCT. Attention! This folder is hidden by default, you must allow hidden folders to be shown!
2. Click on each topic sequentially:
%windir%\Globalization\MCT\MCT-AU\Theme\AU.theme
%windir%\Globalization\MCT\MCT-CA\Theme\CA.theme
%windir%\Globalization\MCT\MCT-G B\Theme\GB.theme
%windir%\Globalization\MCT\MCT-US\Theme\US.theme%windir%\Globalization\MCT\MCT-ZA\Theme\ZA.theme
4. List of Windows programs launched in the Run dialog box:
The Run dialog box is used in Windows to open a program, folder, or document. It allows you to create a task to run with administrator rights. The most famous commands executed in the Run window are cmd (Command Prompt) and regedit (Registry Editor). Knowing the exact name of the command, you can run any system applications or Windows snap-in.
The Run dialog menu is launched either Start -> Run, or by pressing the keyboard Win+R.
To execute a command, you need to enter its name and press Enter.
| Russian element name | English element name | Team |
| Ftp protocol (command line) | Ftp-protocol (command prompt) | ftp |
| Iexpress Wizard (not translated) | Iexpress Wizard | iexpress |
| Internet Explorer | Internet Explorer | iexplore |
| Paint | Paint | mspaint |
| Windows Firewall | Windows Firewall | firewall.cpl |
| Wordpad | Wordpad | write |
| ODBC Data Source Administrator | ODBC Data Source Administrator | odbcad32 |
| Administration | Administrative Tools | control admintools |
| Backup and recovery | Backup and Restore | sdclt |
| Notebook | Notepad | notepad |
| Turn Windows features on or off | OptionalFeatures.exe | |
| System Restore | System Restore | rstrui |
| Logout | Log Out Of Windows | logoff |
| Date and time | Date and Time | timedate.cpl |
| Disk Defragmenter | Disk Defragmenter | dfrgui |
| Authorization Manager | Authorization Manager | azman.msc |
| Windows Task Manager | Windows Task Manager | taskmgr |
| Driver Verification Manager | Driver Verifier Manager | verifier |
| device Manager | Device Manager | devmgmt.msc |
| device Manager | Device Manager | hdwwiz.cpl |
| Additional hours | Additional Clocks | control timedate.cpl,1 |
| Shut down Windows | Shut Down Windows | shutdown /s |
| Notes | Sticky Note | StickyNot |
| Windows account database protection | Securing the Windows Account Database | syskey |
| Sound | Sound | mmsys.cpl |
| Sounds (sound scheme) | Sounds (sound theme) | control mmsys.cpl,2 |
| Sound recording | Sound Recorder | soundrecorder |
| Gaming devices | Game Controllers | joy.cpl |
| Initializing Security Hardware for TPM | Initialize the TMP security hardware | TpmInit |
| Screen color calibration | Display Color Calibration | dccw |
| Calculator | Calculator | calc |
| Command line | Command Prompt | cmd |
| Windows components | Windows Features | OptionalFeatures |
| Management Console (MMC) | Microsoft Management Console | mmc |
| system configuration | System Configuration | msconfig |
| Local security policy | Local Security Policy | secpol.msc |
| Local users and groups | Local Users and Groups | lusrmgr.msc |
| Windows Image Download Wizard | Windows Picture Acquisition Wizard | wiaacmgr |
| Create Share Wizard | Create A Shared Folder Wizard | shrpubw |
| Device Driver Installation Wizard | Driver Package Installer | dpinst |
| Hardware Installation Wizard | Add Hardware Wizard | hdwwiz |
| Volume mixer | Sound Volume | sndvol |
| Resource Monitor | Resource Monitor | resmon |
| Configuring program access and defaults | Set Program Access and Computer Defaults | controlappwiz.cpl,3 |
| Setting up Account Control | User Account Control Settings | UserAccountControlSettings |
| Scissors | Snipping Tool | snippingtool |
| Shared folders | Shared Folders | fsmgmt.msc |
| Disk Cleanup | Disk Cleanup Utility | cleanmgr |
| Control Panel | Control Panel | control |
| "Fonts" folder | Fonts Folder | fonts |
| Downloads folder | "Downloads" Folder | Downloads |
| Folders settings | Folder Options | control folders | Restart Windows | shutdown /r |
| Transferring Printers | Printer Migration | PrintBrmUi |
| Pen and touch devices | Pen and Touch | TabletPC.cpl |
| Personalization | Personalization | control desktop |
| Task Scheduler | Task Scheduler | control scheduled tasks |
| Remote Desktop Connection | Remote Desktop Connection | mstsc |
| Getting programs | Get Programs | controlappwiz.cpl,1 |
| Disk check | Check Disk Utility | chkdsk |
| Checking and restoring system files | System File Checker (Scan and Repair) | sfc /scannow |
| File signature verification | File Signature Verification | sigverif |
| Conductor | Windows Explorer | explorer |
| Explorer: C:\ | Windows Explorer: C:\ | \ |
| Explorer: C:\Users\Your_name | Windows Explorer: C:\Users\Your_name | . |
| Explorer: C:\Users\ | Windows Explorer: C:\Users\ | .. |
| DiskPart program | Disk Partition Manager | diskpart |
| Programs and components | Programs and Features | appwiz.cpl |
| Event Viewer | Event Viewer | eventvwr.msc |
| Screen resolution | Screen Resolution | desk.cpl |
| Personal Sign Editor | Private Character Editor | eudcedit |
| Local Group Policy Editor | Local Group Policy Editor | gpedit.msc |
| Registry Editor | Registry Editor | regedit |
| Registry Editor | Registry Editor | regedt32 |
| Editor title pages faxes | Fax Cover Sheet Editor | fxscover |
| Resulting Policy | Resultant Set of Policy | rsop.msc |
| System Information | System Information | msinfo32 |
| Properties of the system | System Properties | sysdm.cpl |
| System Properties: Advanced | System Properties: Advanced | SystemPropertiesAdvanced |
| System Properties: System Protection | System Properties: System Protection | SystemPropertiesProtection |
| System Properties: Hardware | System Properties: Hardware | SystemPropertiesHardware |
| System Properties: Remote Access | System Properties: Remote | SystemPropertiesRemote |
| Properties: iSCSI Initiator | iSCSI Initiator Properties | iscsicpl |
| Properties: Internet | Internet Properties | inetcpl.cpl |
| Properties: Keyboard | Keyboard Properties | control keyboard |
| Properties: Mouse | Mouse Properties | control mouse |
| Properties: Mouse | Mouse Properties | main.cpl |
| Properties: Mouse: Pointer Options | Mouse Properties: Pointer Options | control main.cpl,2 |
| Properties: Mouse: Pointers (Scheme) | Mouse Properties: Pointers | control main.cpl,1 |
| Certificates | Certificates | certmgr.msc |
| Network connections | Network Connections | control network connections |
| Network connections | Network Connections | ncpa.cpl |
| System Monitor | Performance Monitor | perfmon |
| Indexing service | Indexing Service | ciadv.msc |
| Component Services | Component Services | dcomcnfg |
| Component Services | Component Services | comexp.msc |
| Program compatibility | Program Compatibility | msdt.exe -id PCWDiagnostic |
| Create a system repair disk | Create a system repair disk | recdisc |
| Nearby users | People Near Me | collab.cpl |
| Saving usernames and passwords | Stored User Names and Passwords | credwiz |
| DirectX Diagnostic Tool | Direct X Troubleshooter | dxdiag |
| Help Desk Diagnostic Tool | Microsoft Support Diagnostic Tool | msdt |
| Digitizer Calibration Tool | Ditilizer Calibration Tool | tabcal |
| ClearType Text Adjuster | ClearType Text Tuner | cttune |
| XPS Viewer | XPS Viewer | xpsrchvw |
| Problem Reproduction Recorder | Problem Steps Recorder | psr |
| symbol table | Character Map | charmap |
| Phone and modem | Phone and Modem | telephon.cpl |
| Windows Remote Assistance | Windows Remote Assistance | msra |
| Disk management | Disk Management | diskmgmt.msc |
| Computer management | Computer Management | compmgmt.msc |
| Print management | Print Management | printmanagement.msc |
| Color management | Color Management | colorcpl |
| Installing or removing interface languages | Install or uninstall display languages | lpksetup |
| Devices and Printers | Devices and Printers | control printers |
| user accounts | User Accounts | Netplwiz |
| Color and appearance window | Window Color and Appearance | control color |
| Windows Mobility Center | Windows Mobility Center | mblctr |
| Support Center | Action Center | wscui.cpl |
| Sync Center | Sync Center | mobsync |
| Accessibility Center | Ease of Access Center | utilman |
| Encrypting File System (EFS) | Encryption File System | rekeywiz |
| Fonts (adding or removing) | Fonts | control fonts |
| Screen (text size) | Display (size of text) | dpiscaling |
| Screen keyboard | On-Screen Keyboard | osk |
| Magnifier | Magnifier | magnify |
| Narrator | Microsoft Narrator | reporter |
| Power supply | Power Options | powercfg.cpl |
| Power Options: Advanced Options | Power Options: Advanced Settings | control powercfg.cpl,1 |
| WMI control | Windows Management Infrastructure | wmimgmt.msc |
| language and regional standards | Region and Language | intl.cpl |
| Region and Language: Optional | Region and Language: Administrative | control intl.cpl,3 |
| Region and Language: Languages and Keyboards | Region and Language: Keyboards and Languages | control intl.cpl,2 |
If any of the list items does not start, it most likely means that it is uninstalled. Many of the Windows components can be installed in Start -> Control Panel -> Programs and Features -> Turn Windows features on or off.
5. Keyboard shortcuts:
In many articles you may see text like: Win+R. This word Win stands for the c key Windows logo. This key is usually located on the bottom line, third from the left, and is also often duplicated on right side keyboards.
Basic commands/abbreviations:
Win+Up- Maximize window
Win+Down- Restore/Minimize window
Win+Left- Snap window to left edge of screen
Win+Right- Snap window to the right edge of the screen
Win+Shift+Left- Switch to left monitor
Win+Shift+Right- Switch to right monitor
Win+Home- Minimize/Restore all inactive windows
Win+Break(or Pause)- Launch the System item from the Control Panel (Properties item when right-clicking on Computer in the Start menu)
Win+Space- Show desktop
Win+B- Go to the notification area (tray)
Win+D- Minimize windows or restore all windows
Win+E- Launch Explorer
Win+F- Launch built-in Windows search dialog
Win+Ctrl+F- Run Search on your computer from the domain
Win+F1- Launch built-in Windows dialog: Help and Support
Win+G- Show gadgets on top of all windows
Win+L- Locking the workstation (current user session)
Win+M- Minimize all windows
Win+P- Display additional options display (extend the desktop to 2 monitors, etc.)
Win+R- Launch the Run dialog box
Win+T- Select the first item in the taskbar (Pressing again switches to next element, Win+Shift+T- scrolls in reverse order)
Win+U- Launch the Ease of Access Center
Win+X- Launch Mobility Center
Win+digit- Launch the application from the taskbar (Win+1 launches the first application on the left, Win+2 launches the second, etc.)
Win + "+"- Zoom in
Win + "-"- Zoom out
Ctrl + mouse wheel (up\down) on the desktop- increase/decrease desktop icons.
In Explorer:
Alt+P- Show/Hide Preview Area
Task bar:
Shift + click on icon- Open a new application window
Ctrl + Shift + click on icon- Open a new application window with administrator privileges
Shift + right click on icon- Show application menu
Shift + right click on a group of icons- Show menu, restore all / collapse all / Close all
Ctrl + click on a group of icons- Maximize all group windows
6. Disabling (enabling) unused Windows 7 components:
There are many additional features and components in Windows 7. You can look through them and decide for yourself which ones you will use and which ones you won't. Unused components can be disabled and thereby slightly relieve the system's use of computer resources.
To view and disable (enable) additional functions and components, do the following:
1. Open Control Panel;
2. Open the snap-in Programs and components;
3. Follow the link on the left " Turn Windows features on or off";
4) View all components and disable unnecessary ones by unchecking their boxes.
7. Disabling the "Support Center" flag in the tray:
If during work you see the “Support Center” flag appear in your tray and you want to remove it, then do the following.
1. Right-click on the Taskbar and select Properties;
2. Press the button Tune;
3. Follow the link Enable or disable system icons;
4. Set value system icon Support Center V " Off" and press OK.
8. Changing the function of the power button on your computer case:
By default, the shutdown button in Windows 7 is in the " Shutdown" If you restart your computer several times a day, it would probably be more convenient for you to switch the shutdown button to the “” state. To do this, right-click on the Start button, select the Properties menu item and toggle " Power button action" to state ". You can also select functions " Lock", "Change user" And " Ending a session".
P.S. Personally, for me, the default option is the most successful. Rebooting to auto is not necessary at all.
9. Cancel and change the association of file types with certain programs:
If you select the wrong program in the " To open with" and set the parameter " Use the selected program for all files of this type", and also if the program was uninstalled incorrectly, leaving associations in the system with the file types it supports. There are several ways to fix this.
Method 1: Try to associate the necessary files with the necessary programs using the same “Open with” dialog
Method 2: Control Panel\All Control Panel Items\Default Programs\Set "Change Program" Associations
Method 3: Search the registry in the thread
10. Disabling tooltips:
You can disable tooltips using the Group Policy Editor.
1. Click Start, in the To start searching write gpedit.msc and press OK;
2. Go to section User Configuration - Administrative Templates - Start Menu and Taskbar;
3. Open parameter " Remove tooltips for main menu items", choose item Enabled and press OK;
11. Create a system repair disk and boot from it:
If you have an installation Windows disk 7, it is not necessary to create a recovery disk. If installation disk If you don't have one, you definitely need to create a recovery disk - you will need it sooner or later. You can boot into the environment from the installation disk Windows recovery RE
Creating a system repair disc:
1. Insert a blank CD into the drive;
2. Open Start -> Control Panel -> Backup and Restore;
4. Insert the recovery disc into the drive and reboot;
5. Boot priority from the drive must be set in the BIOS;
7. Select the system you want to restore.
8. Set the switch Use recovery tools... and press the button Further. You will see a window with recovery options.
12. Adding your icon to the list of account pictures:
By default, account pictures are located in the following folder:
C:\ProgramData\Microsoft\User Account Pictures\Default Pictures
You can place your image in it and it will be displayed automatically when you select the option to change the picture account in the snap" user accounts". In this case, the drawing must be in the format *.bmp and have size 128x128 pixels.
13. Removing a lock icon from a folder:
1. Right-click on the folder with which you want to remove the lock icon and select Properties;
2. Go to tab Safety;
3. Press the buttons Edit -> Add -> Advanced -> Search;
4. In search results, hold down the key Ctrl, select the following names: Verified Administrators, and press OK;
5. In the Groups or Users window, select Administrators; and check the box on Full access
, then select Verified; and also check the box on Full access;
6. Click OK;
7. When windows appear " Security application error" click Continue.
14. Reduce the size of the desktop icon:
How to reduce or increase the size of desktop icons.
15. Improving the color quality of the monitor:
Windows 7 offers a new Display Color Calibration Wizard to help you set color, brightness, and contrast settings properly, and a ClearType tuner to make text sharp and contrasty. To call the wizard, click Start, enter DCCW and press Enter. Next - everything is simple.
16. Enabling Flip3D - displaying windows at an angle:
1. Right-click on the desktop, select Create -> Shortcut;
2. In the field " Specify the location of the object" enter the following: RunDll32 DwmApi #105 and press Further;
3. Type the name of your future (for example, Flip3D) shortcut and click Ready.
17. Using checkboxes to highlight (select) files and folders:
Windows 7 has a convenient ability to mark files and folders for selection using checkboxes. This is more convenient than selecting objects by holding Ctrl, but this feature is disabled by default. To enable it, do the following:
1. Open Explorer and press the key once Alt- this way we initialize the display standard menu at the top of the Explorer window, which is hidden by default;
2. Launch Start -> Control Panel -> Folder Options and go to the tab View;
3. Mark the option Use checkboxes to select items and click OK;
Now on the left next to each file and folder it is possible to mark them by checking a box, and in the headings of the sorting columns you can put a check mark to select all objects in an open folder.
18. Automatic ADSL -connecting the Internet when Windows starts in “invisible mode”:
1. Open Control Panel\Network and Internet\Network Connections\ADSL Properties;
2. In the tab options uncheck: Display connection progress, request name and password;
3. Place a shortcut in the startup folder ADSL.
19. Automatic VPN connection to the Internet when Windows starts:
1. Open back planner from the menu Start -> Administrative Tools -> Task Scheduler or by running the command taskschd.msc from the Start menu -> Search;
2. Press Create a task;
3. Tab Name -> Connection name, we leave the placement as is.
4. Tab Triggers -> Create -> Start task: When logging in
Actions tab - Create
Action: Run the program
Program or script: rasdial "connection name" user password
Options tab-Create
Check the boxes:
Run a task immediately if a scheduled run is missed
If execution fails, restart after 1 minute.
Number of restart attempts 99.
Uncheck:
Stop a task taking longer to complete
If you get error 623 when connecting to a VPN via a bat file.
Rename the connection name to English language and everything should work.
20. Restoring missing sound in Internet browsers:
1. Check the volume level in the Flash player itself;
2. Uninstall completely and then install again:
2.1. Adobe Flash Player. Removal: http://kb2.adobe.com/cps/141/tn_14157.html Installation: http://get.adobe.com/flashplayer/otherversions/
2.2. Codecs in the system (K-lite codeck pack, Shark007 Windows 7 Codecs, etc.)
2.3. Browsers
2.4. Sound card drivers
3. In Internet Explorer, check if you have a checkbox in the " Play sounds on web pages" Tools -> Internet Options -> Advanced -> Chapter Multimedia;
4. Check if the service is set to start Windows Audio Automatically.
Control Panel -> Administration -> Services -> double click on Windows Audio -> Startup type: Automatic;
5. Click Stop, Then Launch;
5. Launch Registry Editor Win+R -> regedit. Go to thread: HKEY_LOCAL_MACHINE\SOFTWARE\Microsoft\Windows NT\CurrentVersion\Drivers32;
Check the value of a String parameter wavemapper. Its value should be msacm32.drv. If this parameter no, then create it.
21. Remove unnecessary text on the desktop:
1. Open with Restorator or PE Explorer files C:\Windows\System32\ru-RU\user32.dll.mui And C:\Windows\System32\en-US\user32.dll.mui and in the string table we delete rows with 715 By 718 inclusive and lines 737 And 738 in order to extra inscriptions was not on the desktop.
715%wsWindows%ws
716 %ws Build %ws
717 Test copy.
718 For tests only.
737 Yours copy of Windows is not genuine
738 Test mode
22. Moving system folders and changing their paths:
Transfer system folders It’s better to do it immediately after installing Windows, before installing programs and drivers, because When installing drivers and especially programs, directories and shortcuts will be created in these same system folders.
If you use system folders to store files, then transferring the user's system folders to a non-system drive will help you save your files. If Windows crashes, when you reinstall it, the default system folders will be completely erased, with all the files in them.
But if you set your own paths to the system folders, then all their contents will remain intact. Previously in previous versions In Windows, in order to move any system folder or change its path, you had to edit the value you needed in one of the following registry branches:
HKEY_CURRENT_USER\Software\Microsoft\Windows\CurrentVersion\Explorer\Shell Folders
HKEY_CURRENT_USER\Software\Microsoft\Windows\CurrentVersion\Explorer\User Shell Folders
HKEY_LOCAL_MACHINE\Software\Microsoft\Windows\CurrentVersion\Explorer\Shell Folders
HKEY_LOCAL_MACHINE\Software\Microsoft\Windows\CurrentVersion\Explorer\User Shell Folders
Microsoft, realizing that many users may want to move their system folders, has simplified this task for users by eliminating the need to edit the registry. To move system folders and change their paths, do the following:
1. Create a new folder, preferably with a name similar to the folder being moved.
2. Open in Windows Explorer: Desktop\Your Profile(For example: Desktop\Administrator);
3. Right-click on the name of the folder you are going to move (For example: My Documents) and select Properties;
4. Open a tab Location;
5. Press the button Move and specify the path to the new folder you created;
6. Next, the system will ask you: Move all files from old location to new one?(Recommended answer - Yes);
7. Agree with the new parameters by applying them and exit;
8. Reboot the Computer.
23. Quickly adding your own folder or program shortcut to the Computer folder:
1. Copy the shortcut you need to a folder C:\Users\UserName\AppData\Roaming\Microsoft\Windows\Network Shortcuts
Where Username- this is the name of your account (For example: Administrator).
24. Eliminate blinking of games in OpenGL mode:
Rename files:
..\windows\system32\glu.dll- V glu32.dll
..\windows\system32\opengl.dll - in opengl32.dll
25. Reboot your computer into safe mode without using the keyboard:
In order to reboot into Safe Mode, just press the F8 key during boot and select Safe Mode. And to return back to Normal mode You just need to restart the computer (without pressing F8) and the system will return to its standard state.
But on some motherboards F8 key is used to select physical device, from which the computer should start booting.
In this case, you must select HDD on which the operating system is installed. After clicking Enter keys You must immediately press the F8 key again until a menu for selecting Windows boot options appears on the screen. You must be able to do this fairly quickly, otherwise Windows will begin loading normally.
If you don’t want to play for speed, there are more easy option solutions:
1. Open System Configuration: Start -> Run -> msconfig -> Ok or Win+R -> msconfig -> Ok;;
3. Check the box next to the value Safe mode In chapter Boot Options;
4. Press Ok and restart your computer.
5. To return back to Normal mode: Being in Safe Mode Uncheck this box and restart your computer.
26. Where are icons (icons) stored in Windows 7:
If you want to use one of the Windows 7 icons, you can find most of them in the following files:
C:\Windows\System32\shell32.dll
C:\Windows\System32\imageres.dll
To extract the icon you need:
1. Open one of the proposed files using the program Restorator;
2. In the panel Resource tree open folder Icon;
3. Select any of the icons you like.
4. In the panel Resource tree right-click on this resource and select Extract... > Extract as "resource_name.ico";
5. Select the folder to extract and click Save;
You can also extract all the icons at once, for this:
6. In the panel Tree resources right click on the folder Icon and select Extract... > Extract all as "Icon" type;
7. Select the folder to extract and click OK;
27. Removing an installed update:
If you have installed an update in Windows, to add additional function, and you don’t like it, then you can safely delete it.
To remove any update, do the following:
1. Open Control Panel -> Programs;
2. Click on the link View installed updates;
3. Right-click on any update that you want to remove and click on the word that appears Delete;
4. If necessary, restart the computer.
28. Creating computer status management icons:
To quickly change the system state, you can create shortcuts on the desktop that allow you to change it with one click of the mouse.
To create shortcuts, follow these steps:
1. Click right key mouse on the desktop, select the menu item Create -> Shortcut;
2. In the field Specify the location of the object enter the required command to create a shortcut and press OK;
Locking your computer - rundll32.exe User32.dll,LockWorkStation
Sign Out - Shutdown.exe /l
Shutdown - Shutdown.exe -s -t 00
Dream - rundll32.exe powrprof.dll,SetSuspendState Sleep
29. Deleting data without the possibility of recovery:
When deleting a file or folder, the complete physical removal information, only the “table of contents” is cleared file system. Using the cipher utility, a partial solution to this problem is possible, since it is possible to clear free space on the disk by overwriting it.
The space occupied by the contents of the folder will be overwritten with zeros, then ones, and then a set random symbols in every sector.
To completely delete data:
1. Delete the necessary files or folders from your directory that need to be deleted;
2. Launch the command line with administrator rights;
2.1. Press the button Start;
2.2. Enter the command in the search bar cmd;
2.3. Right-click on the found program and select Run as administrator;
3. On the command line, enter: cipher /w:directory;
directory - path to any folder on the partition to be cleaned. (For example: cipher /w:c:\temp) If you deleted a folder or file from the root of the disk, then you can specify only the drive letter as the path. (For example: cipher /w:c:\).
30. Removing text under a shortcut or file icon:
1. Right-click on the selected icon;
2. Click Rename;
3. Hold down the key Alt, print on numeric keypad consecutive numbers 2, 5 and 5 ( Alt+255) - this combination allows you to add invisible symbol in the name of the shortcut or file;
4. If you want to rename multiple shortcuts, when you rename the next one, you will need to press Alt and enter 255 twice. So for the third icon you will need to enter ALT+255, ALT+255, ALT+255.
Thanks for this collection to the site w7seven.ru


