Logging into Windows without selecting a user. Windows: Automatic login (autologin)
If you don't want to waste time entering your password when booting the system and skipping the Windows login screen, then this can be easily accomplished by following a simple set of steps. By setting up automatic login, you'll save a few seconds, which will ultimately reduce your overall Windows boot time.
This method can be used for both local account, and for a Microsoft account.
It is not recommended to enable automatic login if someone else uses the computer besides you and works under separate accounts. It is also not safe to use this setting if you frequently move your laptop and it is left unattended for a while.
Can be used 2 ways to configure auto-login in Windows:
Method 1: Through user account settings
1. Click right click mouse on the " Start" and in the window that opens, select " Execute». Similar action can be done using a key combination Windows + R.
2. Now enter the command and click on " OK».

3. As a result, a window with a list of accounts should load. Select the desired account and uncheck the "". Click the button Apply».

4. Enter your user's password twice and click " OK».

Now when you reboot the system, you will automatically be taken to your user's desktop.
Method 2: By tweaking the Windows Registry
If for some reason it didn’t help you the above method To automatically login to Windows 10, try using another option.
1. Open Registry Editor. To do this, open the window " Execute» ( Windows +R), enter the command regedit and press " OK».

2. In the Registry Editor, go to the following section:
HKEY_LOCAL_MACHINE\SOFTWARE\Microsoft\Windows NT\CurrentVersion\Winlogon

3. C right side windows look for a parameter called DefaultUserName and double click on it. Make sure the value matches your local or Microsoft account.

4. Next, on the right side of the window, find the parameter DefaultPassword. If there is no such parameter, then create it. To do this, right-click on the right side of the window. empty space, select " String parameter" and give it a name DefaultPassword.

Then set a value for it by opening double click mouse, which will correspond to the password for your account.

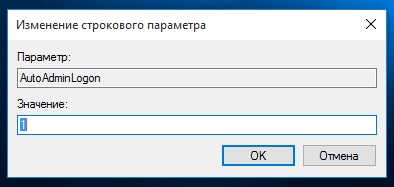
5. Well last step will enable automatic login. To do this, find the parameter there AutoAdminLogon and give it a value 1 .
As in the first case, try restarting your computer and make sure that Windows 10 boots without asking for a password.
It is also worth noting that by setting up automatic login, you simultaneously.
Finally, I would like to remind you that auto-login in Windows is a convenient, but unsafe function. Therefore, it is better not to turn it on unless absolutely necessary. But if you still turn it on, then in some cases you can use the key combination Windows + L to block your account.
13.09.2015 0 6483
 If you are not particularly concerned about the security of your system, you can configure automatic login windows 7, which will slightly reduce the time it takes to start your computer.
1. Click the Start button and enter next command in the search field:
2. In the contribution Users, which should open first, uncheck the " Require username and password"
3. Click the "Apply" button at the bottom of the window "user accounts".
4. When you see the automatic login dialog box, enter the username you want to automatically login as and also enter their password twice
5. Click the button OK to complete the system setup process.
Why disabling Windows 7 login is not a good idea
No matter how much the process annoys you windows 7 login, shutdown requesting a login and password leads to serious threats associated with unauthorized access to your computer. If your Windows 7 computer is used exclusively at home, which is locked, has an alarm, a guard dog and other security systems, then setting up auto-login on the computer will not greatly increase the risk of strangers gaining access to your computer.
However, if you are using a Windows 7 computer, laptop, tablet, or any other device that is frequently used outside your home, we strongly do not recommend remove entry to Windows system 7 with a request for login and password. Because anyone can access your device without your knowledge.
Logging in with a username and password primarily protects your computer from users who should not have access to it. If your computer is stolen and you set it to auto-login, the thief will have access to everything you were working on - e-mail, social networks, bank accounts, etc.
How to set up auto login if your computer is on a domain
If your computer is on a domain, your credentials are stored on the server, not yours. local computer. It's a little complicated how remove Windows 7 login using a login and password, but this can still be configured.
- Open Windows registry 7 (to do this, click the Search button and enter the command there regedit)
- Open the hive in the registry HKEY_LOCAL_MACHINE, Further SOFTWARE
- On the left, find the item Microsoft, Further Windows NT, CurrentVersion, Winlogon
- Select the key on the left WinLogon, and on the right find the value AutoAdminLogon
- Double click on AutoAdminLogon and change the value to 1
- Click OK
- Restart your computer and then follow the standard instructions for setting up automatic login described above.
- Open the Windows 7 registry (to do this, click the Search button and enter there regedit command)
- Open the hive in the registry HKEY_LOCAL_MACHINE, Further SOFTWARE
- On the left, find the item Microsoft, Further Windows NT, CurrentVersion, Winlogon
- On the right should be the following string parameters (if not, create them): DefaultDomainName, DeftaultUserName And DefaultPassword
- Enter the values for these parameters: domain, login and password respectively
- Restart your computer and make sure that auto-login works for you.
P.S. If you couldn't disable automatic login to Windows, contact our
Let's say that only one person logs into the computer every day. Does it have in this case What's the point of entering a code every time you log in to Windows XP? Some see this as expedient, while others doubt it. For those who believe that logging in without a password is most convenient, there are several ways to solve this issue.
This will require editing system files. At first glance, it may seem that such actions are difficult and can create a lot of trouble for an unprepared person. In fact, if everything is done in order, then no errors or difficulties should arise. Each system file can be edited back, so the operation algorithm can be easily restored.
Method one
In this method, we begin to edit the password verification system for those people who work on the computer. First you need to launch the editor using a special window. The Start menu is great for this, as it contains all the necessary applications.
First you need to log in to a special window:
- To do this, open the Start menu.
- Then select a special item quick launch programs Execute.
- In the window that opens, enter the command to launch the application (control userpasswords2).
- Click on the OK button and wait for the result.
Run window
- The menu that appears will show who is using the system. You need to place the mouse cursor on the name through which you plan to log into the system without a password.
- Uncheck the Require input on behalf of... item so that everyone times Windows did not display a password request window.
- The last step is to enter your account password.

Accounts Window
Method two
The second method involves working with a register operating system. The register contains big number parameters, changing which you can adjust the settings standard programs computer.
In this case, everything also starts with opening a special window:
- You will again need to select the Start menu at the bottom of the screen.
- Then click on the special Run item.
- Enter the regedit command in the field that appears in the window to launch the system registry editor.
- Click on the OK button and wait for the application to start.
- The registry editor opens, in which you need to find the address: HKEY_LOCAL_MACHINE\SOFTWARE\Microsoft\WindowsNT\CurrentVersion\Winlogon.
- This is the branch that opens through the entry of each folder.

This is what the registry editor looks like
- Double-click on the DefaultUserName parameter. If it is not available, then the system provides the ability to create a parameter with exactly this name. Enter the characters of the user password and click on the OK button.
- Next, you also need to double-click on DefaultPassword, enter your password characters in the area called Value, and then click OK again.
- Again, click twice, but this time on the name AutoAdminLogon, enter the value 1 and click on the OK button.
Selection example Selection example Create Change value
It is important to know that if Windows XP also logs into a specific domain, then such actions will be useless. The solution to this point is to register the values for logging into the domain:
- We find in the registry editor, as written above, the path: HKEY_LOCAL_MACHINE\SOFTWARE\Microsoft\Windows NT\CurrentVersion\Winlogon.
- We go to the name AutoAdminLogon and set the value 1 there.
- Then move to DefaultUserName and enter the name in it Windows user XP.
- Go to the DefaultDomainName parameter and write in it the name of the domain that includes the Windows XP system.
- In the DefaultPassword register parameter we enter the user's password.
Also, if a parameter does not exist, it can be easily created in the system.
Third way
In the third method, you don't have to use special settings, but just go to standard windows and see if all the values are set as needed.
If you logged into the Windows XP operating system using automatic mode, but then stopped, you need to check the following conditions:
- Automatic password entry can only be performed if there is one user.
- If there is no password, but Windows XP still throws out the window to log in, then the greeting is not disabled. The solution is located at: Go to the Control Panel from the Start menu -> Open the special item User Accounts -> Select the action Change login method -> And decide whether to Use the Welcome screen or not.
If you want to simply bypass the procedure for automatically identifying the owner of the operating system at startup, you should click on SHIFT button after the logout or reboot process. This will change the identification order for one time.
(Visited 6,240 times, 3 visits today)
Introduction
The user selection screen in Windows 7 may appear in several cases:
- When logging in, if automatic login is not configured
- When the system is blocked or the user changes
- When resuming from sleep or hibernation, or exiting the screen saver
The third item on the list is discussed in detail in the article After a period of inactivity, Windows 7 asks for a password to continue working. And in this article we will look at setting up automatic login without selecting a user and entering a password.
About automatic login
Automatic login logging into the system without entering a password is convenient if you are the only user of the computer or use a specific account much more often than others. When setting up automatic login, you need to understand that anyone who turns on the computer will easily log in and have access to all files and settings of the account they are using. Setting up automatic login varies depending on whether the computer is joined to a domain.
The necessary conditions
If there is only one active account on the system without a password, it automatically logs in, so additional customization not required. If you have multiple accounts, automatic login requires configuration, even if none of them have a password. Additional "service" accounts can be added to the system when installing various software.
Administrator rights are required to set up automatic login. The setup process is practically no different from setup in Windows XP or Windows Vista.
Computers not part of a domain
For computers that are not part of a domain (for example, home computers), you can configure automatic login in graphical interface operating system.
The automatic login setup is complete.
Automatic login can also be configured in system registry. All required parameters are listed in the table in the next section of the article.
Computers included in the domain
For computers that are part of a domain, you must specify the name of the default domain to which you will log on automatically. There is no such option in the operating system graphical interface, so automatic login is configured in the system registry.
The first three options in the table can be used to configure automatic logon on computers that are not part of a domain.
Note for Windows 8.x/10. When using an account Microsoft records the value of the DefaultUserName parameter specifies the user name in the form "MicrosoftAccount\ [email protected]", without quotes.
User selection during automatic login
If you have automatic login enabled, but need to log in with a different account, press and hold the key Shift at Windows startup. Or click Logout/Change user in the shutdown menu and hold down the key Shift.
Changing users during automatic login can also be affected by a string parameter (REG_SZ) ForceAutoLogon in the registry section:
HKEY_LOCAL_MACHINE\SOFTWARE\Microsoft\Windows NT\CurrentVersion\Winlogon
The parameter can take values 1 (enabled) and 0 (switched off). Its purpose is to ensure that the user is always logged in if automatic login is configured and the computer is turned on. In fact, enabling this setting results in the user being unable to log out - once the session ends, the user is immediately logged in automatically. This behavior is intended for computers running in kiosk mode in public place(for example, a library). You can bypass it only by holding down the key Shift when the session ends.
When you start Windows 10 or 8, you will be prompted to enter your password to be able to log in. This allows you to protect your computer from unauthorized access. But if you're the only person using the computer and you don't want to be prompted for your password every time, you can get rid of this process and log into Windows automatically without entering a password.
In this article, we will look at three ways in which you can disable the login screen and automatically login Windows 10 without entering a password.
Method 1.
Automatic login to Windows using the commands - control userpasswords2 and netplwiz.
To turn off the login screen and have Windows 10 sign you in automatically, run the following actions:
Step 1: Press the keyboard shortcut Win+R by opening the dialog box " Execute", enter one of the two commands below:
netplwizStep 2: Press Enter to open the " User accounts" And With Uncheck the box, click the button Apply" → "OK".

This action opens a window in which you must enter your account password. If the account is local recording and does not have a password, just leave this field blank.

Step 3: Restart your computer.
Once you do this, you will find that you can sign in to Windows 10, 8 automatically and there is no need to enter your password or your Microsoft account details.
Step 4: All that remains is to disable the password request after sleep; you can read the instructions in our article:
Method 2.
Automatic login to Windows using the Microsoft “AutoLogon” utility.
Microsoft Autologon it's small, free utility offered by Microsoft, which can be used to configure the built-in automatic login mechanism of Windows 10. Similar to the utility netplwiz, you can save credentials for any local or MSA Microsoft account. Most important advantage Autologon encrypts the password before saving it to the registry.

Step 1: Download the utility AutoLogon, unpack the archive and run the file autologon.exe and accept the license terms.

Step 2: Fill in necessary information login, password and click the button Enable" to enable password bypass for the selected user account. A message will appear on the screen confirming that Autologon has been successfully configured.

You can also use the AutoLogon utility with command line using the syntax below:
autologon user domain passwordStep 3: Restart your PC.
Method 3.
Automatic login to Windows using Registry Editor.
Setting up Automatic login in Windows 10 using Registry Editor.
Step 1: Create a system restore point and then click Win+R on the keyboard to launch the " Execute". Enter regedit.exe and press the key Enter to open Registry Editor.
Step 2: Navigate to the following path in the left sidebar of Registry Editor.
HKEY_LOCAL_MACHINE\SOFTWARE\Microsoft\Windows NT\CurrentVersion\WinlogonStep 3: Now, on the right, find the parameter “ AutoAdminLogon" and change its value to 1 .

After this, you need to create some additional string parameters to store the account data values. Just right click on the partition Winlogon and select " Create" → "String parameter" and fill them with the appropriate values depending on the name assigned.

If the String parameter already exists, you just need to change the value accordingly.
Step 4: After all values are filled in, save the settings and close the Registry Editor.
I should note that one of the disadvantages of using Registry Editor to log in automatically is that your password is stored unencrypted. Any user with access to the registry can view it. Therefore, we recommend that you use the Method with netplwiz or Autologon, your password will be securely encrypted and will not be stored in the Registry Editor.
I hope this advice is helpful to you.


