Clear secure boot keys. How to remove password from BIOS and HDD on a laptop
BIOS (Basic Input/Output System) program code is born in developer laboratories.
The most famous of them are Award and AMI.
Each motherboard manufacturer then adapts the BIOS to specific model and at its discretion disables (blocks) certain functions.
Moreover, many functions that affect the “fine” tuning of the BIOS, and on which, in turn, the performance of the computer depends, may be blocked.
Why do motherboard manufacturers block some functions?
First of all, this is done to simplify the procedure. Setup settings BIOS.
They also disable those functions that in a particular motherboard are missing, but can be used in the following modifications.
Using a special software(utilities), you can unlock almost all disabled functions and options in the BIOS.
After modification, the results must be saved in separate file and then update the BIOS.
While loading Setup BIOS you can see new ones on the monitor screen additional features settings.
Each company needs its own utility.
Holders Award BIOS You will need the Modbin utility, and for those who have AMI BIOS installed on their computer, you need to download the AMIBCP program.
An interesting fact is that the AMIBCP utility was developed by programmers from AMI itself.
Practice
First of all, you should prepare the necessary software.
To modify, you will need an update utility (“flasher”), a file with the current BIOS version, and a modification utility.
The flashing utility can be found on the Internet on the website of the motherboard manufacturer or on the CD included with the motherboard.
After which it must be copied to HDD computer.
File containing Current version BIOS can be obtained using this utility.
BIOS modification utilities can be downloaded from the Internet.
As an example, consider the case when an AMI BIOS is installed on the computer.
As for the BIOS from Award, the principle of modification is similar and will not be discussed in this article.
The AMIBCP utility is a DOS program and boots without problems under Windows without rebooting into MS-DOS emulation mode.
AMIBCP volume (file amibcp75.exe) in unpacked form is 542 KB.
After loading the AMIBCP utility, you must use the keyboard to enter the name of the file containing the BIOS, for example, 7vr_f4.bin .
Next, being in the main menu of the program, look for the section “ Configure Setup Data" and look through all the subsections in order.
Of particular interest to us will be the subsections “ Chipset Setup" And " BIOS Features Setup».
The modification itself consists of activating blocked options.
Each subsection contains columns with headings “ Option Name», « Active», « Rights», « Optimal" And " FailSafe».
Locked options are highlighted next to these options in the column " Active" value specified " No».
Keys Page Up And Page Down you can use one or another blocked installation.
There may be cases where the column with the heading " Option Name"The names of the options are completely absent on the screen.
In this case, you will have to enable all the options in a row “blindly”.
Having completed the changes, go to the main menu of the AMIBCP program and, by pressing the key, save the modified BIOS to a file.
After saving modified file use a “flashing tool” - a utility for BIOS updates.
Conclusion
A number of motherboard manufacturers produce their own branded programs to update the BIOS directly in Windows environment.
These include utilities from Gigabyte, ASUS, Intel, etc.
Before flashing the firmware, you should make sure that updating is allowed in the Setup BIOS - in the BIOS Features Setup section, the parameter BIOS Flash Protection should be in the Disabled or Auto position.
After flashing, reboot the computer and enter Setup BIOS.
In modification practice, there were cases when settings in the BIOS were blocked that made it possible to increase system performance.
Namely: the ability to change the voltage on the AGP bus in the range of 1.5 - 1.8 V in steps of 0.1 V and on modules DDR memory within 2.5 - 2.8 V in steps of 0.1 V, and also increase the standard voltage on the processor core by 5, 7.5 or 10%.
There have been cases where S.M.A.R.T mode was blocked in the BIOS. For hard drives and Bypass Mode for optimal performance CPU.
The blocked option in the subsection also turned out to be interesting Hardware Monitor- Slow Down CPU Duty Cycle.
When the system enters Doze mode, the CPU clock speed decreases.
Using this option you can set a different value clock frequency CPU as a percentage of the previous one.
In conclusion, I want to remind you: you shouldn’t lose your head over complete control over the BIOS.
And therefore, modification and change of parameters should be approached with some caution and with an understanding of what you are doing and what you are going for.
Debut of a line of solid-state drives Intel Optane 900p with 3D XPoint memory
Intel Corporation officially introduced the first solid state drives for PCs and workstations, based on future-proof 3D XPoint memory.
The devices are part of the Optane 900p line, available in 280 and 480 GB versions, and their main advantages over competing solutions, as in the case of server counterparts, are high performance when working with small files along with a large recording resource.
Intel Optane 900p drives are available in both low-profile PCI-E expansion cards and 2.5-inch U.2 devices (280GB models only).
In both cases, the information transmission channel is four lines PCI interface Express 3.0.
Maximum sequential read and write speeds are 2500 and 2000 MB/s, respectively, and performance when working with random 4-kilobyte blocks reaches 550 thousand IOPS when reading and 500 thousand operations when writing.
One of the advantages of the presented NVMe drives is their resource.
The TBW (total bytes written) parameter for the 480 GB model is 8760 TB, and for the 280 GB model it is 5110 TB.
Thus, these drives can be guaranteed to be rewritten over 18 thousand times.
As for the recommended cost, a 480 GB Intel Optane 900p drive will cost at least $600, and the 280 GB model was estimated by the chipmaker at $390.
All devices are covered by a five-year manufacturer's warranty.
New sets GeForce drivers 388.10 and Radeon Crimson ReLive 17.10.3
Wolfenstein release: The New Colossus has pushed AMD and Nvidia to release fresh driver packages to address issues related to unstable work new shooter.
Both releases have beta status and do not contain new game optimizations.
Plastic bag Radeon drivers Software Crimson ReLive Edition 17.10.3 fixes freezes and crashes in Wolfenstein: The New Colossus and Destiny 2 on graphics adapters Radeon RX Vega series.
Game optimizations for these projects are included in the “red” set of drivers, starting from the previous version (17.10.2).
Meanwhile, Nvidia, in order not to force gamers to wait for the release of a Game Ready driver optimized specifically for the new shooter from MachineGames, has released a small “patch” in the form of GeForce 388.10 Hotfix.
The key objective of the new release was to provide stable operation Wolfenstein: The New Colossus on Kepler generation video cards.
The release of a full Game Ready driver is scheduled for next week.
New malware for stealing money from ATMs
Kaspersky Lab has discovered a new malware, allowing attackers to steal money from ATMs.
The malware is reported to be called Cutlet Maker.
To carry out an attack on an ATM, a criminal needs to gain access to its USB port.
After this, you need to consistently use a number of software tools.
Cutlet Maker includes a special Stimulator module, which displays the number and denomination of banknotes in ATM cassettes.
This allows an attacker to initially select the cell containing the most a large amount money, and not act “blindly”, sorting through cassettes one after another.
Thus, the time to carry out an attack is reduced, and therefore the chances of catching criminals at the scene of a robbery are reduced.
The situation is made worse by the fact that the Cutlet Maker malware is offered to anyone on the underground Internet market.
The malware costs $5,000, and the kit includes step-by-step instructions.
Thus, even the most inexperienced attacker can commit a crime.
It is not yet clear who exactly is behind the development of Cutlet Maker.
But analysis shows that for the creators of the malware English language is not native.
Apple may block smartphones with non-original displays
WITH iOS release 11.0.3 y Apple It became possible to block smartphones and tablets with a non-original display installed.
Consequently, now the Apple manufacturer can remotely control devices and track which components are used in them.
Apple commented on the update:
"The problem of the non-working touch input on the iPhone 6S, due to which the screens of some devices did not respond to touches due to the receipt of counterfeit components.
Replacing faulty displays with non-original ones may cause deterioration in image quality and operational problems.
Apple Certified repairs are performed by experts using original parts."
Previously from iPhone owners 6S received complaints about the defective display.
Some users did not have their gadgets repaired at certified service centers.
At some point, their touch input stopped working.
Apple then released an update that remotely fixed the problem.
The manufacturer also strongly recommended that the iPhone be repaired only at authorized service centers.
Thus, at some point, millions of iPhones, iPads and other Apple products may stop working if they have been repaired by third-party technicians.
Chrome for Windows now has an antivirus
Google has released new version desktop Chrome browser for Windows.
The update brings built-in capabilities to combat malicious code.
So, now Chrome detects whether the browser settings have been changed without the user’s knowledge and, if changed, offers to return the settings to their previous form.
The browser also has a kind of built-in antivirus.
It will offer to remove any suspicious or malicious program from your PC, including unnoticed installation.
To detect malware, the ESET engine is used.
The update has begun rolling out gradually to Chrome for Windows users.
We turn on the laptop and see this... A wonderful picture, isn’t it? I believe that those who conveniently forgot the BIOS password, or someone very smart made a joke with their laptop, will not agree with me. Have you ever reset forgotten password BIOS on a laptop? Believe me, this activity is not for the faint of heart, where the chances of success tend to zero.
The point is that, unlike regular computers, in laptops, passwords are usually stored in non-volatile memory. There are no jumpers here for reset BIOS to factory settings, and removing the battery rarely resets the password. All that remains is to rely either on luck in selecting the unlock code, or on replacing the BIOS and all sorts of “shamanism” with unsoldering the EEPROM legs (there are such materials on the Internet). So think again before you password-protect your laptop through the BIOS.
If my warnings still haven’t stopped you, admire the picture below; you’ll see something similar when you disassemble your notebook to remove the password.
![]()
Are you scared now? Okay, I was joking, I had to radically disassemble the eMachines E510 for another reason. IN in this case everything was solved easier...
Removing BIOS password from eMachines E510 laptop
In general, they brought a laptop with a request to see what could be done and put it into working condition. Previously, he visited the service, where he was given a verdict about the need to replace the password-protected hard drive. Apparently, there, too, they set a password for the BIOS (so that there would be no temptation to go somewhere else?). I don’t presume to confirm, but the owner has no idea about the password to turn on the laptop, and yet the password for the hard drive is asked only after...
Well, first, let's try to remove the password from the laptop's BIOS. After surfing the net, I realized that the latest good advice ended in 2005. Now no one wants to share secrets for free. There are, however, specialized forums (where you first need to register), where they post different codes to be unlocked at the request of the participants, but the sources are kept in the strictest confidence and they are shrouded in an area of mystery (probably in order to emphasize their chosenness over others).
At the end of the article I will give a link to one such mysterious source that helped unlock the hard disk TOSHIBA without communicating with these "gurus". And the English-language GOOGLE took me there.
Remove BIOS password on eMachines E510 It turned out to be not difficult at all, it was only necessary bridge the battery contacts. To be honest, I didn’t particularly hope for success, but sometimes simple methods turn out to be very effective. I'm not saying that this method unlocking is suitable for all laptops, but it’s worth a try, especially since it does not require any special knowledge or skills.
The eMachines E510 laptop is practically a service technician's dream (unless serious repairs are required), because... provides easy access to the insides. For example, you can clean it by removing just one back cover, though the latches are very tight. By removing the cover, we get access to the desired battery:
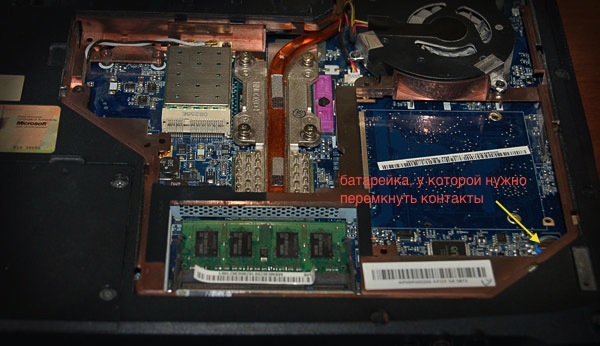

Attention! Before closing the contacts, you must turn off the power and remove the battery from the laptop. Just in case, I held the screwdriver (it was the one I used to close it) for a couple of minutes, because I didn’t know exactly and don’t know how long it was necessary. The main result is that the BIOS password is gone! However, the happiness did not last long...
Removing password from HDD TOSHIBA MK1246GSX
This is where the main ambush awaited me. To understand what we are talking about, read the article Password system of modern HDDs. The article is not mine, I just posted it on my blog so that it doesn’t disappear (I’ll be happy to add a link to the original source when I find out the author).

I cited the article only to familiarize ourselves with what we are dealing with; the advice from it did not help. If you read the text carefully, you will notice that it is not recommended to enter the Master password from a laptop; it will convert it. However, it was no coincidence that I wrote at the beginning of the topic about specialized forums and “gurus”. You don’t have to be a genius to understand that the unlock codes are clearly not taken from your head, and I don’t believe in supernatural capabilities and chosenness.
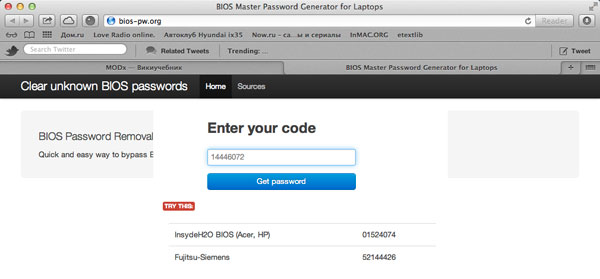
I climbed into the wilds of the Internet and came across an interesting article BIOS Password Backdoors in Laptops on a blog Dogbert's Blog. There was also a link to an online calculator for removing passwords.
The point is that after three incorrect attempts to enter the password to access hard drive, a certain code is issued - Encrypt HDD Key:

It's time to share the link promised at the beginning of the topic: BIOS Password Removal for Laptops. Many thanks to the author of this resource. Upon my request (entered my Encrypt HDD Key), two unlock codes were issued, for Acer, HP and Fujitsu-Siemens. The code for Acer suited me perfectly, because eMachines is practically the same Acer. The HDD password was successfully removed :)
If you find this article useful,
don't be lazy to like and share with your friends.
Situations are different. It happens that your friend or acquaintance decided to change the configuration of his computer. He asked you to help him in this matter. You come to him, but it turns out he doesn’t remember earlier set password to enter the BIOS. Or you yourself, when you were busy protecting your PC, set a password on the I/O system, but now you can’t remember it.
IN similar situations Only a reset can save it BIOS password. There are two ways to do this: reset BIOS settings using a special CMOS jumpers on the motherboard (for this the PC must be completely de-energized); use forgotten DOS commands through the command line interface.
Unlocking BIOS on PC
If you reset the password and reset the I/O system settings, you need to desktop computer equipped with a modern motherboard, then for this purpose there is a special button“Clear CMOS”, but it is not found on all models. If this is your case, then simply turn off the computer from the network, open the system unit and click on this button. The BIOS settings will be completely reset.
If the button described above is not on the motherboard of your PC, you will need to look for contacts with a jumper specifically designed for resetting BIOS settings. They are easy to find; they are labeled CMOS. Disconnect the PC from the network and close the second pair of contacts with a jumper. Then, after about 10-15 seconds, return the jumper back to the first pair of contacts.

If you could not find this jumper, you can reset the settings by removing the battery for 2-3 minutes.
Resetting the BIOS password on a laptop
The three ways to reset your password described above are only suitable for desktop PCs, but what if you use a laptop? Surely there might not be any jumpers on his motherboard at all? In this case, you need to find the documentation for your laptop and study it thoroughly to make sure that the jumpers and buttons are on the mat. no fee. What if it turns out that there is?
If the manufacturer does not provide jumpers on the board, then you will have to use software method resetting the BIOS password on a laptop. To do this you will need a bootable DOS disk or installation disk Windows with command line boot capability. Also, if you can log into Windows under account administrator, then boot disks you won't need it.
So. Before us command line. Enter the command debug.exe in it and press “Enter”. Then, sequentially enter the commands:
o702E
o71FF
q
Note: After entering each command, you need to press the “Enter” button.
That's practically all. After the PC restarts, a message will appear on the monitor screen indicating that an error has occurred in CMOS. And at the same time with this error, you will be asked to check or perform BIOS settings. The BIOS settings are reset and you can continue, depending on what you need: restore your PC settings or change them.
Today, every ordinary user has the opportunity to regularly update the BIOS, and this, perhaps, will not surprise anyone. But the fact is that the BIOS can be modified, including hidden ones in its settings Extra options, - only a few know about this experienced users. This article is addressed primarily to those who are involved in optimization and are constantly looking for ways to improve the performance of their “iron friend,” who are not afraid to take risks and conduct bold experiments on their computer.
Where does it come from? BIOS (Basic Input/Output System) — basic system I/O? Her program code is born in development laboratories. The most famous of them are companies Award And AMI. Each motherboard manufacturer then tailors the BIOS to a specific model and disables (blocks) certain features at its discretion. Moreover, many functions that affect the “fine” tuning of the BIOS, and on which, in turn, the performance of the computer depends, may be blocked.
Why do motherboard manufacturers block some functions? First of all, this is done to simplify the Setup BIOS setup procedure. They also disable those functions that are not present in a particular motherboard, but can be used in the following modifications. Using special software (utilities), you can unlock almost all disabled functions and options in the BIOS. After modification, the results must be saved in a separate file and then the BIOS must be updated. When you load Setup BIOS, you will see new additional configuration options on the monitor screen. Each company needs its own utility. Award BIOS owners will need the utility Modbin, and for those who have AMI BIOS installed on their computer, you need to download the program AMIBCP. An interesting fact is that the AMIBCP utility was developed by programmers from AMI itself.
Now let's move on to the most important thing - to practical classes. First of all, you should prepare the necessary software. So, for modification you will need an update utility ("flasher"), a file with the current BIOS version and a modification utility. The flashing utility can be found on the Internet on the motherboard manufacturer's website or on the CD included with the motherboard. After which it must be copied to your computer’s hard drive. The file containing the current BIOS version can be obtained using this utility. Utilities for modifying the BIOS can be downloaded from the Internet: for Award at http://www.biosmods.com/download.php, and for AMI - It is advisable to place the file containing the BIOS on your hard drive in the same folder along with the utility for modifying it . Be sure to do this before modifying backup copy BIOS file. Now that everything is ready, you can safely download the utility.
As an example, consider the case when an AMI BIOS is installed on the computer. As for the BIOS from Award, the principle of modification is similar and will not be discussed in this article. The AMIBCP utility is a DOS program and boots without problems under Windows without rebooting into MS-DOS emulation mode. The volume of AMIBCP (file amibcp75.exe) in unpacked form is 542 KB. After loading the AMIBCP utility, you must use the keyboard to enter the name of the file containing the BIOS, for example, 7vr_f4.bin. Next, being in the main menu of the program, look for the “Configure Setup Data” section and look through all the subsections in order. The subsections “Chipset Setup” and “BIOS Features Setup” will be especially interesting for us. The modification itself consists of activating blocked options. Each subsection contains columns with the headings "Option Name", "Active", "Rights", "Optimal" and "FailSafe". Blocked options are highlighted, and the value "No" is indicated next to these options in the "Active" column. Using the Page Up and Page Down keys you can activate one or another locked setting. There may be cases when in the column with the heading "Option Name" the names of the options on the screen are completely absent. In this case, you will have to enable all the options in a row “blindly”. Having completed the changes, go to the main menu of the AMIBCP program and, pressing the F10 key, save the modified BIOS to a file. After saving the modified file, use the "flasher" - a utility for updating the BIOS. A number of motherboard manufacturers release their proprietary programs for updating the BIOS directly in the Windows environment. These include utilities from Gigabyte, ASUS, Intel, etc. Before flashing the firmware, make sure that updating is allowed in Setup BIOS - in the BIOS Features Setup section, the BIOS Flash Protection parameter should be in the Disabled or Auto position. After flashing, reboot the computer and enter Setup BIOS. In my modification practice, there were cases when settings in the BIOS were blocked that could improve system performance. Namely: the ability to change the voltage on the AGP bus in the range of 1.5...1.8 V in steps of 0.1 V and on DDR memory modules in the range of 2.5...2.8 V in steps of 0.1 V , and also increase by 5; 7.5 or 10% nominal voltage on the processor core. There have been cases where S.M.A.R.T mode was blocked in the BIOS. for hard drives and Bypass Mode for optimal CPU operation(see picture).
The blocked option in the Hardware Monitor subsection also turned out to be interesting - Slow Down CPU Duty Cycle. When the system enters Doze mode, the CPU clock speed decreases. Using this option you can set a different clock value CPU frequencies as a percentage of the previous one. In conclusion, I want to remind you: you shouldn’t lose your head over complete control over the BIOS. And therefore, modification and change of parameters should be approached with some caution and with an understanding of what you are doing and what you are going for.
Information security plays a huge role these days. However, when BIOS help You can only protect your computer from unauthorized access by not very sophisticated users. In general, BIOS protection is more of a relic of the past than a real necessity. Although, on the other hand, protection at the BIOS level can put some barrier against unconscious changes internal settings BIOS by curious children. And thereby protect your computer from “spontaneous” overclocking.
The BIOS has several protection options: password protection for booting the computer, password protection for changing BIOS settings, protection of the boot sector of the hard drive, blocking writes to a floppy disk, and blocking the read-write of the hard drive.
Blocking access
To block access to booting your computer or changing BIOS settings A password protection system is used. This system is effective only until a sophisticated user gets his hands inside system unit and the battery-BIOS circuit will not open. You may also have to do these steps after you forget. required password access.
To set passwords, use the Supervisor password and User Password(Set Supervisor password and Set User Password), which are located in the main BIOS settings menu. In some BIOS versions, these commands may be located in the Security menu. The first command sets the password for an administrator with full authority, and the second sets the password for a user with disabilities access.
HOW TO DO IT?
Select the Supervisor password command and in the field that appears, enter a password, which is an alphanumeric combination of the Latin alphabet no more than eight characters long. Uppercase and lower case there is no difference in the password. After entering the desired combination, press Enter key. In the field that opens, enter the password again and press Enter. If the data entered in the first and second fields match, you will be notified that the password was successfully saved. Remember the entered combination, or better yet, write it down.
After you define an administrator password that provides access to both booting the computer and BIOS settings, you can define a user password that allows access only to boot the computer. Creating this password is similar to creating an administrator password, only this time you select the User Password command. If your computer is personal, that is, you use it alone, then setting a user password is not necessary.
By default, the BIOS defines password protection only to block access to own settings. To extend password protection to boot the computer, you need to find the Security Option (Password Check) parameter, which is located in Advanced section BIOS Futures Setup. This option allows you to specify the scope of the password:
* Setup value - protect BIOS settings;
* System value - computer boot protection;
* Always value - protects both BIOS settings and computer boot.
After setting the values of all parameters - passwords and their scope - you must select the Save&Exit Setup command in the main menu and press the Enter or Y key. This will save the changes made and restart the computer. Now, if you have set a password to boot your computer, after self-testing the BIOS will prompt you to enter the access password. After talking about how to set a password, you need to talk about how to remove it. For those who remember their administrator password, this will be very simple: after turning on the computer, enter the BIOS settings menu (at the same time you will be asked to enter a password to identify your rights to the computer) and select the Supervisor password or User Password command. In both cases you will be asked to first confirm your knowledge current password, and after pressing the Enter key, enter a new one. If you leave the field blank and simply press the Enter key, the password will be removed and the password protection system will be unlocked and a notification message will appear. If this operation is performed for the administrator password, then the user password, if there was one, will be deleted automatically, and a message will also appear. After you remove or change passwords, you must save the changes to the BIOS and restart your computer.
Unlocking BIOS
If you have forgotten the password, then the only reliable way out in this case is to reset the current values of the BIOS parameters using switches on the motherboard or temporarily removing the power battery.
However, this is the only possibility. For both Award Bl6S and AMIBIOS, there is a fairly large set of so-called technical or engineering passwords. These passwords are initially “hardwired” into the BIOS and can be used to unlock the computer in parallel with passwords user installed. Unlike user passwords, these passwords cannot be deleted or changed. The only inconvenience of technical passwords is that they are not suitable for all BIOS versions.
For example, if the computer has Award BIOS version 4.50G, then you can use the technical password AWARD SW (the password is entered in capital letters).
In addition to technical passwords, you can try using various programs to remove a password, such as AMIPASS or PASSCMOS. However, to run them you first need to download operating system, which is impossible until the locked BIOS commands are executed.
Blocking access to the boot sector
Bootable hard sector The disk is a favorite place for “registration” of various viruses, because only there can they be guaranteed to launch and begin infecting the rest of the current hard drive, as well as other media associated with this computer. To prevent unauthorized access to the boot part of the hard drive, the BIOS has a special parameter that blocks any write attempts. In this case, blocking is carried out for all records - no filters are provided here yet. Therefore, if you place an operating room Windows system, Norton utilities or any other program that is “registered” in the boot sector, this part of the hard drive must be open for writing.
For anti-virus blocking at the BIOS level, use the Boot Sector Virus Protection (Virus Warning, Anti-Virus Protection) parameter, which is located in the Standard CMOS Futures (Advanced CMOS Futures) section. If this parameter is set to Disable, it is disabled and recording in boot sector allowed. If the parameter is set to Enable, the boot sector is locked, and you may encounter difficulties installing new software products.
Overall blocking boot entry hard drive is an anachronism, which is now easily replaced by any antivirus program. Such a program does not protect the boot sector from writing, but checks its contents for viruses. As a result, you don’t have to wonder why this or that program “doesn’t want” to be installed on your hard drive.
Blocking data copying
The ability to protect information stored on a computer by prohibiting writing to floppy disks has remained in the BIOS since those ancient times when this was the only way to transfer information. Now three-inch floppy disks are slowly but surely “dying out” - they are being replaced by more capacious compact media, such as rewritable CDs or flash cards. However, it is possible to protect data from unauthorized copying to floppy disks.
The parameter that controls floppy disk read-write is called Floppy Disk Access Control (R/W) (Floppy Access Control, Diskette Write) and is located in the BIOS Features Setup section. This parameter can take the following values:
* Read only (Disabled) - read only, the floppy disk writing function is disabled;
* Read/Write (Enabled) - full access for read-write.
A similar parameter exists for hard drives, but not for all BIOS types, and not for all versions. It is difficult to think of a task for a hard drive that has a blocked write function, and yet, the possibility of such blocking exists.
Parameter controlling read-write hard disk is called Hard Disk Access Control and is also located in the BIOS Features Setup section. This parameter can take two values:
* Read only - read only, writing to disk is blocked; * Read-Write (Enabled) - full read-write access.


