How to assign your own icon and name to a USB flash drive or external hard drive. How to change the icon of a disk or flash drive
The technique discussed in the article is quite universal and is suitable for both regular flash drives and those flashed in the format USB-HDD, and for ourselves external hard I'm no stranger to disks either.
Although I am writing this article, I have always believed that people who put an icon on a flash drive are on a par with those who buy beautiful monolithic flash drives. Everything is also beautiful, and it’s convenient to carry in your pocket, but in reality it’s not so practical. The simplest thing that can come to mind is banal formatting of the disk, after which everything will have to be redone in a new way.
WHAT SHOULD BE DONE
First you need to put the icon in the root of the flash drive, usually it is given a name icon.ico, it will be easier to remember. You can draw it yourself, in programs like ArtIcons, or download from the Internet, fortunately there are tons of sites on similar topics.
The icon may be strictly one size (For example, 48x48 pixels), and multi-format, such as what is shown in the picture below.
Depending on the location where the system will display it, different formats will be taken.

For example, in My computer format used 48x48, in the autorun window 32×32.

If the right size, the system does not find it, then it interpolates the image independently.
There in the root of the drive, create a file autorun.inf. It represents the usual text file, which can be created using the built-in Windows applications Notebook.
Typically, it looks like this:
icon=icon.ico
label=USBDEV
icon.ico– if the name of your icon is different from this, then paste it here.
label– a parameter responsible for the volume label; it is not at all necessary to create an icon, so you can delete this line. Unlike standard way specifying the label, here it can have a length of not 11 , and integers 32 characters. If you activate this attribute, the real label will be hidden, although it can still be viewed in the disk properties.
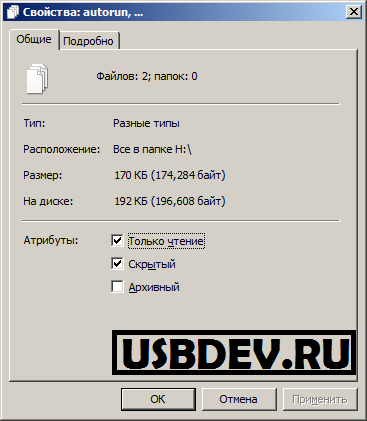
To do this, in the disk properties, set the attributes Hidden And Only reading, so as not to accidentally delete it.
After reconnecting the device to USB-port, the icon will automatically change to yours.
ABOUT VIRUSES AND ANTI-VIRUSES
Absolute number malware, falling onto flash drives, create their own autorun.inf files that ensure their further distribution. Therefore, if your flash drive’s icon disappears, this indicates either that the flash drive has become infected or that the one used in the system antivirus program rubbed it out of harm's way. The intolerance of this file by some antiviruses is another factor against the idea of changing anything using the file autorun.inf.
IS IT POSSIBLE TO DO WITHOUT THE AUTORUN FILE?
If we are talking about assigning any image as a flash drive icon, then there are alternatives to this damn file autorun.inf not available. None of the flash drive flashers have similar functions, I assure you of this.
Therefore, I recommend that you first decide why you need this icon there? If you show off in front of your friends, then this is one story. And if the goal is to mark your flash drive in a special way, then you can resort to other techniques.
You can change the disk label through the disk properties, use it for this autorun-file is redundant.
At the flash drive firmware level, for example, you can change the device name, which is displayed when the drive is first connected to the computer.
The icons of disks and flash drives begin to become boring over time, so the question arises about changing appearance. In this article we will help you figure out how to easily do this.
In operating systems Windows manual Changing the icon will not be such a difficult task, even for those who have just begun to get acquainted with the computer. Below are instructions on how to change the flash drive icon, icon, hard drive and DVD in Windows 7-10 operating systems, whatever you want.
Instructions on how to change the icon of a flash drive or disk in Windows
Now we actually start with the process of replacing the icon manually. We need the icon file itself with the .ICO extension. They can be easily found on the Internet. A huge number of such icons can be found on sites such as iconarchive.com. Or you can convert your image into an ICO using an online service.
On this moment There are 2 ways to replace icons in Windows:
- Using the registry
- Using the autorun.inf file
The method with the registry is more complicated, but with autorun.inf it will be simpler.
Replacing the icon of a flash drive or disk using autorun.inf
This method involves copying two files to the media - the icon and the autorun.inf file. The icon will be assigned to this media, even if you insert it into another computer.
Replacing the icon of a flash drive or disk using the Windows registry
This method has its own characteristics. The thing is that, regardless of what is connected under the letter - a flash drive, hard drive, or memory card, the icon that is specified for this drive letter in the registry will always be displayed.
Now we restart the Windows operating system and enjoy the new icons.
Do you still have additional questions? Write them in the comments about what you did or vice versa!
With a few simple steps you can make your flash drive more interesting by decorating it with some cool icon. From this article you will learn, how to make an icon for a flash drive, from which sites you can download the icon you need, and also how to find out in time if a virus has penetrated your flash drive. If the icon from the flash drive disappears, this is a sure signal that a virus has crept onto it, because we will add the icon using the autorun.inf file, which is rewritten by viruses that have entered the flash drive.
How to make an icon for a flash drive
In order for the icon to start loading, you need to put it on a flash drive and register it in the autorun.inf file. If your flash drive does not have such a file, then you need to create it. For this you will need a regular notepad.
Open the flash drive, right-click and select create - Text Document. IN this document You must provide the following information:
icon=image.ico
This is what the autorun.inf file should look like:

Image is the name of the icon that you will install for the flash drive.
After that, close the document and save it under the name autorun.inf. If you did everything correctly, the notepad icon will change to a notepad icon with a gear.
Where to download icons for a flash drive
Now you need to upload the 64x64 px icon you like into ico format V root folder on a flash drive. Here are a few sites from which you can choose a suitable icon for your flash drive:
iconfinder.com is a foreign site, a favorite source of all kinds of icons for website builders and designers. Available on Iconfinder great amount different, interesting, free icons V different extensions, including the necessary ico and different sizes. The only drawback of the site is that it does not have a Russian version, so you will have to search for icons by English requests. If you understand even a little English language, then this is not a problem for you, otherwise you can use Google Translate for selection the right word. Iconfinder also has a catalog of icons through which you can choose the one you like. To search for icons, you can filter them by size, setting the desired one - 64x64 px.
iconsearch.ru - Russian-language icon database with at least huge collection. Here you can find icons using queries in both Russian and English, as well as by finding them in the tag cloud.
Having selected the desired icon, drop it onto the flash drive and rename it as it is specified in the autorun.inf file. IN in this case at image.ico.
That's all there was to it. To see the result, you need to remove and reinsert the flash drive.
And finally, one more thing. If you paid attention to the image at the beginning of the article, you noticed that part of the name of the flash drive was blurred out. My phone number is in the title. If you indicate the phone number in the name of your flash drive, then if you lose the flash drive, you have a chance that it will be returned to you. And for greater reliability, you can create a text document on a flash drive with a name, for example, “return me to the owner,” which will contain information about how the person who found your flash drive can return it to you.
Manufacturers of modern flash cards decorate flash drives in every possible way. They use rare materials for the body (up to platinum and gold), and make devices in the form of everyone’s favorite cartoon and video game characters. But, no matter how beautiful the flash drive is in appearance, when we insert it into the computer we will see everything - the same template icon that the operating system uses to designate it. But, as you understand, this pattern can be easily corrected - rename the flash drive or select colorful icons for it.
So, first, let's look at the simplest option, how to rename a flash drive without using an icon.
To rename the flash drive using windows We need to connect the flash drive to the computer, go to the My Computer menu and find your device in the devices with removable storage section. Next, right-click on it and select Rename. Enter a new name and click OK.
How to rename a flash drive and make a flash drive icon
IN this method We will consider the option of not only renaming a flash drive, but also making colorful icons for a flash drive that will allow your device to be different from others.
First, let's select suitable icons for the flash drive. Can choose the desired picture and reduce it to 64x64 px in Photoshop, or you can go the other way and turn to the online service for searching icons iconsearch. By using of this service You can select icons of absolutely any topic and make an icon of the appropriate size.
Once you have selected an icon, download it in .ico format (any other format will not be displayed).
Now, in the root section (on the device itself) of the drive, create a file called autorun.inf using any text editor and write the following lines there:
Icon=car.ico Label=Tramp
Accordingly, car.ico is the name of our icon, and Tramp is the name of the drive. If you want to rename the flash drive using this method, write the name of the icon in the Label field.
The flash drive was renamed and acquired its own icon, but now we have two whole files responsible for the name and icon of the flash drive, so that these files are not accidentally deleted, let's hide them. Right-click on the file, select properties and in the properties menu set “Read Only” and “Hidden” - this will allow you not to delete these files when you work with the flash drive. 
It turned out very beautiful and original. But, in addition to design, creating a personal icon for a flash drive allows you to protect yourself from viruses to some extent. The thing is that when a virus penetrates a folder, it first attacks the autorun.inf file and changes the icon to the standard one. That is, if you connected the device to your PC and saw that the icon there was replaced with a standard one, you know that some kind of nasty thing has moved onto your flash drive. That is why be sure to use a good Anti-Virus on your PC.
If you can’t insert an icon, watch the detailed video
For comfortable viewing Set the video quality to HD in the video settings and expand to full screen.
How to change the disk icon or change the flash drive icon in Windows? IN operating system Windows drives and pluggable removable devices are displayed with standard icons.
If the manufacturer has made a special icon on the device connected to the computer (flash drive or external hard drive), then in this case it will not be displayed in Explorer. standard icon, but an icon created by the device manufacturer.
Why do you need to change the icons of flash drives or disks on your computer? In the case of a hard or local drive, there is no particular need to change the disk icon, but changing icons for connected USB flash drives in some cases is desirable.
At simultaneous connection several flash drives to a computer, it can be difficult for a user to immediately distinguish one flash drive from another. Flash drives with different icons are easily distinguishable from each other, this will save a little time spent searching for the desired removable device and increase work efficiency.
How to change the disk icon or change the flash drive icon, with standard image in Windows to a different icon? In the article I will tell you how you can change the disk icon, how to change the icon of a flash drive on a computer in the operating room Windows system. This method works equally in Windows 10, Windows 8.1 (Windows 8), Windows 7.
Preparing the image and autorun.inf file
To change the icon of a hard (local) drive or flash drive ( external hard disk) you will need two files: a picture and the “autorun.inf” file.
First of all, you need an image in “.ico” format with a resolution of 128x128 or 256x256 pixels. Finished image You can find it on the Internet or make it yourself graphic editor. Create an image in JPG or PNG format and then convert it to ICO format using a converter program or online converter.
Now you need to create the “autorun.inf” file, which will be needed to display the icon. Open Notepad or another text editor, paste the following command into it:
ICON=icon_name.ico
In this entry, replace “icon_name” with your own, which will be displayed in Windows Explorer. The icon name can consist of numbers, letters, words. Save the file on your Desktop or other convenient location.
When saving a file, in the Explorer dialog box, in the “File name” field, insert “autorun.inf” (without quotes), in the “File type” select “All files”, and then click on the “Save” button.
The "autorun" file has the extension "inf". The files are ready to use.
Let's change the icon first USB flash drive, and then I’ll tell you how to change the disk icon (hard or local) on your computer.
How to change the flash drive icon
Let's see how to change the flash drive icon from a standard image to your own image. In this image, the Windows 7 operating system Explorer displays the standard removable disk (flash drive) icon: “ Removable drive(F:)."

Prepare an image in “.ico” format and an “autorun.inf” file for the flash drive.
Copy the files to the root of the disk (flash drive). You need to move the files to the root directory (directly to the flash drive itself), and not somewhere in a folder on the flash drive.

First, disconnect the flash drive from the computer (remove it from the connector), and then connect it again USB drive to the computer.
In the Explorer window, you will see that the flash drive has changed its icon to the new one that is selected for this device.

How to change the drive icon in Windows
In order to change hard icon or local disk, you must run similar actions. Prepare an image in the “ICO” format and the file “autorun.inf”, in which write down the name of the icon prepared for the hard drive.
I want to change the drive icon on the Local drive “E:” (this is a separate hard drive) of my computer in the Windows 10 operating system. Changing the hard drive icon in Windows 7 or in Windows 8.1 (Windows 8) occurs in a similar way.
In this image, Local Drive "E:" has a standard icon. Here you can also see that a flash drive is connected to the computer, on which I changed the icon in Windows 7.

Copy the image in “.ico” format and the “autorun.inf” file to the root of the disk (to the disk whose icon you want to change), in my case, to the Local disk “E:”.

Enter the properties of these files (right-click on each file, in context menu select “Properties”), add the attributes (check the boxes) “Read-only” and “Hidden”.
Then restart your computer. After booting the PC, you will see that the hard (local) drive has changed its icon to a different icon.

Conclusions of the article
The user can change the icon (icon) displayed in Explorer on the disk (hard or local) of the computer, or change the icon (icon) of the flash drive displayed in Explorer after connecting a removable device.


