Boot disk image. How to make an installation disk multiboot. How to create a bootable DVD
A bootable Live CD allows you to get started with your computer without installing an operating system on your hard drive. The system will boot in a couple of minutes from removable media. Typically Live CDs are made on Linux or Windows OS. They are used to familiarize yourself with the capabilities of the OS, when recovering from failures, treating viruses, synchronizing the workspace on different computers, and working on computers with a small hard drive. It will be useful for every advanced user to have a boot disk in case of troubleshooting.
Depending on your choice of media and the size of the operating system image, you can create a Live CD, Live DVD disk or a multiboot Live USB flash drive (MultiBoot USB). It is better to use a flash drive because it is more universal (floppy drives are not available everywhere), the loading speed is faster, and you can rewrite and add your own programs.
Loading the image
You can find a suitable image for creating a boot disk on the Internet, or download these:
Launch ImgBurn and specify the path to the downloaded system image (ISO file).
Click the record button.
Recording to a USB flash drive
To burn a boot disk to a USB flash drive, use the free WinSetupFromUSB program. Download from the developer's website: http://www.winsetupfromusb.com/downloads/.
Run the program and specify your flash drive in the USB disk field.
In the Other Grub4dos compatible ISO item, specify the path to the downloaded ISO file with the system.
Check the boxes as in the screenshot.

Press the “GO” button and wait until “Job done” appears.
Launching a boot disk
Now you need to boot from the prepared flash drive or disk. To do this, insert a flash drive into the computer. Keep in mind that some systems will not work through a USB 3.0 port (distinguished by the blue color inside), so if that doesn’t work, insert the flash drive into the old 2.0 connector (black color inside). Accordingly, if you have a disk, insert it into the drive.
Reboot the computer. Immediately after the reboot, you need to open the Boot Menu to select the operating system boot source. This menu is opened by pressing F1, F2, F8, F9, F11, F12, Esc (depending on the motherboard). Usually, when loading, button prompts appear. If you can't open the menu the first time, repeat the reboot until you find the right button.
In the boot menu, use the arrows to select your boot disk or flash drive and press Enter.

Wait for the GRUB4DOS bootloader window with the inscription “RusLiveFull_DVD from partition”. Press Enter and a menu will appear.
Select the first item “RusLive_Ram (256 Mb memory)”.

In the next step, select “Multimedia”.

Wait for the system to boot. You can use it!

Creating a bootable disk using UltraISO
First, you need to download and install the UltraISO program from the Internet. The program is paid, but most Internet resources post already hacked versions (for example, on the website rutracker.org). You can also download the Windows image there if you haven't already. In addition, you will need a blank CD or DVD, which you can buy at any computer store or market 🙂 The further process is incredibly simple! Insert a blank disk into the drive of your computer, go to the folder with the already downloaded Windows image. Right-click on the image, point to the “UltraISO” inscription, move the mouse arrow to the right to the menu that appears and select “Burn to disk...”.
creating a bootable disk using UltraISO
The “Burn disc” window appears, there you simply click the “Burn” button and wait. When the recording is complete, the drive will give you a ready boot disk.

Creating a Boot Disk Using Nero
To create a boot disk using this method, you must have any version of the popular Nero program installed on your computer. Also, as in the previous method, you must have a blank CD or DVD and a Windows image. Launch the Nero Burning Rom program (Start->Programs->Nero->Nero Burning Rom). You should see the New Project window. On the left, select the “DVD-ROM (boot)” option from the list, then to the right of the “image file” line, click the “browse” button and specify the path to the Windows image.

Click the “New” button, then in the window that appears at the top, select “Record”. It is advisable to check the box next to “Finalize disc”. Insert a blank disc into the drive, if you have not already done so, and click the “Burn” button.

Wait for your boot disk to burn. That's it 😉 An article on installing Windows XP, and an article on installing Windows 7.
Best regards, Alexander Molchanov
Learn how to burn bootable disks and create your own multiboot builds with the tools you need to reinstall and restore your system.
What is the difference between a shaman and a system administrator?
- The system administrator has a tambourine with a hole :)
As you may have guessed, today we will talk about “shamanic” “magic” disks, which are “found” in large numbers in holders of various kinds of computer specialists. And these are not only disks with programs. Some of them allow you to run an almost full-fledged operating system even on a non-working computer! Such disks are called boot disks...
Booting Windows
Before we start talking directly about boot disks, it’s worth saying a few words about how Windows and the computer in general boot.
In modern computers, two subsystems can be responsible for booting: BIOS and/or UEFI (in new PCs). In a simplified form, the process of starting a computer looks like this:
- When turned on, the BIOS checks the functionality of all PC components.
- The BIOS determines where further booting should take place.
- The BIOS transfers boot control to the UEFI (if available) or directly to the master boot record (MBR) on the hard drive, after which the operating system starts.
By default, booting is performed from the hard drive after the BIOS tests the functionality of the main components of the computer. To be able to boot your PC from disks or flash drives, you need to slightly reconfigure the BIOS to boot from external media. To do this, set the First Boot Device parameter to CD-ROM (or USB). If you don't know how to do this, you can read about it.
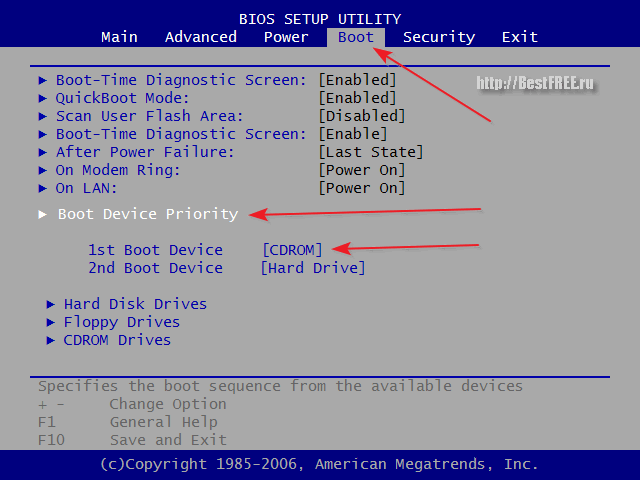
After you have completed this setup, the boot cycle, after checking the place where you should look for boot files, will also add a check for the presence of a disk in the drive (or a flash drive in the USB slot) and a search for the bootloader on it. For many, by the way, the option to boot from a disk drive is set by default (PC builders simply did not change anything back), so perhaps no manipulations with the BIOS will be required :)
Types of boot disks
All boot disks according to their scope of application can be roughly divided into 3 categories:

The first category includes all installation disks that are used to install or reinstall a specific operating system. An ordinary Windows disk that we buy (cough-kg-m :)) at a computer store or a Linux distribution from the Internet belongs to this type.
The second category includes disks that contain tools to restore the functionality of the main OS. These resuscitators are usually ready-made LiveCDs with Windows, which can be launched directly from the disk. The usefulness of these types of tools is increased by the inclusion of additional software to combat viruses, data recovery, etc.
The third category is disks that do not have a full-fledged OS and contain programs designed to perform one or two tasks. Examples include programs for hard drive partitioning or data backup.
The above classification is not universal, since, for example, a LiveCD disk can also be an installation disk. There is also the concept of multiboot, when several different systems or programs can be placed on one disk at the same time. To clarify the situation, consider the question of where to get a boot disk...
Recording the finished image
When we found out what boot disks are and what they are needed for, the question arises: where can you get such a miracle tool? As in any matter, there are two ways: simple and complex...
A simple one is to download a ready-made disk image from any of the numerous torrent trackers, or copy a real disk taken from a friend. The complex one involves creating a homemade assembly containing all the tools you need. Let's start with something simple...
I think downloading a ready-made ISO image from a torrent will not be a problem for anyone today, so let’s consider the case of copying a real disk. Almost any CD and DVD burning program will suit us for this task. Here we will consider the algorithm of actions using the example of the CDBurnerXP program.

If you simply open a boot disk on your computer, copy its contents into a folder, and then write it to your own disc, then nothing will work, since during normal writing of data the boot area is not written to the disk. We need to create an exact copy of your friend's boot disk (or, in other words, his image) and then write this copy to ourselves.
To do this, insert the disc into the drive and click on the “Copy disc” button on the main CDBurnerXP screen. In the window that opens, you can select the drive into which you inserted the disc, the speed (if you are not in a hurry, it is better to set it to about 8-x) and the copying method:

There are two copying methods. By default, direct copying is active. With it, at the first stage, an image of the inserted disk is created in a temporary folder, and then it is proposed to remove the disk and insert an empty one to record the resulting image. After recording, the image is deleted from the temporary folder.
The second option is that you can only create an image and save it on your computer in order to burn it to a real disk in the future or, for example, post it on the Internet. Since there should be no issues with direct copying, let’s consider the second method in more detail.

First of all, in the "Receiver" section, we need to switch to the "Hard Disk" mode. Then all that remains is to specify the path for the image to be created and select its format. ISO and MDF/MDS formats are available in CDBurnerXP. I recommend saving to ISO, since this is the most common option for storing images and is supported by most programs. Now click the “Copy disk” button and wait for the creation of our ISO image to complete.
As I already said, the image can then be written to a real disk without losing its boot properties (the same applies to images downloaded from the Internet). In CDBurnerXP, in the main window there is a separate special section for this - “Burn ISO image”:

In the window that opens, we need to specify the path to our image in ISO or MDS format. If you downloaded the image from the Internet and it is in BIN or NRG format, then CDBurnerXP has a tool for converting such images to ISO. Click the "Convert to ISO" button and specify the path to the desired image there.
After the image is selected, all that remains is to check the “Finalize disc” checkbox (some computers may not want to boot from a disc that has not been finalized) and click the “Burn disc” button. We wait for the end of recording and become the owners of our own boot disk :)
What is multiboot
Following the classification we discussed above, a boot disk can be designed to solve one specific task, be it system installation, repair or maintenance. It used to be like that. For each purpose it was necessary to create a separate disk. However, today there is such a thing as “multi-boot”...
Its essence is that, using a non-standard bootloader (NTLDR is the standard for Windows), we can run, for example, several operating systems from one disk or make it an installation and repair one, writing several images to it at the same time!
The most popular bootloaders for Windows that allow SysLinux and GRUB4DOS. Configuring them manually can literally work wonders in terms of booting a PC, but this requires the user to have knowledge and ability to work with code... However, there are simpler ways to independently assemble your own multiboot disks using third-party programs.
Creating a multiboot disk
On the pages of our website, I already wrote once about a program that allows you to create bootable disks and flash drives - xBoot. Here we will look at another method, which may be even better and more convenient for you, using the SARDU program (short for Shardana Antivirus Rescue Disk Utility):
On our website you can download the Russified version of the program 3.2.3, which is newer and understandable to Russian-speaking users (thanks to our regular reader Valery for the translation!). IMPORTANT: Be sure to unpack the program into a folder where there are no Russian letters in the path. It is best to go to the root of Disk C or Disk D.
Despite the fact that the original program is in English, it will not be difficult to understand it. Its entire interface can be divided into four parts:
- Top menu bar and buttons. At the top there is, as usual, a menu bar and a toolbar. In the menu you can find almost all the functions of the program, but almost everything you need is placed on the top and side toolbars, so we don’t have to look there. On the toolbar there are buttons for opening a folder with images, starting to download selected images, burning a disk, and testing a finished disk or flash drive.
- Left toolbar. Here we have collected large buttons that allow you to download and add typical disk images with antiviruses, system utilities, Linux distributions and even Windows. In addition, it is possible to add any images that are not listed in the previous lists using the "Extra" button.
- Right toolbar. This panel contains tools for selecting a flash drive for recording a startup image on it, buttons for creating an image or USB disk, a button for going to the developer’s website, and a button for exiting the program.
- Central region. This is the main work area, the contents of which vary depending on the activated tool.
In order to create your own multiboot assembly, it is advisable to place all the ISO images of boot disks we need in the ISO folder. If you decide to download images directly from the Internet using the links provided, they will automatically end up in this folder. However, your images will need to be copied manually. There is one more nuance. There should be no Russian letters in the path to the program and images. Therefore, it is advisable to unpack SARDU directly to the root of the disk.

Here click the "Add" button and fill in the proposed fields. Of the required fields, it is worth noting:
- Name. Here we enter the name of the system, in the form in which we want to see it in the list and in the boot menu.
- Derivate checkbox. If we know which system the image being added is based on, we can activate the checkbox and select the desired one from the drop-down list. This will save us from having to select a bootloader.
- Mode drop-down list. Here we select the bootloader. I advise you to use the universal GRUB, which is the default.
- ISO Name. Here you can enter either the full path to the image (if it is not in the ISO folder, which is undesirable), or simply the name of our image.
The remaining fields are optional and we can fill them out as desired. After filling out the fields, click “Save” and our image appears in the list. However, in order for us to add it to the assembly, we need to manually specify the path to it again by clicking on the red button after the image name:
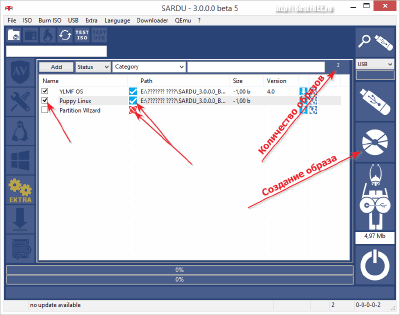
Now all that remains is to check the boxes for the images you need and have been confirmed by the program (the red button is replaced by a blue one) and click one of the buttons on the right panel: “Create SARDU USB” (to create a bootable flash drive) or “Create SARDU ISO” (to create a disk image). Upon completion of the work, we can immediately test the performance of the new multiboot disk using the built-in QUEmu emulator by clicking the "Test ISO" (or USB) button on the top toolbar:

If everything went well, you can launch your newly created image and find the systems added to it in the Extras section.
conclusions
So we figured out what boot disks are and how you can make them yourself. In the article, we didn’t look at other than the principles of working with the bootloaders themselves directly, but I think this is of no use to ordinary users like you and me :) The result is important to us, which, I hope, is what we got.
Creating multiboot builds is not such a difficult task, but it brings tangible benefits in cases where we are faced with the need to reinstall or repair something in the computer OS. As for me, quite a long time ago I created for myself the ideal flash drive, which contains both Linux and a small Windows that can be launched or installed on a PC, as well as a set of the most necessary programs.
I wish you to have similar flash drives and disks in your arsenal. And even more, I wish you fewer breakdowns of your computer!
P.S. Permission is granted to freely copy and quote this article, provided that an open active link to the source is indicated and the authorship of Ruslan Tertyshny is preserved.
If you want to install the Windows XP operating system on some computer, you can record a special one and use it for installation. An alternative way is . This article describes in detail how to create a bootable DVD on your own and what program you will need to do it.
What it is
If you purchased a licensed boxed version of Windows XP, it will include a disk and an activation key. The operating system is installed using the disk and then activated using a code. However, what should you do if you downloaded Windows XP from some site in the form of an image or, for example, ordered a digital licensed version via the Internet?
In this case, you need to write the resulting image to a disk or USB flash drive and use it for . To create, use a special program, for example, Nero or UltraISO.
ImgBurn program
ImgBurn is a free utility that is in the public domain. Anyone can receive it. However, this program is not of low quality, and with its help you can successfully and easily burn a Windows XP image to a floppy disk. To use the application, follow the instructions provided:

Now that ImgBurn is installed on your personal computer, you can use it to burn a Windows XP image to DVD.
Working with ImgBurn - how to burn an image
After the program is successfully installed, you can launch it and get to work. However, first you will need to download the Windows XP image you need in ISO format from the Internet.
In fact, an iso is a digital copy of a disc that can be burned onto any media. Find the required Service Pack, the correct version (Home, Professional, etc.) on the Internet. You may want to use a ready-made assembly that already contains some sets of drivers and pre-installed applications.
Once you have saved it to your computer and prepared everything you need, you can burn the downloaded file to disk. To do this you will need to run ImgBurn. When the program opens, select the “Write image file to disc” section in the “What would you like to do?” column. " 
Next, click on the button labeled “Please select a file”. In the window that opens, you need to specify the path to your Windows XP image. Insert your DVD into the drive and select it from the "Destination" drop-down list. In the column on the right, you can indicate the recording speed (the higher, the greater the load on the computer and the recording drive), as well as the number of copies you want to record. 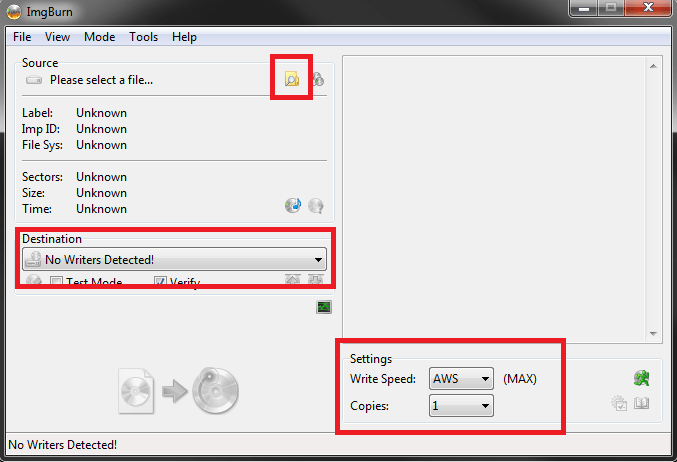
You can download the Windows 7 disk boot image - installation torrent on your computer for free and without registration from our website. Here everyone will find a Windows 7 SP1 installation disk in Russian for any purpose and configuration of your computer or laptop. A Windows 7 disk image is usually in ISO format, so you can create a bootable Windows 7 disk for further installation of Windows 7 using any program that works with images, we recommend the Rufus program or the UltraISO program.
Before you download a windows7 system disk from microsoft, you need to decide on your goals and capabilities. This directly affects the choice when downloading a distribution kit for Windows 7.
If your goal is to play games, access websites and social networks, listen to music and watch movies, work at home for entertainment purposes and to get acquainted with this OS, and you don’t really want to delve into how to activate Windows for free later 7, and how to correctly install the necessary drivers on your Windows 7. In addition, you want there to be nothing superfluous and full functionality, we recommend downloading the original Windows 7 maximum disk image with an activator and driver installer built into the desktop, from the link below . For optimal system operation on your PC, if you have 4 GB or more RAM, download a 64bit Windows 7 disk; if you have 1GB - 3GB, download a 32bit version of the Windows 7 disk.
Download disk windows 7 x64 maximum ISO image torrent
Download disk windows 7 32bit maximum ISO image torrent
If you still need to install win7, for home and entertainment purposes with free activation, and you want to have a full set of versions of the Windows 7 line on one disk or one flash drive with the possibility of installation with the Office 2016 package already installed, programs, updates, with installed gaming system utilities. We recommend downloading this assembly of Windows 7 sp1 x86 x64 13in1 disks. It already has security updates 07/17/2017, in addition, it has the ability to select two interface languages, Russian and English.
In case you need the win 7 operating system to work in an enterprise, to keep records of a legal business, to work with money and increased security, or for other commercial purposes, we recommend purchasing a license key for windows 7 on the official website of Microsoft developers and downloading only a clean one official, original windows7 image to avoid fines and sanctions from Microsoft.
For security reasons, we recommend installing drivers only downloaded from the official website of the manufacturers of the motherboard, video card, etc. of your laptop or computer. We also recommend downloading all programs only from the official developer sites. If you have something to risk, information, files, accounts, etc., then there is no such thing as too much vigilance.


