Optimization of processor operating modes. CPU Control program for optimizing processor performance
An interesting topic and always relevant is how to increase the speed of your computer. In the modern world, the race against time is becoming more and more interesting, everyone gets out as best they can. And the computer plays an important role here. How can he infuriate you with his ridiculous brakes at a crucial moment! At this moment the following thoughts come to me: “Piss, well, I don’t do anything like that! where are the brakes from?
In this article I will look at the 10 most effective ways to increase computer performance.
Replacing components
The most obvious way is to replace the computer with something more powerful, we will not consider it. But replacing some spare part (component) is quite possible. You just need to figure out what can be replaced while spending less money and getting the maximum increase in computer performance.
A. CPU It is worth replacing if the new one is at least 30% faster than the installed one. Otherwise, there will be no noticeable increase in productivity, and a lot of money will be required.
Extreme enthusiasts can try to overclock their processor. The method is not for everyone, but nevertheless it allows you to postpone the processor upgrade for another year, if the overclocking potential of the motherboard and processor allows. It consists of increasing the standard operating frequencies of the central processor, video card and/or RAM. Complicated by the individual characteristics of a specific configuration and the possibility of premature failure.
B. RAM. It definitely needs to be added if during operation all the memory is loaded. We look through the “Task Manager”, if at the peak of work (when everything that can be opened) is loaded up to 80% of the RAM, then it is better to increase it by 50-100%. Fortunately, it now costs a penny.

C. HDD. It's not the size of the disk, but its speed. If you have a slow economy hard drive with a spindle speed of 5400 rpm, then replacing it with a more expensive one with a speed of 7200 rpm and a higher recording density will add performance. In all cases, replacing with an SSD drive makes users very happy. The performance before and after is completely different.
You can roughly determine the bottleneck in the computer configuration using the standard Windows 7 performance tool. To do this, go to “Control Panel -> System” and click “Evaluate performance” or “Update”. The overall performance is determined by the lowest indicator, thus the weak link can be identified. For example, if the hard drive rating is much lower than the processor and RAM rating, then you need to think about replacing it with a more productive one.

Computer repair and cleaning
The computer may be slowing down due to some kind of malfunction, and a simple repair will help increase performance. For example, if the processor cooling system malfunctions, its clock speed is greatly reduced, and as a result, performance drops. It can still slow down simply because of the components of the motherboard due to heavy dust! So first, try to thoroughly clean the system unit.
Defragmentation and free disk space
If you have never heard of what it is or haven’t done it for a long time, then this is the first thing you need to do to increase the speed of your computer. Defragmentation collects the information on the hard drive piece by piece into a single whole, thereby reducing the number of read head movements and increasing performance.
The lack of at least 1 GB of free space on the system disk (where the operating system is installed) can also cause a decrease in overall performance. Keep track of the free space on your disks. By the way, for the defragmentation process it is desirable to have at least 30% of free space.
Reinstalling the Windows XP/7/10 operating system
Reinstalling 90% allows you to increase the speed of your computer by 1.5-3 times, depending on how dirty it is. This operating system is designed in such a way that over time it needs to be reinstalled. I know people who “interrupt Windows” several times a week. I am not a supporter of this method, I try to optimize the system, to get to the bottom of the true source of the brakes, but still, about once a year I reinstall the system, and only because some components change.
In principle, if I didn’t have such a turnover of programs, then I could live 5-10 years without reinstalling. But this is rare, for example in some offices where only 1C: Accounting and Microsoft Office are installed, and nothing has changed for years. I know such a company, they have had Windows 2000 for more than 10 years and it works fine... But in general, reinstallation is a good way if you don’t know how to increase the performance of your computer.
Using operating system settings optimizer programs
Sometimes you can significantly increase the comfort of work using special programs. Moreover, in most cases this is almost the only simple, fast and suitable method. I already wrote about one good program called earlier.
You can also try a good PCMedic utility. It's paid, but that's not a problem. The highlight of the program is the fully automated process. The entire program consists of one window in which you need to select your operating system, processor manufacturer (Intel, AMD or other) and optimization type - Heal (cleaning only) or Heal & Boost (cleaning plus acceleration). Press the “GO” button and that’s it.

And one of the most powerful programs is Auslogics BoostSpeed, although it is also paid, but there is a trial version. This is a real monster that includes several utilities to increase the performance of your computer on all fronts. There is an optimizer, a defragmenter, cleaning your computer from unnecessary files, cleaning the registry, an Internet accelerator and some other utilities.
Interestingly, the program has an advisor who will tell you what needs to be done. But always check what is recommended there, do not use everything indiscriminately. For example, the advisor really wants automatic Windows updates to work. Those who have not bought licensed Windows know that this can end badly...
For optimization, there are also cleaning programs, for example CCleaner, which clean the computer of unnecessary temporary files and clean the registry. Removing junk from disks will help free up free space.
But cleaning the registry does not lead to a noticeable increase in performance, but it can lead to problems if important keys are deleted.
IMPORTANT! Before any changes, be sure to!
NECESSARILY view everything that cleaner programs want to remove! I scanned my computer with Auslogics Disk Cleaner and at first I was glad that I had 25GB of junk in my recycle bin. But remembering that I had recently emptied the recycle bin, I opened the files prepared for deletion in this program and was simply amazed! ALL my most important files were there, my entire life for the last few months. Moreover, they were not in the trash, but in a separate folder on drive D. That’s how I would have deleted them if I hadn’t looked.
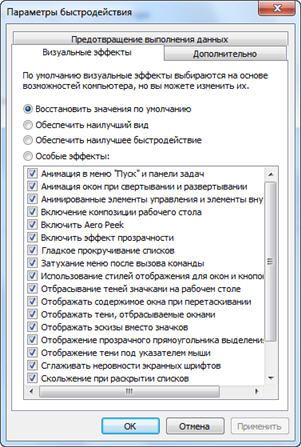
In Windows 7, you can slightly increase performance by simplifying the graphical interface. To do this, go to “Control Panel -> System -> Advanced -> Settings” and disable some of the checkboxes or select “Ensure the best performance”.
Motherboard BIOS Settings
BIOS stores the most basic computer settings. You can enter it while turning on the computer using the Delete, F2, F10 or some other key (written on the screen when turning on the computer). A strong decrease in performance can only be due to critical bugs in the settings. Usually it is configured normally and interfering there is not necessary and even harmful.
The easiest way to change the settings to optimal is to go into the BIOS and select an option like “Load Optimal Settings” (the spelling may differ depending on the BIOS), save the settings and reboot.
Disabling unnecessary services and programs from startup
Today, almost every second installed program sticks its nose into startup. As a result, loading the operating system is delayed for an indefinite amount of time, and the work itself is slowed down. Look at the system tray (near the clock), how many unnecessary icons are there? It is worth removing unnecessary programs or disabling them from startup.
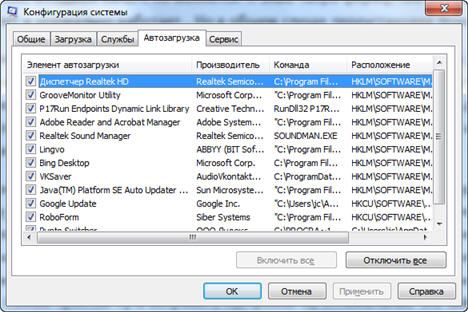
This is easy to do using the built-in Windows System Configuration utility. To run it, press the combination “Win + R” and enter “msconfig” in the window. In the program, go to the “Startup” tab and uncheck the extra boxes. If after a reboot something is missing, the checkboxes can be returned. You should have an idea of what programs you have installed and .
One strong way to increase performance is... disabling the antivirus. It’s bad, of course, but I sometimes disable the antivirus while performing resource-intensive tasks.
No need to do this while surfing the web or installing unknown software!
Installing the latest drivers
This can really help, especially if very old or default drivers are installed (by default from Microsoft). The motherboard chipset drivers have the greatest influence, but others can also reduce performance. You need to update drivers for each device, and you can find them on the manufacturers’ websites.
It is better to update drivers manually, but there are many programs for automatically updating drivers. For example, a good one will scan devices and look for updated drivers.

Choose your operating system wisely
If you are still sitting on Windows XP, having 2 gigabytes of RAM, then I advise you to quickly switch to Windows 7, performance will increase. And if you have 4 GB or more, then feel free to install Windows 10 64-bit version. The speed of work will increase even more, but only in 64-bit programs. Video processing, audio and other resource-intensive tasks can be processed 1.5-2 times faster! It's also time to change Windows Vista to seven.
Do not use various Windows builds for installation, such as Windows Zver and the like. They are already crammed with necessary and unnecessary software, and they are often buggy.
Viruses
Even though they are in tenth place for me, this does not mean at all that you should not pay attention to them. Viruses can significantly slow down your computer or even freeze it. If there is a strange decrease in performance, then you should scan the system with one of the scanners, for example. But it is better to have a reliable antivirus installed, such as DrWeb or Kaspersky Anti-Virus.
In this article, we looked at the main methods of how to increase the speed of your computer. I hope this article helped you save the most important thing in our lives - time that should be used productively, every hour and every minute, and not wasted. In the following articles I will touch upon the topic of increasing computer performance more than once, subscribe to blog updates.
Interesting video for today - incredible ping pong!
Hello dear blog readers. Nowadays, probably every second person has quad-core processors. Of course, if earlier two cores were good, today 4 cores in the system are generally excellent.
But the more cores in the processor, the worse its work with the tasks that we perform on the computer is organized, which means the optimization of the processor leaves much to be desired.
This is mainly due to the fact that not all programs are well designed for multi-core processors, that is, in some applications, programs and games, the main productive power of your processor may simply not be used and is in idle mode.
I think few people are happy with this state of affairs, especially when a demanding game or program slows down on a powerful quad-core processor.
Today we will talk about effective processor optimization using a simple but useful programCPU Control .
To optimize the processor viaCPU Control , we don’t have to overclock it as we did in the article -. By the way, I recommend reading it.
Download the programCPU Control ( ) and launch it. The program is very simple, free and in Russian.
After installation, you will see a shortcut, launch the program and see this window.

Let's start optimizing the processor withCPU Control . By default, the program is disabled. First, go to settings and select Russian language.

Next, select the second processor optimization itemCPU Control — manual .

To select a processor core for a specific task, right-click on the process and select one of the processor cores.

Also, you can select several processes for one core or one process for several cores.

We configure the second (third and fourth) kernel for all other processes.
If a game or some application is slow or performance is clearly not enough.
Try to independently assign all processes except the one that is slowing down to the fourth or second core for processing. And let all the other processor cores take care of one of your tasks.
If you don’t want to dig around and understand the settings, you can simply select the modeauto and see productivity gains.

CPU optimization withCPU Control This is a vital manipulation for all multi-core computers, especially quad-core ones. Of course, after all, the performance increase due to processor optimization withCPU Control can reach one and a half times. On dual-core computers the increase will also be noticeable, but perhaps less than with 4 cores.
In the case of single-core processorsCPU Control will not be able to do anything, since the program is designed to optimize at least two processor cores.
Does your computer have a single-core processor? Then I recommend that you read this powerful article -. After completing 7 simple steps you will be able toCPU Control will make working on your computer more convenient and faster :)
Now you know how to optimize the processor withCPU Control and get a productivity boost for free, in no more than 5 minutes. By the way, to speed up your multi-core computer as much as possible, I recommend this one. This way you will make your computer work even faster. Also don't forget to subscribe to. This is the only way you can be the first to know about new articles on the blog. That's all for me. I wish you to smile more often and look at the world more positively 😉
There is a well-known picture when thoughts about buying a new PC come to mind at the moment when your old computer stops coping with the task that it previously solved much faster. Loading the operating system seems like an eternity, launching programs takes a relatively long time, and more than a dozen browser tabs “hang” the computer. Yes, the picture is quite old, and it is strange to see it when all modern computers contain multi-core processors. Even CPUs from five to seven years ago have sufficient performance for the needs of a modern user. The cause of problems with your PC can be a mere trifle, and in order to make your work on the computer more comfortable, you do not have to incur large time and financial costs. In this article, you will learn about possible solutions to common problems and find a solution for yourself in them.
Speed up your computer boot
After pressing the power button on the computer, the motherboard BIOS initializes the PC hardware components, conducts various hardware tests, searches for the operating system boot file on available storage media, and then transfers control of the computer to it if it starts successfully. It takes a lot of time to go through and complete these procedures. If you are inexperienced in tinkering with the settings, your computer may take more than a minute to boot before you see the Windows logo and it starts loading. Let's first look at how to optimize BIOS settings your computer.
Login to BIOS. After turning on your computer, press the key several times Del . In most cases, this action will open the BIOS Setup settings. Laptops and some desktop motherboards may use a different button (such as F2 or F10) to enter BIOS settings. It is worth noting that in modern versions of BIOS Setup, a simplified mode for displaying settings first opens, so you need to switch to the advanced mode (Advanced BIOS Features or similar).
Disabling the RAM test. The option that has the greatest impact on your computer's boot speed is "Quick Boot" , "Skip Memory Check" or something similar. You can find it in the boot settings (for example, the “Boot Settings Configuration” item). If this function is active, then hardware testing - for example, checking RAM - is not performed. Enabling the option "Quick Boot" can reduce computer boot time by more than 10 seconds.
Download priority optimization. The BIOS can search for the boot sector on all storage devices connected to the system board. However, the system disk is not always detected immediately. In this case, time is wasted. To avoid this, I recommend in paragraph Hard Disk Boot Priority or similar, select your system drive as the first boot device.
Attention. When installing an SSD, you may need to select this device in the “First Boot Device” item or similar as the first disk so that the SSD appears in the boot device priority list.
Disabling unnecessary devices. In modern PCs, all internal drives are connected via the SATA interface. Despite this, many motherboards have a built-in (P)ATA controller, also known as IDE, which takes a few seconds to boot. If your PC does not have drives connected via IDE cables, then disconnect this controller. To do this, open “Integrated Peripherals | OnChip IDE Channel" or a similar item and change its value to "Disabled". You can also disable other controllers, such as the parallel (LPT) and serial (COM) ports, as well as the built-in sound card if you are using an external sound card for audio output. However, these measures can only slightly reduce loading time.
Optimal settings for Windows
The old Windows OS, combined with a large number of applications, loads very slowly. The problem lies in the countless programs and services that start when the operating system starts, regardless of whether they are used or not. Therefore, before deciding to replace a slow-running PC component, you should first “clean up” the system folders and registry. Cleaning the registry and removing unnecessary programs from startup using special software will save tens of seconds on boot speed. For these purposes I recommend using the program Vit registry fix or CCleaner . They can also be used for the following actions.
Disabling services. Windows services are installed with drivers or software, and often their main task is to search for updates for this software. Some of them are necessary for another application to work. One way or another, when the operating system boots, they also need time to start. To disable unnecessary services, use the keyboard shortcut "Win+R" , enter « msconfig" and press "Enter" . The system setup program will open. On the tab "Services" check the box opposite "Do not display Microsoft services" . Uncheck any services that are not part of your antivirus software. However, remember that software update services, such as Adobe Flash and Reader, on which the security of your entire system depends, must be left turned on.
Disabling programs at startup. On the tab close to services in msconfig Listed are programs that automatically start after the computer boots. Disable here first all elements that are not related to your antivirus program or are not necessary, for example, a client for synchronizing a smartphone or an instant messaging program.
Result | Checking OS startup speed. The next time you reboot, the OS should start faster, and your computer will reach its optimal speed only after several reboots. If you receive various error messages during startup, reactivate the services and items that you have disabled. The same applies to programs that have stopped working, which, however, happens very rarely.
Replacing a standard hard drive with an SSD
 When loading the operating system or launching programs, the computer tries to access many small files, which are often stored on different parts of the hard drive, due to the way information is recorded. The read/write head moving from one place to another spends a lot of time searching and reading them. An antivirus program running in the background also greatly slows down your hard drive. , on the contrary, is capable of providing data instantly without mechanical delays. The access time (that is, the time that passes before data transfer begins) for an SSD is 600 times less than for a hard drive.
A computer with the Windows operating system installed on a solid-state drive starts up on average in 15-20 seconds, which is 2-3 times less than the results when using a regular HDD. A computer with a standard hard drive responds more slowly than one with a solid-state drive.
Installing an SSD. There is always room for a 2.5-inch SSD in a desktop computer case, just like in a laptop. Instead of using a mounting frame for the 3.5-inch chassis bay, you can side-mount the SSD with two screws to one of the 5.25-inch slots, which are usually free. Connect the SSD to the SATA power connector of the power supply and to the motherboard with a SATA cable. Check your user manual to see if it supports the current SATA 6Gbps standard, and if the answer is yes, which port, then connect an SSD to it.
Windows installation. After installing the solid-state drive, you must reinstall Windows and all programs to obtain optimal system performance and stability. To do this, disconnect the old HDD, boot from the Windows installation DVD and install the operating system on the SSD, and then all your programs. When everything is ready, reconnect the hard drive. To access the information on it, use the libraries function in Windows 7. To do this, click in one of the libraries (images, documents, music, videos) on the link following "Includes:" . You can later delete any directories that do not contain your data.
Adding RAM
Even if you're just browsing the web or using office programs, your computer should have at least 4 GB of RAM to ensure that the system accesses the page file on the notoriously slow hard drive as little as possible. To work with multimedia files and modern three-dimensional games, you need to have from 8 to 16 GB of RAM.
Attention! Only the 64-bit version of Windows can recognize more than 3 GB of RAM.
Analysis and increase in RAM capacity. Before you upgrade your RAM capacity, find out how much and what type of memory is installed in your system. Install and run the CPU-Z program. On the tab "SPD" in the drop-down menu in item "Memory Slot Selection" you can determine the number of slots, and by clicking on one of the slot numbers, information about the installed memory module will appear. For example, if your system has two 2 GB modules and two more slots are available, purchase two additional modules. It's best to stick with identical models with the same catalog number (by which you can find memory on price comparison portals). If you cannot find them, then you need to select memory that matches the old one or exceeds it in timings and clock speed. If there are no free slots, replace the existing modules with new ones of larger capacity. As a rule, it is best to set an even number, since in this case the fast dual-channel memory mode will be available.
Installing RAM. Installing RAM into a computer is quite simple: press the two DIMM slot latches outward and install the new module so that the groove between the contacts coincides with the slot. Then push the module down until it clicks, first on one side, then on the other. You should make sure that Windows recognizes the installed hardware. To do this, use the “Win+Pause” combination and view information about the computer - among other things, the amount of installed memory will be indicated.
Installing a powerful processor
Tasks that can fully utilize modern processors are very rare. Converting videos or processing RAW photos are among them. In everyday work, a more powerful CPU means a faster computer response time to user actions, but only if you have an SSD and sufficient RAM. If you are sure that your PC is “slowing down” precisely because of insufficient performance of the central processor, then there is nothing left to do but replace it. This procedure will take you several hours and can cost a lot of money, and this is exactly the case when you should think about purchasing a new device, especially if other components are also outdated.
Hardware check. In the corresponding CPU-Z tabs, determine the processor and motherboard model. In chapter "Support" Manufacturer's website to determine the most powerful CPU compatible with your motherboard. The difference in relation to the old processor must be noticeable, otherwise the replacement procedure will lose its meaning. For example, if you change the weakest chip to the most powerful one of one series or install a device from another, more advanced line, then the computer will work significantly faster. Otherwise, the performance gain will be minimal.
Attention. Some older models of processors, which have already been discontinued, are still on sale and are often offered at a higher price than the new generation chip and motherboard. If you are going to buy a powerful CPU, be sure to order a quiet and efficient cooler from a third-party manufacturer for it, and if you need to use an old cooling system, you definitely need a tube of thermal paste (usually included with the cooler).
Installing the processor. Disconnect the power and release the cooler lock. Carefully lift it up and away from the processor, turning it slightly left and right if necessary. Open the CPU socket locking lever and carefully remove the chip. Use a lint-free paper towel and an alcohol-based cleaner to remove any remaining thermal paste from the cooler as well as the CPU socket. Then install the new processor so that the highlighted corner aligns with the socket mark. Squeeze a small amount of thermal paste into the center of the CPU surface (a drop no larger than a pea), then install the cooler and carefully turn it left and right a few times to evenly distribute the paste. The clamping force that appears when you close the cooler clamp will “smear” the paste over the entire surface of the processor. After this, you can connect the cooler's power plug to the motherboard.
Replacing the video card
If three-dimensional games “slow down” and errors appear when they are launched, despite the fact that a fairly powerful video card is used, or if during video processing, contrary to the manufacturer’s information, it is not possible to use the computing resources of the graphics processor, then, most likely, the video card drivers are outdated. Updated utilities will help improve performance and compatibility with new games and applications that use the GPU, but you can only get a noticeable boost in power from a new GPU device that you can install yourself.
Search for the required driver. If you don't know the name of your GPU, install and run the GPU-Z program. Using the information received on the site www.nvidia.ru or www.amd.com you can find the drivers you need. Installing graphics drivers is carried out similarly to other programs, but before installing new ones, it is recommended to remove old ones, or use special applications from the manufacturer to automatically update them (for example, GeForce Experience from Nvidia).
Selecting a video card. Graphics card costing up to 6,000 rubles. (for example, NVIDIA GeForce GTX 650 Ti/660 or AMD Radeon HD 7850) copes with all modern games in resolutions up to Full HD. If you want to have some stock for next-gen gaming, then for around RUB 9,000 you can purchase an NVIDIA GeForce GTX 760 or AMD Radeon HD 7950. All of these models support DirectX 11. Video cards that cost more than these amounts are intended for gamers who play in resolutions exceeding Full HD, or strive to obtain maximum graphics quality.
Installing a video card. Disconnect the PCI-e power connectors from the old video card, and also unscrew the screw or remove the fastener near the metal strip on the back of the case. Push the PCI Express slot latch towards the motherboard and remove the card from the slot. Installation is carried out in reverse order, but do not forget to connect the power connector. All of these boards work in combination with a 500 W power supply.
Instructions
Not always to optimize the work of the central processor it needs to be overclocked. Sometimes it makes more sense to reduce CPU performance. This is especially true when working with mobile computers. Modern laptops have quite high performance, which is not always beneficial. After all, the more powerful the device, the more energy it has. Open Control Panel and select System and Security.
Open the Power Options menu and go to configure your computer's current power plan. Click the "Change advanced settings" button and look for "Power management" processor" In the column “Minimum condition processor» Specify 20% and 50% for battery and mains operation respectively. Expand the "Maximum Condition" menu processor" Set the values to 50% and 100%. Thus, when running on battery power, the central processor will consume much less energy.
If you need to speed up work processor, then open the BIOS menu and select Advanced Chipset Setup. Find the CPU Frequency column and increase the bus frequency by 20-30 Hz. Be sure to raise the voltage supplied to the processor. Change its value in the CPU Voltage column.
Save the CPU settings and restart the computer. Install Core Center and run the CPU stability test. If the program does not detect errors in operation processor, repeat the procedure to increase its performance. To return the computer to its original settings, activate the Use Default Settings item in the BIOS menu. If the computer stops turning on, perform a mechanical reset.
Sources:
- how to optimize your work
The main reasons why your computer slows down are the accumulation of errors in the operating system and inappropriate graphics settings. A radical solution to the problem is to completely reinstall the OS and all drivers. But you can optimize the system using a few standard operations.
Instructions
You should run the program, check the boxes next to the selected items and carry out the analysis. After analysis, cleaning is carried out using the button of the same name. This procedure allows you to optimize performance by freeing up a significant amount of active memory space.
Speed up OS startup by cleaning the startup menu. In the “Start -” menu, select Startup and remove unnecessary programs. It should be remembered that these programs will simply stop running along with Windows, but will not be completely removed. You can also work with the autorun menu using the above mentioned CCleaner.
Optimization of graphic parameters is carried out in the control panel in the “screen” menu. Select “Design” and in “Windows and Buttons” select the classic style. In the “effects” section, uncheck unnecessary graphical frills. Remember that beautiful unusual cursors, animated desktop backgrounds and similar decorations significantly reduce the performance of your computer, so you should avoid them.
To clean the hard drive, select “standard – utility” from the “start-all programs” menu. And run Disk Cleanup.
To speed up Windows, remember that the fewer programs, the faster it is. This means that unnecessary programs need to be removed. Go to Control Panel and run “Add/Remove Programs”. You will see a list of programs installed on your computer and such an important parameter for each program as frequency of use. This will allow you to understand how necessary the program is, and whether it would be better to remove it.
Finally, in order to significantly optimize the operation of your computer, you can carry out. In the “Start-All Programs” menu, select “Accessories – Utilities” and start disk defragmentation. The program suggests first conducting an analysis, and then using defragmentation to compress rarely used files.
Tip 3: How to optimize your computer for maximum performance
In addition to properly selected PC hardware, there is another often underestimated factor that can greatly influence its performance - the system. The default settings after installing Windows do not last long - with each new application the PC runs slower, and after some period of active use freezes and slowdowns inevitably occur, which OS optimization will help to cope with.

Instructions
In Windows 7, users were pleased with the built-in system performance test, which will help identify the “weak link” among PC components. You can find this test in Tools and Performance Counters in Control Panel. Run a test that will show you how each component is rated on an 8-point scale. Hardware that receives less than a three needs to be replaced with faster analogues.
Check the OS for viruses, as these pests can slow down your work, devouring gigabytes of RAM and traffic. For one-time cleaning, a simple scanner like CureIt or Kaspersky Antivirus Scanner is suitable. Better, of course, would be resident protection, which will prevent infection while surfing the Internet.
Clean up startup. This will also free the processor from executing currently irrelevant processes. Don't forget about setting up services. Regularly clean temporary files, cookies and browser cache and reboot your PC every week.
RAM can make life easier with pagefile.sys, properly configured, or a flash drive connected via ReadyBoost technology. Don't forget about setting up services. Unnecessary options such as “Remote Registry” or “Print Queue” can be disabled. The importance of services depends on how and what yours works with.
Clean your hard drives of unnecessary data and regularly defragment them. If you follow these simple recommendations, your PC will be fast not only for the first week after installing Windows.
Setting up RAM operating modes is a very important stage in optimizing your computer. We recommend that you familiarize yourself with possible difficulties and problems before you start changing RAM operating parameters.

Instructions
Perform the standard procedure for checking the status of RAM. To do this, use the MemTest utility or any similar one. It will allow you to avoid a large number of computer reboots while setting up the RAM. If you don't have internet access, open Control Panel and select the System and Security menu. Now open the "Administrative Tools" menu and open the "Windows Memory Test" option. Select the "Reboot and check" option.
Once this process is complete, open the BIOS menu. To do this, restart your computer and hold down the Delete key. Find the Advanced Setup or Advanced System Configuration menu. If these menus are missing, try pressing the Ctrl and F1 keys and repeat the search.
Find the menu responsible for the operating parameters of the central processor and RAM cards. Find four points opposite which the delay values (timings) are located. Change to 0.5 indicative of the last point. Be sure to find the DRAM Voltage parameter and increase the voltage supplied to the RAM cards by 0.1-0.2 Hz.
Save the settings and restart your computer. To do this, you can simply press the F10 key. Now check the operation of the RAM sticks using the MemTest program or a standard Windows OS utility. If the system does not detect errors, then enter the BIOS menu again and reduce the value of the next (third) item.
Perform these cycles until the RAM checker detects no errors. Be sure to periodically increase the voltage supplied to the memory cards. After reducing the timings to minimum values, increase the RAM bus frequency. It is recommended to first increase the latency indicators by 0.5-1, so as not to spoil the RAM strips.
Since netbooks are equipped with low-power processors, their performance is relatively low. And over time, the speed of such a device may drop noticeably. However, the situation can be improved.

The main reasons for poor netbook performance
The reasons for slow operation may be:
Installing unnecessary programs;
- abundance of startup components;
- lack of free space on the hard drive;
- the presence of a large amount of garbage: temporary files, data remaining after uninstalling programs, outdated registry keys, and others;
- a small amount of RAM with a fairly resource-intensive operating system.
Ways to optimize your netbook's performance
First of all, you should remove from your hard drive all unnecessary programs that came with the netbook or were automatically installed from the Internet along with the software of interest to the user. The most convenient way to manage installed programs is through the “Control Panel” item – “Programs and Features”.
Cleaning startup components can significantly speed up the operation of the operating system, not only at startup, but also in the future. You need to open the context menu by pressing the Windows + R keys, enter the msconfig command and click OK. In the window that appears, you can configure the system configuration, in particular startup. By opening the appropriate tab, you should disable unnecessary ones in the list of programs loaded at startup. Here you need to leave only the components that are important for the operation of the operating system itself; the rest can be removed. In this case, files are not deleted from the hard drive; they are simply prevented from being loaded at startup.
For stable and fast operation of the operating system, there must be enough free space on the hard drive where it is installed. This needs to be monitored and unused files deleted in a timely manner.
Periodic defragmentation of the hard drive will help speed up your netbook. The corresponding command is located in the “Service” tab of the “Hard Disk Properties”. The process is lengthy, so before starting it, you should connect your netbook to the network and disable sleep mode. You cannot work with a netbook during this time.
It would not be a bad idea to have one of the special programs for cleaning and optimizing the operation of the system, the so-called cleaners, capable of performing all of the above functions, as well as clearing the registry of things that are difficult to find manually.
In addition, you can improve the performance of a netbook using hardware - by increasing the amount of RAM, as well as replacing the hard drive with a larger one.
Computer programs develop faster than similar technology. More modern and high-quality software requires more resources. Naturally, many simply do not have the desire to buy new hardware to improve their computer. And this method of “pumping” requires considerable costs. Fortunately, there are also free, so-called hardware methods for optimizing and overclocking computers or laptops.

You will need
- Access to the Internet
- Administrator account
Instructions
Remove unnecessary programs. To do this, go to start -> run -> msconfig -> and remove all unnecessary programs. Most often they are software for additional equipment, Skype, UTorrent and MAgent. Remember that the system tray, located in the lower right corner, should contain a minimum number of icons.

To speed up work with hard drives, perform the following steps for each partition. Open “My Computer”, go to the properties of the desired local disk or partition, uncheck the “Allow indexing of files on this disk” option.

As you understand from the title, we will talk about how speed up the processor , or more precisely (some inexperienced users just call the system unit that way ;)) computer and Windows.
That is, today I decided to update and supplement one of the old and incomplete articles on optimization, and not just update it, but by inserting part of the material from one of the lessons into it ;)
You can download it directly from my website, namely. No installation required, just unzip the program.
How to speed up your processor and computer using CPU Control settings
After launch we see something like this:

Where we immediately go to the “ tab Options” and check the boxes “ Autostart with Windows”, “Minimize”, language and check the box 4 kernels, if we actually have them 4 or we don’t put it if, in fact, there are two of them.

Setting up CPU Control to speed up your processor even more
- Manual, i.e. when we set everything for each process ourselves, i.e. on which core/s it will be, what is called processed;
- Auto, that is, when the program itself assigns distribution to cores in order to speed up our processor;
- CPU1, that is, when priority is given to the first core;
- CPU2, that is, when priority is given to the second core;
- Etc.
The last two are not of interest to us, because the idea of transferring the load somewhere to one place is not clear to me. After all, we are engaged in optimization, and not vice versa :). Therefore, we will work with the first two.

First, a few words about " Auto". This is a rather convenient mode when there is no particular desire to bother with fine tuning or there is not enough knowledge for this very tuning. Therefore, you can select this mode and one of 9 profiles for it, which, based on certain rules, distribute applications among cores.
This way you can get a good performance boost without any problems, especially if you spend some time choosing the right profile for your current system.
The second option, as already mentioned, is the mode "Manual". It is more complex because it requires a certain understanding of the concept of the system, applications, etc.

By switching to this mode, you can distribute processes yourself across cores or groups of cores. This is done by selecting one or more processes and then clicking the right mouse button. Here actually CPU and its number is the core number.
Those. if you want to speed up the processor and hang the process on 4 -th core, then choose CPU4, if on 1 -oh and 3 -thie, then CPU 1+3, etc. I think the idea is clear. Now let’s talk about how best to distribute.
Globally, it makes sense to separate processes into groups, and allocate all cores at once for a resource-intensive application. That is, for example, leave the firewall and antivirus in your care 3+4 kernels, small system processes, as well as small programs like ICQ , and other riffraff on the 1st, games-photoshop-other-heavy on 1+2+3+4 .
Or, as an option, try to hang everything on everything and see what happens.
How to see the results of acceleration and changes in general
You can monitor the load on the cores in the same way.
It is important to enable core load monitoring in it, which is done by clicking the “ View” - “Kernel time output" And "" - " According to schedule for each CPU”.
Ideally, do all this not in idle mode immediately after starting the computer, but in the loaded system mode, that is, with resource-intensive applications running, like games, photoshop, or whatever else is consuming your resources.

By the way, here on 4 -x cores, even in automatic mode, the performance increase is noticeable, but for some reason it is not always possible to achieve power with two cores even in manual mode.
In general, there is a huge field for experimentation here, which I hope you will explore, because everyone has their own system, set of programs and so on. By the way, the field is a minefield, because you can easily achieve the opposite effect instead of optimization, but it’s interesting to dig deeper :).
Try using different profiles in auto mode or manual settings to achieve maximum performance on your computer.
Afterword
In a nutshell, something like this. Someone, of course, will say that you shouldn’t bother with all this for the sake of some percentage increase and smoothness of work - your right.
I love tinkering with the system and bringing its speed, convenience and all that stuff to new heights, even if not always great And x, but then b O more, that is, speed up the processor at least somehow.
Let's see what happens for you. In general, I recommend at least trying it.


