How to copy applications to a memory card. How to transfer applications from phone to memory card in Android. Setting up an SD card as internal memory
Memory has one property: it is never enough. The smartphone you just bought delighted you with countless gigabytes inside: but now it’s cramped, like in a trolleybus at rush hour.
And sticking out outside, all so restless, is a Micro SD card that you just can’t manage to fill!
It's a tempting idea to move applications from internal memory on the map! True, its implementation sometimes requires a subtle approach. Let's consider this.
Transferring applications to a memory card using standard methods
Let us note right away: this feature is not present in all versions of Android. It first appeared in version 2.2 of Froyo. And in 4.4 KitKat, the developers blocked the installation of applications on the memory card altogether. Therefore, everything written in this section will be useful only to owners of smartphones with Android no lower than 2.2 and no higher than 4.3.
Can any program or game be transferred to Micro card SD? No, it all depends on whether the developer has provided for this possibility. To transfer an application to a card, first make sure it has enough free space.
Go to the “Settings” menu, open the “Applications” section. Tap on the application you would like to transfer. The settings will show which partition it is installed in. If it is installed in the main memory and, you can transfer it with one tap.

This method certainly works. But looking at each application separately is quite tedious.
Convenient means of transferring applications to a memory card
Fortunately, there are alternative means transfer. Let's consider the most relevant one now - the FolderMount program. With its help, you can even transfer applications that in a regular way it will not be possible to transfer.
- Make sure your smartphone is rooted. Instructions.
- Install FolderMount and give it root access when it asks.
- Look in the Application Analyzer for a list of all applications that can be migrated.
- When FolderMount prompts you to create a pair (a folder on the memory card corresponding to a folder in the main memory), agree.
- Proceed with the transfer, which may take for a long time, depending on the folder size.
- When the transfer is complete, click on the needle icon next to the transferred folder. Wait until it turns green. That's it, the folder on the memory card is mounted to the main disk.

The strength of this application is that it works on Android versions up to 5.0, where regular transfer no longer provided.
However, for full use programs will have to be used paid version, costing the equivalent of 1 dollar.
On the other hand, is it really expensive to fully expand the memory of your smartphone?
Some tricks to free up main memory
- The phone constantly strives to transfer applications to the internal card of a limited size, ignoring the external one, which is much larger? In most cases, internal memory can be repartitioned. Then almost all of the drive's memory will be allocated for system partition, remainder internal map can be made hidden, and the system will have no choice: applications will be installed on an external Micro SD. To repartition memory there are special utilities, which must be selected based on the smartphone model and chipset. Their review is a topic for a separate article.
- Do games weigh many hundreds of megabytes, or even gigabytes? Fortunately, it is customary to store media data in a so-called cache, which can often be downloaded separately and placed in Android folder on the map. The main application file will still have to be installed in main memory. But it doesn’t matter: the cache from the card is perfectly readable.
- Buy cards of at least grade 10. Yes, they are noticeably more expensive than budget class 4, but the data reading speed is incomparably higher. This way you won’t swear at your phone because of the unbearable slowdown.
- Don't want to deal with all of the above? Then buy a phone without a memory card at all. These are, in particular, all Nexus models, some popular Samsung flagships and LG, Xiaomi and Meizu. True, to expand the memory, you will have to buy an OTG flash drive with a plug Micro USB. It can only be used to work with video, music and other data, but not with applications. And it will cost more than an SD card of the same capacity. But all your programs and games will fit in the main section.
With the development of technology, content is becoming more and more voluminous, which leads to constant shortage free space on our devices. Fortunately, many smartphones have a special slot for a memory card, with which you can significantly increase the amount of free memory on your phone. Some users refuse to purchase SD cards and hope that the internal memory of the device is enough for them. They often make mistakes and still purchase microSD, which is perhaps difficult to do without. As a result, there is a need to move all the data accumulated over months (and possibly years) to a memory card. This is exactly what will be discussed further. In this article, we will take a closer look at how to transfer applications from internal memory to an SD memory card in Android. Let's figure it out. Go.
Let's look at popular utilities
The ability to transfer applications, unfortunately, is not available on all versions of the Android operating system. Therefore, only owners of Android above 2.2 Froyo (inclusive) and below 4.4 KitKat can perform this operation. Also, this cannot be done with every application. It is necessary that the developers provide such an opportunity, otherwise you will not succeed.
Now let's move on directly to how this is done. The first thing you need to do is open “Settings” and go to “Applications”. Select the utility or game you would like to move. If the program is installed in the main memory, you can move it by clicking the “Move to SD card” button. In this way, one by one, transfer each available program.
![]()
You must click the corresponding button in the application properties
If there are a lot of applications on your smartphone, this method can be tedious, because you will have to open each utility in turn and add it separately. So, this process can take you the whole day. Fortunately, there are more comfortable ways to solve this problem.
For example, use special utility, which is called FolderMount. With its help, it will be possible to move even those programs that are not available for transfer in the standard way.

For the application to work correctly, do not forget about root rights
To install and use FolderMount, you must be rooted. Then download and install this utility on your smartphone. Next, you will need to grant the program root rights upon its request. Through the "Application Analyzer" you can see a list of all games and programs that are available for transfer. FolderMount will then prompt you to create a folder on the SD card that matches the internal memory folder. Agree to this action to begin the data movement process. All this may take some time. Depends on the size of the folder being moved. When FolderMount completes the operation, tap on the pin icon located next to the folder. As soon as she becomes Green colour, you can close FolderMount, as this indicates that the partition has been mounted.

Continue to follow the instructions
The application cache is a very important component and often takes up even more free space than the program itself. Luckily, the cache can also be moved to a memory card using FolderMount. After launching the application, tap on the “+” icon located at the top right. In the input field, write the name of the game or program whose cache you want to transfer. Then select the cache folder, which you will find along the path “SD/Andoid/obb/utility name”. Next, in the “Destination” section, select the folder on the SD card where the cache will be moved. After filling out all the items, tap on the pin icon, as in the previous case, and wait until it turns green.

Usually the cache size is quite large, so you will need to wait
The undoubted advantage of this utility is that it is available for all versions of Android. In some cases you may need full version FolderMount. However, do not rush to get upset, it costs only one dollar. Agree, this is very little money for a comfortable and complete expansion of the memory of your phone.
In addition to FolderMount, there are other programs that allow you to transfer games and utilities from internal memory to microSD. One such program is Link2SD. Very easy to use, convenient utility, which also copes well with the task.

The application displays information on the size of programs in the list and card of each of them
Another great one software- AppMgrIII (App 2 SD). It is also free and perfectly solves the problem of data transfer. In addition, using AppMgr you can clear the cache and delete junk files from a smartphone. In AppMgrIII, all programs on your smartphone are divided into groups:
- On Phone. Those that are stored in the internal memory and can be transferred to microSD.
- On SD Card. Those that are already stored in external memory.
- Phone Only. Here are those applications that cannot be moved.

First of all, pay attention to the “Movable” tab (On Phone, Movable) and the cache size
If you want to immediately install games on a memory card, then unfortunately, this will not work. In any case, the game will be installed on the main memory, and from there it will have to be transferred to the SD card. This function is only available through the Move2SDEnabler utility.
These are the ways to move games and applications from the main memory of a smartphone to external memory. As you can see, this is done quite simply and quickly. Working with microSD is much more convenient and enjoyable, so feel free to copy all your data there. Write in the comments whether this article helped you understand the issue and share your experience of carrying out similar operations with other users.
Applications in the Android OS are installed by default in the internal memory section. Therefore, owners of devices with 8/16 GB drives often face a lack of free space on their Android device, which can be solved by transferring applications to an SD memory card. If you do not do this, you will lose the ability to install programs on your smartphone or tablet; you will not be able to download data from the Internet or receive a file via bluetooth/NFC/Wi-Fi. Because for these purposes, internal memory is used by default.
In order to continue to fully use your smartphone or tablet, you need to transfer massive applications to an external memory section. How to transfer applications from internal memory to an SD card on Android, read on.
Preface
Applications consist of two main components - the program itself and the cache. The latter is additional file for correct operation, not to be confused with temporary data. This approach is most often used in games where developers place graphics or additional content, volume 15-100 MB and up to 2-3 GB. Whereas in most programs, due to its small size, separating the cache into an additional file does not make sense.
Early versions of Android allow you to transfer the cache to a memory card. At the same time, it is worth mentioning that this function must be supported by the OS, for which the manufacturer and developer are responsible and must enable portability in the application. Otherwise, you cannot do without ROOT rights.
Standard method
Android devices up to 4.0 and some models with version 4.2 and higher allow you to move applications and/or cache through the settings menu. To do this, you need to open the device settings, the “applications” item and select the desired program. After information about the occupied memory capacity, there is a “move to SD card” button. Don't be confused by the different name.
Main advantages:
- Simplicity. No ROOT rights required.
Main disadvantages:
- Moving applications to an SD card is not available on all devices.
- You cannot migrate an application if the feature is not implemented by the developer and manufacturer.

Third Party Applications
If the standard method does not work or is not convenient, it is recommended to try as an alternative third party programs: AppMgr III (App 2 SD), Link2SD or Folder Mount. The listed utilities allow you to identify roaming applications, view detailed information about occupied space, etc.
AppMgr III (App2SD)
A simple and not overloaded application for transferring programs to a memory card, viewing free space, clearing temporary cache, etc. To move an application:
- Open hidden panel by clicking on the 3 bars at the top left of the screen.
- Select "Move applications".
- On the “Movable” tab, mark the program.
- Confirm the move in a new window.
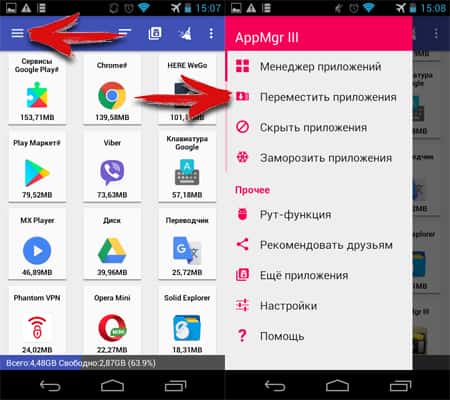

If you grant AppMgr III ROOT rights, the program's capabilities will expand, allowing you to transfer previously unavailable applications.
Main advantages:
- Information content.
- Additional functions: freezing programs, quick cleaning temporary cache, etc.
- Optional availability of ROOT right
Main disadvantages:
- On devices where app transfer is blocked at the system level, roaming is not supported.
- Additional features are not available without ROOT rights.
- Some functions are hidden in free version programs.
Link2SD
More functional utility, with support for transferring applications to a MicroSD card in three different ways:
Link
Application, including system ones, and all related files, are transferred to a previously created 2nd partition on the MicroSD card. At the same time, a link is created so that the system continues to “consider” the moved application installed in the internal memory section. ROOT required.
External Data Folder Link
The method is similar to the previous one, but creating additional section not required on a microSD card. This best option, if you need to transfer a large cache of a game or program. The instructions are simple and consist only of confirming the actions:
- You need to select the application and click on the “send” button.
- Select which data needs to be moved.
- In a new window, select a section if the map is divided into two or more parts.
- Wait until the procedure is completed.

Transfer to MicroSD card (App2SD)
The method is similar to that described for AppMgr III. Allows you to transfer applications and cache. ROOT is not required.
Main advantages:
- Information content.
- Wide range of options for transferring cache and applications.
- It is not necessary to have ROOT rights for the App2SD method.
Main disadvantages:
- Moving does not work on devices where the function is blocked at the system level.
- For full-fledged work ROOT required.
- Most features are not available in the free version of the program.
Folder Mount
The utility allows you to transfer folders with application data, leaving links for the system to save correct operation. To move you need:
- Launch Folder Mount and create a pair. To do this, click on the “+” button on top, or in a hidden window on the left, which opens at the click of a button in the form of three stripes.
- Set parameters. The name is used to understand which application was transferred. Source – the folder that needs to be moved. Destination – Folder for the final location.
- Click the checkmark icon at the top.
- In the window that appears, make a choice: “yes” - the final folder will be created automatically, “no” - select the final folder manually.
- Wait until the files are transferred.


Main advantages:
- Easy to transfer applications.
Main disadvantages:
- Requires ROOT for full operation.
How to transfer applications to a memory card using Adoptable storage
The function is available on all devices starting from Android 6.0. The principle of operation is to create a single data array from internal and external storage. After activation Adoptable storage, by default, applications are installed on the internal drive, after which they are transferred " Standard way", described at the beginning of the article, on outer area– MicroSD. The Adoptable storage method does not require ROOT rights, but requires preliminary formatting of the memory card, which will erase all existing information.
Instructions for activating Adoptable storage:
- Insert a MicroSD card and wait for a suggestion about how to use it in the notification bar. The gear icon will allow you to customize the map.
- In the new window, select “Internal memory” and click “next”.
- Confirm the action and click on the “clean and format” button. Please note that all data on the MicroSD will be deleted.
- Wait until formatting is completed.
- The system will offer to transfer part of the data to external storage to free up space on internal disk. It is not necessary to transfer files immediately.
- After that, go to settings, then applications. Select the program and select “storage” in the new window. The “change” button will allow you to move the application to an external area of the shared disk.
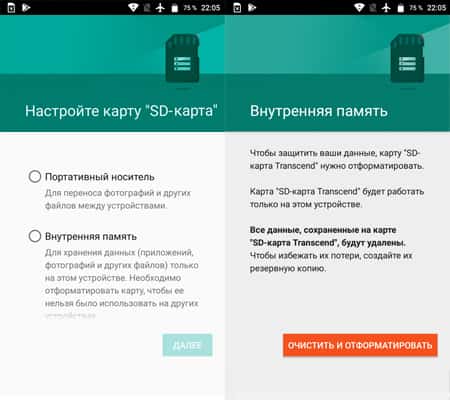

Important! To use Adoptable storage, it is recommended to use a memory card with high speed data exchange, at least 10th grade. Otherwise, the performance of the device will decrease.
Main advantages:
- Simplicity of the method.
- Not required ROOT rights.
Main disadvantages:
- MicroSD data is encrypted, which prevents the card from being used in other devices. If the device fails, you will not be able to retrieve photos from the memory card.
- Only devices running Android 6.0 and higher are supported.
- For efficient work, required MicroSD card with high data transfer speed.
Conclusion
If there is not enough internal space, and you are wondering: how to transfer applications to a memory card on Android, one of the methods described above will definitely help. The easiest one is to check the movement using the App2SD method in the settings. Owners of devices with modern version Android, 6.0 and higher, Adoptable storage method available. Otherwise, you will need ROOT rights to move the entire application or just a folder with massive data, which Folder Mount and Link2SD can do.
Sooner or later, every user of Android devices is faced with a situation where the internal memory of the device is about to run out. When you try to update existing or install new applications, in the store Play Market a notification pops up stating that there is not enough free space, to complete the operation you need to delete media files or some applications.
Transferring Android applications to a memory card
Most applications are installed in internal memory by default. But it all depends on what installation location the program developer specified. It also determines whether it will be possible in the future to transfer application data to external card memory or not.
Not all applications can be transferred to a memory card. Those that were preinstalled and are system applications, you can’t move it, at least if you don’t have root rights. But most downloaded applications tolerate the “move” well.
Before you start transferring, make sure there is enough free space on your memory card. If you remove the memory card, the applications that were transferred to it will not work. Also, you should not expect that applications will work in another device, even if you insert the same memory card into it.
It is worth remembering that programs are not completely transferred to the memory card; some of them remain in the internal memory. But the bulk is moved, freeing up the necessary megabytes. The size of the portable part of the application is different in each case.
Method 1: AppMgr III
Free AppMgr application III (App 2 SD) has proven itself as best tool to move and delete programs. The application itself can also be moved to the card. It's very easy to master. There are only three tabs displayed on the screen: “ Movable», « On SD card», « In phone».
After downloading, do the following:
1. Launch the program. It will automatically prepare a list of applications.
2. In the tab " Movable» select the application to transfer.
3. In the menu, select “ Move application».

4. A screen appears that explains which features may not work after the operation. If you want to continue, click the appropriate button. Next, select “ Move to SD card».

5. In order to transfer all applications at once, you need to select the item with the same name by clicking on the icon in the right top corner screen.

Another one useful feature - automatic cleaning application cache. This technique also helps free up space.

Method 2: FolderMount
FolderMount is a program created for full transfer applications along with the cache. To work with it you will need ROOT rights. If you have them, you can even work with system applications, so you need to select folders very carefully.
To use the application, follow these instructions:
1.After launching, the program will first check for root rights.
2. Click on the icon + " in the upper corner of the screen.

3. In the field " Name» Write down the name of the application that needs to be transferred.
4. In the line " Source» Enter the address of the application cache folder. As a rule, it is located at:
SD/Android/obb/
5. " Purpose" - the folder where you want to transfer the cache. Set this value.
6. Once all the parameters are specified, click the check mark at the top of the screen.
Method 3: Move to SDCard
The easiest way is to use the Move to SDCard program. It is very easy to use and takes up only 2.68 MB. The app icon on your phone may be called " Delete».
Using the program looks like this:
1. Open the menu on the left and select " Move to map».

2. Check the box next to the application and start the process by clicking " Move" at the bottom of the screen.

3. An information window will open showing the moving process.

4. You can carry out the reverse procedure by selecting “ Move to internal memory».
Method 4: Standard means
In addition to all of the above, try to transfer using built-in tools operating system. This feature is only available for devices with Android version 2.2 and higher installed. IN in this case you need to do the following:
1. Go to " Settings", select the section " Applications" or " Application Manager».

2. By clicking on the corresponding application, you can see whether the button is active Transfer to SD card».

3. After clicking on it, the moving process begins. If the button is not active, then this function is not available for this application.

But what to do if the Android version is lower than 2.2 or the developer did not provide the ability to move? In such cases it can help third party software, which we talked about earlier.
Using the instructions in this article, you can easily move apps to and from your storage card. And having ROOT rights provides even more opportunities.
During use Android smartphone files inevitably accumulate in his memory. Over time, there are so many of these files that they take up all the free space and the user is faced with a lack of free space when installing applications or downloading new files.
This problem can be partially solved by moving files to a memory card. Such user files how photos and videos can be painlessly transferred to a memory card and thereby free up some space in the internal memory of your smartphone.
In order to move files from internal memory to a memory card, you must first install file manager. For this task Any will do file manager, but it is better to choose one that clearly identifies the device’s internal memory and memory card. For example, such a function is available in the application.
Install this file manager and launch it on your Android smartphone. Once launched, you will see two folders: “Device” and “SD Card”. The “Device” folder is the internal memory of your Android smartphone. Open this folder and find there the files that you would like to move to the SD memory card.

Let's say you find a file that you want to move to your memory card.

In order to perform the file transfer operation, you need to check the box next to the desired file and click on the “Move” button, which is located in the lower left corner of the screen.

After this, the “Cancel” and “Paste” buttons will appear at the bottom of the screen. The “Cancel” button cancels the transfer of files, and the “Insert” button transfers the previously selected files to the folder that is currently open.

Now you need to click on the “Home” button in the upper left corner of the program. So you will move to home screen file manager.

Then you need to go to the SD memory card. To do this, click on the “SD card” folder.

After this, on the memory card you need to open the folder into which you want to move the files and click on the “Insert” button.

After this, the selected files will be moved from the internal memory of the smartphone to the SD memory card.


