Automatic configuration of the asus rt n12 router. Manual configuration of the ASUS RT-N12 router. LAN and DHCP
Imagine: hurrying to work in the morning, you went into the kitchen to have breakfast. You turn on the kettle, and it answers you: “The device cannot perform this operation. Update the firmware! You turn on the toaster and hear: “ Software outdated. Install the update!”...
The day is not far off when everything around us will be connected to the Internet, and it’s time for us to prepare for it. How? Well... first, let's learn how to configure a router - a gadget that connects devices into a local network and provides them with access to the Internet. Today I will tell you how to configure a router using the example of a typical Asus RT-N12 D1 home segment model.
How to set up a router: instructions on example Asus RT-N12 D1
First start
So here it is, shiny and new, straight out of the box. The first thing experienced users do is install the latest version of firmware, which maximizes the potential of the device. Firmware for other models must be obtained only from the manufacturer’s website! Otherwise, your router may turn into a horned “brick”.
Procedure for updatingfirmware:
- Download the firmware to your computer and unpack the archive.
- Connect the power supply to the router and connect it to the mains, then turn on the device with the “Power” button.
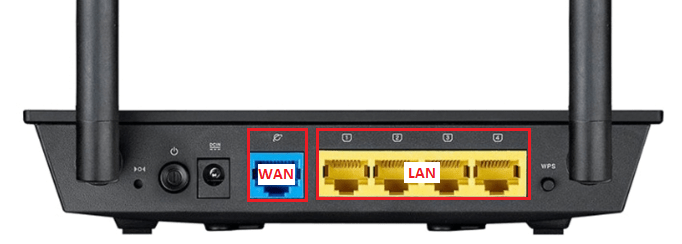
- Connect the router to the computer using the patch cord ( network cable): insert one end into the connector of the PC’s network card, and the other into any of the LAN ports of the device. On the Asus RT-N12 D1 these are yellow sockets 1-4, the blue WAN socket is for the Internet provider cable.
- Log into the router’s web interface: launch any browser and type 192.168.1.1 (its local IP) into the address bar. In the authentication window, enter: username – “admin” and password (password) – “admin”. This information is indicated on a label that is glued to the bottom of the device.
The login information for the web interface (popularly called the “web face”) may be different. For example, network address– 192.168.0.1 or “tplinklogin.net” (on some tp-link models), login with password – “mts”, “beeline” or something else. The main thing is to know where to look for them - on the factory label on the underside of the case of any router. Always.

- First after entering the web interface of Asus RT-N12 D1 and other similar Asus models you will see a window quick settings Internet. We are not interested in it yet, so open the second tab and click on the icon in the form of a house - this will take you to the main menu.

- Go to the “Administration” section and open the “Firmware Update” tab. On devices of other brands, this section may be called “System” or “System Tools”, and the desired menu item may be “Software Update” or “Upgrade Firmware”.
- At the top of the window is indicated Current version firmware. If the one you downloaded is newer, click the “Select file” button and specify its location. By clicking “Submit” you will start the update.
Attention! Do not interfere with the firmware installation process under any circumstances - do not press any buttons on the device, do not disconnect the network cable, do not turn off or restart the computer.

- When the firmware is installed, exit the web interface and press the “Reset” button on the device body, which will reset the settings.
Setting up an Internet connection (WAN)
Fast automatic setup
- Connect your provider's cable to the router's WAN port (in my example, it's the blue socket marked with an icon that looks like a logo Internet Explorer, on some other models it is signed “INTERNET”).
- Open the web interface. The Quick Internet Setup feature can automatically recognize your connection type. Click "Go" in the first window and do the following:
- Change your web access settings. It is not safe to leave this default data.

- Enter the connection login and password that your service provider gave you.

- Give your wireless network unique name and create a network key (password for connection).

This completes the quick settings. Click Apply.
Manual setting (for experienced)
Ask your provider for the following information:
- WAN connection type.
- Your name and password account.
- The Mac address to which your contract is linked (if your Internet provider does not use MAC identification, then this is not necessary).
- IP address, default gateway and subnet mask (if you are assigned a static IP).
- DNS addresses if automatic connection is not used.
- If necessary, other information: VPN server(at PPTP connection and L2TP), pppd parameters, service name, access concentrator name, etc.
Go to the main menu of the “web muzzle” and in the section “ Additional settings » click « Internet" Basic WAN parameters are located on the “ Are common».

First of all, in " Main parameters» set your WAN connection type. The rest is “Enable WAN, NAT, UpnP”, leave as is, if the provider has not specified anything about this.
IN " At a construction siteIP addressesWAN"Leave the value "automatically" if you have not been issued a static IP, which is an additional paid service.
« DNS WAN» also leave it automatic or mark “No” and enter it manually. For example, public from or .

IN " Account settings"Be sure to provide your username and password. The rest depends on the circumstances.

IN " Special requirements supplier"If necessary, write down VPN address, hostname and Mac specified in the contract. Click Apply.

Setting up a wireless network (WLAN)
In chapter " Wireless network “The most basic things are also located on the “General” tab.

- SSID– WLAN name. You can give anything.
- BroadcastingSSID– determines whether gadgets with Wi-Fi will see your mesh in the list available connections. If you check " hideSSID", then some devices will not be able to connect to it.
- Wireless mode. The optimal option is “Auto”, it allows any 802.11b/g/n devices to connect to the router without speed limitation.
- Broadcast channel width. Default is 20/40 MHz. To increase throughput to maximum, set to 40 MHz. If there are frequent failures and interruptions in communication, reduce it to 20 MHz.
- Channel(1-13), on which the transfer is carried out. If the connection is consistently good, leave the default selection. If there are frequent breaks, you can go through the channels and stop at the one with the least problems.
- Option " Extended channel» allows you to use additional channel when operating in some modes.
- Authentication and encryptionWPA ensure data security during transmission. Optimally – WPA2-Personal and AES.
- Pre-shared keyWPA– a sequence of any characters, from 8 to 63, which will be used for encryption.
- Key rotation interval– after the number of uses specified here, the key must be changed. You can put 0.
For those who have never set up Wi-Fi, all this may seem complicated. Technology has been invented to make life easier for beginners Wireless WPS. It allows you to transfer wireless network settings from a Wi-Fi adapter to your router literally “over the air.”
On the back panel of the Asus RT-N12 D1, if you noticed, there is a “WPS” button. On some older devices it may be called "QSS" or "EZSetup". So, to transfer the settings, just press this button first on the router, then on the adapter and wait a couple of minutes.

Insisting on a local network (LAN)
Attention! If you don't understand the purpose of these parameters, leave them as they are!
The main parameters of the local network are set on the first two tabs of the menu of the same name - “ LAN IP" And " DHCP server».
On the " LAN IP"The IP of the router in the local network is indicated. Here, as you can see, the address is the same as written on the label, and you can change it (within the available address pool).

Further - "ServerDHCP"(DHCP is a dynamic host configuration protocol). If enabled, connected devices will automatically obtain IP addresses. If it is turned off and manual assignment is activated, then, accordingly, they will not.
Also on the “DHCP” tab you can set:
- the starting and ending address of the pool within the subnet (for example, the subnet allows the use of 256 IP addresses, but for security purposes we will limit them to the number network devices, which we have at home);
- IP rental time;
- main gateway (in some cases the provider’s gateway IP is specified here);
- IP DNS and WINS servers (the latter are used in network structures based on NetBIOS);
- IP and Mac addresses of hosts that bypass DHCP (with manual IP assignment).

Most home users find it more comfortable to hold DHCP server enabled, that is, do not change anything in this section.
Firewall
A firewall is the protection of an internal network from external penetration by filtering incoming and outgoing traffic. Filtering is carried out according to the rules created by the administrator. It is recommended to enable it if you are not sure that all your gadgets are reliably protected by a software firewall.

On the " Are common» is produced:
- enable/disable firewall;
- activation/deactivation of protection against DoS attacks ( optimal value- Yes);
- selecting the type of packets to be registered (lost, received, both types, or absent);
- allowing/prohibiting responding to ping requests from the Internet (optimally – no).
On the " FilterURL» indicate the addresses of sites that need to be blocked.

« Filter keywords » will prevent loading pages where these words appear.

« Network Services Filter» prevents listed hosts (clients) from accessing certain network services. Uses 2 types of filtering – black and white list.
- Hosts on the blacklist are denied access to the specified services, while others are allowed.
- Khostam from whitelist Only access to specified services is allowed. The rest are prohibited.
Here you can configure the duration of the rules.

General menu
Finally, let’s go through the sections of the “General” menu.
Attention! If the purpose of an option is not clear to you, it is not recommended to reconfigure it!
- "Network map"– displays current connections to LAN and WAN, parameters Wi-Fi security, information about the router and clients. Allows you to change individual parameters, for example, encryption options, network key, etc.

- "Guest network"– allows guest Wi-Fi networks to use the router to access the Internet, but denies access to LAN resources.

- "Traffic Manager" - allows experienced users manage QoS – distribution technology network resources depending on the type of traffic and established priorities. For example, voice traffic wider bandwidth is provided and high priority than the rest. Works in automatic and user modes, the first is enabled by default. Optimally configured.

- "Parental control". The purpose of this section, I think, is clear to everyone. It allows you to limit the amount of time you can use the Internet for certain hosts. Those who find it difficult to figure this out on their own can watch the instructional video.

As you can see, a router is a complex thing and can do much more than just transfer traffic from one network to another. We looked at only the most important options of the Asus RT-N12 D1, and if I decided to describe them all, it would be a very, very long article. But I think we have achieved the main thing: now you can configure routers of this type in no time.
Hello! Let's set it up now Asus router RT-N12+. A short review, photos, characteristics and reviews about this router you can read (don't forget to leave your feedback, it is very important to us :)). I am sure that these instructions will be suitable for other Asus RT-N12 routers different versions, there are a lot of them, I wrote about this in the article linked above. Why, using these instructions you can configure almost any router Asus. I have on this moment There is only RT-N12+, so we will torture it. When the opportunity arises, I will definitely write about other models.
Now we’ll quickly set up our Asus RT-N12+, I’ll tell you how to connect everything, go to settings, set up the Internet, set a name Wi-Fi networks and change your password. I will provide a link to instructions for updating the firmware. In a few minutes you will already be drinking tea and surfing the Internet via Wi-Fi :)
I will not review this router, as I wrote about it in detail on its page (link at the beginning of this article). Let me just write that the router looks very beautiful and stylish, it works stably, and it is intended mainly for home use. Suitable for connecting tablets, phones, laptops, TVs, etc. via Wi-Fi, and if not possible wireless connection, then you can connect 4 devices via cable. For a small apartment, or small house, this is a great option.
We will configure it according to the following scheme:
- Connection and entering settings
- Setting up Asus RT-N12 using the Quick Setup Wizard
- Setting up an Internet connection with a WAN provider (if it didn’t work through the quick setup wizard)
- Setting a Wi-Fi password and changing the wireless network name
- Changing the password to access settings.
To configure the router, we will definitely need information about what type of connection your provider uses and whether it binds by MAC address u. And if the type PPPoE connections, L2TP, or PPTP, then you will need additional data, such as username, password, possibly IP, etc. All this data is provided by the provider. How to find out the connection type, I .
Connection and quick setup of Asus RT-N12+
Connect power to the router. If the power indicator does not light up, check whether the power is turned on with the button on the back of the router. Connect the network cable from your provider or modem to the WAN connector. And in one of 4 LAN port ov connect the cable that connects the router to the computer. If you do not have a computer or laptop, or do not have a network cable, then you can configure the router via Wi-Fi. But it’s better to use a cable, then you can disconnect it from the computer.

If you configure via Wi-Fi, just connect your laptop (or another device, you can configure it from a tablet or phone) to the wireless network, which will appear immediately after turning on the router. The network will be called Asus and will not be password protected.

It may be that the default network will be called differently, or will have a password. Perhaps someone has already tried to configure our Asus RT-N12. I always recommend doing a factory reset before setting up. Press and hold the button on the back side for 10 seconds (showed her in the photo above). When you release, all the indicators will go out and the router will start to turn on.
Go to the control panel
After everything is connected, open any browser and type the address 192.168.1.1 . Settings should open immediately. If this does not happen, or something went wrong for you, then take a look. We should see the Quick Setup Wizard. To begin, press the button Go.


On next page we need in the field Network name (SSID) indicate the name of your Wi-Fi network, and in the field Network key set a password to connect to this network. Write this password down somewhere as well.

The router will think and reboot. A Wi-Fi network will appear with the name we just set. Connect to it with the new password that we just set.

After connecting, go back to the settings. A window with connection information should appear. Click Further.

The router will ask you to provide a username and password to access the settings (which you specified during the setup process).

If everything is exactly as I described above, then you are very lucky. This most likely means that your ISP is using a connection technology Automatic IP, and the router configured everything itself. By the way, the Internet through the router should already be working. This completes the router setup.
But, if your connection type L2TP, PPPoE, or PPTP (providers: Beeline, Dom.ru and others), then the setup will go a little differently. You will just need to manually set some parameters.
Internet setup PPPoE, L2TP, PPTP (Dom.ru, Beeline) on Asus RT-N12
If your provider uses PPPoE technology, PPTP, L2TP, or Static IP, then after running the Quick Setup Wizard, after checking the connection, the router should prompt you to select the type of your connection.


You may need to specify some other parameters. IP address, service name, etc. It all depends on the type of connection and your provider.
During the setup process, as soon as the router establishes a connection to the Internet, it will prompt you to set up a Wi-Fi network, etc. Complete these settings as I showed above in this article.
You can always do it yourself change WAN settings(internet connections). Just go to home page settings (there is a button in the Quick Setup Wizard), and open the tab Internet - Connection.

On this page you can always set the most important settings Internet connection. If the Internet through the router is already working, you have changed the wireless network name and password, then you can finish setting up the Asus router. And I’ll also show you where and how you can change the most important settings.
Setting up Wi-Fi and changing the password
If you want to change the name of your Wi-Fi network, or change the key that you use to connect to Wi-Fi, you can do this at any time in the router settings right on the main page. Simply enter a new username and/or password and click Apply.

More wireless network settings, including channel settings, can be found on the tab Wireless network(left).
After changing the network name or password, do not forget to reconnect your devices to Wi-Fi. If you have connection problems (usually after changing the password), then delete your network and connect to it again.
Protecting the settings of the Asus RT-N12 router
During the setup process, we already asked New Password to access the control panel. But, if you haven’t done this, or want to change your password, then go to the tab Administration - System. Enter twice same password, and press the button Will apply b.

Now, to log into the admin panel, you will use this password. Don't forget it :) On this page you can also change the time zone, assign an action to the WPS button, enable Telnet, etc.
If you have read this article to the end, and you still have a desire to do something, then you can update the firmware of your RT-N12. There is a lot on this topic.
This setting Suitable for ASUS RT N12vp and ASUS RT N12e routers. What can you say about this router? This is exactly the router that is in my apartment, I bought it for an incredible amount of money, about 1 thousand rubles, it seems in the CSN, it was not difficult for me to set it up and forget it. The fact is that at that time there were no funds, and renting from a provider, like you, was not my style. Chose the most a budget option and have never regretted it. ASUS firmware RT N12vp is completely translated into Russian, it has a cool appearance, its network coverage radius is quite enough to broadcast around the apartment without problems. I would also like to note the pleasant interface of the web muzzle. As for quality, for two years there was not a single malfunction, once I caught a virus, but after resetting to factory settings and changing the password, no problems arose. Of the shortcomings, I can only mention one: they burn too much led lamps, just like Christmas tree, interfere with sleep at night!
Appearance of the ASUS RT N12vp router

Router connection diagram.

A cable from a PC is connected to any yellow port. Blue WAN port, a cable from the provider is connected.
We have figured out how to connect the ASUS RT N12vp router, now let's try to configure it. You can enter the router settings using a browser; if you are unable to enter the settings, then read the instructions for setting up the network card:
Setting up a network card on Windows 7
Setting up a network card on Windows XP
To enter the settings, open your browser and enter the address: HTTP://192.168.1.1

Enter the login: admin and password: admin and press Enter.
If the specified login and password are not suitable, then you need to reset the router to factory settings, for this there is a button on the modem case, press and hold it for 15-30 seconds, then try to log in again.


Connection status, wireless network settings, number of devices connected to the router. We can change the language.
Setting up an Internet connection
To start setting up, you need to know your type of Internet connection, the following options are possible:
- DHCP, automatic IP
- Static IP
In my case, the Akado-Ekaterinburg provider issues static ip address, PPTP connection type.
Configuring ASUS RT N12vp and ASUS RT N12e in L2TP mode, go to the Internet tab and fill in the following parameters.

You do everything as in my screenshot, the only thing is that your access details will be different, you will check them with your provider, after you have succeeded in setting them up, click the apply button. The setup is complete, you can see the connection status on the main screen.

Settings for other connection types are made in the same way; if the connection cannot be established, I recommend contacting your technical support, perhaps there is a binding by MAC address, or, for example, you entered your login or password incorrectly, they will tell you about it.
WiFi setup
Now let's figure out how to configure wireless point Wi-Fi access on our ASUS RT N12vp. To do this, go to the Wireless Network tab.

We set the following parameters:
- SSID - name of the wireless network.
- Wireless network mode: auto.
- Authentication method: WPA2-Personal.
- Encryption: AES
- Preliminary WPA key- this is your Wi-Fi password.
Click Apply.
This completes the wireless network setup.

Connect to our network.
Links
Video
Found a typo? Select the text and press Ctrl + Enter
External view of the rear panel of the router.
1. Quick setup of a new router
If you are connected through a new (unconfigured) router, then when you open any browser, a quick setup page will automatically open.

You need to change the password to enter the router settings.


After this, a page with the configured parameters will open.


2. Login to the router
To enter the router settings, you must enter the address 192.168.1.1 in the browser line. After this, a window will open where you need to enter your login information - “Username” and “Password”. The default username and password are admin and admin.

3. Firmware update
The router firmware can be updated in the "Administration" section in the "Firmware Update" vlkdak. Current version The firmware is located on the official ASUS website.

4. Internet setup
In the "Internet" section in the "Connection" tab, the settings should look like this:
WAN connection type - Automatic IP.
Enable WAN - Yes.
Enable NAT - Yes.
Connect to the DNS server automatically - Yes.

5. Wi-Fi setup
To configure a wireless network, on the left, select the "Wireless Network" section, the "General" tab, where you need to change the following fields:
SSID - network name.
Authentication method is WPA2-Personal.
WPA encryption- AES.
WPA Pre-Shared Key - wireless network password.

Owners of the ASUS RT-N12VP model are strongly recommended to enable
Good day, dear friends! Today in this article we will look at the instructions for setting up the Asus RT N12 router; I’m sure it will help you set up the router of this model yourself. Here we will also give some examples of setting up the Internet on our router. popular internet providers: Rostelecom, Dom.ru, Beeline, etc. We will also set up this router for IP TV via set-top box.
STEP 1 - CHECK YOUR ROUTER SET
After unpacking the router, we see that the kit includes:
- Instructions for setting up and operating the router
- Patchcourt – UTP cable, crimped on both sides, you will need to connect the router to your computer.
- Power supply – power adapter of the router itself. Connects to 220.
STEP 2 - CONNECTING THE ROUTER TO THE COMPUTER (LAPTOP)
First of all, you need to turn on the router to the network (220), then insert the provider’s wire into a separate port (“WAN”), it usually differs from other ports in color. Take the patch cord (short wire included) and insert it into the first “LAN” port, insert the other end of the wire into network card(where the provider wire was inserted). On this ASUS connection rt n12 to the computer is finished.

STEP 3 - YOU NEED TO MAKE SURE THAT YOUR NETWORK SETTINGS ARE CORRECT.
To do this, you need to log in to the local connection. network-Properties- Internet Protocol Version 4 (TCP/IPv4) and Properties - Obtain an IP address automatically and Obtain a DNS server address automatically.

STEP 4 - ENTERING THE SETTINGS INTERFACE
After connecting the router, we need to go to the setup interface. As with all ASUS routers, login is carried out as standard. Open any browser ( Google Chrome, Opera, Yandex Browser, etc.). IN address bar dial 192.168.1.1. An authorization window will pop up in front of you 
The login and password are usually written down on back side router. According to the standard for ASUS, the login is admin, the password is admin. After logging in, the Quick Settings Wizard page will open in front of you. In order to better understand the setup process, I advise you to do everything in manual mode. To do this, go to the main page by clicking on the button in the form of a “house” in the right top corner. In some firmware you will need to click on the “next” button.

STEP 5 - INTERNET SETUP ON ASUS RT N12
First, let's set up an Internet connection. To do this, you will need an agreement with your Internet provider, which specifies the settings and type of connection. If you have lost your contract or for some reason it is missing, contact your provider’s support and find out the settings you need. Then go to the menu item on the right "Internet".

Dynamic IP address.
This is the simplest type of connection, used by such providers as Rostelecom Udmurtia, TDK-Ural, etc. Here, just select “Automatic IP” in the Type-WAN-connection field. Then be sure to check “Yes” in the “Enable WAN” and “Enable NAT” fields. You can also “enable UPnP” and put an end to “Yes” - this is required so that we do not have problems working with file hosting services.
If the provider has a link by specific MAC address, then you need to indicate it in the “MAC address” field. Most likely, this is the Mac address of your computer that was connected to the Internet. If you are setting up a router on it, then simply click the “Clone MAC” button. To accept the settings, do not forget to click the “Accept” button, after which the router will reboot.

PPPoE connection
This type of connection is used by most Internet providers - Rostelecom, Dom.ru, TTK, MTS. Select the WAN connection type “PPPoE”, opposite “Enable WAN” NAT UPnP", put the dots on "Yes".

Now the most important thing, in the Account Settings item, in the Username field - We indicate your login which is written in the contract or taken from support, in the Password field - we also enter the password that is specified in the login agreement.

Just like in the Dynamic IP settings, some providers have a link to the poppy address. If you are setting up on a computer that has been connected to the Internet, then simply click the “Clone MAC” button. If not, then you need to register it. After entering all the settings, click the “Accept” button
Step 6 - SET UP WIFI ON THE ASUS RT N12 ROUTER
For wifi settings on the ASUS RT N12 router, go to the “Wireless Network” tab. Here, first, in the “General” tab, we will indicate some data. SSID – network name, enter any word in Latin. “Authentication method” – be sure to set WPA2-Personal, “WPA Pre-Shared Key” – this is the password of your network, specify any, but not less than 8 characters. Click the “accept” button - the router reboots.

STEP 7 - SETTING UP IP TV ON THE ASUS RT N12 ROUTER
For IPTV settings in the ASUS RT N12 router you need to select the port through which the signal will go. If your provider also requires you to specify a VLAN ID, then this router does not have it (accordingly, it will not suit you). To select a port, go to The local network(LAN). Here, in the “Select IPTV-STB port” field, select the port to which you will connect the iptv set-top box. Next, click the “Accept” button.

After entering all the settings, reboot the router; to do this, click on the reboot button, which is located at the top of the settings interface. Wait for the router to turn on completely, this will take a maximum of 2-3 minutes. This completes the router setup.


