ASUS router model RT-N11p: connection and configuration. Setting up and connecting ASUS RT-N11P
Confidently took first place in the “Wireless Wi-Fi Equipment” category. The key role in this most likely was played by the top-end models of top-level routers introduced last year. However, the manufacturer also pays attention to the mass segment, in which several devices are offered on the Russian market today, which are quite difficult to navigate. The fact is that some of the models are available in various modifications and versions, so you should pay attention to this when purchasing.
The hero of this article has so far managed to avoid such confusion. The Asus RT-N11P currently exists in one configuration, and it is this configuration that will be tested in this article. The device is positioned in the mass segment - it has 100 Mbit/s wired ports and a single-band access point with a maximum connection speed of 300 Mbit/s. Considering that the manufacturer's software is unified in many respects for most models, we should expect high speed and a wide (for this segment) set of functions. In addition, the device is interesting because it supports alternative firmware versions, which may be useful for a certain category of users.
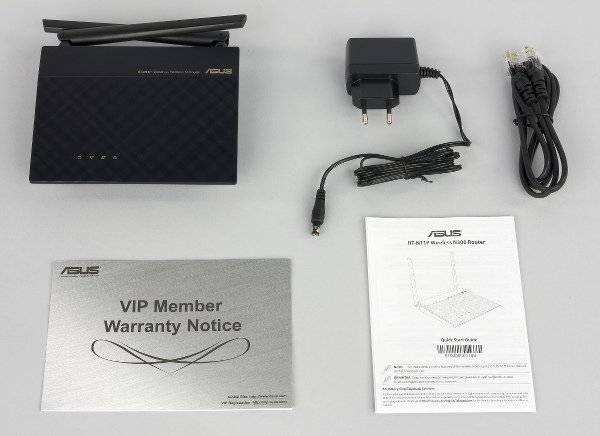
Contents of delivery
The router comes in a standard small cardboard box. It is decorated in dark colors and is completely localized. The packaging contains photographs, key features, detailed technical specifications and other useful information.

The delivery set is also traditional for the budget segment - a router, a 12 V 0.5 A switching power supply, one black patch cord, a warranty card and a very brief quick start guide.

The warranty period for the device is three years.
Appearance
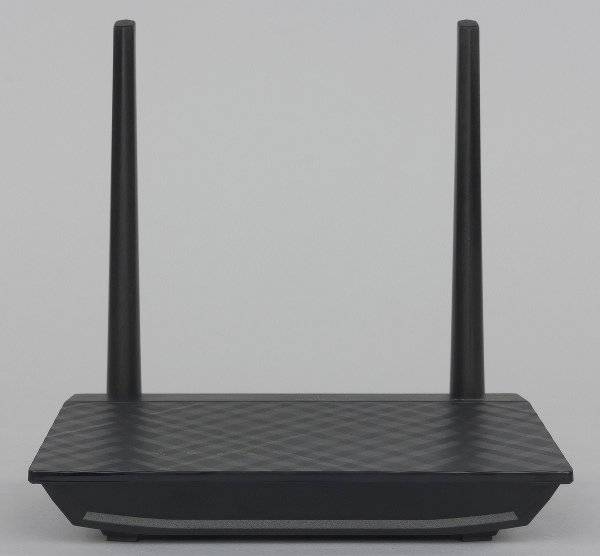
Most of all, in its appearance, the model is similar to the younger brother of top-end devices, obtained by reducing the size by half and removing one antenna. Overall dimensions are 146x111x34 mm excluding antennas.

The body is made of black matte plastic. There are four rubber feet on the bottom. In addition, there are holes for mounting on the wall in one of two positions - with the antennas up or to the right.

The front side has the recognizable “diamond” front panel design and a “rough cut” stripe at the top. In the lower left corner there is a block of four LED indicators.

They do not irritate with excessive blinking (only the Wi-Fi indicator does this), but they have a standard round shape, green color and look quite sad compared to the design in older models.

There are ventilation grilles on the side ends and bottom. There were no comments regarding the temperature even under high load.

On the back we see two non-removable antennas, five network ports without built-in indicators, a power supply input with a switch, and a WPS/reset button. Everything is located quite tightly, but for this class of models this is excusable.

There are no comments regarding the manufacturing quality of the device. The manufacturer keeps it high even in budget models. The design does not stand out in anything special, but it is quite practical and convenient for this segment.
Hardware configuration
The router is based on the Mediatek chip - MT7620N revision 0206. This family is one of the most popular options in the budget segment today. The operating frequency of the computing core is 580 MHz (an alternative version of the firmware uses a frequency of 600 MHz, which is also standard for RAM). A radio unit supporting 802.11n in the 2.4 GHz band with a maximum connection speed of 300 Mbps is built into the main processor. It also contains a five-port 100 Mbit/s switch. The amount of RAM SDRAM is 32 MB, 8 MB of flash memory is installed for firmware. Formally, in similar models, the option with 64 MB of RAM is more common, but if there is no USB port and related services that intensively consume this resource, you can use less.
There are no heatsinks on the chips, the cables from the antennas are soldered to the board, and there is space for a console connector.
In general, it is clear that the manufacturer tried to optimize the cost of the model without compromising its characteristics. For example, there are only four LEDs (and one of them, indicating the presence of power, is not controlled by software), a combined WPS and reset button, and four-pin network connectors.
The main testing of the router was carried out with firmware 3.0.0.376_3754. Additionally, we tested operation with an alternative firmware version, which will be described below.
Settings and features
The standard software of the router is similar to the previously reviewed models, with the exception of the absence of a USB port and related functions. The design and organization of the web interface, developed quite a long time ago, turned out to be, according to the manufacturer, so successful that the company rarely changes anything in them.
Let's take a brief look at the router firmware options. The “Network Map” page provides basic information about the current status of the router and clients.

IPoE, PPPoE, PPTP and L2TP modes are supported for connecting to the Internet. It is possible to access the operator’s local network when working with the provider’s access server.

There is a built-in DDNS client, including work with Asus' own service, NAT Passthrough for some protocols, and implementation of IPv6 in several modes. To access local services, DMZ, UPnP and setting your own port translation rules are used. The router supports working with IPTV services using multicast, allocating a port to the set-top box and tagged traffic. There is also a built-in UDP proxy service.

The settings for the local network segment are traditional - you can change the router’s own address, configure the range of DHCP server addresses, reserve addresses for clients, and add your own entries to the routing table.

The built-in wireless access point supports modern security technologies, including WPA/WPA2 with a password and RADIUS server, has output power adjustment, and can be turned on according to a schedule (one time range for weekdays and one for weekends).

There is also a page for setting up additional parameters, a MAC address filter, WPS and WDS functions. The user can organize up to three guest networks with their own names and security options.

The router is equipped with a firewall and DoS protection module. The first contains filters for URLs, keywords in links, and services. The latter can work according to a schedule, and the rules indicate the addresses and port numbers of the source and destination.
The “Parental Control” function allows you to select the Internet time for each client for a week, accurate to the hour.

Since the firmware is unified, implementing VPN services was easy. A PPTP server and client with support for PPTP and L2TP can be useful for organizing secure remote access to network resources.
Less interesting, in our opinion, is the use of a traffic management system, since the device belongs to the budget class and with active QoS and high load, the overall speed of Internet access can significantly decrease.

Diagnostic tools include ping, traceroute, nslookup and netstat utilities. In the same section, the user can use the WOL function to turn on power to clients on the local network.

The set of system options is also nothing original - changing the administrator password, working with the configuration, updating the firmware, setting the clock. Let us remind you that this manufacturer provides access to the router console via the telnet protocol. Although in this case, in the absence of USB ports, this is not very relevant.

Asus solutions have extensive capabilities for monitoring operation - in addition to the usual system log, you can view a list of wireless clients, as well as tables of DHCP server addresses, routing, port translation and current NAT sessions.
Alternative firmware
Using the MediaTek platform made it possible to transfer alternative firmware created by . The lack of a USB port in this model, of course, reduces the ability to expand the range of functions of the router, but some useful services were implemented thanks to non-standard solutions of the developer. But we must understand that for the mass user many of them will be uninteresting and complex.
However, code optimization and bug fixes will certainly be useful to everyone. Unfortunately, not all problems can be solved with new firmware. In particular, incorrect initialization of the network switch in the bootloader leads to connection for some time to all wired clients of the router to the operator’s network at the time the device is rebooted. To correct this situation, you can update the bootloader in the router with the version presented on the above project website.
Let us remind you that we have already tried this software in a test of the Asus RT-N65U model. In addition, a lot of information is presented in dedicated to this product. Therefore, here we will describe only the main features of the product for the RT-N11P. For the test, version 3.4.3.9-091_base was used, you can update to it (and return to the stock firmware) in the standard way via the web interface. The following description refers specifically to this modification.
The appearance of the interface is noticeably different in design from the original firmware. However, the most significant optimizations, corrections and improvements concern the built-in software modules.

Russian and English versions are provided, there is built-in help and notes for default settings. The start page provides additional information about the operation of the router, in particular processor and RAM load indicators, and there are cross-references to other pages for quick access to popular options.

As in the original firmware, you can find a VPN server and client here. Moreover, they support three protocols at once - PPTP, L2TP and OpenVPN.

The author excluded the little-demanded traffic management system (QoS), but left the useful function of monitoring speeds across interfaces. Graphs are also provided for processor and RAM load, which can be useful for analyzing the operation of the device under load.

The wireless access point, in addition to basic settings, has the ability to operate on a schedule, a MAC address filter, a choice of transmitter power and the number of streams, as well as several specialized parameters and modes.

It is possible to organize a guest access point with its own security settings and restriction of access to the main segment of the local network. There is also a useful ability to specify a fixed connection speed for clients, which allows you to “free” from the point of view of increasing processor load to limit the speed of their operation.

In the settings of the local network segment, the ability to force the speeds of wired ports has been added, disabling 802.3az (Energy Efficient Ethernet, disabling can help improve the quality of connection on some lines), the set of DHCP server capabilities and functions for working with IPTV have been expanded (in particular, IGMP/MLD hardware technology is used snooping, which allows you to more efficiently process multicast traffic on wired ports).

To connect to the Internet, there are IPoE, PPPoE, PPTP and L2TP modes, as well as special options for some providers. Several options for working with the IPv6 protocol have been implemented.

The built-in DDNS client received support for almost two dozen services. To access systems in the local segment, there are DMZ, UPnP, NAT-PMP and PCP, as well as manual configuration of port translation rules. It is possible to pass VPN traffic through NAT and several ALGs.

The firewall contains pages for setting up blocking by URL, MAC addresses and programming rules on LAN/WAN segments indicating system addresses and ports. All lists can use their work schedule.

In the system options, in addition to the standard set with password, configuration, firmware and time, it is possible to change the port number of the web interface, enable access to the console via telnet and ssh, direct access to the console for executing interactive commands and other features.

In the “Personalization” section, the user can change the action of the WPS/Reset button. Short and long presses can be used to control the LEDs on the body, wireless access point, Internet connection and other functions.

In addition, there is a service for determining the status of an Internet connection using external hosts and the ability to launch custom scripts when certain events occur.

The status of all interfaces can be monitored, including viewing connected wireless clients and their parameters.

Like the original firmware, in addition to the system log there are tables for the DHCP server, port translation, routing and current connections. Work with the Syslog server is supported.
Performance
The model under consideration is positioned in the mass budget segment. So the set of basic requirements is quite simple - stable operation of the Internet at speeds of up to 100 Mbit/s and wireless network service for smartphones and tablets.
Both firmware versions are compatible with Beeline Internet when connected via L2TP protocol. The connection is stable, there are no comments about the speed of operation. The load in the form of a p2p client is also quite capable of the router, while providing high speed operation at the level of 8-10 MB/s. But in this case, it is very advisable to set limits on the speed and number of connections in the program settings, otherwise it can occupy the entire Internet channel and all the resources of the router, so it will be uncomfortable to use other services. However, this is completely acceptable behavior for a device of this class. A similar remark applies to watching IPTV via multicast broadcasts while downloading files - without restrictions for a p2p client, the picture can sometimes “scatter”. With a reasonable load on the router, there are no complaints about watching TV shows, including via Wi-Fi.
Bench testing was also carried out with the two firmware described above - standard and alternative. So there are more graphs in this material. The first pair shows the results of assessing routing speed in IPoE, PPPoE, PPTP and L2TP modes when working with one/two flows and sixteen flows.


Since we are already familiar with this hardware platform, and we know the quality of Asus firmware, the high results are not surprising. As for the alternative version, it performs better than the original, which is especially noticeable in full-duplex tests with the PPTP and L2TP protocols.
Both firmware are capable of working with the provider’s network during VPN connections. There are no comments regarding their work in this scenario.


We tested the built-in VPN server with the PPTP protocol with all Internet connection options and modes without encryption and with MPPE128. The graphs show indicators averaged over three scenarios (reception, transmission and full duplex with four streams in each case).


First of all, let's pay attention to the significantly better results in this test for the alternative firmware. So if your tasks include implementing remote access to your home network, the recommendation to use an alternative version of the firmware is quite reasonable.
To test the speed of the wireless access point, we used the TP-Link TL-WDN4800 adapter (802.11n, up to 450 Mbit/s). Tests were carried out in one/two threads and in eight threads. The router was configured for maximum performance with WPA2-PSK AES and a wide channel. Three options for placing the wireless client were tested: four meters of line of sight, four meters behind one wall and eight meters behind two walls.


Before commenting on the results, let us remind you once again that today's 2.4 GHz wireless communications in urban environments can be completely unpredictable due to the large number of networks and other interference. So you need to treat these indicators very carefully.
As we can see, in general the firmware shows similar results in the test. As for the absolute values of speeds, they are quite consistent with the hardware configuration of the router.
conclusions
Of course, the attention of such a large company as Asus to the mass segment can only be welcomed. The RT-N11P router, despite some obvious signs of savings, has a good design, high quality workmanship that fully corresponds to the manufacturer's name, an expanded range of capabilities and decent performance.
The use of the MediaTek platform made it possible to achieve almost maximum performance for a given hardware configuration in routing tests. So the router can be safely recommended to users of any tariff plans with speeds up to 100 Mbit/s inclusive.
Among the additional features of the device, we note support for IPTV technologies, guest wireless networks, as well as the presence of a VPN server and parental control functions.
The possibility of installing an alternative version of the software also adds to the attractiveness of the model. Despite the lack of a USB port, which is usually associated with many additional services, the list of differences from the standard firmware is significant, and many of them are very interesting and useful. However, in terms of speed, such a replacement also has an advantage in certain scenarios.
The router is already presented on the domestic market. In terms of cost, the model turned out to be quite competitive in its segment.
Today, creating a local network with Internet access and Wi-Fi is not a difficult task. You just need to decide on the choice of router for it. Several large companies compete with each other in the market for these devices, and their products are widely known to users. One of them is Asus, which offers a wide selection of routers for building networks of any complexity. The Asus RT model N11P, which will be discussed below, is an inexpensive device that is well suited for creating networks: home or small office.
The Asus N11P router is designed primarily for users with average income. Therefore, it has a set of only the most necessary characteristics for organizing access to the Internet and wireless network. There is no USB port, which is why when using the N11P it is not possible to create a backup connection through a 3G or 4G mobile operator. For the same reason, the Asus model is not suitable for creating a DLNA server. Accordingly, N11P cannot be flashed via USB devices.
Those who want to deploy a VPN server on the basis of their router, use a connection via MMPE, or configure a torrent client on it should not delude themselves about the capabilities of this version of the router.
When making a choice, the buyer should still understand that the absence of the above functions does not mean that the Asus N11P router is “bad”. Its capabilities are sufficient to satisfy the needs of the vast majority of users. And more demanding buyers should simply turn their attention to expensive models.
Appearance
The router model RT-N11P, like other products from Asus, has an elegant appearance in modern style and fits well into the interiors of office or residential premises. Its body is made of black plastic in the form of a rectangle, the height of which in the front part is reduced to a minimum. The entire front surface of the device is made of the “diamond edges” type. The bottom of the case has rubber feet that prevent slipping on a smooth surface, as well as holes that allow you to mount the N11P on a wall.
The thin part of the top of the RT-N11P case from Asus is equipped with an indicator panel. It has four positions:
- power indicator;
- Wi-Fi indicator;
- WAN port indicator;
- LAN port indicator.
Under each “light” there is a pictogram that allows the user to understand its purpose.
The rear panel of the RT-N11P model from Asus has five ports for an RJ-45 connector. One of them is reserved for WAN and is intended for connecting a cable from the provider. The other four are LAN ports using N11P as a “switch”. The WAN port is labeled with an icon symbolizing the Internet, the rest are simply numbered.
In addition to the ports on the rear panel of the N11P there are also:
- connector for connecting the power supply and its on/off button;
- Reset button to reset settings to factory settings.
At the edges of the rear panel there are two non-removable antennas. They have a rectangular rather than a round cross-section, which gives Asus devices a strict and modern look.
Connection and preparation for work

Connecting Asus RT-N11P routers and preparing them for operation does not have any special features compared to other devices of this type. It starts with choosing a location for the N11P. In this case, you should try to follow the following recommendations:
- Position the router so that the distance from it to the farthest corners of the room is approximately the same, that is, as close as possible to the center of the apartment or office.
- Do not install N11P near other electrical appliances that can interfere with signal propagation.
- Try to place Asus at the highest possible point and make sure that there are not a large number of walls and doors containing metal elements between it and devices connected to the network.
Having decided on a place for your Asus N11P, you can start connecting it. This procedure is usual: you need to connect the power to the N11P, connect a cable from the provider to the WAN port, and connect it to a computer or laptop through one of the LAN ports. If you use an xDSL access point to access the Internet, you need to connect the router to the modem via LAN ports. After that, proceed to setting up your N11P.
When you turn on the N11P from Asus, a wireless access point is automatically created, so if you have a laptop, it is not necessary to connect to the router via the LAN port. However, most experts recommend using a wired connection to configure the router.
Settings

For the Asus N11P, all parameters are set in the same way as for other devices of a similar purpose, that is, through the web interface. The parameters for entering it are indicated on a special sticker located on the bottom of the N11P case. They are standard for all Asus devices:
- IP address - 192.168.1.1;
- login - admin;
- password - admin.
When you first enter the Asus N11P settings page, it is recommended to immediately change the password. If necessary, it is also recommended to come up with a new login.
Automatic setup

Immediately after logging into the web interface of the Asus RT-N11P router, the user is prompted to quickly set up Internet connections. All its stages occur automatically. First, a window appears asking you to change the login parameters in the web interface. Then N11P will independently determine the presence of a signal and the type of connection. Next, the user is asked:
- authorization data in accordance with the agreement with the provider;
- enable/disable DHCP;
- DNS data;
- types of protocols and other information.
All the user’s work comes down to answering “Yes/No” questions from the “Setup Wizard” and checking the appropriate checkboxes.
Upon completion, the “Wizard” will prompt the user to configure the wireless network on the Asus N11P. There you will be asked to enter the network name and password to connect to it. After this, the grid will disconnect and you will need to reconnect to it again using the new parameters. This completes the automatic configuration of the Asus N11P.
Connecting to the Internet manually using the example of some providers

Despite the ability to quickly configure the Asus N11P, users often prefer to configure it manually. This procedure is not particularly complicated, but requires certain knowledge. In addition, the user needs to know the specifics of establishing an Internet connection from their provider. This information is usually specified in the contract.
Dom.ru and Rostelecom

Popular Internet providers Dom.ru and Rostelecom use the same protocols, and therefore the connection settings for them are identical. To configure Asus N11P you need to do the following:
- Login to the Asus web interface.
- On the left side of the settings window, go to the “Internet” section (WAN - English version of the interface).
- In the settings window on the right, being on the “Connection” tab, in the “Basic settings” section, set the connection type to PPPoE.
- Make sure that the other three items in the basic settings section are marked “Yes”. If such a mark is missing somewhere, put it there.
- In the “Setting the WAN IP address” section, also check “Yes”.
- Allow automatic connection to the DNS server in the next section by checking the appropriate box.
- In the account settings section, enter the username and password provided by your provider.
- Set the MTU parameters to 1472, and MRU to 1492.
- In the last section, put “No” in the Enable VPN + DHCP Connection field.
"Beeline"

Different from Dom.ru and Rostelecom, Beeline uses a different type of connection. Therefore, its settings for Asus N11P have their own characteristics. To connect to the Internet from this provider, you must do the following:
- In the “Basic Settings” section, set the connection type to L2TP.
- As in the previous case, set the next three parameters to “Yes”.
- Allow automatic IP address acquisition and DNS connection in the next two sections.
- Enter the username and password in accordance with the agreement with the provider.
- In the VPN server field, enter tp.internet.beeline.ru.
Leave all other N11P parameters unchanged. Unless you need to enter some name in the “Host Name” field.
For users who do not want to bother with manual setup of N11P, Beeline offers a special “Setup Wizard” program, which can be downloaded on the provider’s official website. This program will independently create a VPN connection using the L2TP protocol and automatically configure the router and diagnose the connection.
NetByNet

A special feature of the NetByNet provider is that it uses a connection based on the MAC address. Its official website promotes a different router model. NetByNet considers it most suitable for its requirements. But this does not mean that other devices will not work with this provider. Configuring and setting up the Asus RT-N11P Wifi router for it is carried out as follows:
- Follow all steps similar to Dom.ru and Rostelecom, save the settings.
- In the ISP Special Requirements section, set Enable VPN + DHCP Connection to Yes.
- Click the “Clone MAC” button. Find out which MAC address is assigned to the client from the contract with the provider and enter it manually.
After these steps, all that remains is to save the changes made, and the router will be ready for further work.
Wireless network

As mentioned above, the Wi-Fi access point is activated when you turn on the Asus RT-N11P for the first time. It is an unprotected network, in most cases called “Asus” and is needed in order to connect to the router for its further configuration. You should not leave these settings unchanged. To tailor your wireless network settings to your security requirements and personal preferences, you must do the following:
- In the Asus N11P web interface, go to the “Wireless Network” section.
- Enter the network name in the SSID field. It is recommended to design it in such a way that you can then easily find your network in the general list of networks operating in the neighborhood.
- Check “No” next to the “Hide SSID” option.
- Select an authentication method in the appropriate field. The most common method for Wi-Fi connections is WPA2-Personal.
- Set the encryption type to AES.
- In the “WPA Pre-Shared Key” field, enter the password that will be used to access the wireless network. The password must consist of at least 8 characters.
- Save the settings by clicking the “Apply” button.
This completes the basic setup of the wireless network on the N11P router from Asus.
Configuration in repeater (repeater), amplifier, adapter or access point mode

If the wireless network signal strength is not enough to cover the required area, additional devices are installed that repeat (amplify) the signal. You can use another router for this. But it needs to be “linked” to the main device by configuring the repeater accordingly.
The problem is that most budget routers do not have a repeater mode by default and you have to go through various tricks with the firmware to make it work in this capacity. The N11P from Asus stands out from its competitors in this regard because it has this feature. To configure it in repeater mode, you must:
- Check if the cable is connected to the WAN port. If connected, disconnect.
- Go to the “Administration” section in the N11P web interface, select the repeater mode in the settings window by checking the appropriate box.
- Save changes, wait until N11P reboots.
- From the list of wireless networks that appears, select the one you plan to connect to.
- Enter the network password and click on the “Connect” button.
- Make sure that the checkbox is checked to allow the use of default settings in the wireless network settings and click on the “Apply” button.
After this, you need to wait until the connection to the network is completed. If everything was done correctly, a message will appear indicating that the network is configured.
IPTV

For users who want to use their router to watch digital television, the Asus N11P will not be the best solution. Compared to other manufacturers, Asus has not yet paid enough attention to improving this feature. The N11P lacks full VLAN support. But this does not mean at all that the models of the RT line are not capable of working with interactive television - IPTV. In older firmware (interface design in light blue tones), its setup was carried out in the “Internet connections” section. It was enough to indicate the port number for connecting the set-top box in the “Select IPTV STB port” field.
In the latest versions of the N11P firmware (design in dark colors), the IPTV function has been slightly improved. Like routers from other manufacturers, it has been moved to the local network settings section, where a separate tab is dedicated to it. Setting it up is just as easy. To do this you need:
- In the N11P web interface, select the “Local Network” section and in the settings window that appears on the right, go to the “IPTV” tab.
- Specify the LAN port number in the “Select IPTV STB port” field.
- Enable multicast routing by selecting the appropriate value from the drop-down list.
Point 3 is not a prerequisite for setting up IPTV on Asus N11P. But in some cases, without enabling it, this function does not work correctly.
If your set-top box or TV supports Wi-Fi, the N11P from Asus has the ability to set up wireless digital TV viewing. Configuration is carried out in a few simple steps:
- In the “Wireless Network” section, go to the “Professional” tab.
- Enable IGMP Snooping by selecting the appropriate value from the drop-down list.
- In the “Multicast data rate (Mbit/s)” field, set the value to “OFDM 24”.
IPv6 protocol
IPv6 is currently implemented by all major router manufacturers. The Asus N11P is no exception to this rule. However, it should be noted that support for this protocol on devices from this manufacturer is only possible if they have firmware version 3.0.0.3.78 and older installed.
Therefore, those users who want to use IPv6 must first make sure that their N11P has software that meets these requirements. IPv6 debugging itself is carried out as follows:
- In the “Advanced Settings” section, go to the IPv6 subsection.
- Select the connection type in accordance with the parameters of your provider.
- In the new fields that appear, enter the prefix, its length and the IPv6 gateway. All these parameters must be obtained from the provider in advance.
- Enter the IPv6 DNS server address. It must also be obtained from the provider in advance.
- Click on the “Apply” button and wait until the changes are saved.
Dynamic DNS

If the user needs to use dynamic DNS, the Asus TR-N11P model provides this option. To set it up on your router, you need to do the following:
- In the device’s web interface, select the “Internet” (WAN) section and go to the DDNS tab.
- Allow the DDNS client by checking “Yes” next to the appropriate option.
- Select a server according to your parameters (asus.com is specified in this field by default).
- If required by the server, provide the username and key provided during registration.
- Enter the hostname to which you will connect.
- Apply changes.
Dynamic DNS is now configured and the N11P is ready to accept connections through the registered domain name, regardless of the client's IP address type.
Security Settings

To ensure local network security, the Asus N11P has a built-in firewall. With its help, incoming and outgoing traffic is filtered based on rules created by the user. The firewall is configured by going to the appropriate section of the web interface.
The firewall settings in the Asus N11P are quite flexible and varied. The section dedicated to it has four tabs. On the general settings tab you can:
- enable/disable firewall;
- enable/disable DoS protection;
- ability to select the type of packages to be registered;
- allowing/denying ping replies from the global network.
The remaining three tabs are dedicated to creating firewall rules. In particular, it is possible to filter traffic by keywords in URLs and by keywords appearing on web pages. To create a rule, simply activate the filter and then add keywords to it. Up to 128 keys are allowed.
In addition to filtering web pages in a firewall, it is possible to create rules for filtering network services between local and global networks.
All these features give the user confidence that when using N11P, his network will be reliably protected from hacker attacks.
Parental control
Currently, more and more parents want to control the time their child spends at the computer in order to protect his health. Therefore, manufacturers of devices that provide Internet access provide them with a parental control function. ASUS N11P also has a corresponding section in the interface.
To set up parental control mode, you must:
- Go to the “Parental Controls” section of the router web interface.
- Set the Enable Parental Control switch to the “ON” position.
- In the field that appears, select from the drop-down list the IP or network name of the computer or gadget that the child uses, and click on the plus sign. The specified device will appear in the list below.
- Enter the rule setting mode by clicking on the pencil image on the right, set the desired time periods during which the device will be allowed access to the network.
- Save changes.
All access parameters are clearly presented in the form of a table reminiscent of Excel, where the days of the week are indicated horizontally and time intervals are indicated vertically. You can allow or deny access to the network with one click on the corresponding cell.
Possible malfunctions and ways to eliminate them
Products from Asus are highly reliable. Therefore, once you set up your N11P, you can forget about its existence for years. If, however, problems occur with network access, you must do the following:
- Update the router firmware to the latest version.
- Restart the network. To do this, you need to sequentially turn off the router, modem (if used), as well as all computers on the network. Then turn on the router and wait at least two minutes. After that, turn on the computers on the network.
- Check that the cable from the provider is correctly connected to the router in the WAN port and connected via the LAN ports.
- Check the wireless network settings on your computer. They should match the Wi-Fi settings on the N11P.
If the described actions do not lead to the desired result, you should contact Asus support on their official website, describing the problem. And if you suspect a physical malfunction of the router, take it to a service center.
Firmware update

Keeping the Asus N11P firmware up to date is the key to its successful operation for many years. Therefore, it is recommended to update it periodically.
This Asus model cannot be flashed via a USB interface due to the lack of one. The Asus device management mobile app also doesn't support the N11P. Thus, updating the firmware is only possible through the web interface. To do this you need:
- Download the latest firmware version from the manufacturer's website and unpack the resulting archive.
- In the web interface, go to the “Administration” section and open the “Firmware Update” tab.
- In the “New firmware file” field, click on the “Select file” button, and in the explorer window that opens, specify the path to the unpacked firmware file. It must have a .bin extension.
- Click on the Upload button.
After the manipulations have been completed, the firmware update process will begin. It may take up to five minutes, after which the router will reboot.
Resetting the router to factory settings

In cases where errors were made in setting up the N11P from Asus and the device refuses to work normally, everything can be corrected by reverting to factory settings. The same need arises in a situation where the user received a used router configured for someone else’s network, and the login password is unknown.
There are two ways to reset your Asus router:
- By pressing the Reset button located on the back of the device.
- Via web interface.
In the first case, it is recommended to disconnect all cables from the router except for the power supply, hold down the Reset button with a pin or other similar object, and wait a few seconds. The WPS indicator on the front panel will blink to indicate that the settings have been reset. After this, you need to wait until the router boots up completely, then start setting it up.
In cases where access to the router’s web interface is not lost, reset the settings as follows:
- In the “Administration” section, open the “Manage Settings” tab.
- Opposite the “Factory settings” option, click on the Restore button.
This section also contains such a useful function as saving settings. Using it, it is always possible to quickly restore the user configuration of the router after resetting it to factory settings.
Conclusion
The router model RT-N11P from Asus is an inexpensive and yet multifunctional device for building local and wireless networks. It can be safely recommended for use at home and in small offices.
pros
The advantages of the N11P model include the following parameters:
- cheapness;
- reliability;
- the presence of two antennas providing good signal coverage;
- possibility of working in repeater mode.
Minuses
Among the disadvantages of N11P, users note the following indicators:
- lack of USB port;
- inability to control the device via a mobile application;
- incomplete VLAN support.
If you ask a modern person whether he can live without the Internet for at least one day, the answer, of course, will be negative. Developments in this industry have not stood still for a long time. For convenience, users are provided with a wireless connection. It's called Wi-Fi. In order to create such a network at home, you need to purchase a special router, or, in other words, a router. Currently, stores offer a wide selection of this type of equipment. Devices differ in configuration method, functionality, bandwidth and other characteristics.
What criteria should you pay attention to when buying a router? Advanced users recommend models with minimal settings, extensive functionality and do not require constant maintenance. The Asus RT-N11P router, a review of which is presented in this article, is exactly such a device. Taking into account its cost (about 2000 rubles), this device can be classified as a budget class device. Recommended for home use only. Why are there such restrictions? The answer is hidden in the characteristics.
Equipment
Buyers have long been accustomed to the fact that budget devices are not equipped with a large set of components. The Asus RT-N11P router was no exception.
The manufacturer packages the device in a black box. It contains information about the manufacturer, brief characteristics and warranty period. A good marketing ploy was the use of a message that the router was tested by Russian providers. The front panel also contains an image of the device itself. Inside the box, unfortunately, the set of equipment is quite meager. In addition to the base station itself, there is only a charger and a patch cord. The manufacturer did not bother with special mounts for wall mounting. There are also no branded stickers, which can often be found on competing models from other brands. In addition to all of the above, the kit necessarily includes a warranty card and an instruction manual. The instructions will help you quickly, and most importantly, configure the router correctly.

Appearance
What is the Asus RT-N11P router? This is a device that provides a wireless connection. Its body is made of plastic. The quality of the material, unfortunately, leaves much to be desired. In reviews, users point out that when they press a finger on the panel, an unpleasant squeak is heard. The dimensions of the router are quite compact - 145x110x25 mm. The device weighs 180 g. Dimensions undoubtedly add to the list of advantages. According to many owners, due to its light weight, the router can be attached to the wall even with double-sided tape.
Many buyers have no complaints about the choice of external design. The manufacturer used a combination of two surfaces: plain black and checkered (a combination of black and gray). On the top of the front panel there is the name of the brand and the model itself. At the bottom of the Asus RT-N11P case, the user will see indicators that display operating modes. They are highlighted in green. Two antennas are attached to the rear side edge. Between them there are four connection ports, there are reset and power buttons, as well as a socket for a 220 V cord. Next to the latter, the developer has placed a connector for an Internet cable.
On the back there are two ventilation holes, four legs and a device for wall mounting. It’s also worth adding that there are ventilation grilles on the side edges, so users don’t have to worry about the device overheating.

Antennas
As mentioned above, the Asus RT-N11P router has two antennas. They are non-removable. Thanks to a special mount, the user can rotate them in any direction along the axis by 180 degrees. If you look at the instructions, you can find information there that talks about the purpose of these antennas. The developers claim that they are installed to strengthen the signal. How true are these characteristics? Testing has shown that this configuration is more about decoration than helping to improve technical performance.
The most advanced users decided to experiment with the router. They took aluminum soda cans, cut out the bottom and put them on the antennas. A copper wire was drawn from the base, securing it to the body. The homemade antenna was pointed directly at the wireless signal receiver. Surprisingly, it was this device that helped achieve the 5 dB gain claimed by the developers.

"Stuffing" of the router
What conclusions can be drawn about the performance of the Asus RT-N11P router? Reviews from both users and experts are mostly positive when it comes to the “filling”. The developers indicated that the device is capable of operating at a data transfer rate of 300 Mb/s. This performance is provided by the MediaTek processor. It operates at a frequency of 580 MHz. For home use, these characteristics are more than enough. Unfortunately, this router model does not have a USB interface. A more powerful chipset is required to service it. The amount of RAM is 32 MB. It cannot be called large, but for the given tasks such storage is quite sufficient. Built-in memory - 8 MB. The specialists who disassembled this device noticed that the manufacturer’s name was missing on the chips. Therefore, they concluded: Asus used low-quality components to reduce the cost.
Performance
Despite some shortcomings, the Asus RT-N11P router is extremely popular. Reviews left by users on relevant information resources naturally highlight the low price. It is this criterion that in most cases forms consumer demand. However, the range of functionality cannot be ignored. The manufacturer has assembled a device that can work with all existing Russian providers. You can connect to any network and protocols. There are no restrictions on these indicators. Surprisingly, the router can work with virtual private networks. It also provides support for proxy servers.
Data transmission is carried out at a frequency of 2.4 GHz using the 802.11n protocol. The stated speed is 300 Mb/s. Unfortunately, it may be declining. The testing showed the following results: when transferring a large file (up to 10 GB), the speed decreased by half.

How to connect Asus RT-N11P?
After purchasing, many buyers are concerned with the question: “How to connect a router of this model?” To do this, it is recommended that you first study in detail the information contained in the instructions. In this article, we will briefly consider this process. The first thing you need to do is connect the provider cable to the connector that is located near the network socket. It is marked with the letters LAN or a special sign. The remaining four ports are used if you need to connect the Asus RT-N11P router directly to a computer. For these purposes, you need to use a patch cord. The package includes a power supply. The buyer will see a plug on one edge, and a network adapter on the other. This cable connects the router to power. Before turning on, the plug must be inserted into the socket.
After connecting all cables, you must press the “On/Off” button. and wait until the indicators light up. If everything was done correctly, then you can start setting up.
Asus RT-N11P: setup
After connecting the RT-N11P router, you need to configure the device. To do this, on a computer that is directly connected to the device, you need to enter the router address in the address bar of the browser. As a rule, it consists of a combination of the following numbers: 192. 168. 0.1. A pop-up window will appear on the monitor asking you to enter your username and password. By default this word is admin. It is entered only in English. Those who for some reason have forgotten the address, login or password of the Asus RT-N11P can look at the information on the sticker located on the back panel of the router. In this model, the manufacturer has provided quick Network setup. That is, the user just needs to connect the device correctly, activate the special mode - and the wireless connection will appear automatically.

Setting details
Creating a wireless connection with the RT-N11P is quite easy. However, it will be necessary to correct some points. First, the user needs to select an authentication method. Experienced experts recommend setting the WPA2 mode. In this case, the encryption type must be AES. It is important that no one other than the owners can connect to the wireless Network created on the Asus RT-N11P. The protection setting is selected in a special section of the menu. To do this, you need to use a password or MAC address filter. The user will only be able to find out some parameters directly from the service provider, for example, the type of IP address determination or connection method. If some mistake is made in the settings, then there is no need to worry ahead of time. It's quite easy to reconfigure the Asus RT-N11P router. Resetting the settings can be done by pressing a special button. It is located on the rear panel on the left side. When pressed, the device will return to factory settings.

Conclusion
This router model belongs to the budget class, so consumer demand for it is quite high. It attracted attention thanks to its expanded functionality. The Wi-Fi signal is strong and uninterrupted. Bandwidth - 300 Mb/s. For home use this will be quite enough. The advantages of the Asus RT-N11P also include simple setup that does not require special knowledge. Many owners claim that the process itself takes literally a few minutes. As for the negative aspects of the router, these include the quality of materials, a combined reset and reboot button, and the lack of special fasteners. But, according to many owners, the low cost largely justifies all the shortcomings.
ASUS RT-N11P is a simple entry-level budget router designed for unpretentious users. ASUS has a whole series of similar devices, of which the RT-N11P router is distinguished by the presence of “stronger” antennas.
The number of router models from ASUS is currently very large. Completely new models are appearing, while routers of previous generations are still available for sale.
In the model under consideration, the letter P in the name indicates a more powerful antenna with a higher gain. The total Wi-Fi coverage area directly depends on this coefficient. In general, the RT-N11P model is a classic ASUS router with a typical design, software and hardware.
After choosing and purchasing a router, it is important to place it correctly and configure it accordingly. The exception is when providers use a dynamic connection type. Most home Wi-Fi devices are initially configured for this type of connection. Despite this, you still need to change the Wi-Fi router options to set up a wireless network.
Kit and appearance
The router comes in a compact standard cardboard box in dark colors. It is distinguished by complete localization. The packaging contains useful information, namely photographs, key features, detailed technical specifications and other useful information.
The delivery set is standard for inexpensive models and includes: a router, a switching power supply (12V/0.5A), a black patch cord, a warranty card and a short setup guide. The router's warranty period is limited to three years.
There are different ones, they differ not only in color, but read about this in detail in the article Types and purpose of patch cords
The dimensions of the router are 14.6x11.1x3.4 cm excluding antennas. The case material is black plastic. At the corners, the lower part is equipped with rubber feet. There are also holes for wall mounting.

The design of the front side is similar to “diamond facets”. On the bottom left there is a block of 4 LED indicators. They offer virtually no annoying flickering, but are a bit dull and rough in design.
The side walls and bottom are equipped with ventilation grilles. The temperature conditions, even at maximum load, are not satisfactory.
From the back you can see two stationary antennas, five non-indicator network ports, a power supply input connector with a toggle switch, and a WPS/reset key. Everything is located very tightly, but for the class of budget models this is quite traditional.

The production quality of the router is quite decent. Moreover, ASUS keeps it at the highest level in both top and budget models. The design is practical, and the design of the router is quite convenient compared to other routers in this price segment.
Connection
First, the ASUS RT-N11P router needs to be connected to a workstation, mobile computer or other portable device.
The connection can be made either via a LAN cable, which is included with the router, or via Wi-Fi. A more reliable connection is via a cable, due to the fact that modern firmware is protected by encrypted Wi-Fi, which can cause certain problems.

Sequence of actions for physically connecting the router:
- you need to connect the power supply to the “power” socket;
- then you need to connect the LAN cable from the provider to the “WAN” connector on the router;
- The power cord supplied with the ASUS RT-N11P router should be connected on one side to the network card of a workstation or laptop, and on the opposite side to any LAN connector on the router.
The physical connection to the router can be considered complete. If the connection is successful, four indicators should light up on the front panel of the router: “WPS”, “WLAN”, “POWER”, and one of the “LAN”.
Video: Asus RT N11P
Entrance
The most common question that arises when setting up a router is “How to enter the settings?” To do this, you need to log into its web interface.

To log into the router's web interface, open the installed web browser. After launching it, type the router’s IP address in the address bar. The new device has the address 192.168.1.1. By default Login is “admin”, Password is “admin”. The login and password have these values provided that the router has factory settings.
Setting up Internet protocols
After successful authorization in the router interface, select the “Advanced Settings” tab on the left side, and mark “WAN” in the list that appears. Further settings depend on the selected connection protocol.
PPTP
To configure a router using the PPTP protocol:

L2TP
To configure the ASUS RT N11P L2TP router:

PPPoE
Basically, all providers in Russia work using the PPPoE network protocol, including Rostelecom.
To configure a router using the PPPoE protocol:

Static IP address
To configure a router with a static IP address:

Configuring the ASUS RT N11P router in repeater mode
To configure the router to operate in repeater mode:

Wi-fi
Wi-Fi is configured as follows:
- you need to enter “Advanced settings - Wireless network”;
- you need to select the left tab and check “Wireless network” in the list that appears;
Then you need to set the parameters:

IPTV
IPTV is configured in the router when you configure the Internet connection settings. To do this, you need to select “Select IPTV STB port” and indicate the number of the router port to which the cable from the set-top box will connect.
Router firmware
If the user is not satisfied with the operation of the router or additional capabilities are needed, it is recommended to reflash the router.

To do this you need:
- download the firmware from the Internet (finding the required firmware version is not at all difficult);
- extract the firmware BIN file from the archive;
- In the “Administration – Firmware Update” menu, select the firmware file and click “Upload”.
Uploading new firmware takes about 5 minutes.
Restoring factory settings
Often, after changing the router settings, you should remember them so that if difficulties arise, they can be restored. To do this, go to “Administration - Additional settings - Restore/Save/Load settings”

To remember the current router settings, click on “Save”. The setup file will be saved to the desired location on the hard drive.
To restore settings from a configuration file, click the “Select File” button, select the required configuration file and then click the “Submit” button.
It is important to know that selecting “Restore” will reset the settings and restore factory settings.
In general, ASUS RT-N11P is a fairly simple and budget option for creating a home network consisting of a maximum of four wired devices and several wireless gadgets. The technical capabilities of the ASUS RT-N11P will satisfy the majority of potential users, but if the user wants more, then it is reasonable to pay attention to more expensive models.
I bought it 2 weeks ago for a simple home network of 1 desktop computer and 3-4 Android devices. I set up a network of a file server, Smart TV, media player, several video cameras via Ethernet and Wi-Fi, plus 5 mobile devices. There was a communication error over the Internet connection, but the router worked. I updated it to the latest version of the software, but the router itself did not automatically update itself, despite the fact that it detected the presence of a more recent firmware version on the Asus website. I downloaded the update file from the site and flashed it via the intranet. All errors have disappeared. The router worked without any problems for a week, after which it was given (donated) to its main user, where it has been working for 5 days also without problems. While testing on my network, I measured the temperature with a pyrometer - the heating in the area of the nameplate at the bottom of the router is 36.5 degrees (the CPU is installed in this area, judging by the photos of the board from Google), on top of the router is 27 degrees, the power supply is -33 degrees. Considering the considerable traffic on my network, the heating is quite modest. The speed did not decrease either over Wi-Fi or Ethernet. Good quality device from a reliable manufacturer. I recommend it for small and medium-sized networks on a limited budget. Don't forget to update your firmware.


