Asus rt n12 router is connected. Connecting, flashing and setting up the ASUS RT N12 VP router. Connecting the Asus RT-N12 router
Step-by-step setup of RT-N12 C1 (B1, D1) for any provider: MTS, Beeline, Rostelecom and TTK, also Dom.ru. Indicates how to properly install a VPN server. And the result of three tests is given.
ASUS routers called RT-N12 are presented in three models: B1, C1 and D1. The new firmware with a black interface is installed on the D1 router, and for the C1 it is easy to update. Model B1, in turn, simply cannot be purchased. That is, for C1 and D1 the setting looks the same, and there are also HP B1 and VP models that have the same black interface. This is what we will talk about further – it’s interesting to configure the ASUS RT N12 in a new version. Your firmware number must start with a three.
Equipment and appearance
Appearance of the device
The ASUS website lists the following equipment: LAN power cord, router, power supply, two antennas and a warranty card. For models B1 and C1 there is also a CD-ROM, and their power supply produces 9 Volts. And for D1 you need 12 Volts! The current strength is 1 Ampere in the first case and 0.5 in the second.
Specifications
Each of the three routers under consideration is built on the same processor. The amount of memory and ROM is also the same:
- Processor – BCM5357, 300 MHz;
- FLASH – 8 MB;
- RAM – 32 MB;
- Wi Fi – 802.11n, 300 Mbit/s.
It does not follow from the above that the firmware from routers of one revision is suitable for others. Whoever forgets about this will receive a “brick”.
The hardware revision number is printed on the label in the top line. Example: “H/W Ver. B1".
Options and functionality

3 modes, 4 networks
Each of the three devices, from B1 to D1, operates in router, access point or wireless repeater mode. You can create not one, but four WiFi networks with different names. And you can adjust the bandwidth of each network. In reality, we are talking about one network, it’s just that all subscribers will see four SSID names, and depending on their choice they will receive different traffic. Well, the speed of “300 megabits” is, of course, a theory.
All characteristics are summarized in the table.
| Parameter | B1 | C1 | D1 |
|---|---|---|---|
| Case dimensions, mm | 179 x 119 x 37 | 190 x 125 x 37 | 179 x 128 x 28 |
| Ports | 4LAN + WAN, 100 Mbit/s | Same | Same |
| Ability to configure LAN as WAN | + | + | + |
| VPN | IPSec, PPTP, L2TP, PPTP server* | IPSec, PPTP, L2TP, PPTP server | |
| WPS button | + | + | + |
| Mode selector (router, etc.) | Tumblr | Tumblr | Program |
Quick Setup Wizard
The asterisk means “only after updating the firmware to version 3.X.” Further, LAN as WAN is configured normally in the third firmware, but not in beta. But for B1 it still needs to be found. However, in the “old interface” they do this: select the IPTV STB port, and use it as a WAN. This method has a drawback - the WAN indicator on the router will not light up.

Work in the "master"
When you first connect to a PC, the router turns on the “master”, and all you need to do is go to the website “192.168.1.1”. No password is needed. Click “Go”, set a password and click “Next”. Then the router will configure the WAN connection itself. But reviews say that this option does not work for everyone.
Most likely, the connection type will have to be set manually. “Special requirements” include MAC cloning. The “wizard” will ask for parameters, and you must fill out the fields correctly. “Router settings” is the third section where you set the password for the WiFi network.
Indicators and connectors
When designing its routers, ASUS did not invent anything. On the case of the RT-N12 router there are 7 LEDs indicating the presence of voltage, as well as the activity of 5 ports and WiFi. A short press on the Restore button will reboot the router, and pressing for 5-7 seconds will reset the settings. This is how any ASUS router works!

Rear panel of the router
The yellow ports are the home network, and the provider's cord is plugged into the WAN port.
If the WAN port on the router burns out, you can use the LAN port instead of the WAN. ASUS is a good company, but additional configuration is needed.
Video: setting up the Internet, Wi-Fi network on ASUS RT-N12
How to connect Wi-Fi router ASUS RT - N12 to a computer
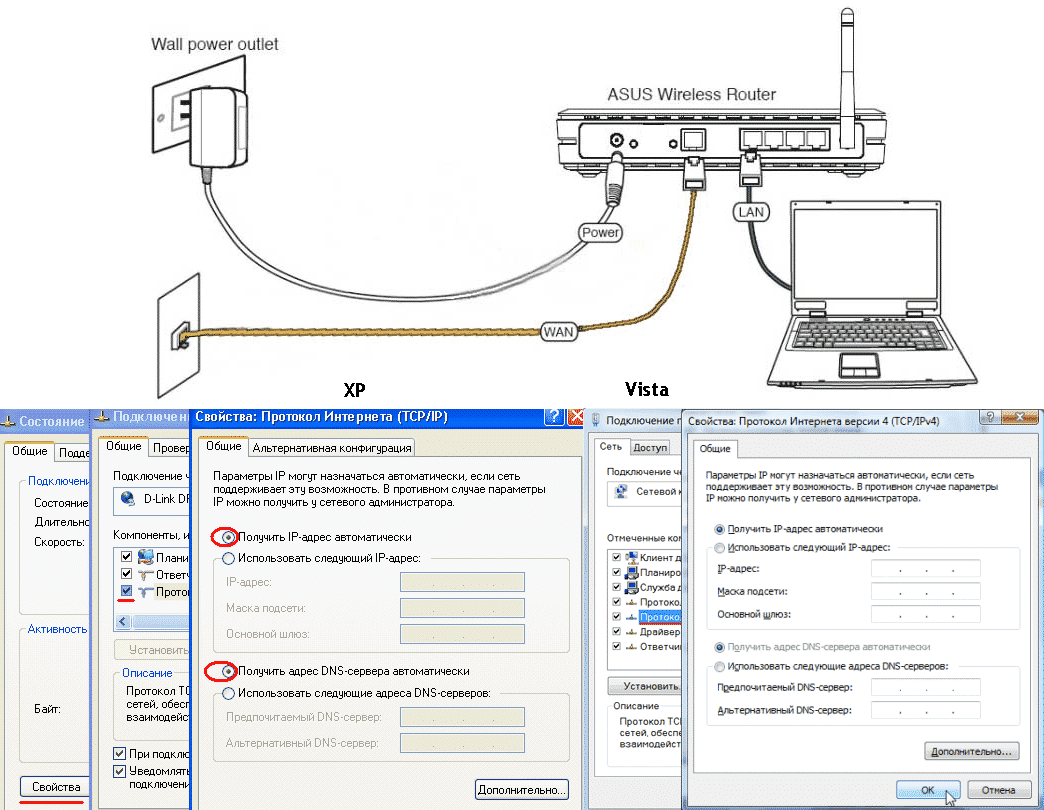
Preparation
On the computer, the network card is configured for “automation”. The LAN port of the router is connected to the PC via a patch cord, and the provider’s cord must be connected to the WAN port. Next, power is supplied to the router: in a minute it will boot, and after 2 minutes the computer will update the address of its card. And you can open the site “192.168.1.1”. In the “wizard”, click “Go”, set a password, click “Next”, “Next”. The router will display the Network Map tab.

WAN setup
To set up an Internet connection, open the “Internet” -> “Connection” tab in the router interface. By default, the router is configured in Auto IP mode. For subsequent logins, the admin login is suitable, and the password will be the one that was set. If something doesn’t work out, the router settings are reset: a minute after turning it on, press Restore for 7 seconds.
Setting up the ASUS RT N12 router for Rostelecom
Rostelecom uses different cables - Ethernet, telephone or optical. In the latter cases, you need to know what the VPI and VCI parameters are equal to. And the WAN port of the router must be connected to the modem, where the VPI/VCI numbers are already set. There are no these parameters inside the router interface.
PPPoE
Go to the tab for setting up WAN. Select a protocol.

PPPoE Rostelecom
You need to specify the parameters:
- NAT – “Yes”;
- UPnP – “No” for starters. This is how the router works for everyone, and then you can fix it.
- Automatic IP address – “Yes”;
- DNS automatic – “Yes”;
- The name and password are clear from the contract;
- Time is better than “0” so that the router does not turn off!
- MTU is better than 1450, and if it works, try 1492;
- MRU – 1480, etc. (until 1492).
Let the rest be by default. Press the “Apply” button, and the connection appears on the “Network Map”.
The “VPN + DHCP” option can be disabled.
PPPoA
There is no PPPoA support on the RT-N12 router. By opening the “master”, you can make sure that this protocol is missing.

Internet setup
The same will happen with most other routers, including non-ASUS ones. It is not clear why Rostelecom needs PPPoA.
The efficiency of PPPoA compared to PPPoE will be 1% higher. But it’s easy to choose the MTU - always 1500.
Setting up the ASUS RT N12 router for Beeline and MTS
The easiest way would be to configure PPPoE. It is used by MTS. And the L2TP protocol “from Beeline” is now used by all ASUS routers. But with MTS the question is open, although it has the PPTP protocol, with which there are no problems either. We must remember that in addition to PPPoE, MAC cloning on the router is performed for all protocols! A PC with which the Internet was connected is connected to the router, and the “Clone MAC” button on the settings tab is easy to find.
PPPoE
On the “Internet” -> “Connection” tab, select the desired protocol.

There is no need to change anything - the router is almost configured:
- NAT – “Yes”;
- UPnP - “Yes”;
- IP address, DNS auto – “Yes”;
- Username and password – see agreement;
- Time – “0”;
- MTU, MRU – 1492;
- “VPN + DHCP” – “Yes”.
The new settings are “applied” and the “Network” icon appears in the upper right corner. That is, the router connects to the Internet.
Most often, MTS uses the PPTP protocol (see below).
L2TP
The line vpn.internet.beeline.ru is the name of the server for Beeline subscribers. The router has a “VPN server” field for such names, which is located on the “Connection” tab. The L2TP protocol is selected on it.

Options:
- NAT – “Yes”;
- UPnP - “Yes”;
- IP address, DNS auto – “Yes”;
- Name – starts with 089, see contract;
- Password - from the agreement;
- VPN server - see the beginning of the chapter;
- “VPN + DHCP” – “Yes”.
After cloning the MAC, click “Apply”. The router will establish a connection in 30-40 seconds.
You can try setting up the router for MTS. Server name – l2tp.e66.ru or l2tp.local (depending on the region).
PPTP
We are talking about the MTS provider. On the router, set the server name or one of the addresses:
- 172.19.1.1;
- 172.19.1.27;
- 172.19.1.26;
- 172.19.1.21.
Numbers may vary in different regions. And the name is vpn.local.
By setting the address in the settings, you make life easier for the router, but not for yourself. On the “Connection” tab, the setup is almost done - just set the protocol.

The main parameters for the router are login and password, server name or address, and nothing more. You need to clone the MAC, click “Apply” and wait 10 seconds.
Setting up a router for Dom.ru and TTK
The Dom.ru provider always checks the MAC address, even on the PPPoE protocol. And TTK does the same, but only using the PPTP protocol. This means that the WAN port of the router must receive a suitable MAC address. For this purpose, there is a “Clone” button.
PPPoE
For TTK and Dom.ru, the setting differs in “cloning”.

PPPoE TTK and Dom.ru
Only login and password are specified. All this is done on the “Connection” tab. The settings need to be “Apply”, and the router connects to the Internet.
Before applying the settings, clone the MAC (for Dom.ru).
L2TP
On the “Connection” tab, select “L2TP”.

- Fill out the password and login field (271XXXX);
- The router needs to know the server name (one);
- Other settings are default.
Click “Apply”. After 30 seconds, the router will create a valid connection.
The names of TTK servers depend on the region: l2tp.svg.ttkdv.ru, l2tp.kms.ttkdv.ru, etc.
PPTP
Both TTK and Dom.ru like to issue a static IP for the PPTP protocol.

Setting up a router will be difficult. On the “Connection” tab, select PPTP, then install:
- Your own IP, mask and gateway (see contract). Example for TTK: 10.10.3.200, 255…0, 10.10.3.1.
- DNS (both);
- Login and password;
- Server IP address. Example: 10.10.3.1, 10.10.3.36 – only one.
Clone the MAC, click “Apply”.
The contract contains 8 parameters! Or 7 if the server and gateway are the same.
Setting up the ASUS RT-N12 D1 PPPoE wireless router
How to set up WiFi on the ASUS RT N12 router?
You can make changes on the start tab. Change SSID, set password.

"Network map"
The router also has a special tab with settings. Its name is “Wireless Network” -> “General”.
It is better to write down all data.

WiFi, shared
The settings themselves are set like this:
- Name – any;
- Hide – “No”;
- Mode – N;
- Width – “40” (300 Mbps) or “20” (150), but not “Auto”;
- Router channels (I and II) – both “Auto”;
- Method – WPA2 or WPA for older Android devices;
- Encryption – AES or TPIK for WPA;
- Key – 8 characters.
Click “Apply”. The router will reboot.
ASUS RT N12 IPTV setup
All settings are contained on the “Local Network” -> “IPTV” tab.

Select a name for the Internet connection. Then:
- Select a port for the set-top box (does not work with the Internet via ADSL);
- For a PC or Smart TV, you need to “Enable” the last two options.
Click “Apply”.
The router will not transmit traffic intended for the set-top box to the local area.
ASUS RT - N12 VPN server setup
The router can be a server.

VPN server
To configure, open the “VPN” tab:
- “Server”, “Enable” – “Yes”;
- “More details”: “LAN to VPN”, MPPE, IP pool;
- “Server”: “+Add” and password with login.
After each step, click “Apply”. The router is designed for 10 subscribers.
When the router was a PPTP subscriber, it used MTU/MRU = 1450.
Local LAN and DHCP
On the “Local network” -> “IP address” tab, set the router address.

The DHCP Server tab contains other settings:
- Router name in LAN;
- Auto-issuing address pool (for PlayStation set X.9-X.254);
- Gateway address, by default equal to the router address.
It is better not to turn off the server. The main thing is to click “Apply”.
IP values in LAN and WAN networks must not overlap!
How to reset your router?
Two equivalent methods:
- Turn on the router, wait a minute, press Restore for 7 seconds;
- Select “Administration” -> “Manage Settings”, click “Restore”.
The router will forget the settings. Then it behaves like new.

The photo shows “method 2”.
If you have forgotten your password, do as stated above.
Protecting the settings of the Asus RT-N12 router
All settings are saved on the PC. You need the “Manage Settings” tab.

The latter is needed to download the settings to the router.
Update to the latest firmware
You can download the firmware on one page:
- B1: www.asus.com/ru/Networking/RTN12_ B1/HelpDesk_Download/;
- C1 and D1: change the letter B to C or D.
The ASUS instructions do not contain this information. Then on the router go to the “Update...” tab.

Firmware
Select a file and click “Submit”.
After pressing, you have to wait 5 minutes. And the router cannot be turned off!
Tests
WAN-LAN transmission speed is almost 95 Mbit/s.

Testing
- WiFi 20 MHz – 21 and 16 (some have 52);
- WiFi 40 MHz – 40 and 30 (90).
The router also coped with L2TP. The result was slightly higher than 70 Mbit/s.
The main advantage of RT-N12 is its affordable price.
Video about ASUS RT-N12: connection and setup
The Asus rt-n12 router is a fairly popular budget router that successfully implements all the functions necessary for a simple home network. The device is a portable WiFi access point with an information exchange speed of up to 150 Mbit, while the device supports the common 802.11n communication standard with an operating frequency of 2.4 GHz and is equipped with 4 LAN ports for “hard” connecting local computers.
Asus rt-n12 router: indicators and connectors
There are seven LED indicators on the front panel of the router:
 1 - power indicator (Power);
- - off – power is not connected;
- - steady green light means the system can be used;
- - flashing quickly - process.
2 - WiFi wireless network status indicator;
- - “off” – no power (or the network is disconnected);
- - lights up solid green – the system is ready to exchange data via a wireless channel;
- - blinking – data is being transmitted (wireless network).
3 - indicator of connection to the Internet (WAN);
- - “off” – the Internet does not reach the router from the provider (there may be problems on the line or the service has been suspended for non-payment);
- - lights up steadily – active connection to the Internet;
4 - local network connection indicators (LAN ports 1-4);
- - “off” – the network cable is not connected (or there is no electricity);
- - lit – the corresponding port is busy actively connecting external devices to the network via an Ethernet cable;
- - blinking – data is being transmitted (via cable).
The rear panel is equipped with several connectors for an RJ 45 connector and switches:

- - one separately located WAN port (for connecting an Ethernet cable);
- - LAN1-LAN4 connectors (connecting network devices);
- - one round connector for connecting the power adapter;
- - standard power button;
- - WPS button for quick authorization in the home network;
- - button to reset the router to factory settings (hold for 7 seconds);
How to connect Wi-Fi router asus rt - n12
It’s quite simple to install and configure the connection to the asus rt n12 router yourself:

- - connect the power adapter plug to the DC In socket located on the back panel of the router;
- - connect the power supply to a power supply with a voltage of 220 V;
- - for initial setup, use a “hard” connection of the asus wireless router access point to the computer via an Ethernet cable (to avoid wireless interference);
- - connect the Internet cable provided by your provider to the WAN socket of the asus rt n12 router (if you need to connect this port to the LAN connector of the modem);
- - connect the LAN port of the router to the network card connector of a “classic” computer using an Ethernet cable from the “basic” set of the router;
- - if you have a TV set-top box, also connect it to the LAN connector of the router;
- - turn on the power button.
At this point, the installation and connection of the asus rt n 12 Wi-Fi router is completed - the device is completely ready for use. Step-by-step configuration of the modem is carried out through the built-in web interface of the device, which can be accessed through any Internet browser installed on the computer.
To enter the router settings, enter the combination of numbers 192.168.1.1 in the address bar and enter the authentication data in the window that opens.
 By default, the login and password “admin/admin” is used.
If the router was in use before, you should first reset the settings of the asus rt n 12 router to factory settings according to the instructions in the final part of this article.
Setting up an asus wirelessroute rt n12 router for Rostelecom
To configure the asus rt n 12 wifi router to connect to the Internet through providers such as Rostelecom and Dom ru, go to the router settings, find the “Advanced settings” tab and select “WAN” here.

At the top of the window, set the following Internet connection settings:
- - WAN type – you must select PPPoE from the drop-down list of connections;
Most Rostelecom subscribers use a PPPoE Internet connection. However, when setting up a router yourself, it is still recommended to clarify your type of Internet connection: this information can be found in the contract with the provider or clarified by calling the technical support of your Internet service provider.
- - the choice of port for setting up IPTV STB depends on which port you connected the set-top box to, but by default it is recommended to use the LAN4 connector;
- - enable UPnP – mark the option “Yes” with a marker;
- - get a WAN IP address automatically – select “Yes”;
- - enable PPPoE relaying – it is recommended to set the option “no” from the list.
- - in the username and password fields, enter the data received from the Rostelecom operator for connecting to the Internet.

Setting up an asus rt n12 router for Beeline and MTS
In general, the instructions for setting up an asus rt n12 router for MTS, Beeline and other “mobile” providers are similar to setting up a router for Rostelecom.
Here, in the “WAN” - “Internet Connection” tab, set the following values:
- - WAN connection type - set the L2TP item;
- - enable UPnP - set the marker to “Yes”;
- - obtain a WAN IP address automatically – check “Yes”;
- - connect to the DNS server automatically - select the “Yes” option;
- - L2TP server (VPN) - for beeline, enter this address tp.internet.beeline.ru.
“Username” and “password” in this case are issued to the subscriber by the Beeline service provider. Enter them. There is no need to change the remaining parameters - feel free to click the “Apply” button.
However, when setting up a router for MTS, there are certain subtleties.
In the WAN connection selection tab, you must set the connection mode to automatic. The login and password must be entered into the appropriate tab “Account and connection settings” - you receive them directly from the operator.
How to set up wifi on asus rt n12 router?
Setting up WiFi on the asus rt n12 router is carried out in the “Wireless Network” tab, where you need to set the following parameters:


Configuring the asus rt n12 router to watch IPTV consists of the following steps:
- - select the “local network” tab in the menu;
- - further IPTV;
- - enable multicast routing – mark the “Enable” option with a marker;
- - enable IGMP Snooping – set the marker to “Enable”.

Leave the remaining items unchanged and click the “Apply” button to save the new settings.
asus rt - n12 setting up vpn server
Go to the router management menu and follow the following instructions step by step:

Set any IP address in the range from 192.168.10.2 to 192.168.10.254: the asus rt -n12 router simultaneously supports up to 10 clients. In the VPN server tab, you must enter your username and password. Save your changes.  In the network map section you can see the status of your VPN server, its IP address and connection status.
How to reset the settings of the asus rt n12 router?
Resetting user settings to factory settings is quite simple: for this you will need a regular needle or pin. On the back of the router, find the socket labeled “Reset”. Press and hold for 10 seconds. The device has been reset. Release the button.
How to set the password for asus rt n12?

The next step is to connect the router ASUS RT-N12 VP B1 to a Laptop or Personal Computer (PC). To do this, you need to connect the cable that the provider installed to the WAN port of the router (that is, this is the cable that goes to the apartment, house, office, etc. from outside), and the cable that came with the router is one connect the end to one of the four LAN ports, and connect the other end to a laptop or PC. And yes, don't forget to connect the power cable.
If you encounter network problems while connecting, go here to resolve the problem:
Authorization of ASUS RT-N12 VP B1 router
So, we have connected the router, now you need to access its web interface through any browser (be it Google Chrome, Mozilla Firefox, Internet Explorer, etc.). To do this, open the browser and enter the router address in the address bar: router.asus.com or 192.168.1.1 and press the button " Enter" on keyboard.
- Username - admin
- Password - admin
So, enter the data and press " Sing in"


Setting up the ASUS RT-N12 VP B1 router
We got to the router's Web interface. Now you need to configure the equipment. First of all, let's secure the wireless network by setting a password for wi-fi. Then you will need to find out what type of connection is used to access the Internet, is it PPTP, L2TP or PPPOE. You can find out by calling your provider (this is the organization with which you entered into an agreement to provide Internet services). So, let's start setting up the router. First, let's change the language of the Web interface to Russian. To do this, go to the upper right corner of the interface and click on " English"and choose" Russian"

Setting a password for wi-fi
I offer video instructions for setting a password for wi-fi on a router ASUS RT-N12 VP B1
Let's also take a written and illustrative look at setting up a Wi-Fi password on a router ASUS RT-N12 VP B1.
1.
On the Web interface, go to the menu in the "tab" Wireless network".
2.
In the column " SSID“Come up with and indicate a name for the wireless network; this name will then light up when you connect to the network. I advise you to indicate the frequency used in the name of the network, for example: “imya seti 2.4”.
3.
"Channel width" - 20 MHz.
4.
Now you need to set a password for the wireless network. To do this, select " Authentication Method" - WPA2-Personal".
5.
In field " WPA Preshared Key"we come up with and enter a password. Then click " Apply".

Setting up PPTP
PPTP on the router ASUS RT-N12 VP B1 using the ASUS RT-N56U router as an example.
Let's also write and illustrate PPTP on the router ASUS RT-N12 VP B1.
1.
Internet".
2.
IN " WAN connection type"choose" PPTP".
3.
"" and "" select " Yes".
4.
Below you are asked to indicate " Username", "PasswordVPN server
5.
"Hostname
6.
Apply".

Setting up PPTP with a static IP address
Let's look at the connection setup PPTP with static IP address on the router ASUS RT-N12 VP B1.
1.
Go to the menu in the tab " Internet".
2.
IN " WAN connection type"choose" PPTP".
3.
No" against " Obtain WAN IP address automatically" And " Connect to DNS server automatically".
4.
IP address"), subnet mask (in line " Subnet mask"), default gateway (in line " Main gate") and DNS (in the line " DNS server 1" And " DNS server 2").
All this data is usually specified in the contract with the provider. If for some reason you couldn’t find them, you need to call the provider’s hotline and find out how you can get them.
5.
Below you are asked to indicate " Username", "Password". You will also need to specify the server IP address in the line " VPN server"All of the above data is provided by the provider (the organization that provided the Internet).
6.
"Hostname" - any word in Latin, for example "Host".
7.
After you have entered all the necessary data, press the button " Apply".

L2TP setup
Let's look at the connection setup L2TP on the router ASUS RT-N12 VP B1.
1.
Go to the menu in the tab " Internet".
2.
IN " WAN connection type"choose" L2TP".
3.
"Obtain WAN IP address automatically" And " Connect to DNS server automatically"choose" Yes".
4.
Below you are asked to indicate " Username", "Password". You will also need to specify the server IP address in the line " VPN server"All of the above data is provided by the provider (the organization that provided the Internet).
All this data is usually specified in the contract with the provider. If for some reason you couldn’t find them, you need to call the provider’s hotline and find out how you can get them.
5.
"Hostname" - any word in Latin, for example "Host".
6.
After you have entered all the necessary data, press the button " Apply".

Setting up L2TP with a static IP address
Let's look at the connection setup L2TP with static IP address on the router ASUS RT-N12 VP B1.
Typically, a static IP address is provided to legal entities, or as an additional service to the basic tariff to individuals.
1.
Go to the menu in the tab " Internet".
2.
IN " WAN connection type"choose" L2TP".
3.
Since the connection uses a static IP address, set " No" against " Obtain WAN IP address automatically" And " Connect to DNS server automatically".
4.
Specify the server IP address (in the line " IP address"), subnet mask (in line " Subnet mask"), default gateway (in line " Main gate") and DNS (in the line " DNS server 1" And " DNS server 2").
All of the above data is provided by the provider (the organization that provided the Internet).
All this data is usually specified in the contract with the provider. If for some reason you couldn’t find them, you need to call the provider’s hotline and find out how you can get them.
5.
Below you are asked to indicate " Username", "Password". You will also need to specify the server IP address in the line " VPN server"All of the above data is provided by the provider (the organization that provided the Internet).
All this data is also specified in the contract with the provider.
6.
"Hostname" - any word in Latin, for example "Host".
7.
After you have entered all the necessary data, press the button " Apply".

Setting up PPPOE
I offer video instructions for setting up the connection type PPPOE on the router ASUS RT-N12 VP B1 using the ASUS RT-N56U router as an example.
PPPOE on the router ASUS RT-N12 VP B1.
1.
Go to the menu in the tab " Internet".
2.
IN " WAN connection type"choose" PPPOE".
3.
"Obtain WAN IP address automatically" And " Connect to DNS server automatically"choose" Yes".
4.
Below you are asked to indicate " Username", "Password"All of the above data is provided by the provider (the organization that provided the Internet).
All this data is usually specified in the contract with the provider. If for some reason you couldn’t find them, you need to call the provider’s hotline and find out how you can get them.
5.
After you have entered all the necessary data, press the button " Apply".

Setting up PPPOE with a static IP address
Let's look at the connection setup PPPOE with static IP address on the router ASUS RT-N12 VP B1.
Typically, a static IP address is provided to legal entities, or as an additional service to the basic tariff to individuals.
1.
Go to the menu in the tab " Internet".
2.
IN " WAN connection type"choose" PPPOE".
3.
Since the connection uses a static IP address, set " No" against " Obtain WAN IP address automatically" And " Connect to DNS server automatically".
4.
Specify the server IP address (in the line " IP address"), subnet mask (in line " Subnet mask"), default gateway (in line " Main gate") and DNS (in the line " DNS server 1" And " DNS server 2").
All of the above data is provided by the provider (the organization that provided the Internet).
All this data is usually specified in the contract with the provider. If for some reason you couldn’t find them, you need to call the provider’s hotline and find out how you can get them.
5.
Below you are asked to indicate " Username", "Password"All of the above data is provided by the provider (the organization that provided the Internet).
All this data is also specified in the contract with the provider.
6.
After you have entered all the necessary data, press the button " Apply".

I hope the article was as helpful as possible.
If you wish, you can support the project:
Hello! We will now configure the Asus RT-N12+ router. You can read a short review, photos, characteristics and reviews about this router (don't forget to leave your feedback, it is very important to us :)). I am sure that these instructions will be suitable for other Asus RT-N12 routers of different versions, there are many of them, I wrote about this in the article at the link above. Why, using these instructions you can configure almost any Asus router. At the moment I only have RT-N12+, so we will torture it. When the opportunity arises, I will definitely write about other models.
Now we’ll quickly set up our Asus RT-N12+, I’ll tell you how to connect everything, go into settings, configure the Internet, set the name of the Wi-Fi network and change the password. I will provide a link to instructions for updating the firmware. In a few minutes you will already be drinking tea and surfing the Internet via Wi-Fi :)
I will not review this router, as I wrote about it in detail on its page (link at the beginning of this article). I’ll just write that the router looks very beautiful and stylish, it works stably, and we intend it mainly for home use. Suitable for connecting tablets, phones, laptops, TVs, etc. via Wi-Fi, and if there is no wireless connection, you can connect 4 devices via cable. For a small apartment or small house, this is a great option.
We will configure it according to the following scheme:
- Connecting and entering settings
- Setting up Asus RT-N12 using the Quick Setup Wizard
- Setting up an Internet connection with a WAN provider (if it didn’t work through the quick setup wizard)
- Setting a Wi-Fi password and changing the wireless network name
- Changing the password to access settings.
To configure the router, we will definitely need information about what type of connection your provider uses and whether it binds by MAC address. And if the connection type is PPPoE, L2TP, or PPTP, then you will need additional data, such as username, password, possibly IP, etc. All this data is provided by the provider. How to find out the connection type, I .
Connection and quick setup of Asus RT-N12+
Connect power to the router. If the power indicator does not light up, check whether the power is turned on with the button on the back of the router. Connect the network cable from your provider or modem to the WAN connector. And connect a cable to one of the 4 LAN ports, which will connect the router to the computer. If you do not have a computer or laptop, or do not have a network cable, then you can configure the router via Wi-Fi. But it’s better to use a cable, then you can disconnect it from the computer.

If you configure via Wi-Fi, just connect your laptop (or another device, you can configure it from a tablet or phone) to the wireless network, which will appear immediately after turning on the router. The network will be called Asus and will not be password protected.

It may be that the default network will be called differently, or will have a password. Perhaps someone has already tried to configure our Asus RT-N12. I always recommend doing a factory reset before setting up. Press and hold the button on the back side for 10 seconds (showed her in the photo above). When you release, all the indicators will go out and the router will start to turn on.
Go to the control panel
After everything is connected, open any browser and type the address 192.168.1.1 . Settings should open immediately. If this does not happen, or something went wrong for you, then take a look. We should see the Quick Setup Wizard. To begin, press the button Go.


On the next page we need in the field Network name (SSID) indicate the name of your Wi-Fi network, and in the field Network key set a password to connect to this network. Write this password down somewhere as well.

The router will think and reboot. A Wi-Fi network will appear with the name we just set. Connect to it with the new password that we just set.

After connecting, go back to the settings. A window with connection information should appear. Click Further.

The router will ask you to provide a username and password to access the settings (which you specified during the setup process).

If everything is exactly as I described above, then you are very lucky. This most likely means that your ISP is using a connection technology Automatic IP, and the router configured everything itself. By the way, the Internet through the router should already be working. This completes the router setup.
But, if your connection type L2TP, PPPoE, or PPTP (providers: Beeline, Dom.ru and others), then the setup will go a little differently. You will just need to manually set some parameters.
Internet setup PPPoE, L2TP, PPTP (Dom.ru, Beeline) on Asus RT-N12
If your provider uses PPPoE, PPTP, L2TP, or Static IP technology, then after running the Quick Setup Wizard, after checking the connection, the router should prompt you to select the type of your connection.


You may need to specify some other parameters. IP address, service name, etc. It all depends on the type of connection and your provider.
During the setup process, as soon as the router establishes a connection to the Internet, it will prompt you to set up a Wi-Fi network, etc. Complete these settings as I showed above in this article.
You can always do it yourself change WAN settings(internet connections). Just go to the main settings page (there is a button in the Quick Setup Wizard), and open the tab Internet - Connection.

On this page you can always set the most important Internet connection settings. If the Internet through the router is already working, you have changed the wireless network name and password, then you can finish setting up the Asus router. And I’ll also show you where and how you can change the most important settings.
Setting up Wi-Fi and changing the password
If you want to change the name of your Wi-Fi network, or change the key that you use to connect to Wi-Fi, you can do this at any time in the router settings right on the main page. Simply enter a new username and/or password and click Apply.

More wireless network settings, including channel settings, can be found on the tab Wireless network(left).
After changing the network name or password, do not forget to reconnect your devices to Wi-Fi. If you have connection problems (usually after changing the password), then delete your network and connect to it again.
Protecting the settings of the Asus RT-N12 router
During the setup process, we already set a new password to access the control panel. But, if you haven’t done this, or want to change your password, then go to the tab Administration - System. Enter the same password twice and click the button Will apply b.

Now, to log into the admin panel, you will use this password. Don't forget it :) On this page you can also change the time zone, assign an action to the WPS button, enable Telnet, etc.
If you have read this article to the end, and you still have a desire to do something, then you can update the firmware of your RT-N12. There is a lot on this topic.
The Asus RT-N 12 router is a standard device with average characteristics, which should be sufficient to meet the needs of users. The presented model is compatible with IPTV, but setting up iptv on an asus router can only be done at the standard level: a port is allocated for this, but traffic is not recorded. Wi-Fi is fully supported by 802.11n, which, under ideal conditions, allows you to overclock the Internet to 300 Mbit. But in reality, of course, the speed is several times lower, although this is enough.
So how's Asus? Let's figure it out.
Setting up the router
The IP address on the network for the presented device is the most common - 192.168.1.1. To see the web interface, you need to enter the following into the browser line: http://192.168.1.1. It looks something like this:Figure 1. Interface
The user name and password are standard – admin, admin. After the first login, the “Setup Wizard” will be displayed. The tool is useful for beginners as it allows you to configure the router in simple conditions. After clicking the “Next” button, an attempt will be made to automatically select the connection type. If unsuccessful, the device will give you the choice.
When setting up an asus rt router, L2TP is selected for Beeline, and PPPoE is selected for Rostelecom and other providers of a similar type. Click “Next”.
Advanced setup
How to set up a wifi router asus rt nt12 yourself without a program?If the default language is English, then change it:

Figure 2. Changing the interface language
Below you will find the settings for currently popular Russian providers.
These include:
- Rostelecom;
- Dom.ru;
- Beeline.
Setting up PPPoE for Rostelecom
In the additional settings section, you need to select the “WAN” subsection:
Figure 3. Select WAN
We use the parameters specified as follows:
- Type of WAN – connections – select PPPoE;
- Digital television receiver (IPTV STB parameter) – you should select exactly the port where the STB device is connected;
- UPnP – connect;
- Obtain an IP address offline – enable;
- DNS – server – enable offline retrieval;
- Login – information specified on the card or in the agreement concluded with the provider;
- Password – provided by the provider;
VPN L2TP on Beeline
How to configure the Asus RT N12 router to work with Beeline?- WAN – connection – L2TP;
- Port selection – where the device is connected;
- UPnP – enable;
- Automatic WAN acquisition – enable;
- Offline DNS server – enable;
- Login and password - the latter is issued by the provider, and the login is the phone number itself;
- L2TP server – resource tp.internet.beeline.ru.
Opening the port
In the additional settings section, go to “WAN” and click on the virtual server subsection:
Figure 4. Virtual server
We enable the “Virtual Server” service, that is, set it to “Yes”.
Fill in the service name line. Here you need to write the name of the program or application for which the port is opened.
In the “Port range” value we enter the one that opens for the application. The same is indicated in the value of the local port.
In the local IP address line, enter the value of the personal computer for which it will be registered.
Confirm and apply the settings.
Setting up Wi-Fi
Setting up wifi is quite simple. How to set it up correctly? Let's go to the additional section. settings and in the wireless network subsection.
Figure 5. Wi-Fi setup
Step-by-step instructions for setting up the Asus RT N12 lx router to work with a wireless network:
- "SSID". In this field we write the name (identifier) of the network. It can be absolutely anything;
- "Verification Method". Select the “WPA2-Personal” parameter;
- "WPA Preshared Key". The Wi-Fi password is entered here. This can be either a letter or number combination. But the main rule is at least 8 characters.
Reset
How to configure the Asus RT N12 wifi router to reset settings? It is worth noting that this procedure is optional and is used if the user is unable to connect to his personal account due to hacking or intentional modification of identification data.
Figure 6. Reset button
To reset settings on an asus rt router, the router must be connected to power (anything can happen).
The button is located inside the case. Above it you can see an inscription, which from Asus means reset (in other models everything is simpler - Reset).
It is possible to press the button using a toothpick, pen, etc. You need to hold it for about 15 seconds. When the WPS button flashes, you can release it and wait a couple of minutes for the settings to reset.
Unfortunately, not every problem can be solved by resetting the router, since problems may not be related to the program, but to physical damage, incorrect network parameters, and much more.
Video with connection instructions
The video clearly and step-by-step explains and shows how to connect to the network, what settings are made and other necessary steps.


