Installing an ssd on a win 7 computer. Optimizing Windows using an SSD. Enabling the TRIM Command
If you use an SSD hard drive, you may experience that your computer running Windows 10 will start to slow down and freeze while working with the disk. But before you start looking for the reason and changing the drive settings, it is worth considering that Windows 10 differs from previous versions of the operating system, including in terms of its relationship with the SSD drive.
Do I need to configure and optimize an SSD drive in Windows 10?
In Windows 7, XP and others outdated versions systems, one could stumble upon processes that prevented the computer from using the SSD drive. For example, it was necessary to manually disable automatic disk defragmentation, since it was harmful to it. Nose the advent of Windows 10, the situation has changed in the opposite direction: now the system independently determines that an SSD drive is connected to the computer, and not only does not conflict with it, but also automatically optimizes it.
From all of the above, we can conclude that touching the settings SSD drive It's not worth it, as it won't help you fix errors and problems associated with it. The only thing you can do is change some of the parameters described in one of the following paragraphs of the article to extend the life of the disk and prevent it from breaking prematurely.
If you notice that your computer has become worse and are sure that the reason lies in the hard drive, then there can only be a few reasons for this:
Automatic optimization carried out by the system
Above in the article it was said that Windows 10 performs automatic setup and disk optimization, so you don’t need to change anything manually. Here is a list of actions performed operating system to achieve maximum SSD performance disk:
- Changes the type of disk defragmentation from regular to special, based on the Retrim function. This defragmentation option does not harm the disk, but, on the contrary, helps sort the information redirected to it. Therefore, there is no need to disable automatic disk defragmentation in Windows 10 unless there are some reasons for doing so.
- Disables the ReadyBoot feature, which by default changes the way the page file works to speed up slow hard drives.
- Does not disable the Superfetch function, as it did in previous versions operating system. WITH Windows release 10, this function, which allows you to optimize the performance of applications and games through the use of cache, can also work with an SSD drive.
- The system automatically adjusts the power supply parameters of the disk to provide it with the most comfortable recharge conditions.
This is where the optimization actions performed by Windows end, but there are still some functions that can either harm the disk or simply have no effect on it. Setting them up will be discussed in the paragraph below, but first you need to familiarize yourself with the rules that should be followed when using an SSD drive.
Rules for using the disk
So, if you are an SSD drive user, then you should adhere to the following rules so that your drive lasts as long as possible:

Manually configuring functions that affect disk performance
Next, all functions that in one way or another affect the speed of the disk will be considered separately. Many of them have both positive and bad influence to the disk, depending on certain factors, so do not rush to completely disable these functions, first experiment with how deactivating them will affect the disk.
Swap file
The page file is needed to help the system run some applications that require large quantity random access memory. Sometimes, it can negatively affect the operation of an SSD disk, but there are often cases when everything happens the other way around, the page file helps the disk. Disabling this file may cause certain programs will stop opening on your computer because there simply won’t be enough RAM for them. Moreover, according to statistics provided by Microsoft, this file is used only in one case out of forty, that is, very rarely, therefore, if problems arise with the SSD drive, it is most likely not because of it.
But if you want to check whether the page file is really the problem in your case, you can temporarily disable it by following these steps:
- Using a search engine Windows string, launch the System Presentation and Performance Settings program.
- In the window that opens, expand the “Advanced” tab.
- Click on the “Change” button.
- Uncheck the option that enables automatic settings for the paging file.
- Check the box next to the line “No paging file” and click on the “Set” button to save changes made. Done, the paging file is disabled, now you should test how the disk will perform without it: will it improve, deteriorate, or not change its speed. If there are no changes or the performance worsens, then turn on the paging file back.
Hibernation
Hibernation is a feature that allows your computer to boot quickly. If the computer goes into hibernation mode, then all information about the programs running on it is recorded in special file, taking up space on your hard drive. This is necessary in order to quickly get all this information and not lose it. But if the function fast loading If you don't use it, you can disable hibernation so that the file related to it does not take up much disk space.

System protection
System protection is expressed in the fact that the system automatically creates restore points that allow you to roll back your computer to a certain period of time if an error appears on it that cannot be eliminated by another method. There is one drawback to this function - sometimes it can load the system and, accordingly, the disk background processes. To avoid this, some disk manufacturers recommend disabling system protection. But in reality, it’s better not to do this, since no one is immune from a computer breakdown, and if you encounter one, you’ll really need a restore point. If you are ready to take a risk and think that disabling creation backup copies can help you with the disk, then follow these steps:
- Using the Windows search bar, launch Control Panel.
- Go to the "Recovery" section.
- Go to the sub-item “System Recovery Settings”.
- In the window that opens, expand the “System Protection” tab.
- Click on the “Configure” button.
- Select the "Turn off system protection" option.
- Click the “Apply” and “OK” buttons successively. Done, protection disabled, control points no more will be created. It remains to be seen whether this had a positive or negative effect on the operation of the system and disk.
Superfetch and Prefetch functions, record caching and clearing, indexing of hard drive partitions
All these functions have undergone changes when comparing Windows 10 with Windows 7, so their operation should not negatively affect the SSD drive. The only thing is that these functions can put an excessive load on the disk if it is overloaded not only with them, but also with running applications, small quantity free memory and many background processes. Based on this, you should not get involved in setting up the functions described above, since this will not give any positive result.
Third-party SSD optimization programs
If you are not well versed in computer settings or do not want to spend time on this, you can use third-party programs that will change the parameters of all the above functions to the optimal option for the disk. For example, you can use the simple and free SSD application Mini Tweaker, which can be downloaded from the official website of the developer -
http://spb-chas.ucoz.ru. It is very easy to use, just check the boxes which settings you would like to change and click on the “Apply changes” button. The program will automatically make all changes. You may have to restart your computer after the process is complete for all the changes to take effect.
So, if the SSD drive does not freeze and shows no signs that it needs to be repaired, then it is better not to try to make any changes to the system to optimize it. If you still encounter the fact that the disk needs to be configured manually, then use third party program, which will automatically do this for you. Also make sure that the disk is not being loaded by the system or background processes. You can view information about disk load through the task manager, located in the “Processes” section.
SSD is a device that has the same purpose as HDD, but in terms of structure and principle of its operation it is very different from its brother. In particular, if the matter concerns the operation of Windows installed on an SSD, you should properly optimize this device to significantly extend its service life.
SSD optimization for Windows
Let's assume you have already installed the Windows operating system, starting with version seven, on a brand new SSD. If not yet, you can follow the link below to learn a short guide that will allow you to complete this procedure Right.
The main feature of a solid state drive is that it has a limited number of rewrite cycles. This means that as little data as possible on the disk should be erased and rewritten. First of all, we will take this point into account when optimizing the SSD for the Windows operating system.
Step 1: Checking TRIM Activity
TRIM – special function, introduced in Windows 7, which finds unused areas and allows you to clear them for later recording. If this function is undesirable for HDDs, then in the case of SSDs it will extend the service life of the drive.

Step 2: Disable automatic defragmentation
The next point that can seriously affect the service life of a solid-state drive is automatic defragmentation. The fact is that defragmentation is useful tool For hard drives. It optimizes disk recordings, which allows you to speed up work with the HDD. In the case of SSDs, the less information is overwritten, the better.
As a rule, if an SSD is installed on your computer, Windows automatically disables this procedure, however, you should still check if this is the case.
To do this, press the keyboard shortcut Win+R to open the “Run” window and write in it next command by pressing the Enter key:
The disk optimization menu will be displayed on the screen, in which, by highlighting the item "Solid State Drive", in the lower area of the window you should see the value "Off". If you see the item "On", click on the button to the right "Change settings".

Uncheck the “Run on a schedule (recommended)” option, and then save the settings.

Step 3: Deactivate the page file
The paging file is a system file that allows you to make up for the lack of RAM when it is fully loaded.
The idea is that the page file takes over unused data from RAM to the hard drive (solid state drive). It becomes clear that with activity this file Information on a solid-state drive is regularly overwritten, which needs to be minimized.
Alternatively, you can completely deactivate the page file, which will reduce the number of rewrite cycles on the solid-state drive, however, if you run several resource-intensive games or programs on your computer, the RAM may completely run out, which means a message will appear on your screen the following plan:


Step 4: Disable Windows Hibernation
Hibernation is a popular mode for turning on a computer, in which, after completing work, the computer turns off completely, but after turning on it continues from the same place where you left off. Thus, the user does not have to re-launch all programs, open files, etc.
To disable hibernation, run Command Prompt as an administrator (as described above), and then run the following command in it:
Powercfg -h off
From this moment on, hibernation will be disabled, and the file responsible for it will be deleted from the system.
Step 5: Disable File Indexing
The file indexing procedure allows you to quickly find files on your computer, but due to constant rewriting, it negatively affects the life of the SSD.

Step 6: Enable Record Caching
Activating the record caching function will benefit both the solid-state drive and the hard drive.

Step 7: Disabling Prefetch
Prefetch represents special technology to speed up the loading of the system, which is aimed at working with slow media. As you understand, this function is useless for SSDs.
- Launch the Run window using the Win+R keys and enter the following command:
HKLM SYSTEM CurrentControlSet Control Session Manager Memory Management PrefetchParameters
Double click on the option "EnablePrefetcher" and set the value in it «0» . Save your changes.
These tips will allow you to reduce the number of SSD write cycles without affecting system performance. But even if you do not resort to the tips listed in the article, the solid-state drive will still for a long time delight you with our excellent work. If you know what other SSD optimization techniques exist, share them in the comments.
SSD – recording device digital information based on flash memory - microcircuits, which implies the absence of mechanical elements. High performance, enough high price and a limited number of rewrite cycles - basic SSD differences from magnetic platter drives. Last feature primarily excites the minds of owners solid state drives or those who are going to purchase such a device to install Windows 7 or 10 x64 on it in order to improve the performance of the computer. This procedure is practically no different in both systems. Therefore in equally it can be considered that SSD setup in Windows 7 is absolutely identical to Windows 10.
In this article we will understand how this happens SSD setup, installing the operating system on it and setting up some Windows settings 7 or 10, allowing to extend the operating time of such a drive. The fact is that the “seven” or “ten” repeatedly refers to system partition not only for the purpose of reading any files, but also writes to disk temporary files, page file and performs indexing. These and other similar actions will use up the working resource of the SSD at a significant rate and the disk will wear out faster than expected.
Transferring temporary files
The “Temp” directory is a directory for storing files with intermediate calculations during the operation of Windows 7 or 10. This service folder must be transferred to your hard drive after completion Windows installation 7 or 10. This action will slightly slow down the computer, which will be virtually invisible to the user, but will increase the service life of the SSD.
This is done as follows:
- Go to the context menu “My Computer” and call it “Properties”. Or click right click mouse on the “Start” button and select “System” from the drop-down menu.
- In the left frame, click on the tab “ Extra options».
- Go to the “Advanced” tab and click on the “ Environment Variables...", as in the screenshot.
- Next, new values of environment variables are set.
- Select the “Temp” directory and click “Change”.

- In the “Default” line, set the full path to the directory where temporary files will be stored. It is recommended to transfer them to the disk that is first in the list of HDD partitions.
- We do the same for the “Tmp” directory.
From now on magnetic disk will keep official Windows files 7 or 10 x64, saving the SSD from unnecessary wear and tear.
Disabling sleep mode
Sleep mode or hibernation - turning off the computer and writing the contents of RAM to system disk to the hiberfil.sys file. This mode allows you to perform quick start PC with Windows 7 or 10. For computers with large amounts of memory (8 GB or more), this factor of SSD wear becomes even more relevant. To avoid unnecessary overwriting of unimportant information onto a solid-state drive, it is necessary correct setting operating system. In order to increase the life of the drive, it is worth abandoning hibernation, especially since 7 or 10 starts up instantly anyway.
- Disabling hibernation is done with the command “powercfg –H off” entered into the command line launched with administrator privileges.

- It is launched using the "cmd" command in search bar Start or through the desktop context menu.

Disabling the page file
The page file is used by Windows 7 or 10 to write little-used data when there is low RAM until it has its turn. The speed of information exchange between HDD and RAM depends on many factors, but is significantly inferior to the operating time of RAM. The paging file not only slows down the work on a PC with a small amount of RAM, but also requires repeated writes to the solid-state drive .
If you want to extend the operating time of an SSD on Windows 7 or 10, disable the page file (it’s better to buy a stick of RAM, it will never be superfluous). To get maximum speed from your computer, you will have to sacrifice the working resource of the drive.
Disabling the paging file is done as follows.
- Go to “Advanced parameters”, as in the previous method.

- In the “Performance” tab, click on the “Options” button.

- In the tab, as in the screenshot, click “Change”.

- Uncheck the “Automatically select...” option.

- Move the trigger switch to the “No paging file” position,
- If you want to use a swap file, select HDD partition, preferably the first one, and set pagefile equal to the amount of installed RAM.
Disable drive optimization
Defragmentation is the process of collecting file fragments scattered across the surface of the media into one. Fragmentation occurs while writing information to disk due to imperfection of the file NTFS systems. A high degree of fragmentation negatively affects the performance of the drive due to the fact that the reading magnetic head has to make significantly more movements than if the file fragments were in neighboring clusters. But on an SSD, document fragmentation has virtually no effect on performance, so it is not recommended to defragment it and you need to turn off defragmentation on a schedule (setting up and disabling SDD defragmentation in Windows 10 occurs automatically).
- Go to the properties of the SSD disk and go to the “Service” tab.
- Click “Run defragmentation”.

- Click “Set up schedule” and uncheck the box next to “Run according to schedule.”

Indexing
Indexing is the procedure for entering data about files stored on disk into special list, called the index. This data is needed to search for information on a PC with Windows 7 or 10. If your SSD does not store hundreds or thousands of personal files and the need to search for something on the disk rarely arises (for this you can use the functionality Total Commander or other applications) it is reasonable to deactivate indexing. This will slightly reduce the number of accesses to the drive in write mode. The setup is performed as follows.
- Select the disk and select “Properties” from the context menu.
- Uncheck the box next to “Allow indexing...”, as in the screenshot.

Program cache
Many applications, such as Internet browsers, use data caching to obtain quick access see them next time. The situation here is the same as with the swap file and temporary directories: if you want maximum speed– donate SSD resource, storage is expensive - transfer the cache or install the browser itself on your hard drive .
Alternatively, use the free amount of RAM to create a RAM disk on which the browser cache and other programs will be stored. Setting up and creating such a disk is a simple process, but it looks different for each application, which is beyond the scope of our article.
Restore points
Disable point creation Windows rollback 7 or 10, which will also have a positive effect on the service life of the SSD.
- To do this, go to “Properties” of the “My Computer” directory.
- In the “System Protection” tab, select the system disk and click configure.

- Move the switch to the “Disable system protection” position, click “Delete” and save the changes.
Simplifying the setup process
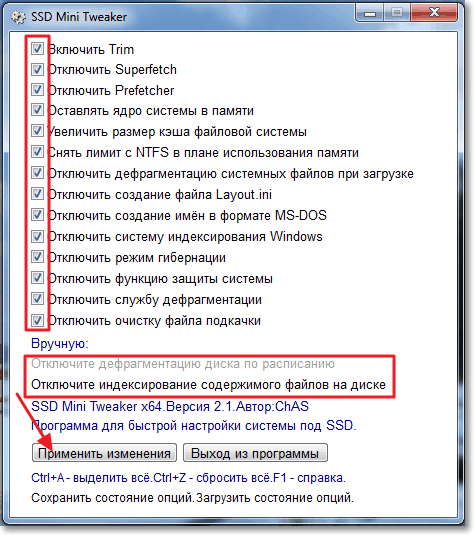
At SSD operation Mini Tweaker setup Windows 7 or 10 to use solid state drive is carried out in several steps.
- Download, install and launch the application.
- Checking the boxes next to unnecessary options is done using the knowledge gained above.

- Click “Apply changes”.
- Setting new parameters will take effect after rebooting the PC, so we restart the system.
Setting most of the parameters in SSD Mini Tweaker is done manually, but through the program, settings windows open with one click.
(Visited 11,681 times, 1 visits today)
Hello! Decide to prepare an article in which you will talk about how to properly install Windows 7 on an SSD drive, and how to configure Windows 7 on an SSD drive after installation so that it works for a long time and without problems. I recently bought a laptop, took an Asus K56CM and immediately bought an OCZ Vertex 4 128 GB SSD drive for it, I really wanted to experience all the speed that an SSD gives.
In our case, the model of laptop/computer and SSD drive does not matter; my instructions can be said to be universal. I will write what needs to be done immediately after SSD installation drive into the computer and how to configure the operating system after installation on the SSD.
If this is your first time encountering an SSD, then you are probably wondering why there is such attention to setting up the operating system for these drives compared to conventional ones. hard drives. I will now explain everything in simple words.SSD drives have a limited failure time compared to hard drives. Simply put, they have a certain number of rewrites. Now I won’t say what this number is, it is different and what is true and what is not is difficult to understand. For example, for my OCZ Vertex 4 in the characteristics it was written that the operating time between failures is 2 million hours. And the operating system writes a lot during operation, deletes and writes again various temporary files, etc. Services such as defragmentation, indexing, etc. serve to speed up the system on normal hard drives. And they only harm SSD drives and reduce their service life.
In fact, installing Windows 7 on SSD almost no different from installing on a hard drive. But after installation you will need to make some settings in Windows operation 7, but there is nothing complicated there either, we will do everything using the utility SSD Mini Tweaker 2.1.
What should you do before installing Windows 7 on an SSD drive?
Well, first you need to install an SSD drive in a laptop or computer, it doesn’t matter. I will not describe this process. There is nothing complicated about this, and this is a topic for another article. Let's say that you have already installed the SSD, or it has already been installed.
If you will use a regular hard drive in your computer next to the SSD drive, then I advise you to disable it while installing Windows 7, this is so that you do not get confused when choosing a partition to install the OS, but this is not necessary.
All you need to do before installation is to check whether our solid state drive is working in AHCI. To do this, go to the BIOS; if you don’t know how, read the article. Next, go to the tab "Advanced" and select the item “SATA Configuration”.

Select the item, a window will open in which we select AHCI(if you had another mode enabled). Click F10 to save settings.

Now you can start Windows installation 7. The installation process on a solid-state drive is no different from installing on a hard drive. I just want to give you one piece of advice:
Try to install the original image of the Windows 7 or Windows 8 operating system. I recommend installing only one of these operating systems, because only seven and eight can work with SSD drives. Do not use different assemblies, and if you install Windows assembly 7, or Windows 8 downloaded from the Internet, then try to choose an image close to the original.
We install the operating system. You may find the following articles useful:
Once the operating system is installed, you can proceed to setting up Windows for SSD.
Setting up Windows 7 to work with an SSD drive
More precisely, Windows 7 will work anyway, our task is to make sure that our solid-state drive lasts as long as possible and without various errors.
As I already wrote at the beginning of the article, to optimize Windows for a solid-state drive, we will use SSD utility Mini Tweaker. Everything is allowed unnecessary options disable manually, but in SSD program Mini Tweaker can do all this in a few clicks. You will only need to manually disable indexing of files on local drives.
First we need to download SSD Mini Tweaker. Download version 2.1 from the link below:
There is no need to install the program, just extract it from the archive and run it.
Launch the SSD Mini Tweaker utility.
You can tick all the boxes, or rather, it’s not possible, but it’s necessary. I have checked all the boxes, except that you can leave only SuperFetch; disabling this service may increase the startup time of programs. Check the boxes necessary services, and press the button “Apply changes”. Almost everything, in the same utility there is a “Manual” item, this means that you need to manually disable services. There are two of them, disk defragmentation on a schedule and indexing the contents of files on the disk.
If scheduled defragmentation is disabled automatically after the changes we have made, then indexing of files on the disk must be disabled manually on each local partition.
Let's go to "My computer", and right-click on one of local disks. Select “Properties”.
A window will open in which you need to uncheck the item “Allow the contents of files on this drive to be indexed in addition to file properties”. Click “Apply”.

Another window will appear, click “Ok”.

We are waiting for the process to complete.
When you do this procedure on drive C, you will most likely receive a message stating that you do not have rights to change system files. I just clicked “Skip all”, I think that if you skip a few files, nothing bad will happen.
That's all, Windows setup under the solid state drive is completed. You know, many people say that these are different myths, that nothing needs to be turned off, etc. Maybe so, but if they came up with it, then it means it’s necessary and I think that in any case it won’t hurt.
It seems that I wrote everything I wanted, if you have additions, comments, or something is not clear, then write in the comments, we’ll figure it out. Good luck!
Also on the site:
Updated: February 7, 2018 by: admin
Solid state drives (SSD), due to their design, are noticeably faster in operating speed than the good old mechanical ones hard disks(HDD). However, they also have a significant drawback. For each gigabyte of SSD capacity, the user has to pay much more than the cost of a gigabyte of HDD. But if you really need high speed disc, then SSDs are an excellent option, even taking into account their high cost. Speed SSD operation out of the box is impressive compared to an HDD, although some venerable hardware gurus claim that an SSD can be accelerated even more in simple ways. Let's figure out whether we need to speed up the SSD if Windows 7, 8 or 10 itself is doing the optimization?!
Even if you just purchased a drive, came home and installed it in your computer, you should not immediately search the Internet for a guide to optimizing an SSD in order to ruin all your efforts in a few minutes Microsoft specialists in SSD optimization and slow down the system as a whole. Yes, yes, this is exactly what will happen if you start following optimization tips, even two years ago, not to mention optimization materials from older years.
SSDs are not as fragile as they seem
As I wrote above, there are many guides on the Internet about optimizing SSDs, but I do not recommend using most of them. The fact is, since the days of the Windows 7 operating system Microsoft company spent great job for ensuring maximum performance your operating system on an SSD, so most recommendations from third-party software developers and hardware manufacturers are outdated.
Most recommendations for optimizing Windows for SSDs involve reducing the number of writes to the SSD. This is because each flash memory cell on the disk has limited number write operations, having reached which it will no longer be possible to write to this cell. All guides state that you should try to avoid unnecessary wear and tear on the SSD by minimizing the number of writes.
But concerns about SSDs suffering from such wear and tear are exaggerated. The guys at Tech Report ran an 18-month stress test in which they wrote as much data as possible to the SSDs to see when they would fail. And this is what they found:
Over the past 18 months, we've seen that modern SSDs easily accept far more data than most consumers will ever write to them. Drive sector failure errors Samsung series The 840 started after 300 TB of data was written to it, and it also withstood 700 TB of data transfer during the test. The fact that the 840 Pro series exceeded 2.4 PBytes is not surprising, even if this achievement is a kind of academic height of data recording.
Even considering that 700 TB is the lowest failure threshold you could get at work or at home, writing 100 GB to a drive every day for over 19 years before the drive failed. 2 PB is the threshold that you can reach in 54 years by writing 100 GB to disk every day. Agree, it is unlikely that you will write such a large amount of data to disk every day. In fact, the chances of other PC components failing are much higher than an SSD failing from overwriting.
But one way or another, everything wears out, and SSD drives are no exception. But they do not wear out as quickly as the Internet community would like you to believe. With them, as with regular HDD, there is a possibility of failure, but it is not so impressive.
Still, I recommend that you do regular backup important files, since SSDs can fail for other reasons, not just wear. And for very intensive use, for example, for a database server, an SSD can be as vulnerable as an HDD.
Optimization settings with Windows side, which allow you to write a little less to the disk, are practically unnoticeable and do not provide a large increase in performance, much less an increase in the lifespan of the SSD disk.
Some guides recommend that you reduce the number of files you store on the SSD to save space. This is because SSDs can slow down once they're full. free place disk. But this recommendation applies not only to SSDs, but also to all modern means of storing information, be it an SSD, HDD or a flash card.
What optimizations can Windows perform automatically on an SSD?
There are several important optimizations, which need to be monitored and turned on if they are turned off. But only applies to Windows XP or Windows Vista. Starting with Windows 7, the operating system performs all optimizations automatically.
So if you used an SSD with Windows XP or Vista, you need to manually enable TRIM. This feature will allow you to automatically erase deleted files on the SSD, and then record again on the free space. In this case, the HDD simply overwrites files on top of deleted ones, which somewhat slows down its operation. That's why SSD is faster here. Since Windows 7 was first released, TRIM has been automatically enabled for any SSD drive that is present on the system.
The same applies to disk defragmentation. Performing a typical defragmentation operation on an SSD will not bring benefits, unlike an HDD. But Windows 7, 8, 10 already know about this and when they detect an SSD, they will simply disable defragmentation on them. Except that Windows 10, even if you want to check it, will not allow you to defragment the SSD.
In operating rooms Windows systems 8 and 10, every time during memory optimization, the system will try to optimize SSD drives using the TRIM principle. Windows will send the command retreat, which will cause the SSD to actually delete data that should have been deleted, even if TRIM is disabled.
Windows 8 and 10 will also automatically disable the service SuperFetch for solid state drives. Leave SuperFetch enabled in Windows 10 and the system will automatically turn itself on for slower mechanical drives and self-lock for fast SSD drives. You don't need to configure this manually if you have hybrid system data storage consisting of SSD and HDD. Windows 10 will do everything for you and do it right. Windows 7 will disable SuperFetch system-wide if you have fast SSD. There's no manual settings not enough.
In addition, the Center Windows updates will automatically update hardware drivers, including SSDs, if the manufacturer releases a new version. You no longer have to worry about a new version driver provides performance improvements. Windows will do everything for you.
Myths about SSD optimization
Main SSD myth- if you fill a modern SSD disk completely with data, it will start to slow down like all other types of drives. This is far from true. Modern SSDs contain an additional amount of data that is not available to the user for writing and serves solely to ensure performance while filling the main capacity of the disk.
Here are some useless tips that would seem to optimize the disk and the system as a whole:
By default, Windows uses a "balanced" power plan, which will automatically turn off power to your drives when not in use to save power. You can switch plan High performance, and Windows will keep power on for all drives at all times. The drives will only turn off in sleep mode when you are not using them, you will not see a noticeable drop in performance. It makes no sense to change your nutrition plan to increase productivity.
It's an inherently bad idea because some programs simply won't run properly without a page file, even if you have a lot of RAM. Of course, the presence of a swap file can lead to more Records on the SSD, as well as the swap file, take up a lot of space. But again, this is not a problem with modern SSDs. And Windows 7, 8, 10 automatically manage the size of your paging file.
This will remove the hibernation file from your SSD and you can save some extra space. Again the problem is modern drives not applicable. Gone are the days when we saved for every extra gigabyte. The advantages of sleep mode completely cover the disadvantages extra space on the drive. For those who are used to working with a computer with a bunch of windows open, they can appreciate the advantage of saving all open source software when you turn off your computer at night. In the morning, you don’t need to remember all yesterday’s work, the location of windows, or the information that the browser displayed. Just turn on the computer, which will wake up from sleep mode and return everything that was on it yesterday.
Some gurus say that you should disable the search and indexing feature, which makes searching faster. They claim that with SSD search so it's already fast enough. But this is not entirely true. Indexing builds a list of files on your disk so that you can see search results instantly. And if you disable indexing, Windows will have to scan the entire disk again each time, which takes some time and wastes processor resources.
Claims that indexing is bad because Windows writes data to disk are not entirely true. At the beginning of this article, I gave small calculations of data recording, and how many of them are needed for the disk to last 54 years.
Do not do that. If you disable this feature, you may lose data in the event of a power failure. To disable this feature, your drive must have a separate power supply, which will allow it to clear its buffer and save data to disk in the event of a power failure. In theory, disabling the buffer Windows entries may speed up some SSD drives, but may cause other drives to slow down or crash. So this optimization does not guarantee improved performance.
Windows 10 allows this by default, as does Windows 8. Windows 7 does not offer this feature for SSDs.
These features are really not necessary for SSDs, so in Windows 7, 8 and 10 they are already disabled for SSD drives in cases where your SSD is fast enough.
It is important that TRIM is enabled. TRIM is always automatically included in modern versions Windows with modern SSD. You can check this if you have Windows 7 or higher and a fresh SSD. Open a window command line and run the command fsutil behavior query DisableDeleteNotify. If it is set to "0", TRIM is enabled and all is well. If it is set to "1", TRIM is disabled and you need to enable it.
- Set your meal plan for high performance
- Disable System Restore
Disable System Protection and Windows will not create system restore points. You could do this for Windows 10. Some people argue that system restore is bad because the recovery files take up a lot of space, given modern storage SSD drives and especially HDD doesn’t need to worry about it. System Restore is extremely useful function, which can help you out more than once in case of serious equipment failures.
- Disabling the page file
- Disabling sleep mode
- Disable indexing or Windows Search Service
- Disable Windows write buffer to disk.
- Optimizing SSD disk according to schedule
- Disable Superfetch and Prefetch
- Check TRIM operation
TRIM operating mode
These are not really optimizations for SSDs. It hides the Windows boot logo during system startup. IN best case scenario, it can do the download Windows is faster for a split second. This kind of optimization really doesn't matter. If you want to make your computer boot faster, use the tab in Task Manager to turn off unnecessary programs launch. This will help a lot more than disabling the loading logo.
If you have several installed Windows versions, and you see a menu with a list of them every time you turn on your computer, you can disable this menu to save boot time. But since you have several operating systems, then you hardly need such optimization. At most, you will reduce the time it takes to select the system you need from 30 seconds, for example, to 5 seconds.
- Enable "No GUI Boot" in MSConfig
- Disable Time for displaying a list of operating systems
So, you shouldn’t apply all sorts of advice about optimizing SSD drives. They do not increase the performance of the SSD and the operating system as a whole.
Install Windows on the SSD and enjoy the operating system as Micsoft has provided for it. You should not waste time and effort on optimizing the SSD; it is better to devote it to a more in-depth study of the operating system.


