Installing android on pc w3bsit3-dns.com Preparing a disk partition for Android. Create a disk partition for installing Android
New in version 8.1-r1 (Oreo-x86) (15.01.2019)
First stable release of Android-x86 8.1
- Supports both 64-bit and 32-bit kernel and userspace with the latest LTS 4.19.15 kernel.
- Support hardware acceleration OpenGL ES 3.x for Intel, AMD, Nvidia and QEMU (virgl) from Mesa 18.3.1.
- OpenGL ES 2.0 support via SwiftShader for rendering software on unsupported graphics devices.
- Support for hardware accelerated codecs on devices with the Intel HD and G45 family of graphics processors.
- Support secure boot from UEFI and installation to UEFI disk.
- Added text interface installer.
- Added theme support to GRUB-EFI.
- Supports Multi-Touch, Audio, Wi-Fi, Bluetooth, Sensors, Camera and Ethernet (DHCP only).
- Auto-mount external USB drive and SDCard.
- Added taskbar as alternative remedy Launcher that includes the Start menu and recent apps bar at the top of the screen and supports freeform window mode.
- Enable ForceDefaultOrientation on devices without known sensors. Portrait apps can run on a landscape device without rotating the screen.
- Arch application support via native bridge mechanism. (Settings -> Android-x86 Options)
- Support for updating from unofficial releases.
- Added experimental Vulkan support for new Intel and AMD GPUs.
- Mouse integration support for virtual machines, including VirtualBox, QEMU, VMware and Hyper-V.
New in version 7.1-r2 (Nougat-x86) (02.05.2018)
- Updating grub-efi 64-bit to version 2.02 to fix the "malformed file" issue.
- Fixed high load system_server due to the keyboard position sensor (kbdsensor) on some devices.
- Fixed Services crash Google Play, caused by the i965 driver.
- Improved compatibility with some applications.
- Fixed some memory leak issues.
- Fixed a display issue associated with using the old boot method in Hyper-V.
- Added qxl support to the qemu-android script.
- Fixed getSupportedPreviewFpsRange exception.
- Kernel update to version 4.9.95.
New in version 6.0-r3
- Automatic mounting CD/DVD
- Fixed VMware issue found in 6.0-r2
- Added qemu-android script for Android launcher-x86 in QEMU
- Update to Android Marshmallow-MR2 release (6.0.1_r79)
- Kernel update to version 4.4.62 with new patches from AOSP
- Updating Mesa to version 17.0.4
- Update related projects(libdrm, ntfs-3g, exfat, bluez)
New in version 5.1-rc1
Version 5.1-rc1 is based on Android 5.1.1_r24. Added x86-specific code sections and fixed stability and smoothness issues.
Main functions:
- Support for 64-bit kernels and 32-bit systems;
- OpenGL ES hardware acceleration support for Intel chipsets/ AMD (radeon / radeonsi) / Nvidia (nouveau);
- Supports UEFI boot and installation UEFI drive;
- Added the ability to install ext4/ext3/ext2/ntfs/fat32 file systems using a text installer;
- Supports multi-touch, audio, Wi-Fi, Bluetooth, sensors, camera and Ethernet (DHCP only);
- Automatic mounting of external USB drives and SD cards;
- Support for virtual machines, including Qemu, VirtualBox and VMware;
- Support for third-party architectures (arm/arm64) using own mechanism bridge.
New in version 4.4-r5
Android-x86 4.4-r5 includes fixes for bugs found in version 4.4-r4. Fixed problems with hazi fonts in the Mesa 10.5.9 graphics library on GPUs Intel 5th generation.
Android-x86(formerly known as “patch hosting” for android x86 support") is free project with open source code, designed to run Android OS on systems with x86 processor architecture.
In fact, this is an Android porting project open source project (AOSP) on the x86 platform, offered by by Google for free use.
Android-x86 allows users to use the Android OS on laptops and desktop computers.
Application
Android-x86 allows you to run and work with the Android OS on devices based on AMD processors x86 / Intel (not on ARM chips). The program is not officially sponsored by Google. Android-x86 will be excellent choice for users who want to install an alternative OS on a Linux-based computer.
Android-x86 review
Installation
Android-x86 contains two files. The ISO file can be booted on any device by selecting the boot mode in the BIOS. The EFI image can be used in modern systems With UEFI firmware. Select the file that is appropriate for your hardware type. After loading, a screen will open where you can select the option to start a “live” session, i.e. without the need for installation, or an option with product installation. Android-x86 can be installed on USB drives, which saves basic disk space. The software installation process is very simple. The only problem is that there is no support for formatting partitions with the ext3 file system.
Ease of operation
Android-x86 is different high performance work on any computer. When using the program for the first time, you will need to create or log in to your account. Google posts. Even if there is a login error, it will be loaded pure Android. As a result, you will be able to browse websites on the Internet using the built-in Android browser. You will also need to set up a Wi-Fi network. A ring-shaped mouse cursor is used to navigate and simulate clicks. Some navigation functions require the use of keyboard keys. With Android-x86 you can access the store Google applications Play Android settings And Google Chrome to personalize the new OS.
The program includes two home screens and 6 background images. Both main screens contain search bar Google and an icon for voice input request. The panel at the bottom of the screen contains familiar Android keys“Home”, “Back” and “ Recent Applications" Just above are the buttons for quick launch YouTube, standard application For SMS correspondence, Google Music, browser and button to launch application bar.
Advantages
By running Android on all devices, you can have fast access to Google applications, settings and services. Android-x86 allows you to organize this instant access without much difficulty. The new version of the product has become even more intuitive and easier to learn. She works faster previous versions Android on dedicated hardware. Use the solution on various devices: From netbooks to tablets - you will be surprised by the high performance. Hardware acceleration technologies are now available for Vmware and Nvidia chips. The new version has added support for GPS sensors.
Flaws
Some users report problems using the suspend and resume feature, while others complain of limitations associated with using only standard browser Android.
In some cases, when using a live session, the browser may not start and an error message will appear. In many cases simple reboot allows you to solve the problem. Sometimes users report that the program does not start at all, in other cases they report systematic failures. For a temporary solution similar problems, restart your computer. The developers should fix these bugs in the future.
Conclusion
Android-x86 is good tool to run Android OS smoothly on a laptop or desktop computer based on AMD x86 / Intel processors. However, many users will not like possible problems stability. It is recommended to wait for the release of a new version of Android-x86.
Everyone knows that the Android operating system is developed by Google for smartphones and tablets. On this moment, this is the most popular platform for these devices. Official version Android may only run on supported devices with ARM architecture. But since Android is an open source project, the community has created a port of Android for x86 computers that will run on almost any modern computer.
Official Android version 6.0 from Google came out quite a long time ago, but only a few days ago the developers released stable version Android port x86 for version 6.0 In this article we will look at installing Android x86 6.0 on a computer or laptop. Perhaps the platform is not yet stable enough, but it can already be used and you will see it.
System requirements Android x86 6.0
Android x86 is quite demanding on hardware. Ideally, it should run on any computer with an x86 processor. But in reality it's not that simple. The developers tested the system on several devices, for example, laptops from ASUS, EeePC and Dell full list Supported devices and their level of support can be found on the official website.
As for equipment and characteristics, the following parameters are recommended:
- CPU: Intel;
- RAM: 2048 MB;
- Free disk space: 10 GB;
- USB flash drive- to record the installer.
Preparing for installation
As with other operating systems, first we need to download installation media. Download the most new version systems you can from the repository on SourceFoge or the official website. Images are available for both 32 and 64 bit architecture:
The image does not take up much, only 400-odd megabytes, so it loads quickly.
Step 2. Burn to media
For Android installations you need to use either a flash drive or a rewritable disk. But a flash drive is still better. I don't recommend using various utilities to burn the image, do it with this command:
dd if=~/android-x86-6.0.iso of=/dev/sdc bs=5M
Here ~/android-x86-6.0.iso is the image you just downloaded, and /dev/sdc is your flash drive.
Step 3. BIOS setup
Everything is standard here. Restart your computer and during the BIOS splash screen, click F2, F8, Shift+F2 or Del to login BIOS setup, then go to the Boot tab and select in 1st Boot Device your flash drive.

All you have to do is go to the tab Exit and press Exit & Save Changes.
Installing Android 6.0
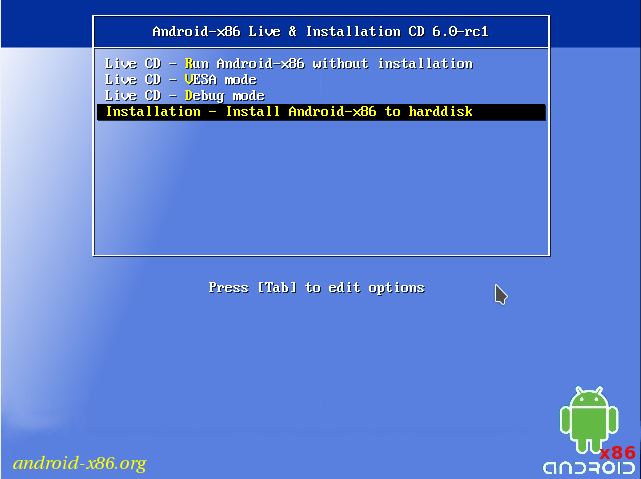
Step 1. Start installation
Immediately after restarting your computer, you will see this bootloader window. Here you can either log into Live system, or proceed to install it. We will be interested in the last point, installation:
The installer will start very quickly:

Step 3. Select a drive
In the first step, you have to select the disk on which you will install:

Step 4: Partition Table
Next, if this disk is not yet partitioned, you need to select a partition table. You can use GPT, but I don't recommend it because there is a high chance that the installation will simply freeze. Therefore, at this step we select No. In this case, the MBR will be used:

Step 5. Create a partition
Android x86 6.0 installation is performed on only one partition. And in this step we have to create it. The cfdisk utility will be used for this. First click New to create new section. You can navigate through the buttons using the left/right arrows, and press using Enter:
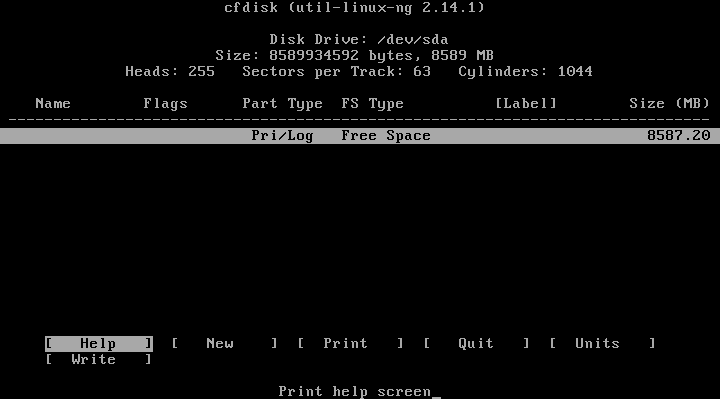
Select type primary, primary:


Find the Bootable button and press Enter to make this partition bootable:

Find and click the Write button to write the changes to disk. To confirm, type yes:

All that remains is to press the quit button to exit the program:

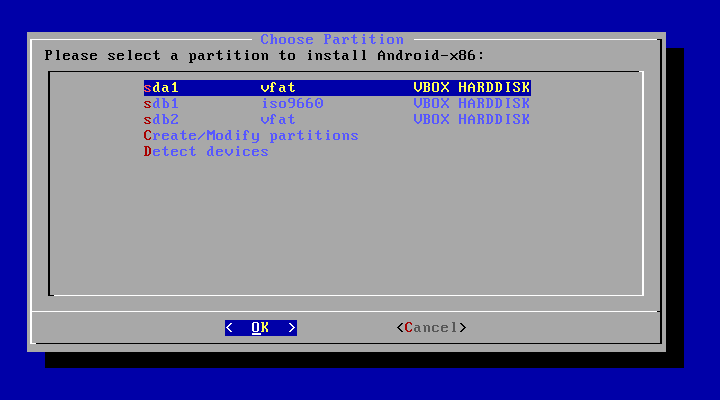
Step 6. Selecting a partition
Once the partitioning is complete, you need to select the newly created partition:
Step 7: File System
Select file system eg ext4

Step 8: Formatting
Since we need a clean partition, we agree that it will be formatted:

Step 9. Bootloader
We will need a bootloader, so select Yes:

Step 10. EFI Boot Loader
But we don’t need an EFI bootloader, given that we used the MBR. Select Skip:

Step 11. Access Mode
In this window you need to choose whether to mount system partition/system in read-write mode. This will be useful for installing new programs, so select Yes:

Step 12: Complete installation
Wait for all files to be unpacked:

When the installation of Android on your computer is complete, select Reboot to reboot your computer and log into the new system:

Step 14. Bootloader
Select the first bootloader item:

Step 15. Starting the system
Wait until the system boots.
Step 16: Done
That's all, installing Android x86 on your computer is complete. Now you can use Android directly on your computer. You can install and run Android applications, play games:

conclusions
As you have seen, installing Android x86 on a PC is not so different from other operating systems. If you are lucky and the system fully supports your hardware, then you can very easily get a full-fledged system Android to your computer. If you have any questions, write in the comments!
To complete the video with the Android installation process from an American video blogger:
Before purchasing a smartphone, many users want to become more familiar with Android. In order to understand whether a smartphone with this operating system is suitable for them or not. Fortunately, this can now be done using a computer. After all, you can install Android on your PC and explore its capabilities.
In this article, we will look at the entire process of installing Android on a PC in as much detail as possible. Starting from downloading ISO image and from the operating room Android system and ending with its installation on the PC.
In order to install Android on a regular PC, you first need to do some preparatory work. First, you need an Android ISO image that is ready to run on x86-based PCs. This ISO image can be downloaded from the Internet. For example, you can download ISO images from Android version 4.3. If you need more modern version Android, then, at the moment you can download Android version 6.0 there.
After ISO file with the image operating system downloaded, you need to burn it to a CD or flash drive that will be used to install Android on your PC. For recording you can use various programs. In this article we will demonstrate how this is done using the UltraISO program as an example.
Run UltraISO program on your computer and using the “File – Open” menu, open the previously downloaded ISO image with Android. After this, you can start burning the ISO image. If you want to burn an ISO image to a CD, then press the F7 key or the button on the UltraISO toolbar.

If you want to do bootable USB flash drive with Android, this can also be done in UltraISO. To do this, you need to open the ISO image in the program and use the menu “Boot - Burn” image of Hard disk."

After this, you need to select the flash drive that should be used to install Android on your PC and click on the “Burn” button.

As a result of the above steps, you should have a bootable CD or bootable USB flash drive with installation files Android operating system.
Installing Android on PC
After finishing preparatory stage, you can proceed directly to installing Android. To do this, reboot the computer, enable booting from a flash drive or disk in the BIOS, insert boot disk or a flash drive, we boot the PC from this drive.
As a result, a menu should appear on your PC screen asking you to boot into LiveCD mode or start installing Android on your PC. Select the installation option and move on.

After this, the process of installing Android on your PC will begin. At the first stage, you will need to select the partition on which you want to install Android. Please note that the partition you select will be formatted, so make sure you don't lose any data before proceeding.


After this, we allow writing to the system directory.

And wait until the process of installing Android on your PC is completed.

When the installation of Android on your PC is completed, you will see a proposal to immediately launch Android or restart your PC. Select reboot.

After rebooting the PC, disconnect the bootable USB flash drive or disk and boot from just installed Android. When you launch Android for the first time on your PC, a menu will appear for the initial setup of the operating system.

You will need to select the operating system language and also configure some other options. After this, the Android desktop will appear on your PC screen.
Initially, Android did not have support for computers with x86 architecture, and older versions were intended exclusively for mobile devices. Now there are no restrictions. On the website of the developers of the Android-x86 project, you can download a distribution kit of the system, which can be installed on any computer without any problems. The latest version available for installation is Android 7.1.
When choosing a distribution, pay attention to . If your computer uses x86 architecture, you need to download the appropriate installation package. You can view the system type in the “Computer” properties.

Creating installation media
To burn the distribution to a flash drive, use the Rufus program. Connect the drive to your computer and set the settings in Rufus as shown in the screenshot. Choose to create an ISO image and click on the drive icon to provide the path to the downloaded Android file.

When asked about the recording type, select ISO. During creation bootable media All data will be deleted from the flash drive.
Launch without installation
The Android-x86 distribution has the function of starting the system without installation. In this mode you can use all Android features, but the changes made are not saved. Essentially, this is a demo mode that helps you understand whether it will be convenient to work with Android on a computer.
Restart your computer and boot from the flash drive - the same as with . Select the first item in the menu Run Android without installation.

After a short boot, the language selection screen and other initial settings will appear. At this point, your keyboard, mouse, and touchpad should work if you're running Android on a laptop. You don’t have to configure anything - the configuration is not saved in this mode anyway.
Click "Next" until you get to main screen systems. Check how this version of Android works on your computer. Wi-Fi, connection via local network, video playback - everything should work by default, without additional settings.
Installing the system
If you want to have two systems running on your computer, install Android. Installation on a Windows partition will completely erase the system. For Android you need to allocate at least 8 GB of free space. Optimal size- 16 GB.
On the installer screen, click on the last item Install Android to harddisk. Select the section dedicated to Android.

Specify the file system FAT32 or NTFS. A warning will appear indicating that all data from the selected partition will be destroyed. Click Yes.

Accept the offer to install GRUB boot loader. Install the EFI GRUB2 subkey if you are installing Android on a computer with UEFI. If you have a regular BIOS, click Skip.

Click Yes in the “Do you want to install/system directory as read-write?” dialog to be able to overwrite data on the system.

Wait for the installation to complete. After installation, you will be prompted to create a user partition within the system. Click Yes and set the size to 2000 MB.

Click Run Android to complete the installation. Initial setup The system is completely the same as turning on a new Android device for the first time: you need to select a language, Wi-Fi network and add a Google account.
Android-x86 is not the only desktop version of Android. For variety, you can put . It is positioned as a system that is easier to install and learn, which was immediately created for a computer, although it is based on the Android ecosystem.
There are times when there is a need to use a mobile OS. But what to do if there is no smartphone with a suitable system nearby? Let's take a closer look at how to install Android on a laptop or PC.
Preparation
Before installing Android, you need to prepare a bootable USB flash drive and BIOS. The principle of creation is no different from recording Windows image. We will need:
- Android image.
Note! For installation we will use Android-x86, which is a constantly evolving project.
- Rufus utility.
- Flash drive (preferably at least 16 GB).
- Computer/laptop.
Let's move on to creation boot drive.


Run from a flash drive
If you don’t want or have the ability to fully install Android on your PC, then you can run it directly from a flash drive.

Installation on a computer
There are two ways to install a mobile OS on your computer:
- as the main system;
- second additional OS.
Let's look at both methods in more detail.
Primary OS
If you want to use Android as your only OS, the installation process will not take much time.
- Insert the flash drive.
- Start the computer with the previously configured BIOS.
- In the window that appears, click the last item (install Android-x86 on your hard drive).
- Select HDD partition to download → “ext4”.

- In the next window, click “Skip” if you plan to use only this OS.

- Wait for the installation to complete → select “Reboot”.

- After downloading, configure your Android settings (country, Google account, etc.).

Once the process is complete, your desktop will be displayed, ready for use.
Additional system
If you plan to use Android as a second operating system, you will need to partition the disk before installation.

Let's move on to installing Android.
- Insert the USB flash drive → start the computer.
- If the preparation is completed correctly, the boot menu will be displayed.
- Select the last item “Install Android x86 to hard disk» .
- Specify the previously prepared partition → select the formatting type “ext4” → “OK”.
- Click "Yes" to GRUB installations(allows you to select the OS to run).
- Click "Yes" to Windows additions in the boot menu.

- Wait for the process to complete → click “Reboot”.
- After rebooting, the GRUB window will appear.

- Select the first option to launch Android or the last one for Windows.
- Set up the system (Time, Google account, etc.).
- Ready.
Android based OS
In 2016 appeared modified version Android-x86, which is called Remix OS For PC. Its peculiarity lies in the interface, which is designed for interaction with a computer.
Note! Remix OS can also be launched from a flash drive or used as a full-fledged system.
I advise you to watch the video, which shows in detail the features of the system.
Let's move on to the installation process.
conclusions
There are two ways to use Android OS on a PC: directly from a flash drive or by installing it on a computer. If you plan to constantly work with the “green robot,” then I advise you to download Remix OS For PC, which is completely tailored to work with a computer interface.


