Hard disk analysis programs. A program for checking the status of your hard drive CrystalDiskInfo. HDDScan - a program to check your hard drive for bad sectors
The PC records user information and system data on the hard drive. Over time, the drive becomes littered and wears out. Logical errors appear related to OS failures, indexing, file table, and physical errors. bad sectors. The program will help you find and eliminate all faults. hard checks disk for all kinds of errors and bad sectors. Let's talk about similar programs and the peculiarities of their work.
Checking your disk for errors is necessary if your computer:
- freezes when opening and saving files;
- reboots itself;
- The OS began to load more slowly;
- When accessing the disk, specific sounds appear.
The drive can be damaged by power surges, incorrect shutdown of the PC, impacts and shaking. As a result, some sectors are no longer readable - they are called “broken”. Single problem sectors do not make work difficult, but if their number grows, try to correct the errors as soon as possible.
Applications for testing
When choosing a program to test a disk, consider its type - HDD or SSD. The former are still more common, but the latter are often used as the main or additional storage. Some applications are universal and can test any type, others are tailored only for one type.
Windows built-in tools
Quickly checking the disk for errors in Windows 7 and 10 is possible with a built-in utility. In Explorer, right-click on the desired drive and go to Properties in the submenu. In the window that opens, go to the “Service” tab.

Click on “Check”. In the settings, select whether you need to immediately correct system errors and restore bad sectors. At the end, a detailed report will be displayed.
There is another option to check HDD through the command line for serviceability. Press Win+R and enter cmd, in the black window paste chkdskC: /f /r. The “C:” parameter means that drive C will be checked; to test other drives, enter the corresponding letter in the command.
Victoria HDD
Victoria HDD perfectly understands how to check a hard drive for errors and performance:
- in the “Standard” tab, select the desired drive;
- go to “SMART” and look at the result of the background test - good or bad;
- in the “Tests” section, check the “Ignore” option to start simple testing;
- the utility will start the test, bad sectors will be colored Blue colour– unreadable, green, orange or red – slow;
- To correct errors, run the test again with the “Remap” option enabled.

The application can also restore and reassign damaged areas, scan more than 1 TB, and conduct surface flaw detection.
HDDScan
Able to identify various problems drives. How to check a hard drive in HDDScan for bad sectors:
- Select the verification source from the list;
- Click “SMART” and view the results of the background scan;
- on the round button on the right select “Surface test”;
- check the "read" option and run testing.

At the end, the results will be displayed in the form of graphs, color schemes blocks and text report.
HDD Health
The HDD Health application implements background check disk in Windows. It analyzes the state of the surface, displays statistics on sections and rotation temperature. The program hangs in the tray and issues notifications if there are problems.
SSD Life
Simple SSD check disk. Conducts diagnostics, displaying drive health indicators as a percentage. The program has portable version, free and extended paid. When installed on your computer, you will be able to run SSD Life in the background to constantly monitor status changes. It will monitor the temperature of the SSD drive; for some manufacturers, you can change the operating speed and noise level.

Conclusion
We figured out how to check your hard drive for all errors. Select a testing program according to the drive type and run the test. If many errors are found as a result, monitor the status regularly so as not to lose all the data.
Lack of free space on your hard drive is a constant problem. With the purchase of a more capacious medium, this problem is not solved, but only worsened: the more information accumulates, the more difficult it is to control it and at the same time maintain a certain conventional order.
There are many utilities for finding duplicates, outdated and other unnecessary files, however service maintenance disk does not eliminate the need to independently “sort out the rubble.” These files, as often happens, are stored in folders different levels nesting. Using file manager tools for searches is one option. By the way, even standard Explorer has a filter and search available. However, there are more effective comprehensive solutions for disk space analysis. Typically they include features such as:
- Scan disks and directories
- Data visualization: display file structure as a chart, graph or map
- Advanced statistics and their export
- Search for duplicates, temporary files
- Filters and advanced search
- Additional tools
Today's guide participants are predominantly free programs. The exceptions are FolderSizes and TreeSize, although the latter also assumes free version edited by Free. The resulting list of participants looks like this:
- TreeSize
- Scanner
- WinDirStat
- Space Sniffer
- JDiskReport
- Xinorbis
- FolderSizes
TreeSize Pro
TreeSize is a utility for finding files that waste disk space. Includes both information functions(visualization, statistics, export), and service: search for duplicates, outdated files and so on.
In the left panel of the TreeSize window there is a disk selection menu and a directory tree where navigation and selection of the scan source is carried out.
The results are displayed on the right side of the window, consisting of tabs. In the Chart section there is a diagram from which you can find out percentage directories within the selected source. It is also easy to change the display of data in the form of graphs or maps. Detailed information about the directory (amount of data, space occupied, etc.) is available in the Details tab. Extensions - distribution of data according to their content: video, graphics, text and others. In Age of files - information about the age of files. In addition, it will be useful to analyze the chronology of disk filling (History). All data is available for export in XLS, CSV, HTML, TXT and other formats.
Top 100 contains a list of the largest files on the disk. The accompanying information in the columns of the table allows you to find out the date of the last access or creation of the file - this will help you decide whether to delete or leave the file.

No less interesting in TreeSize are the search (File Search menu). You can use all data types (All Search Types): this, in particular, includes searching for outdated, temporary files, and duplicates. The advantage of searching through TreeSize is undeniable: the program is multi-threaded, works over the network, and supports templates.
Alas, the free (essentially trial) version of TreeSize is significantly inferior to the paid version: multithreading, advanced search, visualization and many other important functions are not supported.
Summary. TreeSize Pro perfectly complements the capabilities of any file manager, allowing you to thoroughly analyze the occupied disk space and directories. A well-customizable interface and search, visualization, export - a standard set included.
[+] Functionality
[+] Advanced file search
[+] Fast multi-threaded scanning
[+] Additional tools
Scanner
Scanner free utility for analysis hard content disk. No settings, a minimum of options - nevertheless, Scanner is a completely functional solution.
In the left part of the window, you can select a disk for analysis; you can also get information in existing files on all disks using the “Total” button in the lower left corner.

In the center is pie chart, which displays the file structure as segments. Segments, as is easy to note, have several levels of nesting and different color. When the cursor is on specific area diagrams, information about the number, size of files, and their location is available. You can move to the directory by clicking on it, or perform operations with the file through context menu.
Summary. The program will be useful for a quick visual analysis of occupied disk space. As for the available operations with files and directories, they are only sufficient to delete and open files. In other words, use Scanner like file manager(with search, display modes, statistics) will not work.
[+] Ease of use, intuitiveness
[−] Minimum number of file operations
WinDirStat
WinDirStat is a free utility for analysis and cleaning hard disk from unnecessary files.
The program scans the specified sources (directories or local disks) and provides information for analysis in an easy-to-read format. The directory structure is displayed as multi-colored segments various sizes, according to the space occupied, at the bottom of the WinDirStat window. The table of color correspondence to the file type is in the upper right corner.

This structure representation has its drawbacks: for example, you cannot find out the file size when hovering, there are no marks. Therefore, in the case of WinDirStat there is not enough alternative ways visualizations such as graph and chart.
By clicking on a segment, you can get detailed information about the corresponding file and its location. The following files are available with: standard commands, such as deleting (to the Trash or permanently), viewing properties, copying the path and others. In the “Cleaning” section of the program settings, it is possible to create user actions, allowing you to add up to 10 operations from the command line: deleting files, archiving, recursive deleting and others.
In general, almost all WinDirStat settings come down to design, display of the structure and list of directories. Any additional utilities, tools for reporting, statistics, and search are not provided here.
Summary. WinDirStat provides good customization options, but the lack of additional tools and display modes significantly limits the program's use.
[+] Selective scanning
[+] Command line support
[−] One file display mode
[−] Lack of detailed statistics and reporting
SpaceSniffer
SpaceSniffer is a free utility with a fully customizable interface and data display mode in the form of a map. Compared to similar solutions, notable features include multithreading, search (including network search), and NTFS support.
For processing, you can select not only a disk from the list, but also a directory by specifying the path in the Path line. As a result of scanning, a map is formed in the form of blocks. The level of nesting can be adjusted using the Less/More Detail buttons - accordingly, the detail is reduced or increased. By clicking on a block, you can view its contents without going to the catalog. Navigating deeper through catalogs is no less convenient. Additional modes There is no display in SpaceSniffer, but you can customize the design to your liking through the main settings (Edit - Configure).

Statistics functions are presented modestly. If desired, you can export to text file: summary information, list of files, as well as files grouped into folders. Interestingly, reports can be created using templates.
Additional features include tags and a filter. Filtering is carried out using the specified mask; the syntax is described in the Filtering help section. You can search by size, folder name, tags, attributes and other data. Tags allow you to make selections from data for subsequent filtering and batch operations. They can be thought of as temporary bookmarks within a session.
Summary. SpaceSniffer does not stand out for its wide functionality, but it attracts with its speed of operation, fairly convenient display of data in the form of a map and additional tools such as filter and tags.
[+] Multi-window interface
[+] Integration with Explorer
[+] Filters and tags
[−] No search
JDiskReport
The free cross-platform utility JdiskReport analyzes which files take up the most disk space. In addition, the program provides statistics on the distribution of data, which can be viewed in the form of graphs and charts.
By selecting a directory or drive to scan, the user can view the collected information or save the result as a snapshot for later opening. This is relevant when permanent job with large amounts of data.
Statistics are divided into tabs: Size, Top 50, Size Dist, Modified and Types. The Size section shows the ratio of files in the selected source. There are several display modes to choose from: 2 types of charts, graph and table. Top 50 contains a list of the largest, oldest and newest files- potential “candidates” for removal. The Size Dist, Modified and Types sections allow you to see the distribution of files by their size, modification date and type, respectively.

On the one hand, the statistics really give food for thought, on the other hand, navigation through files and sample directories is not thought out in JdiskReport. That is, any file operations are not available, only the “Open Explorer…” item is available in the context menu. There is no export, except that the file table and related information can be copied to the clipboard.
The program settings are mainly responsible for the interface. There are plenty of design themes, but, say, there are no options for displaying columns or a directory tree.
Summary. JdiskReport outperforms Scanner and WinDirStat due to file distribution statistics. But there is also weak sides- first of all, there are no operations with files and directories.
[+] Statistics
[−] No export
[−] Non-functional context menu
Xinorbis
Xinorbis is a data analyzer on your hard drive with the ability to view statistics in the form of tables, charts and graphs. The program supports scanning on various sources: hard drives, removable media, by local network, FireWire, etc.
When selecting a scan source, you can specify multiple paths, include and exclude items, and add favorites. The scan results are displayed in the form of a summary: this information will help you quickly determine the largest file or directory, familiarize yourself with the distribution of data by type, etc.

Detailed information is collected in the Folder properties section of the Tasks section. Data can be viewed in the form of custom graphs, charts, and structured by data type or file extension. Information about the age of data (Dates), chronology (History), and occupied size (Folders) is available. The Top 101 section contains a list of not only the largest and smallest files. The file table displays properties such as creation, modification, and last access dates.
The navigator context menu in Xinorbis is more than functional: it not only contains standard Explorer commands, but also provides for export, archiving, Hex editing, and checksum generation.
The Advanced section contains tools such as searching for duplicates by name and size. Other teams are also expanding search capabilities. The most interesting section is Folder Detail, which is a filter based on a number of parameters: text, size, file attributes, owner, category.

An important advantage of Xinorbis is customizable reports in HTML, CSV, XML and other formats. As a result, it takes just one click to create a file.
Summary. In Xinorbis, it is most difficult to find shortcomings, since all the standard capabilities of a file analyzer are taken into account: from creating diagrams to exporting reports.
[+] Reporting
[+] Filter and search
[+] Flexible setup and functionality
FolderSizes
FolderSizes is a program for scanning and analyzing disk space with the ability to export results as a report. Includes tools for searching files by multiple criteria: size, owner, age, etc.
The FolderSizes interface consists of several panels (navigator, drive list, graphs, address bar), as well as a ribbon divided into tabs. The main section is Home, where basic tools for analysis, export and other operations are available.

In the address bar you can specify not only the standard path, but also a server or NAS devices, network and removable media (Analyze path(s) option). The file panel is flexibly customizable, columns are easy to hide or add additional ones. Scan results can be viewed as graphs, charts, or a map in the Bar Graph area. Extra options, related to displaying information in panels, are available in the Graph tab.
To create reports, use the File Reports tool, which searches based on specified criteria and displays detailed information in a human-readable format. Report export is available in HTML, PDF, XML, CSV, TXT and other formats, including graphic ones. FolderSizes can be easily linked to a scheduler to automatically generate scheduled reports.

In addition to standard reporting functions, FolderSizes offers trend analysis. The Trend Analyzer tool is designed for this and allows you to see changes in size, number of files and other criteria.
Filter and search with rule support, built-in archiver, command line- FolderSizes capabilities can be listed further. The functionality of the program is unrivaled.
Summary. FolderSizes pleases with the presence of all the tools necessary for analysis, user-friendly interface, additional features, which are not available in other programs (for example, trend analysis and archiver). As a result, it will be interesting for study by a wide audience.
[+] Fully customizable interface
[+] Trend analysis tool
[+] Convenient navigation by files and directories
[+] Filter and search
Pivot table
| Program | TreeSize Pro | Scanner | WinDirStat | SpaceSniffer | JDiskReport | Xinorbis | FolderSizes |
| Developer | JAM Software | Steffen Gerlach | Bernhard Seifert, Oliver Schneider | Uderzo Umberto | Jgoodies | Maximum Octopus | Key Metric Software, LLC. |
| License | Shareware ($52.95) | Freeware | Freeware | Freeware | Freeware | Freeware | Shareware ($55) |
| Localization in Russian | − | + | + | − | − | − | − |
| Visualization | Diagram, graph, map | Diagram | Map | Map | Diagram, graph | Diagram, graph | Diagram, graph, map |
| Export | XML, XLS, TXT, CSV, etc. | − | − | TXT | − | HTML, CSV, TXT, Tree, XML | HTML, XML, CSV, TXT, PDF |
| Search | + | − | − | − | − | + | + |
| Search for duplicates, temporary files | + | − | − | − | − | + | + |
| File distribution statistics | + | − | − | − | + | + | + |
| Scheduler | + | − | − | − | − | − | + |
| NTFS functions | + | − | − | + | − | − | + |
| Network support | + | − | − | − | − | + | + |
| Multi-threaded scanning | + | − | − | + | − | − | + |
Sometimes when using a computer you may notice problems with operation hard drive. This may manifest itself in a slower speed of opening files, an increase in the volume of the HDD itself, or the periodic occurrence of BSOD or other errors. Ultimately, this situation can lead to the loss of valuable data or complete failure operating system. Let's look at the main ways to diagnose problems with a disk drive connected to a PC running Windows 7.
There are several ways to diagnose a hard drive in Windows 7. There are specialized software solutions, you can also check standard means operating system. We will talk about specific methods of action to solve the problem below.
Method 1: Seagate SeaTools
SeaTools is a free program from Seagate that allows you to scan your storage device for problems and, if possible, fix them. Its installation on a computer is standard and intuitive, and therefore does not require additional description.
- Launch SeaTools. When you first launch the program, it will automatically search for supported drives.
- Then a window will open license agreement. In order to continue working with the program, you must click on the button "I accept".
- The main SeaTools window opens, which should display hard disks drives connected to the PC. All is displayed here basic information about them:
- Serial number;
- Model number;
- Firmware version;
- Drive status (ready or not ready for testing).
- If in the column "Drive Status" against the right hard disk installed status "Ready for testing", it means that this medium information can be scanned. To start this procedure, check the box to the left of its serial number. After this the button "Basic tests" located at the top of the window will become active. When you click on this element A menu of three items opens:
- Information about the drive;
- Short universal;
- Long lasting universal.
Click on the first of the named positions.
- Following this, immediately after a short wait, a window appears with information about the hard drive. Here you can see the data about the hard drive that we saw in the main window of the program, and in addition the following:
- Manufacturer's name;
- Disk capacity;
- Hours worked;
- His temperature;
- Support for certain technologies, etc.
- In order to find out more detailed information about the disk, you need to check the box next to it again in the main program window and click on the button "Basic tests", but this time select the option "Short universal".
- Testing starts. It is divided into three stages:
- External scanning;
- Internal scanning;
- Random reading.
The name of the current stage is displayed in the column "Drive Status". In column "Test Status" shows the progress of the current operation in graphical form and in percentage.
- After complete completion test, if no problems were detected by the application, in the column "Drive Status" the inscription is displayed "Short Universal - Passed". If there are errors, they are reported.
- If you need an even more in-depth diagnosis, then for this you should using SeaTools perform a lengthy universal test. Check the box next to the drive name and click the button "Basic tests" and select "Long-lasting universal".
- A long universal test starts. Its dynamics, like the previous scan, is displayed in the column "Test Status", but it lasts much longer and can take several hours.
- After the test is completed, the result will be displayed in the program window. If successful and there are no errors in the column "Drive Status" the inscription will appear "Long Universal - Pass".


As we see, Seagate SeaTools is quite convenient and, most importantly, free tool to diagnose your computer's hard drive. It offers several options for checking the depth level. The time spent on the test will depend on the thoroughness of the scan.
Method 2: Western Digital Data Lifeguard Diagnostic
Western program Digital Data Lifeguard Diagnostic will be most relevant for testing hard drives produced by Western Digital, but it can also be used to diagnose drives from other manufacturers. The functionality of this tool makes it possible to view information about the HDD and scan its sectors. As a bonus, the program can permanently erase any information from the hard drive without the possibility of its recovery.
- After a simple installation procedure, launch Lifeguard Diagnostic on your computer. A license agreement window will open. About the parameter "I accept this License Agreement" set a mark. Next click "Next".
- A program window will open. It will display the following information about the disk drives connected to the computer:
- Disk number in the system;
- Model;
- Serial number;
- Volume;
- SMART status.
- To start testing, select the title target disk and click on the icon next to the name "Click to run test".
- A window will open that will offer several verification options. To get started, select "Quick test". To start the procedure, click "Start".
- A window will open where you will be asked to close all other programs that are running on the PC to ensure the purity of the test. Quit applications, then click "OK" in this window. You don't have to worry about wasted time, since the test won't take up much of it.
- The testing procedure will begin, the dynamics of which can be observed in a separate window thanks to the dynamic indicator.
- After completing the procedure, if everything was successful and no problems were identified, a green check mark will appear in the same window. If there are problems, the mark will be red. Click to close the window "Close".
- The mark will also appear in the test list window. For start the following type test, select item "Extended test" and press "Start".
- A window will appear again asking you to terminate other programs. Do it and press "OK".
- The scanning procedure is launched, which will take the user a much longer period of time than the previous test.
- After its completion, as in the previous case, a mark indicating successful completion or, conversely, indicating the presence of problems will be displayed. Click "Close" to close the testing window. At this point, diagnosing the hard drive in Lifeguard Diagnostic can be considered complete.


Method 3: HDD Scan
HDD Scan - simple and free software, which copes with all its tasks: checking sectors and conducting hard drive tests. True, its purpose does not include correcting errors - only searching for them on the device. But the program supports not only standard hard drives, but also SSDs and even flash drives.
- This application is good because it does not require installation. Just run HDD Scan on your PC. A window will open showing the name of the brand and model of your hard drive. The firmware version and storage capacity are also indicated.
- If several drives are connected to the computer, then in this case you can select from the drop-down list the option that you want to check. After this, to start diagnostics, press the button "TEST".
- Next, an additional menu opens with verification options. Choose an option "Verify".
- After this, a settings window will immediately open, where the number of the first HDD sector from which the scan will begin, the total number of sectors and size will be indicated. This data can be changed if desired, but it is not recommended. For direct launch testing, click the arrow to the right of settings.
- Testing in mode "Verify" will be launched. You can watch his progress if you click on the triangle at the bottom of the window.
- An interface area will open containing the name of the test and the percentage of its completion.
- To view in more detail how the procedure proceeds, right-click on the name this test. In the context menu, select the option "Show Detail".
- A window will open with detailed information undergoing the procedure. On the process map, problematic disk sectors with a response exceeding 500 ms and from 150 to 500 ms will be marked in red and respectively. orange, and broken sectors are in dark blue indicating the number of such elements.
- After testing is completed, the indicator should display the value in an additional window "100%". On the right side of the same window will be shown detailed statistics by response time sectors of hard disk.
- When returning to the main window, the status of the completed task should be "Finished".
- To run the next test, select again required disk, click on the button "Test", but this time click on the item "Read" in the menu that appears.
- As in the previous case, a window will open indicating the range of drive sectors to be scanned. For the sake of completeness, these settings should be left unchanged. To activate the task, click the arrow to the right of the sector scan range parameters.
- The disk read test will start. You can also monitor its dynamics by opening the lower area of the program window.
- During the procedure or after its completion, when the task status changes to "Finished", you can use the context menu by selecting the item "Show Detail" using the previously described method, go to the detailed scanning results window.
- After that, in a separate window in the tab "Map" you can view details by response time HDD sectors on the subject of reading.
- To launch the latest version of hard drive diagnostics in HDD Scan, press the button again "Test", but now we select the option "Butterfly".
- As in previous cases, the sector testing range settings window opens. Without changing the data in it, click on the arrow on the right.
- The test starts "Butterfly", which consists of checking the disk for reading data using queries. As always, you can monitor the dynamics of the procedure using the informant at the bottom of the main HDD Scan window. After completing the test, if you wish, you can view its detailed results in a separate window in the same way as was used for other types of testing in this program.


This method has an advantage over using the previous program in that it does not necessarily require shutting down running applications, although this is also recommended for greater diagnostic accuracy.
Method 4: CrystalDiskInfo
As you can see, in Windows 7 it is possible to diagnose the hard drive using third party programs, and using the built-in utility of the system. Of course, the use of third-party software provides a more in-depth and diverse picture of the state of the hard drive than the use of standard technologies that can only detect errors. But to use Check Disk you don’t need to download or install anything, and in addition, the in-system utility will try to fix errors if they are detected.
The HDD Scan program is designed to check hard drives under Windows 2000 and Windows XP. In this article I will consider HDD Scan v2.6 - the latest version released at the time of writing this review. (By the time this article was published, version 2.7 was already available.)
Main features of the program:
- View S.M.A.R.T. information
- Checking the disk surface in three modes: Verify, Read, Erase.
- Control noise characteristics Winchester.
- Starting and stopping the spindle motor.
The HDD Scan program does not require installation and takes up about 350 KB on disk.
This program is absolutely free. You can download it from the website HDDGURU.COM.Interface
The program interface is made entirely in English language. However, the program is very easy to use even for novice users.
Rice. 1. HDDScan interface.
Selecting a hard drive
In the drop-down menu located in the section Source Disk, you can select the hard drive with which the program will work. Below is basic information about the selected hard drive: model ( Model), firmware version ( Firmware), serial number ( Serial) and the number of available physical sectors ( LBA).
View S.M.A.R.T.
To view S.M.A.R.T. settings you need to press a button S.M.A.R.T. located at the top of the program window. 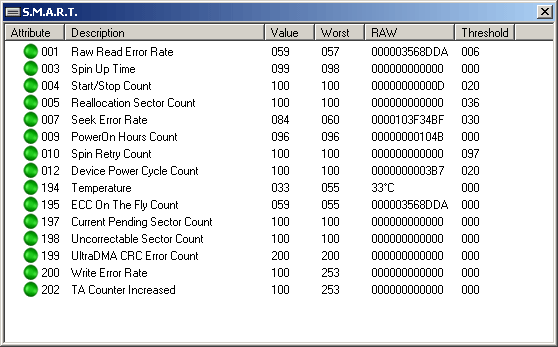
Rice. 2. View S.M.A.R.T. settings
Description of table columns:
- Attribute- attribute number.
- Description- attribute name.
- Value- attribute value. Can range from 1 to 255 (the higher the number, the better).
- Worst- the most low value attribute for all time.
- RAW- attribute value in hexadecimal system calculus (with the exception of Temperature, the value of which the program indicates in degrees Celsius).
- Treshold- threshold value of the attribute. Used to compare with the value of the parameter (Value).
The color of the indicator indicates the state of the attribute:
- Green - the attribute is normal.
- Yellow - deviation of the attribute from the norm.
- Red - a strong deviation of the attribute from the norm.
In this case, the received information is automatically saved to the file SMART.txt, located in the directory with the program.
Checking the disc surface
Surface testing parameters are located in the section Process.
- Start LBA And End LBA- the sector from which the check begins and the sector at which the check stops. If you want to check the entire disk, this parameter no need to change.
- Command- select the type of check ( Verify- verification, Read- full reading of sectors, Erase- writing zeros to all sectors). Selecting the Erase option will result in complete loss of all data on the disk!
- Start And Stop- start and stop the scan.
- Block size- number of sectors in one block. The default is 256 sectors (it is not recommended to change).
During the disk check, the elapsed time (Process time), current sector (Current LBA) and read speed (Kbytes/s) are indicated. 
Rice. 3. Result of checking the disk surface.
In the tab Map the disk map is located. On the left there is a pointer that indicates the colors of the rectangles on the map, depending on the access time. Blue rectangle ( Bads) shows bad blocks ( bad sectors). To the right of the colored rectangles is the number of sectors with this access time found when checking the disk. 
Rice. 4. Text report on surface inspection.
In the tab Report A text report about the inspection is located. It contains information about sectors with access times greater than 50 ms (green, orange and red rectangles), as well as bad blocks. 
Rice. 5. Reading speed graph.
On the tab Graph There is a graph of disk reading speed. The X axis is the sector numbers, and the Y axis is the reading speed.
Noise Control
On the tab IDE Features, in the upper left section, you can change the noise level emitted by the hard drive. This can only be done if this option is permitted by the manufacturer (displayed green indicator and inscription Enabled to his left). It should be noted that reducing noise entails reducing the speed of the hard drive. 
Rice. 6. Control of the noise characteristics of the hard drive and the start/stop of the spindle motor.
Starting and stopping the spindle motor
On the tab IDE Features, In chapter Spindle Start/Stop You can start and stop the spindle motor of the hard drive. It is not recommended to stop the spindle motor on the system disk. Conclusion
This article discussed the main features HDD programs Scan. This program also has some other features, but they are not so important and are practically not used.
HDD Scan is a convenient and functional program in its class.
Good afternoon.
Very often, users ask me the same question, but in different interpretations: “what is the hard drive full of?”, “why has the space on the hard drive decreased, since I haven’t downloaded anything?”, “how to find files that are taking up space on the HDD ? etc.
For evaluation and analysis occupied space exist on the hard drive special programs, thanks to which you can quickly find everything unnecessary and delete it. Actually, this is what this article will be about.
Analysis of occupied hard disk space in diagrams
1. Scanner
Official site: http://www.steffengerlach.de/freeware/
Very interesting utility. Its advantages are obvious: it supports the Russian language, no installation required, high speed (it analyzed a 500 GB hard drive in a minute!), and takes up very little space on the hard drive.
The program presents the results of the work in a small window with a diagram (see Fig. 1). If you hover your mouse over the desired piece of the diagram, you can immediately understand what takes up the most space on the HDD.
For example, on my hard drive (see Fig. 1), about a fifth of the busy space is occupied by movies (33 GB, 62 files). By the way, there is quick buttons to go to the trash can and “add or remove programs”.
2. SpaceSniffer
Official site: http://www.uderzo.it/main_products/space_sniffer/index.html
Another utility that does not require installation. When starting, the first thing you will do is ask you to select a drive (specify a letter) to scan. For example, my Windows system disk has 35 GB of space, of which almost 10 GB is occupied by the virtual machine.
In general, the analysis tool is very visual, it helps you immediately understand what is clogged up on your hard drive, where the files are “hidden”, in which folders and on what topic... I recommend it for use!
Rice. 2. SpaceSniffer - analysis system disk with Windows
3.WinDirStat
Official site: http://windirstat.info/
Another utility this kind. It is interesting primarily because, in addition to simple analysis and drawing up a diagram - it also shows file extensions, painting the diagram in the desired color (see Fig. 3).
In general, it is quite convenient to use: the interface is in Russian, there are quick links (for example, on emptying the recycle bin, editing directories, etc.), it works in all popular Windows operating systems: XP, 7, 8.
Rice. 3. WinDirStat analyzes the “C:\” drive
4. Free Disk Usage Analyzer
Official site: http://www.extensoft.com/?p=free_disk_analyzer
This program is the easiest tool for quick search large files and optimization of disk space.
Free Disk Usage Analyzer helps you organize and manage your free disk space HDD by searching for the largest files on the disk. You can quickly find where the largest files are located, such as videos, photos and archives, and move them to another location (or delete them altogether).
By the way, the program supports the Russian language. There are also quick links that will help you clean your HDD from junk and temporary files, remove unused programs, find the largest folders or files, etc.
5.TreeSize
Official site: http://www.jam-software.com/treesize_free/
This program cannot create charts, but it conveniently sorts folders depending on the space occupied on the hard drive. It is also very convenient to find a folder that takes up a lot of space - click on it and open it in Explorer (see arrows in Fig. 5).
Despite the fact that the program is in English, understanding it is quite simple and quick. Recommended for both beginners and experienced users.
Rice. 5. TreeSize Free - results of analysis of the system drive “C:\”
By the way, significant space on your hard drive can be occupied by so-called “junk” and temporary files(by the way, because of them, the free space on your hard drive decreases, even when you don’t copy or download anything to it!). Periodically, you need to clean your hard drive with special utilities: CCleaner, FreeSpacer, Glary Utilites, etc. Read more about such programs.
That's all for me. I would be grateful for additions on the topic of the article.
Good luck with your PC.


