HP printer does not print - what to do? The printer began to make noise when turned on or after some time of inactivity for no apparent reason. The power light blinks green, but the printer does not print
Today, there is little that can overshadow the purchase of office equipment. Moreover, the procedure itself today is reduced to a minimum of actions on the part of the buyer. I chose the model that I like best in design or takes up a certain place on the table, paid and rejoice. The most that the most “advanced” buyers do is read reviews on the Internet. But in the age of commercialization of such sources, objective information is often lost among paid reviews and secondary characteristics. Today we would like to tell you about some unexpected moments that await end user, who decided to purchase an HP inkjet printer using a series of cartridges No. 178.
Since September 2010, HP began producing updated inkjet (ink) cartridges models 178, 364, 564 and 862. The updated models were conceived as compatible with printers and MFPs already available at that time, while they took into account in advance the new functions of the devices that only were preparing for release.
The main differences between the updated models and their predecessors:
First, the black XL cartridge has a reduced ink capacity compared to its predecessor. On the manufacturer's website, the reason is literally the following: “to match the cost per page to the value obtained from the ISO resource”.
The second difference follows from the first: physical The updated black XL cartridge is much smaller in size than previous version this cartridge.
The third difference, which is not advertised on the manufacturer’s website: a change in the type of chips inside the updated cartridges.
Let's take a closer look at what each of these differences means for the end user.
The reduced ink volume in the updated black 178XL leads to increased purchases of new cartridges: the “old” model 178XL CB321H is designed for 800 pages, the “new” model 178XL CN684HE is only 550 pages.
Regarding the second difference, it would seem that everything is clear: the updated cartridges will fit into older models of printers and MFPs without problems:
“Old printer model” – “ old model black XL cartridge"
“Old printer model” - “updated black XL cartridge model”

But the “old” cartridge simply won’t fit into the new printer model. Those. possible situations: you buy a black HP 178XL cartridge, and when you open the package you discover that the cartridge does not fit your device. With original cartridges now (2013) there should be no such problems due to the expiration of the warranty period for old batches of ink (August 2012). The exception to the rule here could be counterfeits or cartridges with expired expiration dates. With compatible cartridges, we can only advise one thing: before purchasing, check the full article number of the black cartridge you are purchasing with the one used in your device, not limited to code 178XL.
The third difference is the most unpleasant for the end user. Due to chip replacement, older cartridge models will not work on the following HP devices:
HP PhotoSmart 5510 e-All-in-One B111 series
HP PhotoSmart 5515 e-All-in-One B111 series
HP PhoroSmart 6510 e-All-in-One B211
HP DeskJet 3070A e-All-in-One B611
How it happens: you order new cartridge No. 178 or No. 178XL (any) online or buy it in a store. You insert it into the printer and see the message: “Incompatible older generation cartridge installed” or "The cartridge listed above is an older generation cartridge that does not work in your printer, which uses the latest version of the cartridge"). Unfortunately, the cartridge you purchased will not work on your device.
Compatible cartridges, as a rule, still contain old-style chips. This is due to the fact that for three or four it is not very popular models printers to manufacturers compatible cartridges It is simply unprofitable to repurpose production. Therefore, if you are the owner of a device from one of the above listed models, the only reliable way to insure against similar situation on this moment You only benefit from purchasing original HP cartridges.
To make sure you have purchased a refurbished cartridge model (all models except Black XL), look for the warranty expiration date on the bottom of the package. If to the right of the date is marked “v1” or the warranty expiration date is September 2012 or later, then this is an updated cartridge. U updated version For a black XL cartridge, the article number must begin with CN684.
If you have already unpacked the cartridge and there is no way to look at the packaging, find the cartridge part number located on its bottom surface. If it starts with "CN680", "CN681", "CN682", "CN683", "CN684", "CN685", "CN686", "CN687", "CR276" or "CR277", then you purchased an updated cartridge model .
If your device is not included in the “lucky” list, you can safely save on printing and use compatible cartridges.
However, we should also not forget about the fact that HP plans to “update” a number of other models in a similar way. The article numbers of the “renewable” cartridges and printers remain a mystery for now.
When connecting the printer to a computer, HP recommends using USB cable no longer than 3 meters (10 feet) to reduce noise caused by electromagnetic fields.
The power light blinks green, but the printer does not print.
The printer is busy processing information. Wait for it to complete.
The power indicator flashes red.
The printer requires user intervention. Try the following:
If the printer is connected to a computer, check the computer screen for instructions. If the printer is not connected to your computer,
Top cover open
No paper
Paper jam
There is an obstruction or jam in the carriage path
Wrong hp 7450 ink cartridge inserted
If the above instructions do not resolve the problem, turn off the printer and unplug the power cord. Wait one minute, then reconnect the power cord. Turn on the printer.
The power light blinks amber briefly after the printer is turned off.
This should accompany the printer shutdown process. This is not a printer problem.
The power indicator flashes yellow.
A serious printer error has occurred. Try the following:
If the printer is connected to a computer, check the computer screen for instructions.
If the printer is not connected to your computer, turn it off and unplug the power cord. Wait one minute, then reconnect the power cord. Turn on the printer.
The printer does not find or display photo numbers on the memory card.
Try the following:
Remove and reinsert the memory card.
Turn off the printer, and then unplug the power cord from the printer. Wait approximately 10 seconds, then reconnect the power cord. Turn on the printer.
The memory card may contain file types that the printer cannot open directly from the memory card.
Save the photos to your computer, and then print them from your computer.
The next time you shoot with this digital camera, set the camera's settings to save photos in a format that the printer can read directly from the memory card.
The printer is connected by cable to a power outlet, but does not turn on.
The printer may not have enough power. Unplug the printer's power cord. Wait about 10 seconds, then plug the power cord back in. Turn on the printer.
The printer may be connected to an outlet that has no power. Turn on this outlet, then turn on the printer.
The printer began to make noise when turned on or after some time of inactivity for no apparent reason.
The printer may make noise after long periods downtime (approximately 2 weeks), and also in cases where the power supply was interrupted and then restored. This is normal operation printer - the printer performs an automatic maintenance procedure to ensure best quality print.
The printer does not print 10 x 15 cm (4 x 6 in) borderless photos.
You may be using the wrong type of paper. Make sure you are using 10 x 15 cm paper with a margin (4 x 6.5 inches with a 0.5 inch margin). If you use borderless paper, there will be a border around the edge of the printout.
Printing is very slow.
One of the following situations may have occurred.
May require calibration. If it is replaced but not calibrated, print quality and speed may deteriorate.
Maybe, printing in progress a project containing drawings or photographs, high-resolution photographs, or a PDF document. Large, complex projects that contain drawings or photographs are slower to print than text documents.
The printer may be using backup printing mode. The printer switches to this mode when one of them is not installed. Install the missing one.
Photo paper does not feed into the printer properly.
One of the following situations may have occurred.
If you are using the photo paper cassette, there may be paper loaded in the tray. Remove all paper from the input tray before inserting the photo paper cassette.
The photo paper cassette may be empty. Press the photo paper cassette until it clicks into place.
The printer may be installed in an environment with very high or very low humidity. Load photo paper one sheet at a time.
The photo paper may be curled. If the photo paper is curled, place it in a plastic bag and gently bend the paper into opposite direction until she straightens out. If you cannot eliminate the curl, use uncurled photo paper.
Paper does not feed into the printer properly -or- paper does not exit the printer properly.
There may be too much paper loaded in the tray. Remove some paper from the input tray and try printing again.
The paper may be too thin or too thick. To achieve the highest best results Use HP inkjet paper.
Two or more sheets of paper may be stuck together. Remove the paper from the paper tray and turn it over until separate sheets didn't stick together. Reload paper in the paper tray and try printing again.
The printer does not output sheets -or- a paper jam occurred during printing.
There may be a paper jam. Try the following:
Remove any paper from the input and output trays.
If you printed labels, make sure that the label has not peeled off from the backing inside the printer.
If there is still jammed paper inside, follow these steps.
1 Turn off the printer.
2 Remove the back cover.
3 Unplug the printer's power cord.
4 Gently remove the jammed paper from the printer.
5 Replace the back cover.
6 Connect the power cord to the printer and turn on the printer.
7 When the paper jam is cleared, print the document again.
If a paper jam occurs when printing on photo paper, try the following:
Insert photo paper immediately before printing on it.
Load photo paper one sheet at a time.
The printer produces blank sheets.
Check to see if the status indicator appears on the printer screen. If the indicator appears, there is low ink remaining. If the light is blinking, the HP ink level is insufficient to print. Replace those that have run out of ink.
Printing may have started and then been interrupted. If the process was interrupted before the photo began printing, the printer may have already loaded paper and was preparing to print. At next print the printer will produce a blank sheet before printing the next job.
It is possible that only a black printer is installed and the backup printing mode is being used. Replace the missing one with a new one.
The document is printed at an angle or is off-center.
The paper may not be loaded correctly. Make sure the paper is oriented correctly in the input tray. For instructions on loading paper, see Load paper in the printer.
They may not be calibrated properly.
The print is not aligned properly.
The paper width guide may not be set properly. Make sure the paper width guide fits against the edge of the paper but does not wrinkle the paper.
Try alignment. For achievement optimal speed and print quality, immediately after installing a new one, it should be aligned.
Clicking the Print button does not print photos.
Photos may not be selected for printing using the Select Photo button.
The printer shows the hp ink low indicator, but it is not clear which one needs to be replaced.
Connect the printer to your computer and read the instructions on the computer screen. They will indicate which one needs to be replaced.
Poor print quality
The printer may be using backup printing mode. The printer prints in standby mode when one of them is missing. Replace the missing one with a new one.
One may have run out of ink. Check to see if the status indicator appears on the printer screen. If there is little ink left, replace it.
Use photo paper designed for this printer. For best results, use inkjet paper.
You may be printing on the wrong side of the paper. Make sure paper is loaded face down in the tray.
Perhaps when shooting on digital camera was chosen low resolution. Reduce the image size and try printing again. For better results in the future, choose higher resolution in a digital camera.
There may be a problem with the cartridge. Try the following:
Remove and reinstall it.
Run the procedure automatic cleaning from the printer control panel.
Perform the alignment from the printer control panel.
If this does not resolve the problem, try cleaning the copper contacts or replacing the hp 7450 ink cartridges with new original hp 7450 ink cartridges.
If this doesn't help, replace it.
Photos do not print properly.
The photo paper may not be loaded correctly. Make sure the photo paper is loaded face down.
The photo paper may not be feeding into the printer properly. Try the following:
If a paper jam occurs, see The printer does not output sheets -or- a paper jam occurs while printing.
Load photo paper one sheet at a time.
Status indicators
There are two status indicators on the printer screen: the paper status indicator.
Very often, users are faced with the fact that the HP printer does not print in black. In truth, some people immediately panic. But you shouldn't do that. WITH this kind of Probably everyone who has a printer faces problems. But why does this happen? What to do in in this case? Let's try to understand our difficult question today.
Print head damage
The first option, which occurs quite often, is damage to the printer. In this case, even a new cartridge will not work with the equipment. True, diagnosing the problem can be difficult.
Your HP 3525 printer does not print in black? Then it's time to take your equipment to a specialized service center. Tell us about your suspicions that the head is faulty. If the “diagnosis” is confirmed, then you will be offered several options for the development of events to choose from. The first is replacing a broken part (often faults can be corrected), the second is purchasing a new printer.
There's no need to panic. Damage to the print head is encountered very often. And it’s not a fact that the HP printer does not print in black precisely because of this. If you first want to rule out simpler causes, then you should postpone your visit to the service center for a while.
Clogging
The following scenario is perfect for home fix. If the HP 5525 printer does not print in black, you don’t know what to do, but you don’t want to take the equipment (not only 5525, but also other models) to the service center, then you can check what happened yourself.

Try printing a test document. Did not work out? Although the settings show that the printer has black ink? Then try using a specialized printer cleaning solution. Drop it onto the print head and wait a bit. After the cleanup occurs, try again. Happened? Then you no longer need to rack your brains with black. HP or any other - it doesn't matter. The main thing is that the problem was found and fixed.
But what to do if washing the head does not bring results? Of course, look for the reason for this kind of behavior somewhere else. Let's try to figure out what else can cause this phenomenon.
No paint
The most common thing is when the printer runs out of ink. However, the computer may not inform the user about this event. Then the HP 5525 printer does not print in black. What to do? By the way, this applies not only to the listed printer models, but to all printing equipment. When it runs out of paint or has already run out of paint, you will have to collect it and install it in the device.

Quite often it just happens. This is done either independently or in service centers. In addition, some printer models require direct refilling of an already inserted cartridge using a specialized syringe and ink. This procedure It is carried out mainly at home.
After you refill the cartridge, shake the equipment a little and check. HP 5510 printer does not print in black (or any other model)? Then the reason is not the paint at all. The problem is resolved? Great, from now on keep track of how much black ink you have left.
Poor quality filling
Sometimes, as practice has shown, printers refuse to print even after ink of the appropriate color has been “poured” into them. In our case, black. The reason for this could be a lot of problems. But often this is nothing more than a poorly executed process. What are we talking about?
You either did not fully insert the cartridge into the equipment or poorly sealed the existing one. In this case, everything is corrected extremely quickly and easily. Firmly insert the cartridge into the printer. Until there is a slight click. If you were “pouring” ink into already inserted equipment, you will have to take adhesive tape and stick it tightly to the “injection” site. This way you can correct the situation with the printer refusing to print in black.

After completing the steps, try to check the functionality of the equipment. Often, you will no longer be bothered by problems with printing documents for some time. But this doesn't always happen. Your HP 3525 printer does not print in black? What to do - you don’t know? Then it is advisable to check some more quite interesting options developments of events. And only then make a conclusion about the failure of the printer as a whole.
Nozzles
If your printing equipment is not used very often, but suddenly it stops working, try cleaning the nozzles inside. Indeed, very often the reason for such behavior is nothing more than drying of paint on these parts. In this case, your HP printer does not print in black.
There is no need to be afraid. The nozzles are cleaned using alcohol and a cotton pad. Wipe them down and then let them dry. Only then start testing the printer. Users say that the nozzles on most printing equipment need to be cleaned regularly. Otherwise, it will soon refuse to work.
Everything is wrong
Problems can also be observed if low-quality printed materials are used. This applies to ink, cartridges, and even paper. Often, an HP printer does not print in black due to an incorrect selection of components for this undertaking.

To avoid any problems, just buy exclusively quality materials, as well as components identical to those inserted into the equipment. If you suspect that you bought something incorrectly, then just take the printer to a service center for diagnostics. There, your theories will be quickly confirmed or refuted. So there is no need to panic when the equipment does not print in black.
Drivers
The last reason why the HP 5510 printer (or any other model) does not print in black is a problem with the computer. In particular, drivers for printing equipment. In this case, it is best to reinstall them. And in general, reinstall the drivers immediately after the first occurrence of problems with the printer.
After the action is completed, you will have to check your equipment. A printout will be made test page. It will become clear whether the printer prints in black or not. Not that often, but reinstalling drivers does help. Especially when the printer is completely new.
Malfunctions and breakdowns
True, if even after all the manipulations the equipment still does not start printing in black, then it is quite normal to believe that the problem is that it is broken. That is, you will have to take the printer to a store or service center. The first scenario is preferable. After all, you will have to buy a new printer.

If your equipment is still on warranty period, then take it to a service center. There they should diagnose the problem and offer you a new, similar printer, or alternative options(cheaper or more expensive). As a rule, this is the only solution to the problem of a broken printer. New model After setting it up on your computer, it will not cause you any trouble.
Advice for the future - promptly clean the printer from dust and dirt, and also monitor the amount of ink in it. This will help avoid many situations in which the equipment stops printing in black.
This usually happens at the most inopportune time - when you urgently need to print an important document. Just yesterday, a printer that was working properly suddenly refuses to fulfill its duties: instead of a document, it throws out blank sheets paper or stupidly blinks light bulbs, as if not understanding what you want from him.
Almost everyone who uses a printer regularly encounters printing problems. The largest group of such problems are various defects in the printed image, in second place are complete absence print. There are many reasons why the printer does not print at all or prints poorly - from incorrect settings V operating system until the device itself malfunctions.
Why doesn't the printer print?
All reasons that lead to failures and complete failure of the printing system are conventionally divided into 3 large groups:
- Problems with installing and configuring the printing device in the operating system. Other types of software problems.
- Problems with cartridges or system continuous feed ink (CISS).
- Problems with the hardware of the printer itself.
The first group is the easiest for the user to diagnose and eliminate. It is possible to cope with it in approximately 90% of cases. A group of problems associated with cartridges cannot always be solved at home, but if funds allow, it is enough to simply buy a new cartridge. The third group is solved only for simple and typical problems, like a paper jam, crease connecting cable etc. Problems associated with a malfunction of the device require contacting service.
Problems with printer installation and printing in Windows
Fortunately, the majority of problems in the printing system related to software operation are very easy to resolve. These include:
- There is no printer driver in the operating system or the driver has failed.
- Disable the print service.
- The default print device is incorrect.
- User pauses printing.
- Switching the printer to offline mode.
- Problems with the document in the print queue (too large, not recognized, etc.). The printer still prints, but extremely slowly. Or instead of text it displays something similar to hieroglyphs.
- Denying access to the printing system by security policies.
More complex cases include damage to OS components, driver conflicts, and viral infection. Unlike the previous ones, it is not always possible to deal with them with a couple of mouse clicks.
Reasons why a network printer does not print:
- On remote computer The printer port is blocked.
- The network path to the printer is incorrect.
- Sharing settings are incorrectly set.
To separate problems with the printer itself from problems on your computer, try printing the document from another PC or mobile device. If it (the printer) is connected via USB, if possible, connect it via wireless communication and vice versa. Your task is to find out whether the print function works anywhere.
After making sure that the source of the failure is not in the printing device, but is connected to the computer, look at the device manager (the printer must be connected to the computer and plugged in). The absence of the “Printers” group in the list of devices and the presence of unknown equipment marked with an exclamation or question mark indicates that there is no required driver. To solve the problem, just download it from the device manufacturer’s website (for example, HP, Epson, Samsung, Canon, Brother) and install it.

If the PC sees the printer, but it still does not print, look at the “Services” application (it’s most convenient to open it through the task manager tab of the same name).

Find Print Spooler in the list of services and make sure it is running. If not, right-click its properties. In the “Startup type” drop-down list, set “Automatic”, then click the “Run” button below.

Is the problem still there? Go ahead. Run system application“Settings”, go to the “Devices” - “Printers and Scanners” section (this and further instructions are discussed on Windows example 10). The right half of the window displays a list of all installed printers, among which there should be the one with which problems arose. If it's not there, check physical connection device to PC. If there is, click "Open Queue".

- Is the printer used as the default (if not, it may be the default printing device) virtual printer, which instead of printing, for example, converts the file to another format).
- Is there a checkmark next to the “Pause printing” and “Work offline” items? If the printer spontaneously switches to offline mode, this indicates bad connection with the computer, power problems or malfunction.
- If there are documents in the print queue, click Clear Queue and try printing a test page.

If the printer does not print online only, click " General access" and check if it is allowed to this device.

Next, look at the “Security” tab and make sure that your account It is not prohibited to use the print function.

The reason the printer is not queuing files could be one of the following:
- The paper is out or jammed.
- The toner or ink is low.
- A non-original cartridge is installed in the device.
- The print counter has reached its limit - printing is blocked.
- The user account does not have permission to print files.
- The device is faulty.
- There was a failure in the operating system.
Devices different manufacturers block printing in different situations. So, when a cartridge runs out of ink, one machine stops processing documents and resets the print queue, while the other simply spits out blank sheets. The same is true in other situations. The specific problems that lead to blocking are usually described in the printer instructions.
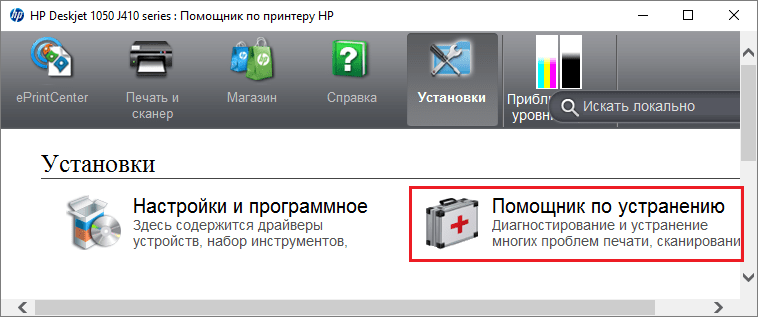
Many printer problems are well recognized by their self-diagnosis system. If the device is equipped with a display, the cause of the failure is most often displayed on it. Diagnosis of simpler devices is carried out using their proprietary application. It is usually present on the disk that came with the device, as well as on the manufacturer’s website.
Below is an example of the troubleshooting function in the proprietary application of the HP Deskjet 1050 printer.
A stop when sending a specific document for printing is most often associated with the document itself. So, if the printer does not print pdf file, perhaps the author protected it from printing (pdf supports such functions). IN similar cases The easiest way is to take screenshots of the pages of the problematic file, paste them, for example, into Word document and easily print them as pictures.
If hieroglyphs, “crazy words” or spaces appear on the printed copy instead of text, try replacing the font in the document with one of the ones preinstalled in Windows (all printers recognize them).
Problems with cartridges, dye, CISS
Any dye - toner or ink - runs out sooner or later. But this does not happen suddenly. The idea that there is little paint left is suggested by a decrease in the quality of the print - pale colors, whitish stripes, partial unprinting. It happens that the printer stops printing even when the dye level is normal. This is due to:
- A drop of ink dries in the print head or becomes clogged with an air lock.
- Incorrect installation of the cartridge (for example, when the protective films, the lid is not completely closed).
- Cartridge air ducts are dirty.
- Clamping or blockage of the CISS ink plume.
- There are no locks original cartridge.
- Reaching the limit on the number of printouts.
- Cartridge malfunction.
Clogging the head with dried ink is a common occurrence when an inkjet printer is not used for a long time. If the plug is relatively small, cleaning the nozzles (outlet holes) helps solve the problem. This is also done using proprietary utility printer, and each manufacturer calls this function differently:
- HP has cartridge cleaning.

- Epson has print head cleaning.
- Canon has cleaning and deep cleaning(the second is a strengthened option when the first does not help), etc.
During cleaning, a special pump installed inside the printer forces some ink through the nozzles under high pressure. This causes a clot of paint or an air lock to come out.
The most budget models printers are not equipped with a pump, and the nozzle cleaning function does not work on them (despite the driver supporting it). If clogged, the print heads of such devices must be soaked and washed in a cleaning fluid.
On modern inkjet printers The Epson print head is built not into the cartridges, but into the device itself, and it is quite expensive. Its failure is equivalent to the failure of the entire printer, which in such cases can only be thrown away. To prevent ink from drying out, owners Epson printers It is important to clean the nozzles at least once every 2 weeks if the device is idle.
If you removed cartridges from the printer, make sure that they are installed correctly and that their air ducts are not blocked.
At using CISS First of all, you should also check whether the ink plume is passable and whether the air holes of the tanks are free.
Spots and streaks (sometimes almost black sheets) when printing on a laser or LED printer— a consequence of cartridge leakage (toner spills out), overfilling of the waste bin, foreign small objects getting into the device, damage, incorrect installation or wear of cartridge parts.
Problems after refueling when:
- the printer prints in only one shade, for example, red;
- the print looks too pale when the cartridge is full;
- instead of an image there are multi-colored spots, etc.,
As a rule, they arise due to contamination, improper installation of the cartridge in place, or a violation of the refilling technology.
The complete absence of an image (white sheets) or printing defects after replacing the original cartridge or ink with a conditionally suitable one is precisely the result of the incompatibility of the latter with your printer model. In some cases, it can be solved by reflashing the cartridges or the device, in others - only by purchasing original components and consumables.
Printer problems
A breakdown of a printing device does not always manifest itself as a complete failure, when the device does not turn on or does not perform its functions at all. In some cases it looks like this:
- The printer does not print in one of the colors, for example, black. The cartridge is in good working order, compatible, and there is paint. Replacing the cartridge and toner does not help.
- Only part of the document is printed.
- The toner does not adhere to the paper.
- Paper does not pick up from the tray.
- The printer does not print or incorrectly transfers the text of any documents onto paper, and does not reproduce standard commonly used fonts.
- The print is not positioned correctly on the sheet.
- Instead of one document, several are printed and vice versa.
At home without special training the bulk of such problems cannot be solved. The user can independently see if the device has jammed the paper; if yes, try to extract it; check whether the cartridge is installed correctly; delete foreign objects, caught in the device, if they are easily accessible; clear visible dirt. In other cases, all that remains is to contact the service or buy new device, if it is from a series of disposable ones that are very cheap.
Users of these devices often encounter the problem that the printer does not print in black. Problems of this kind can be caused for various reasons. They are typical for models from HP, Epson, Canon and others. The most serious in terms of repairs include mechanical damage details, for example, the print head. In such cases, you will need to seek help from service center specialists. But most of the reasons are quite easy to eliminate on your own, without outside help.
Print head damage
Very often the printer does not print black due to damage to its print head. It is quite difficult to determine this problem. If you have any suspicions of this kind, it is better to take the device you are using to the service center manufacturer. If print head damage is confirmed, there are two ways to solve this problem:
- replacement old part new;
- purchase of new printing equipment.
But before contacting the service, you need to check other possible reasons to exclude them. This will avoid unnecessary actions and possible costs if the device is not under warranty. Often the issue is resolved independently in this way.
Print head clogged or dry nozzles
The following common reasons for a printer not printing black are:
- clogged print heads;
- drying of paint in the nozzle.

Clogged print head nozzles
The print heads are cleaned in the following way:
- check the black ink level in the printer settings;

- if available, make a test printout;

- when this does not bring results, wash it special solution print head;

- give the composition time to act (about 15 minutes);
- go to the settings of the printing device and select the head cleaning option;

- after the process is completed, perform a test printout of any document.

If nothing worked the first time, then all steps must be repeated again. When the second attempt did not bring the required result, then you should work on the nozzles. They often dry out when equipment is rarely used. To remove dried paint from the nozzles, wipe them with cotton wool soaked in alcohol. Only after drying the test document is printed.
Once a satisfactory result is obtained, you can begin working with the equipment. Please note that the nozzles and print heads need to be cleaned periodically to prevent them from clogging or the ink drying out.
The exact timing of regular inspections is given in the operating instructions for each model.
No ink or incompatible ink
Most the simplest reason The reason that the device has stopped printing with black ink is a simple lack of ink. Due to various failures, the computer may not notify the user about what happened. The problem is being solved adding ink:
- about 2 cubic centimeters of paint are injected into the cartridge with a syringe;
- carry out testing;
- if the result is positive, then you can add the same amount of ink and print documents.
When refilling yourself, you should remember that in some models it can only be done after installing the cartridge in its place in the printer. To carry out the procedure you will need a special syringe.

Also, the equipment used may not print in black if the inks used and the ones added are not compatible with each other. Therefore, before refilling, you should carefully study the label on the ink bottle. Such information is always indicated there.
Better to buy Consumables from well-known, trusted manufacturers to be confident in their quality.
Replacing the used cartridge with a new one suitable for the model used is even more easy option eliminate this type of problem. But doing the refueling yourself will cost several times less.

Poor quality filling
It happens that after adding high-quality black ink, the equipment still refuses to print. This may be due to poor quality refueling: the cartridge was inserted incorrectly or sealed. Then the problem can be easily resolved:
- the cartridge is removed and reinserted until it clicks;
- before or after installation, seal the hole from the syringe needle with tape (adhesive tape);
- then check the functionality of the device.
All manipulations should be done carefully so as not to accidentally break anything.
Disabling ink level control and resetting the chip
A number of printing equipment models are equipped with an ink level control function. Therefore, when the latter run out, the printer does not print in black and is blocked. To fix the problem, you need to disable the level control function. They do this in several ways.

It is recommended to perform zeroing after refilling yourself. To do this, use a programmer (resetter). You can also purchase disposable or auto-reset compatible chips that work on some models.
Please remember that stopping the ink level control function yourself will void the device warranty.
There is a less expensive way to reset the cartridge counter - for this seal the corresponding contacts. Problem practical implementation lies in finding them. U different models cartridges are used different contacts. The algorithm of actions is as follows:
- include equipment;
- take out a black ink cartridge from it;
- place it on the table, pointing the nozzles towards you and the contacts upward;
- seal the left one top contact tape;
![]()
- insert the cartridge, click “Ok”;
- print out the verification document;
- take the cartridge back out;
- seal any contact at the bottom right;
- install the cartridge into the slot;
- check the functionality of the equipment;
- remove the cartridge and peel off the first contact;
- insert it back, wait for recognition;
- then take out the cartridge and remove the second tape;
- wipe all contacts with cotton wool soaked in alcohol;
- returned to its place.
After the manipulations have been completed, the ink identifier should show 100% of its level. If this does not happen, then you can try to glue the 3 upper ones at once instead of one lower right contact for the second time. All further actions are carried out in the same way.
Driver problems
You should also check the operation of the hardware drivers yourself at home. In this case they do this:
- reinstall the corresponding programs;
- print out a test text.
The persistence of the problem after all the measures considered indicates a more serious breakdown. If the equipment is under warranty, then you must contact the service center or store where the product was purchased.
For the technology to serve for a long time, you should clean the print heads and nozzles regularly. You should also use compatible, high-quality ink. If the equipment is idle, then once a month it is necessary to print any document to prevent the ink from drying. Recommended for use several cartridges of each color, then after refilling they will be perceived as new.


