A program for diagnosing and correcting hard drive errors. Let's check our disk. Noise Control
The hard drive is an important, but far from perfect, component of a personal computer. For some users it does not work reliably, it crashes, data from it is lost or is significantly damaged. One of the most common problems with a hard drive is the appearance of so-called “broken” (bad) sectors on it, which become a “headache” for many users. In this article, I will talk about the reasons for the appearance of bad sectors on a hard drive, list a number of programs that allow you to recognize them, and also explain how to check a hard drive for bad sectors on your PC.

What are “bad sectors”?
As you know, a traditional hard drive consists of several rotating magnetic disks, over which magnetic heads move, magnetizing some part of the disk and thus writing information onto it (in the form of zeros and ones).
The disk itself is divided into tracks, and the latter, in turn, are divided into sectors onto which the information the user needs is recorded.
Due to certain reasons (I will list them below), information from a number of sectors cannot be read by the hard drive. Such sectors receive the status of “bad sectors” (bad sector), and the system tries to either restore the functionality of such a sector (restore), or reassign the address of such a bad sector to the backup sector (remap), or completely clean up the bad sector (erase). In the case of remapping, spare workable sectors are usually located at the end of the hard drive, and the hard drive spends additional time accessing them, which inevitably affects the speed of the hard drive and the loading of various applications and programs. Next, I will tell you how you can check your computer’s hard drive for bad sectors.

Reasons for bad sectors
What are the reasons for the appearance of bad sectors on an HDD disk? Usually they are as follows:
- Gradual “shedding” of the surface of the hard drive due to its wear, due to which there are more and more bad sectors on the disk;
- Physical impact on the hard drive due to various types of external shocks;
- Power surges in the network, which directly affect the violation of data integrity on the hard drive and lead to the appearance of bad sectors;
- Incorrect shutdown of the computer (improper operation), as a result of which bad sectors appear on the hard drive.
Symptoms of bad sectors
Due to the reasons described, there are more and more bad sectors on the hard drive, which begins to directly affect the operation of the operating system. In particular, you may notice the following:
- The system boots slowly;
- The system slows down (freezes) when reading and writing data from the hard drive;
- The system refuses to boot at all (quite often in the middle of the process);
- The computer sometimes restarts for no reason;
- Various errors regularly occur while the OS is running.
After we have described the symptoms and reasons for the appearance of bad sectors, let’s move on to a description of how to check a hard drive for bad sectors.
The best ways to check your hard drive for bad sectors
So how to check bad sectors (and fix them)? Below I will describe a number of methods that have proven their effectiveness in working with various hard drives.
Method 1. Use the CHKDSK system utility
The easiest and most convenient way to find and fix bad sectors on an HHD hard drive is to use the functionality of the CHKDSK system utility.
- To take advantage of its capabilities, launch Explorer, right-click on an inactive volume (on which there is no operating system installed), and select “Properties” from the menu that appears.
- In the window that opens, go to the “Service” tab, there click on the “Run check” button.
- Check the boxes next to the two verification options, click on “Run”, and wait for the process to complete.

The same can be done for the system volume (on which the OS is installed). The only thing is that this may require a system reboot, but after the system reboots, it will begin checking the disk for bad sectors.
You can also run CHKDSK through the console. To do this, run the command line as an administrator and enter:
chkdsk c: /f /r - (instead of: if necessary, specify a different letter of the problem drive) press enter and wait for the process to complete.

Method 2. Use the Victoria HDD program to analyze and treat the disk
Victoria HDD is probably the most popular program for checking a hard drive for bad sectors (and even for restoring the latter). It effectively checks and repairs bad sectors, has good reviews from experts, and can be used in both classic graphics mode and DOS mode.
One of the Wiki bonuses is the ability to read the SMART indicator of your hard drive, which allows you to monitor in sufficient detail the degree of its performance (the “SMART” tab of the program). In addition, the Victoria program performs “remapping” (reassignment of damaged sectors), resets bad sectors, conducts a detailed test of the hard drive surface, ranking sectors into different groups depending on the speed of reading information from them.
- To use this program, download and run it.
- Then go to the “Test” tab, select “Ignore” there and check the surface for bad sectors.
- If such are found, you should select the “Remap” mode in the same tab, this will allow you to reassign addresses from bad sectors to backup ones.
- If, after remapping, bad sectors remain, you can try to restore them using the “Restore” function, while the “Erase” function completely erases data in bad sectors, writing zeros there.
In general, the functionality of “Victoria” is quite extensive, and to get a full description of it, you need to go to the material specifically about using the program.
Method 3. Use the HDD Scan program to check the hard drive for bad sectors
Another program that can check a hard drive for bad sectors is HDD Scan. This is a fairly popular utility that offers several different tests (Surface Test, Smart Offline Tests, etc.). Select Surface Test, check the “Read” box on the right and run a disk surface test.
The program will analyze the response time of the available sectors and give us the result in graphical mode.

Method 4. Check your hard drive with HDD Regenerator
The HDD Regenerator program allows you to check and restore data on your hard drive, the same applies to bad sectors. I note that the program is paid, but those interested can search for free options online.
- To take advantage of the program’s capabilities, you need to launch it, select the disk to work with, decide on the scanning mode (I recommend Normal Scan), and then select the “Scan and repair” option.
- Then it will be necessary to specify the scanning boundaries (starting from sector 0) and monitor the scanning process itself.
- Depending on the response speed, sectors will be marked with different letters and colors.

Method 5. Scan the disk with HDD Health for damaged sectors
Another program for checking the disk surface for damaged sectors. HDD Health analyzes the general condition of the disk, provides detailed statistics on existing partitions (using SMART technology, including the general health of the structure, disk rotation temperature, the presence of bad sectors, and so on).
The icon of the running program is located in the system tray, and the program itself notifies the user, as necessary, of any problems in the operation of the hard drive.

Recovering a hard drive, removing BAD (bad) sectors [video]
Typically, checking a hard drive for bad sectors is carried out using special software tools, the Victoria HDD level or HDD Regenerator. The most effective of all the programs listed in the article, Victoria HDD, allows you not only to check the surface of the hard drive for bad sectors, but also to restore them, remap them and clean them. If bad sectors begin to appear on your hard drive, then I recommend using the functionality of the above programs; they have proven their effectiveness in working with the hard drives of many users.
You are reading this article because your HDD is experiencing problems or you accidentally came across a title that interested you. In any of the two cases, it will be useful to know what checking a hard drive for bad sectors is and how to do it. As usual, let's start with terminology. A disk sector is a unit of information storage, the smallest possible. A damaged sector is one that is unreadable due to the fact that it contains a faulty cluster (cell). By the way, on the Internet you can also come across the terminology – bad sector or block. Speaking about bad sectors, we immediately note that there are two types: physical and logical, they arise for the following reasons.
Physical bad block – cannot be restored:
- ingress of moisture/dust – led to clogging;
contact of the HDD head with a moving pancake and, as a result, damage; - With regards to SSDs, wear and/or overheating of the microcircuit, as well as moisture ingress may be the cause;
- Factory defects are also possible, especially among inexpensive and little-known manufacturers.
Logical bad sectors - can be fixed, since part of the hard drive does not work correctly:
- Incorrect disconnection of the power/power cable while writing data to the hard drive, so the operation cannot be completed and is interrupted;
- virus attack;
- malicious software.
So, when accessing them, the OS cannot read the information and displays an error code; as a result, Windows will report that the sector is damaged and cannot be further used for storage. The problem of logical bad sectors is solved by low-level formatting, using built-in Windows utilities and third-party software. Below are more details about each possibility.
Built-in tools
Checking an HDD hard drive for bad sectors, as already mentioned, is carried out in a number of ways, starting with the built-in tools of Windows 7.
CHKDSK
Before using check disk, let's use disk check - many have probably already used this service.
If the check indicates errors, it will immediately offer to correct them.
Now let's use a deeper check using the check disk command, which literally translates to disk check:


The chkdsk command has a number of parameters, such as:
- “/F” - check for errors and fix them automatically;
- “/V” - during disk scanning, display the full paths and names of files stored on the disk, also for disks with NTFS partitions;
- “/R” - searches for bad sectors and restores the contents, used with “/F”;
- "/X" - dismounts the volume before checking if necessary, used with "/F". As well as a number of other parameters.
Checking the flash drive for bad sectors is also carried out, let’s use the “/F” and “/R” keys:


Third party software
Today there is a lot of software that allows you to check your hard drive for the presence of bad sectors, but we will look at proven software. The program for checking an external hard disk HDD for bad sectors is performed using the same means as a regular disk. All of these instructions are suitable for all types of memory, both stationary and connected via a USB port.
Victoria HDD
The Victoria HDD program is one of, dare we say, legendary.
Designed to check the disk; shows complete information: model, functions, size and much more. It also performs a surface test to determine the presence/absence of bad sectors. Let's check a hard drive or SSD drive for bad sectors in Windows 7 with Victoria. First, you need to download the installation package from our resource, the fact is that it is not possible to download from the official website, since support for this product is no longer provided.

Use only proven resources; I would like to note that no installation is required and no additional components should be included in the archive. After successfully downloading the software, let's proceed to use.

Wait for the result and look at the performance indicators of the screw, so if “GOOD” is highlighted in green, then there is no point in worrying about the operation of the device, but if “BAD” is indicated, then you should take action, but more on that later.

In addition, pay attention to the “Health” column, translated from English as health, and in general, the number of dots and their color will say a lot. It is also worth paying attention to the “VAL” parameter - the higher the number, the better, then “Wrst” or “Worst” - displays the lowest attribute value for the entire time of operation. The “Tresh” parameter is a threshold value for “Val”, and one of the most important “Raw” - displays a quantitative indicator, as in the example indicated by field ID 5 “RAW” - Reallocated sector count indicates the number of rejected and reassigned from the reserve area disk sectors - in this case 1. If the number were much higher, you would have to start worrying.
Let's go to the “Tests” tab → click “Start” → wait for the result.


HDDScan
Another program for checking bad sectors of an SD card and any media is HDDScan. You can download it from the official website.
No installation is required, and we open the executable file on behalf of the machine Administrator.


By the way, by clicking on the same button with the image of a screw → “Identity Info”, you can get complete identification information about the device.


Next about the tests, select “Butterfly Read”. 


Here the data will be read into the internal buffer and transmitted through the interface, saving it in a temporary software buffer. Thus, the total indicators of data transfer time and block recording are measured, and readiness is determined after each write, according to the results. Testing is also sequential, from the minimum to the maximum block.
As for the two remaining tests, they work as follows:
- “Read” - measures the total indicators of disk readiness time and information transfer for each block with results. Testing is also sequential, from the minimum to the maximum block.
- “Erase” - here the total block record and information transfer time are measured, and displays the readiness for each record with the results. Testing is also sequential, from the minimum to the maximum block.
HDD REGENERATOR
Checking a disk for bad sectors in Windows 7 is also done using HDD REGENERATOR software. I would like to immediately note that it is paid and in English. Free demo version available on the official website

Next, follow the screenshots step by step to install. 

Let's start checking:
At the top of the window, click on the long active text “Click here to repair...”, in the program status bar we see information that this copy is not registered and that only 1 sector can be restored. 
Further, if a window appears with an important message, translated into Russian it literally sounds like this: “The system has detected a SATA controller operating in AHCI mode. For better performance, it is recommended to change it to IDE compatible mode (in BIOS). Do you need to restart the computer to manually change the controller settings in the system BIOS? It's up to you here. 
In order to show the possibility of work, I will connect an external screw and click in the main window again on the active link with the text “Click here to repair...”, having already selected the connected screw:


In the results table we see the following indicators:
- “D” delays sectors – shows the sectors where the reading delay occurs or is completely erroneous.
- “B” bad - bad sectors.
- “R” is turquoise, recovered – restored.
- “N” new bad sectors appear – new bad sectors appear.
- “R” is burgundy color, bad sectors reappear - bad sectors that reappear during re-scanning.
By pressing the spacebar, we will exit to the main menu, and by pressing any key, we will exit this report. 
Now let’s select scanning with the possibility of recovery, step by step in the screenshots. 


Recovering bad sectors
So, the hard drive has been checked for bad sectors in Windows 7, and now it is necessary to restore the data. I’ll say right away that in general, complete recovery of bad sectors is possible from MS DOS with a bootable flash drive. But we will show how the full version of Victoria HDD can correct the situation.
As soon as the list of bad sectors is displayed, go to the “Tests” tab:

So we assigned the program an algorithm to force data to be written to the bad sector of the hard drive, and several attempts will be made. As a result, either the bad sector will become healthy, or it will be replaced by a healthy reserve one, by the way, modern models have a sufficient number of them, but if the screw begins to crumble, it’s time to take action.
Long life to your HDD!
Have a great day!
A computer or laptop is associated specifically with errors and malfunctions in the hard drive. In this article, we will figure out how to check the health of your hard drive using Windows tools and programs specially designed for this.
Checking for errors using standard tools
This method is equally effective for Windows Xp, Vista, 7, 8 and 10. Required:
If the notification “Windows cannot scan the drive that is currently in use” appears, click “Schedule scan”.
So now we do a reboot, and when the system boots, it will run a performance test through the BIOS and fix media errors. Its duration can range from 2-3 minutes to an hour, depending on the characteristics of the hard drive and its capacity.
Checking the hard drive for errors via the command line
To start the scan, you must complete the following steps: go to “Start/All Programs/Accessories/Command Prompt”. Right-click and click “Run as Administrator”.
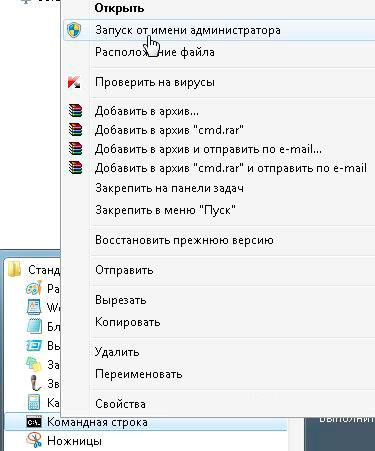

In the window that appears, execute the command “chkdsk disk_partition: scan_parameters”. Please note that this method only works with disks that have been formatted in FAT32 or NTFS.
An example command is “chkdsk C: /F /R”. Its essence is as follows:
- Section C will be checked for errors;
- Any problems found will be automatically corrected (parameter F is responsible for this);
- Damaged sectors will be checked and information will be restored (parameter R);
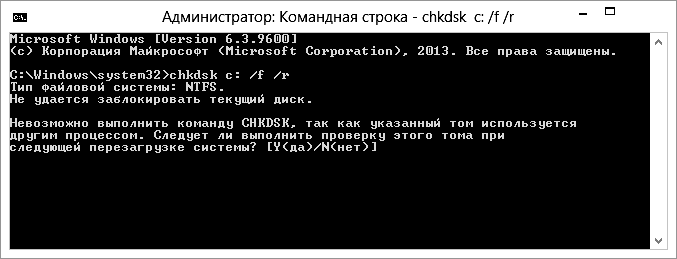

If you want to diagnose the drive currently being used by the system, you will see a special notification. You will be prompted to run the scan the next time you boot your computer. To agree with this, press Y, to refuse - N. Based on the results of the check, you will have access to information about the verified data, the number of damaged sectors and errors found.
To get a complete list of options, run chkdsk with a question mark as an option. But if you need a regular check for errors and sectors, then the above information will be enough for you.


It happens that errors found during scanning cannot always be corrected immediately; it is likely that this is due to the program running at that time. In this situation, an offline scan of the drive will be required: it is disconnected from operation, diagnostics are carried out, and then it is connected back. To do this, you need to enter “chkdsk C: /f /offlinescanandfix” (C: - disk partition) into the command line. If it is not possible to disable it, the check will be performed at the next reboot.


If necessary, after the inspection you have the opportunity to study the inspection log. To do this you need:
- Go to Windows/Applications Logs;
- Right-click on Application/Search;
- Search for the word Chkdsk;

Software check
Of course, the above method is not always effective. Therefore, we will look at a number of programs such as Victoria. They will allow you to conduct the most thorough analysis of the state of the hard drive on your computer or laptop.
Victoria


A utility for diagnosing and testing hard drives. It will help you not only detect problems in its operation, but also eliminate them.
The program has a number of advantages and useful functions:
- Reads the hard drive passport and provides detailed information;
- 5 diagnostic modes;
- Eliminates crashes;
- Displays unstable areas;
- Hides defects;
- Evaluates media performance.
It is one of the best today. It can solve problems with bad sectors and quickly bring any type of hard drive into working condition.
HDD Regenerator


One of the most effective programs for assessing the status and troubleshooting drives. It makes it possible to obtain information about the current SMART status of the selected device and complete control over it.
Among the main features are:
- Simple and intuitive interface;
- Complete security;
- NTFS and FAT support;
- Pre-scan mode;
HDD monitoring in real time;
That is, with the help of a regenerator you can test the hard drive as efficiently as possible.
TestDisk

Designed to determine the status and test drives. In addition to simple diagnostics, it also detects bad sectors and corrects any errors found. Its main functions include:
- Perform an analysis of the current state of the hard drive;
- Search for bad sectors;
- Recovering deleted partitions;
- MFT fix;
Checking external hard drives;
In addition, the utility has a number of functions that are related to the recovery of deleted files.
Hitachi Drive Fitness Test


An excellent program designed to find and fix problems on drives. It is universal, since diagnostics of any drives can be carried out. With its help, you can very quickly find out the current position of the hard drive, as well as obtain additional information about it.
Includes:
- Quick but thorough check;
- Support for all components;
- Monitoring;
- Data statistics;
This utility is suitable for all devices and can even be used on a netbook.
Seagate Seatools for Windows


Used to check and test the status of the hard drive. She finds any problems and failures.
- The utility can fix:
- Equipment incompatibility;
- HDD file system violations;
- Errors in installed drivers;
- Viruses and malware that infect the file system;
In addition, it provides complete information about the media and all related indicators. According to the developers, this utility is incredibly effective at independently correcting minor problems, SSD and HDD errors, and is capable of completely restoring their functionality.
So, now you have complete information on how to determine whether your hard drive is working properly, and how to solve the problems associated with it yourself. Choose the option that suits you best or the one you like and act!
Video: checking the hard drive using standard tools
Today we’ll talk about such an important computer component as the hard drive.
Sometimes users complain about the slow operation of the system, its frequent freezes, the appearance of blue screens of death BSOD, system errors, missing or damaged files and/or directories, etc., not suspecting that the problem is not at all in buggy Windows, clumsy drivers or viruses.
The problem is the hard drive, which is slowly starting to crumble. This is where a program for checking your hard drive comes in handy.
To understand the further content of the article, first consider the principle of operation of a hard drive.
In addition to error detection, there is also a function to automatically correct them and restore the ability to read and write to the hard drive.
In addition to diagnosing hard drives, the tool can also be used to diagnose removable media (USB, SD cards, etc.).
Before checking the disk, close all programs and applications.
Click Start, write “My Computer” in the program search field, and select the item found by the system. In the central window we see a list of hard drives.
Right-click on the hard drive you want to check and select “Properties”.
Go to the “Service” tab and click the “Run check” button, in the window that opens, check the “Automatically correct system errors” checkbox and click the “Run” button.
For initial diagnostics, these settings are quite sufficient.
For more detailed diagnostics, you need to check another box in the “Scan and repair bad sectors” field.
In this mode, verification may take longer than in the previous one.

If the disk you select is a system one, i.e. an operating system is installed on it, it is impossible to perform a check at this point in time, because When checking, the disk must be disconnected.
In this case, the system will display a warning window and prompt you to perform a scan before the next Windows startup (“Disk Check Schedule”).

If the disk you select is not the system one, there is no need to restart the computer; before checking, the system will prompt you to disconnect it.
You must click “Disable” in the appropriate window, after which the scan will begin.

After the check is completed, we will see a window with its results.

The presence of bad sectors is the first sign that after some time the hard drive will fail.
Therefore, to avoid losing valuable information, we recommend that you do not waste time and immediately copy all valuable data to another physical hard drive.
Review of third-party programs for checking drives
To diagnose a hard drive, there are quite a large number of different utilities of varying functionality and convenience with free or paid types of licensing.
MHDD- a fast, free, compact program for working with low-level drives developed in 2000 by Dmitry Postrigan.
The program is aimed at professionals and has an ascetic DOS interface.
In addition to diagnostics, the program can read/write arbitrary sectors, manage the SMART and password system, noise management system, perform extreme testing, work with the drive’s password system, etc.
Before working with the program, in order to avoid damage to the equipment being diagnosed, the developer strongly recommends that you read the documentation for the program available on the official website.

Advantages:
Free;
Compact;
Fast.
Flaws:
Works exclusively under DOS so is not suitable for beginners;
Has relatively complex settings;
English interface language.
HDDExpert- a free utility whose operating principle is to convert SMART information of drives into data convenient for user perception and analysis.
The program provides complete information about computer hard drives (performance, errors, warnings, temperature) and has the ability to test their performance.
Despite the lack of Russian language support, the program has a simple interface that even a beginner can understand.
The program's capabilities are limited by the parameters of SMART technology, so you can't count on serious diagnostics and testing.

Advantages:
Has a simple interface.
Flaws:
Suitable for primary, shallow diagnostics;
Victoria. For testing hard drives, as well as for eliminating some problems, in 99% of cases, the Victoria program is suitable.
It was developed by Belarusian programmer Sergei Kazansky, is absolutely free, has a small size (up to 1 MB) and works with hard drives at the port level, i.e. at the lowest level, which allows achieving high performance qualities.
Due to these characteristics, service center specialists prefer to use the program.
In addition to more complex tasks, the program allows you to perform a number of tasks for the average PC user:
- perform low-level testing,
- determine the average access time,
- control the noise level,
- erase information without the possibility of subsequent recovery and much more.
Among other things, the program can work in Windows and DOS environments.
DOS mode is relevant when the operating system cannot be loaded and it is necessary to check the hard drive.

Advantages:
Free;
Compact;
Has a wide range of functions;
Works in MS DOS and MS Windows;
Has a simple interface.
Flaws:
The project is not being developed and some of the widely used versions of the utility have an English interface and do not support work in 64-bit operating systems.
The problem is solved by downloading alternative versions of the program created by the community.
Most personal computers and even servers use hard drives to store information. They are quite reliable, but over time, magnetic drives become unusable. In most cases, the service life of the disk is 5-10 years. Each user must be able to diagnose the HDD in order to determine the need to replace the part and perform a data backup. You will learn everything about verification from this article.
Symptoms of hard drive problems
Malfunctions or imminent death of the hard drive may be accompanied by typical symptoms. We recommend paying attention to the following symptoms:
- The appearance of uncharacteristic sounds during operation. There may be clicks, crackles, or metallic clanging. In such cases, the problem is usually mechanical in nature.
- “Brakes” in the operation of the system. Windows loads too slowly, some files do not open, and errors occur when installing programs.
- The appearance of blue “screens of death”. In such cases, an error code is always written, which can be used to determine the source of the problem.
- Spontaneous shutdown or reboot of the computer. As a rule, in such situations, the boot sector of the HDD is damaged.
Please note that computer freezes can also occur due to insufficient RAM.
Ways to check the hard drive
HDD diagnostics is an important task. There are several ways to do this. Operating system tools allow you to analyze your hard drive, but they are not always effective. The optimal solution is to use specialized utilities that are created specifically for this task.
Via command line
Windows operating systems have a standard utility that can analyze the status of the hard drive. To do this you will have to run the command line:

In the command parameters, specify the drive letter and two specifiers. The first - F is responsible for automatic error correction, and R performs information recovery. Be prepared that the verification may take several hours. If you are using a laptop, be sure to charge it. At the end you will get statistics on how many sectors are damaged.

Using Windows Explorer
If you prefer using familiar windows, you can run the scan through Explorer. To do this, users should follow a number of steps:

During this operation, the system will perform the following checks:
- basic file system structure;
- security descriptors;
- file name associations;
- USN magazine.
To find out the scan results, you need to go to the “Event Viewer” menu, and then find the scan log in the Windows log.

Via Windows PowerShell
The latest Windows operating systems have an additional utility similar to the command line, which was created for convenient system administration. You can also use it to test your hard drive. To start, you need to perform several steps:

The system will scan and automatically fix if possible. If there are no errors, the message NoErrorsFound will appear.
Using Windows 10 Tools
The latest operating system from Microsoft has advanced functionality, so it can independently diagnose a wide range of problems. Using the built-in security center, you can check the status of the HDD. Additionally, go to storage diagnostics. How to use these functions will be described below.
Security and Service Center
This is a special section in the “ten”, which is responsible for maintaining the operating system. As a rule, all necessary checks are performed automatically after a certain period of time. You can access this section through the control panel. Next, if necessary, open the “Maintenance” tab and find the “Disk Status” line. Opposite it should be the “OK” option. If it is not there, then we recommend conducting a thorough analysis of the condition of the hard drive.

Storage Diagnostic Utility
The developers of Windows 10 also created an additional utility for checking the hard drive - storage diagnostics. It is launched via the command line (how to open it was described in the sections earlier). Next, enter the command and press Enter.
The procedure may take 2-5 hours (depending on the HDD capacity). At some points the process will appear to be stuck, but it is strongly recommended that you do not interrupt the scan. Once the process is complete, navigate to the path to save the report and open it (the file will have evtx permission). It will provide the following information:
- chkdsk check data and error information;
- registry files containing data about connected drives;
- Event Viewer Logs.
Experienced specialists are required to correctly interpret the information presented in the report. The report will be uninformative for ordinary users.
Third party programs
For professionals and ordinary users, third-party developers have created many useful, functional and easy-to-use utilities for checking the status of the hard drive. With their help, you can get comprehensive information about the status of your HDD. The most popular of them will be described below.
Victoria
This is the most popular free software from qualified specialists. Its wide functionality allows you to get almost any information about the hard drive. The parameters are displayed in a form convenient for the average user, so you don’t have to study anything additional to make a conclusion about the state of the HDD. The utility is distributed on a Freeware basis, i.e. absolutely free.
Download the software to your computer and follow the instructions:

All sectors will be marked in different colors depending on the response speed. Gray sectors are not dangerous. Green sectors are allowed in quantities of several hundred (up to 2-3 thousand). For example, on a completely new 1TV hard drive their number is about 1 thousand. Orange sectors are at their limit. No more than 100 pieces are allowed. Red and blue cannot be restored. They need to be “closed”, limiting reading from them.

When scanning, you can set the operating modes:
- Ignore is a classic check without further action.
- Remap – replacing unreadable sectors with reserves if available.
- Restore – restore damaged sectors programmatically.
- Erase – overwriting unreadable sectors. Attention, erases information.
As you can see, the utility is informative and easy to use even for beginners.
HDDScan
Another useful software for scanning your hard drive. It has less functionality, but a more friendly interface compared to the previous version. The utility is completely free, and allows you to get SMART parameters and detailed information about the state of sectors.
To start the verification procedure, follow these steps:

The colors for the sectors are identical to those described above. The scanning menu does not provide functions for correcting sectors.
DiskCheckup
The software supports work with almost all types of hard drives (SATA, USB, FireWire). It has small but sufficient functionality. Through the application, you can check the SMART parameters, as well as conduct a full test on the Disk Self-Test tab. The main disadvantage of the program is the complexity of the results for the average user. The status is indicated by the “OK” line and numerical parameters. Considering that they are all in English, it will be difficult to understand.

MHDD
This is highly specialized software for advanced users. It is used if the system does not start and the OS does not load to the desktop. To run MHDD software, you must burn it to a CD or flash drive as an image. You can even run the utility with the entire operating system. To do this, you need to select a flash drive or CD as the boot drive when using a floppy drive.
After the menu appears, you just need to select the desired hard drive and enter the command to check. The software is controlled in the same way through commands as on the console, or using the function buttons of the keyboard. Not recommended for use by ordinary users without appropriate skills.

Crystal Disk Mark
This utility allows you to evaluate the speed of writing and reading information from your hard drive. In its interface, the user can select the write/read type, local disk and file size to be read and written. After finishing the test you will receive information at speed.

You will not be able to evaluate these results yourself. We recommend finding a similar HDD model online to compare its testing with your test data. If the results with identical settings are almost the same, then there is no need to worry. If there are strong differences, we recommend analyzing the hard drive through Victoria.
HDD Regenerator
Functional utility for HDD scanning and recovery. A special magnetization reversal algorithm allows you to eliminate quite serious problems with your hard drive. To launch the software you should:

The advantage of this utility is the ability to quickly correct errors and close “bad sectors”.
Seagate SeaTools
Specialized software from Seagate product developers. Allows you to obtain basic information about the disk, perform preliminary and full scans. We recommend using this utility in cases where the above for some reason does not work, and you own a hard drive from Seagate.

Western Digital Data Lifeguard Diagnostic
Special software in English for checking Western Digital disks. It is more suitable for advanced users, but ordinary users can also perform quick diagnostics. For example, you can check the status of SMART parameters.
The utility also allows you to conduct simple and advanced tests, but the information content of the results for typical users leaves much to be desired.
Disk Utility on macOS
MacOS users also have a standard hard drive utility. Its functionality includes:
- creation and transformation of images;
- mounting and unmounting disks and other media.
- activation and deactivation of logging mode;
- HDD integrity testing and file recovery;
- erasing, formatting and partitioning disks;
- cleaning up debris;
- adding a partition table;
- checking the S.M.A.R.T status of the hard drive and much more.
To start, you need to find the application in the utilities on the system disk, and then launch it.

Prevention measures
To maximize the life of a hard drive, users can do a variety of things, including:
- Defragmentation. This procedure arranges all file blocks in order, making access to them as fast as possible, accordingly, the head travels less distance to open the file and wears out more slowly.
- Install a quality power supply. Power surges have a detrimental effect on any equipment. If important data is stored on the HDD, take care of a high-quality power supply to prevent damage to the hard drive due to power surges.
- Avoid vibrations and shocks. Winchesters are extremely vulnerable to impacts. When transporting your computer, make sure that the hard drive will not be subject to vibration.
- Clean the system. Freezes due to unstable software or viruses can cause increased load on the disk; accordingly, it will use its resource faster.
- Eliminate external magnetic fields. Many people install the system unit with other powerful equipment that has a magnetic field. If you want to ensure maximum data safety, do not place the system unit next to equipment that emits a powerful magnetic field.
Never forget to make backups. Any hard drive will eventually become unusable, and it is not always possible to recover data. Regular checks will allow you to determine the future demise of the HDD in advance and take action, for example, purchasing a new one.
Report content
Copyright infringement Spam Incorrect content Broken links


