Windows 7 disk check program. Files and registry. CHKDSK flags that are valid only when checking disks with the NTFS file system
aass, didn't use it. But I note that Victoria and MHDD are proven tools for serious diagnostics.
And Windows 7 can track SMART information. It will warn you if anything happens.
aass
Vadim Sterkin, Thanks for the answer and for the topic!
I agree with the assessment of the Victoria and MHDD programs, I myself use Victoria for serious diagnostics, but I try to test other programs, everything is learned by comparison.)
Dmitriy
when checking hard drive The standard program on Windows 7 says that bad clusters have been detected in null.sys... what kind of driver is this?
Dmitriy
Vadim Sterkin,
thanks...can it cause the system to slow down?
Sanyok
Hello.
I ran (hypothetically) checking drive C: from the graphical interface with parameters similar to your screenshot. Clicked the "Schedule disk check" button. Changed my mind. How can I cancel this one-time system disk check before rebooting the system?
I myself assume that it may be entered into the Task Scheduler.” But I want to know for sure. I see no point in experimenting. Since, after such a check was completed successfully once (in practical reality), it would be entered into the “Scheduler” even as a one-time check, and should, in theory, be saved. After all, tasks from the “Scheduler” do not have the ability to self-delete (I think so). But I didn’t find any traces in the “Planner”. As you probably know, I didn’t receive an answer on the Internet or on the forum.
Simply put, I want to know where this mythical “Check Schedule” is located and what methods and methods Windows 7 offers for adjusting it. And then it turns out like this - click, and ala-ulu...
Sanyok
Yeah…
There were graphics, but they all came out. This is some kind of graffiti, black and white, with a register. Just like Battleship Potemkin.
(Yes, I Googled, but really for a slightly different request). Thank you.
You can plan this by checking two boxes in the chart, and canceling by going to the register. They got smart here. Well, okay, there’s nothing to do - I’ll post in the forum.
Yes, by the way, does it make sense to check the second (bottom) checkbox if the system is on an SSD? After all, as far as my knowledge is concerned, the SSD controller itself periodically (when idle) scans the memory for faulty cells.
And this second checkbox, by definition, is intended to check for broken cells on the surface of the HDD.
Sanyok
Sanyok,
You turn on your TV with the remote control and set the wake-up timer. The next morning you wake up to the music of your favorite music channel. And life flows smoothly and measuredly. But at one fine moment it dawns on you - after all, tomorrow is Sunday. No problem, you tell yourself. With a slight movement of your hand and a screwdriver, without disconnecting the TV from the network, you remove back cover, quickly replace a couple of resistors on the board and you’re done. Tomorrow you can sleep peacefully until lunchtime.
Do you feel what I mean?
Vadim Sterkin: Sanya, what do you mean, smart? You don’t have to split hairs by pressing all sorts of strange buttons, and everything will be fine :)
It's really funny, but also of course, of course Truth.
Yes, but it’s not quite out of place. I don’t see anything unpredictable or completely incomprehensible in checking the disk. And the conversation was about the fact that if you have already provided a graphical opportunity to schedule such a task, then be kind enough to provide the same opportunity to disable it, and not through one place (the registry). Either remove graphics when planning (do planning only through CMD), or provide the ability to disable this task using the graphical interface. As an engineer, in my technical practice and in the practice of interfaces of various industrial programs and IT, this is the first time I have come across something like this. Yes, and in Windows OS too.
That’s what I wanted to convey when I said, “We’ve been clever.”
When faced with a question, I noticed that this function causes complaints from the user in terms of frequent independent launches. But let's not talk about that. As unrelated to the topic.
And of course, thanks for the comments. Everything is clear to me here.
Regarding the bottom daw:
To perform a thorough disk scan, select the Scan and Repair option. bad sectors" In this mode, the scanning program attempts to find and correct physical errors on the hard drive itself, which may take much longer.
It doesn't say anything about the file system. More about physical disabilities. Some of us are wrong. Or I didn't understand something.
And further in the text:
To check for both file and physical errors, select both options: Automatically fix system errors and Scan and repair bad sectors.
Please comment. I would like clarity on the issue.
So as not to press “all sorts of strange buttons”, and everything was fine. :-)
Vyacheslav
I am very surprised by the possibilities of checking and restoring a disk under Windows 8. Changing the partition size upward using the program Acronis Disk Director 11 completed with errors. I wanted to increase the size of the system disk by empty space on an adjacent 200 GB partition. As a result, this program reports that everything is OK, and the disk size in Explorer has not changed. I checked the disk using the OS - it said that there were errors and needed to be rebooted. After the reboot, nothing changed and a request appeared to reboot to fix it. As you can already guess, this also did not help. As a result, we have lost 200 GB, despite the fact that Acronis says everything is ok, but the system is not able to correct the errors found. Sadness. Do I need to format it?
Vyacheslav
Vadim Sterkin,
In fact, under Windows 7, a similar operation was always performed without problems. I always perform the task of expanding/narrowing a partition in 2 stages: first, we cut off a piece of space from the partition being compressed and transfer it to the “unallocated space” status from the required end of the partition, and then we expand another partition using this space (I do everything manually in 2 reboots in case of “jambs”, because Acronis performs a group of operations very strangely. There is a sad experience under Windows XP). So, if under Windows 7 after checking the disk, everything returned to normal and free place did not disappear so easily, then under Windows 8 Acronis completed the first stage successfully, but when performing the second it failed with errors, although later it reports that “everything is fine.” The problem was eventually resolved by booting from a Live CD from Acronis. It's a pity that this cannot be done under Windows 8. And I was counting so much on the “improved checking and correction of file system errors” promoted in the media. Of course, it is very difficult to trust that checking and background diagnostics of FS problems is working correctly. It is very confusing that the time to scan one partition under Windows 7 and under Windows 8 differs by orders of magnitude better side for the last one. Are all problems really so easily and quickly fixed? Maybe Windows 8 simply doesn’t notice most of them, or even worse, ignores them?
Vyacheslav
Vadim Sterkin,
Well, what option is there in Windows 8 to expand the partition size? I saw the Disk Management snap-in. Well, I didn’t see how it’s possible to cut the size of a logical volume from the desired end using “standard means”. There's also no way to move a partition within the unallocated space. If there is an analogue that I missed, tell me. Along the way, you did not quite correctly understand what I meant by the phrase “I had a bad experience under Windows XP.” And it was like this: after a reboot, this operation was performed and at that moment the electricity went out. Thus, I lost 2 partitions, although, in theory, there could have been 3 options: the second partition would have been lost, from which space was taken due to the incompleteness of the operation of moving NTFS service zones, or only the system partition would have been lost (although this is unlikely), or both partitions would be fine, and between them there would be some area of unmarked space. But I was very “lucky”. Let's skip the topic of sources uninterruptible power supply and it turns out that Acronis is a reputable company, and their products are sometimes dangerous to use in any way in the absence of alternatives from the OS. And then another “surprise” emerged. And even here everything is fine with the power supply. But as I already noted, the last problem was solved by booting from a Live CD from Acronis and classical check disk, and not the super-optimized one from Windows 8, the benefits of which I have not yet felt. It seems to be there, but there seems to be no point. Or maybe I was using the disk check tool wrong. Unfortunately, this “optimization” still raises more questions and mistrust in me than answers.
Vyacheslav
Vadim Sterkin,
Irina
Conducted Windows hard drive diagnostics (chkdsk). There were no messages, but later it turned out that there was no free space. Although before the check, less than 50% of the disk was full. And now it shows 931 GB occupied. Was all the free space wasted? The disk is six months old.
I forgot to say, after that I checked with Victoria and reported that there weren’t even any errors.
Irina
This is not the case for me. It's about not about system disk. And about the external drive. I’ve already found out that the system marked all the free space as bad blocks. Now I’m trying to figure out whether it’s a failure or whether the screw has died.
Sergey
Vadim, I have the following problem: After running the chkdsk disk check utility, if both “daws” are checked, it asks to reboot and the check is performed, I don’t know what to call it, but it looks like MS-DOS - lines run quickly on a black background. After the next reboot, I look at the information in Windows logs— Appendix, text in English, “many letters,” but the meaning can be understood from a single sentence: “Windows has checked the file system and found no problems." At the same time, a few lines above I was kindly informed that, they say, “Cleaning up 31 unused security descriptors.” Sometimes it is not “31 unused security descriptors” that are cleared, but more or, conversely, less. That is, something is still not quite right, and the program corrects it a little. Like, overall everything is fine, but the Bug died. So, no matter how many times I run this chkdsk, it requires a reboot to correct these errors, nothing else is detected. Previously, on another machine in Windows XP this happened rarely, but now it happens time after time.
The SSD drive is about a quarter occupied. The system is legal Windows 7 x64 Professional and is automatically updated. If you don’t run disk check, then there is no reason to worry, everything works fine, doesn’t glitch or crash. So, in connection with this, the question is - maybe there is no need to spoil your mood. I didn’t find a solution to the problem of these file system errors on the Microsoft website, and are they really errors?
 far_town2 Kulyasov
Are there any methods to check if the power supply is sufficient? And could it be because of him insufficient power Are there freezes/errors in games?
Hard disk (HDD) is the most important element of a computer on which all the necessary information, programs and user files are stored. Like any other component, over time the hard drive wears out and its normal operation, failures begin to occur. Along with physical wear and tear, leading to the appearance of so-called bad sectors(bad blocks), logical errors associated with file system, indexes and the main file table.
For the time being, you may not observe problems in work hard disk, but this does not guarantee that one fine day the hard drive will not die for long. Therefore, it is important to periodically (once or twice a year) check your hard drive for errors and bad sectors that require repair. Regular monitoring will allow you to track the condition of the media and respond in a timely manner to changes in its condition. Of course, you should not neglect such a proven method of protecting information as backup. The most valuable data must be duplicated on a backup storage device.
Symptoms of a failing hard drive
In most cases, HDDs operate uninterruptedly for several years without requiring any special attention. However, in case of improper use ( physical impact, lack of proper cooling) the resource of the storage medium is significantly reduced. In rare situations, there may be a manufacturing defect or sudden failure.
Taking too long to boot may indicate hard drive failure operating system, random disappearance of files and folders, slow application launch. Obvious symptoms of a hard drive losing performance are slowdown of programs and long copying files. If the computer constantly freezes, and nothing other than restarting helps, then in the process of identifying the causes, checking the hard drive should be the first point.
Using standard Windows 7/10 tools
You can test the media using standard Windows tools. The easiest way is to select the desired hard drive in Explorer, right-click on it and go to the “Service” tab.
Next, click the “Run scan” button and set the scan parameters in the window that opens. If both checkboxes are checked, Windows will automatically correct all system errors and restore damaged sectors during diagnostics.

The results of the audit can be found in the report.

Command line
You can also audit your hard drive using the utility chkdsk called from command line. In fact, such a check will not differ much from the above option.
So, launch the command line by selecting the required Start menu item. Then enter the command in the window: chkdsk G: /f /r
- G – name of the hard drive being tested (select the drive you will check);
- f – error checking and correction;
- r – detection and recovery of bad sectors.
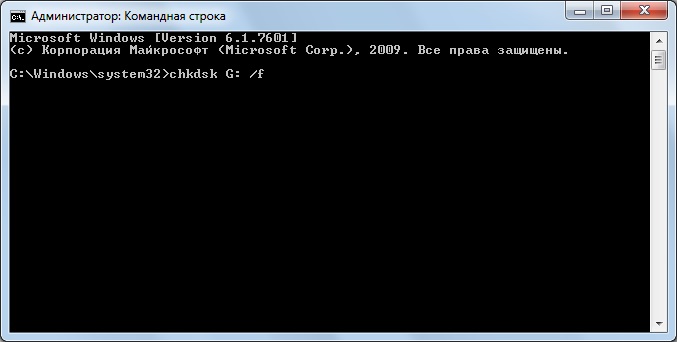
All information about errors and bad sectors found will be displayed as the diagnostics are carried out.

Third-party programs for checking your hard drive
There are many programs and utilities for finding bad sectors and fixing them. HDD errors. We will list only the most famous ones.
Victoria
Perhaps the most popular hard drive checking tool. The program can be launched both in Windows and in DOS mode from a bootable USB flash drive.
The interface provides five tabs: Standard, SMART, Tests, Advanced and Setup. First of all, go to the section Standard, where in the list of devices we select the hard drive we are interested in. The Drive passport area will display basic information about the HDD.

Next, select the tab SMART and press the “Get SMART” button. SMART (Self-Monitoring, Analisys and Reporting Technology) is a hard drive self-monitoring technology. Those. The hard drive monitors its operation during operation, recording information on a set of parameters that allows one to assess the condition of the media. It is this service information that we are trying to obtain.
After clicking “Get SMART”, either the inscription GOOD on a green background or the inscription BAD! will appear to the right of the button. on red. The second option will indicate that the media is in unsatisfactory condition and will most likely have to be replaced. For a more detailed study of SMART statistics, let's pay attention to the list of parameters on the left. Here we are primarily interested in the attribute 5 Reallocated sector count, indicating the number of sectors remapped. If there are too many of them, then the disk has begun to “crumble,” that is, its surface is rapidly degrading and it is urgent to make a copy of all data. In this case, there is no point in restoring the hard drive.

Chapter Tests makes it possible to check the hard drive for bad sectors, as well as try to “cure” or reassign unreadable blocks. For simple testing of the hard drive, set the switch to Ignore and start the test with the Start button. Sector health is assessed by measuring response time. The smaller it is, the better. Each response time range has its own color designation. The slowest blocks are marked in green, orange and red. Sectors that could not be read at all are marked in blue. In the presence of large quantity“slow” and unreadable blocks, the hard drive should be replaced.

The Victoria program allows you to restore bad sectors, but we will not consider all the nuances of the procedure. Moreover, “treatment” often contributes only to a slight extension of the service life of the storage medium. To reassign bad blocks, perform a check with the mode enabled Remap. If the restoration was successful, do not rush to rejoice. Re-diagnostics the disk after certain period operation. The appearance of new bad blocks will indicate that the degradation of the hard drive is irreversible, and it’s time to find a replacement.
HDDScan
This is another one convenient program to identify problems with hard drives. After launching the application, select Select list Drive drive that needs checking.

Below we click on the “S.M.A.R.T.” button and get acquainted with the provided report.

Now let's diagnose the disk surface. Click on the round button to the right of the drop-down list of media and select Surface Tests in the menu that opens.


Click on the Add Test button, thereby adding a test to the list and starting its execution.

You can receive information about the testing progress in Graph, Map, and Report modes. All blocks are also distributed into groups with appropriate color marking depending on access time.


At the end, a final report is generated.

Perhaps this is all we wanted to tell you about the methods of checking a computer’s hard drive for functionality. We hope the information provided will be useful to you and help you save important data.
Often, unstable computer operation is associated with errors in the HDD file system. To deal with this problem, error checking on the hard drive is necessary. Among other things, it would be nice to know about the condition of the hard drive if it makes strange sounds, such as clicking or grinding, while the PC is running. If information about damage to the hard disk will be received in advance, you can save all user data before the device fails.
Victoria
First of all you will need specialized program. Victoria is considered one of the best and most reliable. With its help, a hard drive can be checked for errors on any operating system. Whether you have Windows 7, XP or 8 installed, Victoria will work stably under each.
The application is absolutely free and can be downloaded from the developer's website. However, it is distributed in two versions. The first one is standard binary packages to run in the OS. The second is an ISO image to run without having to boot the operating system. This is convenient when Windows refuses to work due to HDD errors.
If the HDD has a capacity of about 700 GB, errors will take at least one or two hours. Windows 7 will perform this procedure much faster using built-in tools. However, the quality of testing and the amount of data obtained using Victoria will be disproportionately higher.
Testing
First download the app. It is supplied in an archive. Extract it to any empty directory and double click on executable file. If the work is carried out in Windows 7 or 8, you need to click on the exe file right click mouse, and then select “run with administrator rights”.
Checking for errors should begin with several preparatory steps. After starting the program, go to the "Standard" tab. On the right side you can see all the drives located in the computer. Select the HDD you want to test. Then click on the "Passport" button. If nothing goes wrong, the name and model of the hard drive will be displayed at the bottom of the window.

After this, go to the tab called “SMART” and click on the inscription “GetSMART”. If the status next to the button changes, it means everything was done correctly. This area usually displays the word "GOOD", but "BAD" may also appear. In both the first and second cases, the sensor data was read correctly.
Possible mistakes
It happens that the HDD controller works in AHCI mode. In this case, consider SMART attributes It won’t work, so the hard drive cannot be checked for errors. The program will send the message "Error reading SMART" to the log. Also, next to the button that is responsible for reading data from sensors, “Non ATA” will be displayed, and the area under the text itself will be highlighted in red.
To allow Victoria to work with the hard drive, you need to change the BIOS settings. To enter them, you should press the “DEL” button several times while the very first messages appear on the screen when the computer boots. The method for launching the BIOS settings utility may differ for different motherboard models. If the "DEL" key does not lead to a positive result, you should familiarize yourself with the information that is easily found on the developer's website.
After entering the BIOS, go to Config (may be Advanced) - Serial ATA - Controller Mode, and then change the setting to Compatibility. Remember that after completing the hard drive check, the settings should be returned to their original state.
Continue checking
After correctly reading the SMART information, go to the “Test” tab and click on the “Start” sign. After this, error checking on the hard drive will begin. In the main area of the program, rectangles that were previously monochromatic will now be painted in different colors. On the right will be written the total number of sectors, sorted by access time.

The main attention should be paid to the numbers near the blue and red marks. They mark dead or broken sectors. That is, those that are impossible to access or require a lot of time to read. Thus, when accessing them, the computer seems to freeze.
Recovery
To try to restore bad sectors, error checking on the hard drive should be run again, but now set the switch located at the bottom right to the “remap” position. The program will mark "bads" as non-working, entering their addresses into a special area on the HDD.
Be carefull! If bad sectors begin to appear on your hard drive, most likely the drive will continue to fail after recovery. It is advisable to replace it or at least make a backup copy of all important data by copying it outside the HDD.
Built-in tools
The built-in OS tools can also check the hard drive for errors. Windows 8 allows you to launch it in a few clicks.

- First, open File Explorer by clicking on the My Computer icon.
- Then right-click on any section and select "Properties".
- Go to the tab called “Service”, and in it click on the inscription “Run check”.


Checking the hard drive for errors via the command line
The command line is a powerful tool that is used by many system administrators during the decision various problems systems. Its main advantage is that testing can be started even when graphical shell refuses to start. In this case, it is worth using command line support by pressing the F8 key during Windows boot, but before the logo appears on the screen.

If the standard mode works normally, follow these steps to run the test:
- Press "Windows+R" on your computer keyboard.
- In the input line of the window that opens, type “cmd.exe” and click on the “OK” button.
- The command line will appear on the screen. To run the scan, write “chkdskX: /f /r” into it. Instead of the letter "X", click the one that the operating system uses to indicate the partition that requires testing.
- After entering the OS, it may indicate that it is not possible to complete the procedure without necessarily rebooting the PC. When the message appears, simply press the "Y" key and restart your computer. After this, error checking on the hard drive will begin automatically.
Remember: when checking the HDD, you should wait until it is completely finished. Disabling this process should only be done using tools built into the program. If there is no way to stop the procedure, do not try to interrupt it by turning off the computer or pressing “RESET”. These actions can lead to additional errors and data corruption on the hard drive. The most dangerous thing is the impossibility of recovering information after incorrect termination work.
Hello friends. Checking the hard drive or how to check a hard drive for errors and bad sectors, we will talk about this in detail today.
In the previous article I showed. Today you will learn about programs for testing hard drives and other storage media. At the end of the review I posted short video lesson.
Checking our disk
It is useful for anyone who has a computer to know about the status of the hard drive or drives, if there are several of them. After all, the hard drive stores information that is important for some, and not so important for others. So, in order not to lose it, I recommend making backup copies at least once a month.
You can purchase portable disk or a flash drive to store important information, you can also use regular CDs and DVD discs. If you don’t know how to save information on optical plastic discs, then I recommend reading.
You can test your computer disks different ways And special programs. In this article we will look at:
- Checking the disk using Windows 7
- Useful Victoria v4.3
- HDDScan program
- Ashampoo HDD Control 2
There are of course many other useful and worthy programs and utilities, but in this publication we will only talk about these 4 methods.
How to check your hard drive using Windows 7
Any hard drive or flash drive can be checked for functionality using Windows tools. I wrote more about this here. Here is a simple algorithm for the necessary actions.
Go to My Computer, select the desired hard drive or flash drive, right-click on it and go to Properties.


Check the boxes you need or all and click Start.

This procedure can take a long time, everything will depend on the size of the storage medium that you want to check for errors and bad sectors.
Checking the disk with Victoria
Victoria one of the main programs that I personally use to check the hard drive through Windows, or if the operating system does not start at all, then through a boot disk with this utility.
After downloading Victoria version 4.3, you need to go into the archive, unpack it or run the file with a green cross called Victoria43.

We launch the program, it is on English language, if you don’t know this language, don’t be alarmed, I will help you figure it out.
The Standard window describes the main characteristics of the storage medium: its model, serial number, disk size, how many cylinders, sectors it has, and so on.

In the Smart tab you can see state of hard disk. Click on the Get Smart button and look at the indicators that appear. Since my hard drive is new, my indicators are normal, SMART status = Good. You may have different meaning and information.

Smart is a technology of analysis, self-control and reporting. Using it, you can view and evaluate the condition of the hard drive, its built-in self-diagnostic equipment, and also predict possible time its failure.
To test the storage media, go to the Test tab and click on the Start button. If you have a lot of green, orange, red and blue rectangles (sectors) - this is not good. Ideally, all sectors should be light gray and grey.

If you have damaged sectors marked “Err X”, then after completing the test, check the box next to the word Remap and run the test again. The Victoria program will try to restore these sectors and fix errors on the hard drive.
Checking the hard drive may take a long time, so be patient, it all depends on the amount of information on the media. In the meantime, testing is underway, I recommend reading the article on how to set up your computer yourself or.
Checking the hard drive using HDDScan
HDDScan is a program for diagnosing and testing hard drives in English.
After downloading, you need to run the file called HDDScan.

Choose required device Select Drive, on the right there will be basic information about it.

Click on the blue round button and select required action. Go to Surfase Test - select and run the test.

Check the boxes next to Verify or Read and click the Add Test button. I do not recommend choosing Erase - it erases data.

Once you click add a test, it will start automatically and will appear in the lower Test Manager window.

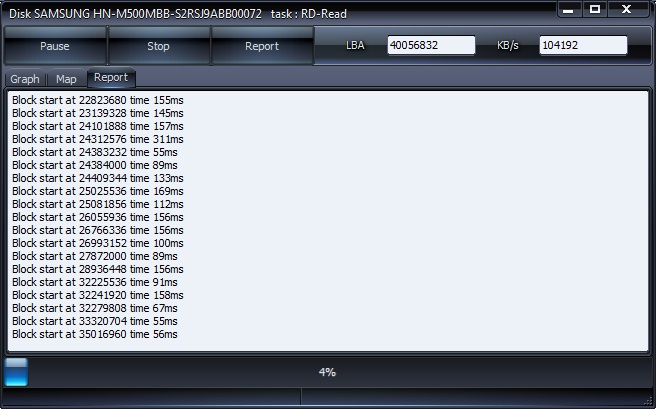
Double-click on RD-Read, go to the test that has started and look at its process, you can see it on the Graph.

View on Map. At the top there are navigation buttons for controlling the Pause, Stop and Report test process, cluster and testing speed in KB/s, and on the right is the sector scanning time in numbers from< 5 до >500 milliseconds.

In the third column of Report you can see the scanned clusters and sectors of the storage medium, and at the very bottom the progress of the test process is shown as a percentage.

Upon completion of the test, a corresponding message will appear in the task manager window.
If for some reason you did not like the first three methods, then I offer you a powerful and useful utility for review. diagnosing hard disks and storage media from Ashampoo.
Cool program Ashampoo HDD Control 2
I have already worked with this utility for diagnosing and monitoring hard drives from Ashampoo. I really liked this program, so I decided to mention it in this article.

After you download and install Ashampoo HDD Control 2. Depending on language pack, the program can be in both Russian and English.
It has a simple and accessible interface that anyone can understand.
Here you can see probably almost all the information about a hard drive or flash drive that you want: model, partitions, size, condition, performance, temperature and much other useful information.

This program has extensive capabilities and many settings; at the top there are seven navigation tabs:
- Control
- Defragmentation
- Testing
- Disk Cleanup
- Removing Internet Traces
- Deleted files
- Content Analysis
You can browse through all seven tabs and explore useful information.
We are interested in checking the hard drive, go to the Testing tab, click Scan hard disks, select the one you need and click on the magnifying glass that says Start. This test can measure the speed of your hard drive.

In order to check the surface of the disk, you need to return to the Control tab and click Surface Test.

After this, the Hard Disk Surface Testing window will appear, which contains the following symbols: blue square— not tested yet, green — great, red (already bad) — at least one bad sector.

The scanning time will again depend on the volume and speed hard disk or flash drive.
In custody
Today we discussed in detail the topic of checking a hard drive or how to check a hard drive for errors and bad sectors. To do this, we used four methods: standard Windows tools, the useful Victoria, the HDDScan utility and the cool Ashampoo program HDD Control 2.
Now let's watch a short video tutorial on how to check your hard drive.
Checking the hard drive | website
Perhaps you have questions related to checking hard disk. You can ask them below in the comments to this article, and also use the form with me.
Thank you for reading me on
One day it may turn out that a PC or laptop refuses to start the Windows operating system or freezes during important and urgent work. Hard drive errors when Windows work- Not last reason computer failure. However, any problem can be corrected if you know what its cause is.
The essence of the disk problem
Whether it's a traditional hard drive or a newfangled SSD drive - critical error it appears anywhere on it. Disk error - physically or software damaged sectors, infection of the Windows system with viruses, failures in PC components (from parts of the drive itself to components of the computer motherboard). The user's task is to figure out what caused the errors on the disk.
How to fix hard drive problems detected by Windows
Hard drive problems are unspecified errors on it that are not signed numeric code(for example, error 11). First of all, the media from which it is proposed to copy valuable data is indicated.
Windows warns you that your data could be seriously damaged
Action plan:
- Urgent copying important files to another storage device: flash drives, disks, memory cards, placing some of these files on “cloud” Internet services.
- Checking the disk for bad sectors.
- Antivirus scanning.
- Checking the CMOS/BIOS settings on your computer.
- PC maintenance: checking the integrity of the cables, external inspection of PC components and cleaning them.
- If you find faults that you could not fix yourself, send your PC or laptop for repair.
The last two points will not be considered - this is the task of specialists at computer service centers.
Backing up files in Windows 7
Do the following.
- Click "Start" and search bar In the Windows main menu, enter the word “archiving”. Launch the Backup and Restore application.
 Click on the first option offered - this is the backup wizard
 - Start setting up your archiving program. Click "Set Up Backup".
 Get started setting up your backup
 - Select the disk or partition where backups will be created. External drives and flash drives or large-capacity memory cards (from ten gigabytes) are best suited.
 Select another, healthy and working disk
 - Click on "Give Windows a choice." However, if you have clearly decided what you need first, choose the independent option.
 If you give the system a choice, Windows will copy the contents of all user folders by default
 - Select system folders user files and/or the contents of copied disks - except for the disk on which the copy will be created.
 Select everything you want to copy except the destination drive
 - Windows will ask for confirmation and display the categories of files being sent to backup storage.
 After this, the system will ask you to double-check the settings and start copying
To restore files from a backup, do the following:

The process will start. After the copying is complete, check if everything has been restored.
 Click the link that appears to view a list of files and folders from the previous copy
 Checking the disk using the Windows 7 command line
Disk scan identifies logically or physically problematic sectors of the hard drive or SSD drive, which is the main one in the computer. Do the following:

If you still don’t trust standard disk checking tools, use the Victoria program. The Victoria version for Windows is almost identical to the version for DOS - with one exception: after downloading it, you can immediately run it to check the disk running another working system Windows without resorting to other disks, including removable ones.
Also get a new disk - in case the old one has outlived its usefulness.
Checking your PC for viruses
Boot viruses spoil boot entry and the NTFS(5) file table, with which Windows 7 works. Because of this, valuable data that is not easy to recover with special utilities, as well as the system itself, “fly”.
As an example, use the Dr. utility. Web CureIt, which allows you to quickly check your hard drive for malicious code.

The application takes up more than 100 MB - due to the extensive antivirus database of all times. After two days of work, this database is considered outdated - viruses appear almost hourly.
If an error appears when starting Windows
The computer refuses to boot from the hard drive, reporting an error reading system Windows files.
 To try to resolve the hard drive read error, press Ctrl+Alt+Del to restart
 A professional way to resolve this error is third party utility disk check with bootable media Windows or another operating system (if there is a version of this utility for it).
Checking the disk using built-in tools hides some details, although its use is not useless.
What makes no sense to do:
- restore the Windows system to an earlier date;
- run automatic recovery;
- launch safe mode Windows.
Setting up the BIOS to boot your PC from a flash drive or external drive
Change the PC boot priority in the BIOS from different disks. Do the following (the Award BIOS version is taken as an example).
- When you turn on the computer, after the manufacturer's logo appears (or immediately below it), a prompt line to enter the BIOS will appear - press this key.
 Press the key indicated at the end of the list of devices scanned when turning on the PC
 - After entering BIOS Setup, select “Integrated Peripherals”.
 To enter component management, select Integrated Peripherals
 - Check if the USB port controller is active.
 USB Controller Enabled means that the USB controller is enabled
 - If USB support is enabled, exit this submenu using the Esc key. If it's off, turn it on USB support using the Page Up\Down keys (the meanings of all the BIOS settings control keys are revealed below), then exit by pressing Esc.
- From the main BIOS menu, select Advanced BIOS Settings.
 Go to the advanced BIOS settings to control how your PC boots from different types carriers
 - Enter the priority menu hard drives and turn on the USB flash drive as the first boot disk.
 To configure the system, the boot order from media must be changed
 - Use the “+” or “Page UP/Down” key to designate the flash drive as the first boot device.
 The first place in the boot list should be a flash drive.
 - Exit this submenu by pressing Esc and set USB drives as the first device to be launched.
 Put it in the First section Boot Device parameterUSB-HDD (First boot from USB drive)
 - Exit all submenus to the main BIOS menu and press F10 to save the settings.
 When a message appears asking the BIOS to save settings, press Y and Enter
 - Give the command “Y” - “Enter”, the computer will restart.
Now, when you restart the PC, it will first poll the ports for the presence of a flash drive or removable hard drive (HDD/SSD) - and only then try to start Windows from the built-in disk.
Checking a hard drive from a flash drive running the Victoria program
For example, we took a ready-made flash drive with Victoria under DOS and a laptop with faulty disk. Do the following.
- Insert the USB flash drive and restart the PC. Should come out boot menu with Victoria.
 In the window that appears, select Victoria
 - The Victoria app may offer different versions - choose the laptop version.
 In the Victoria for Notebook section, select the second option
 - If you want to familiarize yourself with Victoria's functionality, read the key help by pressing F1.
 First, find out how to run different functions Victoria programs by pressing F1
 - To exit the help, press the X key or any other key that is not in the list.
 To exit the help, press X and go to Check Disk
 - From the main menu, press F2 to display disk information. If this does not happen, press the P key to select the channel IDE interface, on which the disk “sits”. All modern PCs are equipped with hard drives SATA drives.
 In the window that appears, select Ext. PCI ATA/SATA and press Enter
 - After selecting the channel type, enter its number, for example, 1. If there are no other hard drives, the following numbers will be empty, there is no point in entering them.
 Busy channels in the program are immediately visible - enter the channel number of your disk and press Enter
 - Wait until Victoria detects the disk on channel 1.
 A message indicating successful channel detection will appear at the bottom
 - If your disk turns out to be IDE-based, go back to the interface selection submenu and select one of the options Primary/Secondary Master/Slave (English: “Primary/Secondary Main/Auxiliary disk”) - check on the disk itself what position it is in switch. IDE is outdated - modern wheels based on SATA do not require switching. The Primary Master mode is taken as an example.
 Select the mode with the cursor keys and confirm the selection with the Enter key
 - The disk details will appear at the bottom. Press F2 to display information.
 The channel port number is attached to the disk information
 - Initialization (passport data) of the disk shows that its recognition by the Victoria application has been completed.
 After the disk is fully initialized, you can start checking it
 - Press F4 - the disk scanning menu will appear. Here LBA is a disk sector (512 bytes). We multiply the number of LBA sectors by 512, divide by 1024 3 - we get the size in gigabytes. The size of the disk area being scanned in Victoria for DOS should not exceed 1024 GB. If the size is more than 1 TB, calculate the beginning (Start LBA) and end (EndLBA) and scan the disk in several stages.
 Check that the disk size does not exceed 1 TB
 - Press the spacebar and enter an integer number in gigabytes or percentage - this will determine the location of the last sector in the scanned area. The scanning start point is also changeable - similarly calculate the size in gigabytes. When you're finished typing, press Enter.
 Enter the last gigabyte that will end the scanned disk area
 - The size of the scanned disk area will be recalculated into the number of LBA sectors. Switch to linear reading. Do not change this reading algorithm to another (random and “floating” reads will take longer and wear out the already old disk more).
 Select the program's linear disk scanning mode
 - Go to the next item and select “BB (Bad Blocks) Advanced Remap”. Options are selected using the left/right cursor keys or the space bar.
 Select the BB Advanced Remap option - it will use sectors from the reserve area
 - Don’t rush to set the “Erase 256 sect.” algorithm. (“Erasing 256 adjacent sectors”) - in place of one problematic sector, 128 KB of data on the disk will be erased. In this case, the size of the destroyed information will be multiplied by the number of “broken” sectors - depending on the proximity of each of these sectors to each other throughout the scanned area of the disk. Try other sector recovery options first! Press "Enter" to start scanning.
That's it, the process has begun, the Victoria application will notify you of completion with the sound of a beep on the computer. When bad sectors are found, “remapping” (reassignment of sectors) will be automatically performed.
 Replacing bad sectors using Victoria is one of the effective ways to temporarily fix a hard drive
 Forecast further work disk can be estimated based on SMART monitoring data. Press F9. The status will be indicated at the top. If it is “Good”, there is still a reserve for replacing bad sectors. The status has changed - the disk will be replaced with a new one. If it is not possible to replace the disk, try to programmatically trim it, excluding the bad sectors from the cropped area (often they are close to each other, many of them in a row), but this is for those who like difficulties.
 The Good status indicates that the disk is in good condition.
 Other ways to check the disk
There are several options:
- using other applications recorded on a flash drive in a similar way (DOS boot loader);
- scandisk.exe utility launched through DOS using the appropriate commands;
- Windows XP command line launched from LiveCD/DVD;
- connecting the problematic drive to another computer via a free cable.
Video: checking and trimming “broken” space
Error 11 when writing or unpacking data
The “11th error” has nothing to do with damaged sectors on the disk. This is 90% a software problem. It occurs when installing unverified programs that have installation sources that were compiled by the developers with some omissions. Message is generated system library unarc.dll, which is responsible for unpacking content for any installed program and is one of the components of the service " Windows Installer».
 Error code 11 can be replaced by any code from 1 to 10
 Some users, not understanding the problem with the source code of the installed program, update or replace this file (it “lies” in the C:\Windows\System32 directory) with any version of it from the Internet. As a result, Windows may report that some files have been replaced with unknown versions and require you to insert an installation DVD or flash drive to restore them.
The solutions to the problem are as follows:
- try not to allow Russian names of files and folders in installed applications. For example, instead of the \Truckers-2 folder, when installing the game “Truckers-2”, the \Rig&Roll folder is created. If, after all, the directory name is written in Cyrillic, it means the game is from a dubious source, download the licensed one (hacking the version does not matter, as long as it has a file structure like the licensed source);
- There is not enough disk space (in any of its partitions) for the program to be installed. Clean the disk from unnecessary programs, documents and other content;
- error unpacking archives downloaded from the Internet. Install several archivers (for example, WinRar, WinZip, 7zip and several others);
- disable the antivirus and Windows firewall - sometimes they become an obstacle, especially if any application or game requires crack (activator with key selection).
Other hard drive errors
They may be:
- 3f1 (the error is inherent in HP laptops);
- 300 (boot record not detected);
- 3f0 (no boot disk);
- 301 (SMART disk health diagnostic error), etc.
Video: checking partition C: and flash drives for errors in Windows 7/8/10
Restoring the functionality of a PC or laptop in the event of disk failures is not a problem if you act wisely and consistently. May you be lucky!


