Diagnostics and maintenance of hard drives. HDD diagnostics using programs from the manufacturer. Checking the hard drive for bad sectors
Hello readers of the ComService company blog (Naberezhnye Chelny). In this article we will look at the topic - Hard Disk Diagnostics. The reason for writing this article was a message from relatives - our operating system has been installed for a maximum of two months, after which glitches begin and we have to reinstall it. Even after I installed Windows 7 for them, complaints began. I had no doubt about the operating system. It was already installed on more than 10 computers. I tested the RAM, replaced the thermal paste on the processor, cleaned the system of dust - nothing. Then I tested the entire system using the system stability test (functions of the AIDA64 program). Everything is okay.
After repeated successful testing, enlightenment came. Checking the hard drive completely slipped my mind. I first diagnosed the HDD with a third-party program called HDD Regenerator. Having discovered errors (8 unreadable sectors), I ran the check again using a program from the manufacturer Western Digital. The latter confirmed the malfunction and the hard drive was sent to a service center under warranty. Read on to learn how to diagnose your hard drive...
Article structure
- Diagnosing a hard drive using Windows
- HDD diagnostics using WD Data Lifeguard Tools
- Hard drive test using Seagate SeaTools
- Restoring the Seagate HDD
- Testing Toshiba hard drives
- Conclusion
1. Hard drive diagnostics using Windows
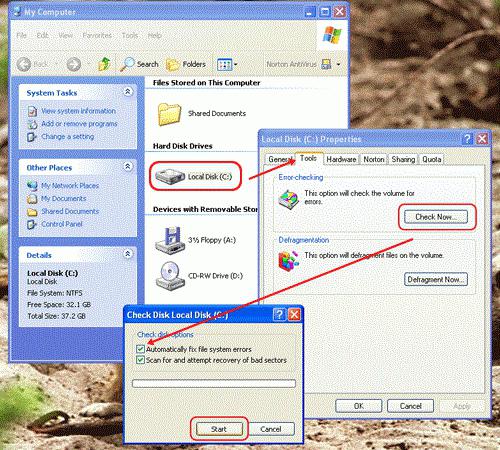
Diagnostics using the operating system is what can and should be used first. To do this, open the main Start menu and select Computer. Right-click on the partition to open the context menu and select Properties
Are opening Disk properties. Go to the Tools tab and in the Check for errors section click the Check button

In Windows 8, the following window appears (most likely due to checking the partition on the SSD drive). Let's trust Microsoft and cancel the disk check

In Windows 7, a window opens where, for a more thorough check, you need to check both boxes (as shown in the figure) and click the Run button

If the operating system is using the volume you want to check, you will see a message

If you click Disable, the disk will be checked

If you click Cancel, another window will appear asking you to check the disk the next time you boot the computer. This is the most preferred option. In this case, the disk being checked will be free from any tasks and processes, which will allow you to perform the scan without problems

Click on disk check schedule.
We repeat all the above steps with all partitions (volumes) of your hard drive and reboot. When the computer boots, the operating system will diagnose the hard drive. If there is something interesting, then when the computer boots, an information window with the results will appear

Typically, Windows does not want (or rather cannot) immediately scan the system disk. It asks you to assign it the next time you boot. All other partitions can be checked without rebooting.
If you chose to check the system disk and scheduled it for the next boot, then you will see approximately the following picture

You must wait until the diagnostics are completed and the operating system loads. If errors are found, perform diagnostics using programs from the manufacturer.
HDD diagnostics using programs from the manufacturer
There were several manufacturers of hard drives. These are Seagate, Western Digital, Samsung and Hitachi. Each manufacturer produced disks and, of course, utilities for diagnosing them. Afterwards, Seagate bought Samsung, and Western Digital bought Hitachi. That is, there are actually two manufacturers. I will give their diagnostic utilities
- Western Digital - Data Lifeguard Tools
- Seagate - SeaTools
There is a special utility for Hitachi hard drives - Drive Fitness Test. I tried it on two hard drives of the same model - nothing worked. The program does not see the hard drive. Therefore, we will check with the Data Lifeguard Tools utility from Western Digital. Let's start with it.
2. Data Lifeguard Tools - a program for diagnosing WD and Hitachi hard drives
You need to download it. To do this, go to link- Data Lifeguard Tools. A page opens where you need to select your product

Since I needed to check the internal 3.5″ hard drive with a SATA interface, I chose it. You choose yours.

On the next page you select your Windows or Mac system and the Data Lifeguard Diagnostic hard drive diagnostic utility

Below is more information about the program. Click on the Download button

The WinDlg_124.zip archive will be downloaded, which can be opened using the 7-zip or WinRar program in the same way as a file with the rar extension. Unpack and run the Setup.exe file highlighted in the figure below to install the diagnostic utility

Under Windows 8, run with administrator rights. Otherwise nothing will work. Installation is simple. The installed program starts immediately. Check the box to accept the license agreement and click Next

The main program window looks like this. You must select the drive to test and click on the highlighted area to select a test

A window opens in which you can select a quick test, an extended test, write the entire disk with zeros, or view the test result. Selecting this option will show the results of the last test. To diagnose a hard drive, you must select either a quick test - QUICK TEST, or an extended test - EXTENDED TEST

Wait for it to finish and see the results.
Here are the results of the extended hard drive test that I talked about at the beginning of the article

Errors were detected when clicking the Repair button

All you have to do is click OK

Then close - Close and see the result. As you can see, the short test succeeded, but the extended one failed

Hence the conclusion. It is necessary to check with an extended test. It takes several hours (in this case about five), but it is reliable.
Afterwards, the disk that failed the test was successfully replaced under warranty.
3. SeaTools - diagnostics of hard drives from Seagate and possibly Samsung
You also need to download the utility. Follow the link - SeaTools. We get to the Seagate company page. To download, go to the DOWNLOADS tab. We are offered a choice of downloading the utility for Windows and DOS. If your operating system does not boot at all, then you need to select DOS. The disk image will download. It must be written to disk. If you are at a loss, I recommend reading the article How to burn an image to disk?. Then it will boot from the disk and diagnose the HDD in the same way as in the Windows version. To find out how to do this, read on.
Select SeaTools for Windows by clicking Download in the appropriate field

On the next page you must accept the license agreement by clicking ACCEPT

Then, to directly download the diagnostic utility, click Download

The file SeaToolsforWindowsSetup-1208.exe will be downloaded, ~20 MB in size. Launch and install the utility. On the website, support for Windows 8 is stated, but the program did not install immediately. On Windows 7 the installation went without problems.
Launch the hard drive diagnostic utility. If you do not have NET Framework version 4.0 installed, you will see the following window. Click Yes and go to the download page

The page below opens. You need to wait until you are redirected to the package download page

Select your language and click the Download button

The following pop-up window may appear. Click Cancel and continue

The dotNetFx40_Full_setup.exe file will download and you need to run it. Next, accept the license agreement by checking the appropriate box and clicking the Install button.


The installation is not fast because distributed calculations are carried out in parallel.
When finished, click Finish

Launch the SeaTools program again
Searches for supported drives. Need to wait a little

Then, accept the license agreement again


To diagnose a hard drive, the Short and Long universal tests are sufficient

To be on the safe side, select Long-term universal and wait until it ends. If the test does not pass, follow the instructions and if the program does not fix the disk, bring it under warranty.
In the Basic tests menu there is an item Repair all. I have not tried this function. I’ll try as soon as I get a suitable hard drive.
4. Restoring the Seagate HDD
10_21_2013 A few months ago, bring a 160 GB Seagate hard drive without warranty. A long-term universal test produced an error. When connecting to another computer, I was able to copy all the important information from this disk without any problems.
To restore functionality, we used Additional tests

A warning window opened saying that you can activate Additional tests using the F8 key.

By clicking on F8, the window closed and the Additional tests section appeared. Since our data was saved, I chose Full Erase (SATA)

Another warning popped up

Scrolling the screen in this message with the slider, it was discovered that to start a complete erase, you need to press F8. After pressing, erasing started.
When the process was completed, I ran the Long-Term Universal Test again. The test was passed. After that, we reinstalled the production system image using Norton Ghost. And until this moment no one complained.
5. Testing Toshiba hard drives
31_10_2013. It was necessary to check two Toshiba hard drives. Of course, I wanted to find and use a utility from the manufacturer.
I downloaded the diagnostic utility from:
Downloaded the test for Windows. The notes do not state support for Windows 7

Launched the downloaded file fjdtwin.exe. Accept the license by clicking Agree

The diagnostic utility from Fujitsu starts in which you need to select and press the Short Test or Extended Test button

The problem is that I can't select the hard drive for the test. I selected it with the mouse and keyboard - nothing.
Download the utility for DOS from the official Toshiba website. and copy it to a flash drive.
We restart the computer and using the Boot menu, called up using the F8 or F11 keys or look at the instructions, select the flash drive

In the command line, write the name of the diagnostic utility and press Enter

Press Space to continue

We agree by clicking Agree

We wait while the utility identifies

Then comes a warning from the test utility asking you to press any key to exit. That is, the utility did not find the hard drive

I tried connecting it to another SATA connector - nothing. I tried connecting via another SATA cable - the same result.
Here is a harsh HDD diagnostic test from Toshiba. If anyone has managed to test their disks, please tell us in the comments. Everyone will be interested.
If I come across another Toshiba HDD, I'll try again. If I succeed, I'll post it. If that doesn’t work, I’ll test it with SeaTools or WD utilities.
Conclusion
In the article diagnosing a hard drive, you learned how to check your HDD for errors. Here we looked at two way: checking with built-in Windows tools and checking with special utilities from manufacturers. In a combat situation, I like to use diagnostic utilities. Since this, for me, is 100% an option. If the disk passes the test, everything is fine. Otherwise, we will take it for repair under warranty. This is why in the article about such importance I attach to guarantees. It is necessary that she be 3 years old. This is a whole 3 years without a headache. Naturally, it is necessary to treat the hard drive well during the entire warranty period, since the service center pays close attention to scratches.
The main thing I want to convey to you is. Hard drives are consumables. Like cartridges for a printer. You need to have at least two copies of your important data on two different drives. For example, on internal and on . One fails, buy a new one, restore the data from the backup one and you are happy again. In order not to buy often, look at the same guarantee. I wish it was longer. Another great option is to use .
I have not encountered any problems with Samsung hard drives. I couldn't find any utilities specifically for these disks. If anyone has information, please share in the comments. For now I will check them with a utility from Seagate or WD.
A video in which I will briefly talk about diagnosing hard drives
Thanks for sharing the article on social media. All the best!
Hello, friends! In this article we will understand the topic - Hard Drive Diagnostics. The reason for writing this article was a message from relatives - our operating system has been installed for a maximum of two months, after which glitches begin and we have to reinstall it. Even after I installed Windows 7 for them, complaints began. I had no doubt about the operating system. It was already installed on more than 10 computers. I tested the RAM, replaced the thermal paste on the processor, cleaned the system of dust - nothing. Then I tested the entire system using the system stability test (functions of the AIDA64 program). Everything is okay.
After repeated successful testing, enlightenment came. Checking the hard drive completely slipped my mind. I first diagnosed the HDD with a third-party program called HDD Regenerator. Having discovered errors (8 unreadable sectors), I ran the check again using a program from the manufacturer Western Digital. The latter confirmed the malfunction and the hard drive was sent to a service center under warranty. Read on to learn how to diagnose your hard drive...
Diagnostics using the operating system is what can and should be used first. To do this, open the main Start menu and select Computer. Right-click on the section to bring up the context menu and select Properties

Disk Properties opens. Go to the tab Service and in the section Checking for errors press the button Check

This will be Data Lifeguard Diagnostic for Windows.
The WinDlg_v1_28.zip archive will be downloaded, which can be opened using the 7-zip or WinRar program in the same way as a file with the rar extension. Unpack and run the Setup.exe file.
When finished, click Ready

Launch the SeaTools program again
Searches for supported drives. Need to wait a little

Then, accept the license agreement again


To diagnose a hard drive, the Short and Long universal tests are sufficient

To be safe, choose Long lasting universal and wait for it to finish. If the test does not pass, follow the instructions and if the program does not fix the disk, bring it under warranty.
In the Basic tests menu there is an item Repair all. I have not tried this function. I’ll try as soon as I get a suitable hard drive.
Restoring the Seagate HDD
10_21_2013 A few months ago, bring a 160 GB Seagate hard drive without warranty. A long-term universal test produced an error. When connecting to another computer, I was able to copy all the important information from this disk without any problems.
To restore functionality we used Additional tests

A warning window opened saying that you can activate Additional tests using the key F8

By clicking on F8, the window closed and the Additional tests section appeared. Since our data was saved, I chose Full erase (SATA)

Another warning popped up

Scrolling the screen in this message with the slider, it was discovered that to start a complete erase, you need to press F8. After pressing, erasing started.
When the process was completed, I ran the Long-Term Universal Test again. The test was passed. After that, we reinstalled the production system image using Norton Ghost. And until this moment no one complained.
Conclusion
In the article hard drive diagnostics you learned how to check your hard drive (HDD) for errors. Here we looked at two methods: checking with built-in Windows tools and checking with special utilities from manufacturers. In a combat situation, I like to use diagnostic utilities. Since this, for me, is 100% an option. If the disk passes the test, everything is fine. Otherwise, we will take it for repair under warranty. This is why in the article on choosing a hard drive I attach such importance to the warranty. It is necessary that she be 3 years old. This is a whole 3 years without a headache. Naturally, it is necessary to treat the hard drive well during the entire warranty period, since the service center pays close attention to scratches.
The main thing I want to convey to you is. Hard drives are consumables. Like cartridges for a printer. You need to have at least two copies of your important data on two different drives. For example, on an internal and external hard drive. One fails, buy a new one, restore the data from the backup one and you are happy again. In order not to buy often, look at the same guarantee. I wish it was longer. Another great option is to use Windows 7 archiving.
I have not encountered any problems with Samsung hard drives. I couldn't find any utilities specifically for these disks. If anyone has information, please share in the comments. For now I will check them with a utility from Seagate or WD.
Good day.
The hard drive is one of the most valuable pieces of hardware in a PC! Knowing in advance that something is wrong with it, you can have time to transfer all the data to other media without loss. Most often, testing a hard drive is carried out when purchasing a new drive, or when various kinds of problems arise: files take a long time to copy, the PC freezes when opening (accessing) the drive, some files stop being readable, etc.
By the way, on my blog there are quite a few articles devoted to problems with hard drives (hereinafter referred to as HDD). In this same article, I would like to collect in a “heap” the best programs (that I have ever dealt with) and recommendations for working with HDDs.
1.Victoria
Official website: http://hdd-911.com/
Rice. 1. Victoria43 - main program window
Victoria is one of the most famous programs for testing and diagnosing hard drives. Its advantages over other programs of this class are obvious:
- has an ultra-small distribution size;
- very fast operating speed;
- many tests (information about the status of the HDD);
- works directly with the hard drive;
- free
By the way, I have an article on my blog about how to check the HDD for problems using this utility:
2.HDAT2
Rice. 2. hdat2 - main window
A service utility for working with hard drives (testing, diagnostics, treatment of bad sectors, etc.). The main and main difference from the famous Victoria is the support for almost any drive with interfaces: ATA/ATAPI/SATA, SSD, SCSI and USB.
3.CrystalDiskInfo
Rice. 3. CrystalDiskInfo 5.6.2 - S.M.A.R.T. readings disk
Free utility for diagnosing your hard drive. During operation, the program not only displays S.M.A.R.T. disk (by the way, it does this perfectly; on many forums, when solving certain problems with the HDD, they ask for readings from this utility!), but it also keeps track of its temperature, and general information about the HDD is shown.
Main advantages:
Support for external USB drives;
- Monitoring the health status and temperature of the HDD;
- S.M.A.R.T. schedule data;
- Manage AAM/APM settings (useful if your hard drive, for example, is noisy:).
4. HDDlife
Rice. 4. Main window of the HDDlife V.4.0.183 program
This utility is one of the best of its kind! It allows you to constantly monitor the status of ALL your hard drives and notify you of problems in a timely manner. For example:
- there is little disk space left, which may affect performance;
- temperature exceeding normal range;
- bad SMART disk readings;
- the hard drive doesn't have long to live... etc.
By the way, thanks to this utility, you can (approximately) estimate how long your HDD will last. Well, unless, of course, force majeure occurs...
5. Scanner

Rice. 5. Analysis of occupied space on HDD (scanner)
A small utility for working with hard drives that allows you to get a pie chart of occupied space. A chart like this allows you to quickly assess where to spend space on your hard drive and delete unnecessary files.
By the way, such a utility allows you to save a lot of time if you have several hard drives and are full of all sorts of files (many of which you no longer need, and searching and evaluating “manually” is tedious and time-consuming).
That's all. Have a great weekend everyone. Thank you, as always, for your additions and feedback to the article!
Hard drive diagnostics are necessary in cases where strange and incomprehensible things happen to the computer. For example, if, with a minimum of running programs, your operating system begins to slow down terribly or the “blue screen of death” often begins to appear. If you recently reinstalled the operating system, and the computer continues to show a “blue screen” and slow down, then diagnostics must be carried out without fail.
Hard drive diagnostics in Windows
Diagnosing a hard drive using the operating system is the easiest, most painless and fastest way to do this, which is why it should be done first. In order to do this, you need to go to the My Computer section and right-click on the disk shortcut that you want to check. Next, select Properties in the context menu and go to the Tools tab in the window that appears. In this tab we are interested in the item “Checking the disk for system errors” (the wording may differ in different versions of the OS, but the meaning is the same).
If you are about to check the hard drive on which the operating system is installed, a window will appear warning you that it is impossible to do this while the drive is in use. You can disconnect the disk (not recommended for inexperienced users) or click Cancel. In the second case, a window will appear asking you to schedule a disk check at the next reboot - this is what we wanted (this is the most optimal check option). You can perform the same actions with all other disks and schedule them to be checked at the next reboot. After rebooting and successfully checking all disks for errors, if any were detected and not corrected by the system automatically, it is necessary to carry out diagnostics using special programs from the manufacturer or specialized utilities.
Diagnosing a hard drive using programs
There are a large number of programs for diagnosing the condition of a hard drive, both from equipment manufacturers and those created by third-party developers. Before using them, it is necessary to save all the most important data on another medium, since data may be deleted during disk recovery. Next, if you are going to use software from the manufacturer, you need to find out who made your hard drive. You can do this by delving into the documentation for your computer or through Device Manager.
After you have found out your manufacturer, or if you decide to use a universal utility (for example, MHDD), you need to download this program from the developer’s website. If you are using software from the manufacturer, then you just need to install it on your computer, launch it and follow the intuitive prompts.
If you use the MHDD program, then everything will be a little more complicated. At the initial stage, we make sure that the disk is faulty. To do this, we connect it to another computer or laptop, for example, via a USB adapter, copy the data that is needed and format the disk (all information will be deleted). Next, we return the disk to its rightful place and install the operating system again. We check the functionality, if the errors do not disappear, move on to the next stage.
The downloaded MHDD program, or rather its image in ISO format (distributed free of charge), must be burned to disk. Next, we reboot the PC and enter the BIOS, setting up the boot so that the disk drive starts first. Again we go to reboot, during which the program menu appears in front of us. Press F4 to start scanning and wait for the results. Most likely, after completing the work, the program will display a picture on the screen that will show individual sectors with a very slow response to the request (more than 500 ms).
At the next stage, execute the Erase command in the program menu to completely erase the disk and format it. After this, you need to scan the disk again, however, enable the Remap function, which will block all damaged areas of the disk and prevent them from being used during operation. Now you can return to normal boot settings and install Windows.
Or removable hard drives are almost the most important for ensuring the functionality of the entire computer system and proper storage of information without data loss in unforeseen situations. HDD operation should be monitored regularly. Let's look at what programs for diagnosing a hard drive exist today and what they are capable of.
What is hard drive diagnostics?
First, let's look at some of the most important aspects. Hard drive monitoring and diagnostics include several basic processes. The most significant here are the following: preliminary collection of information about the state of the hard drive (monitoring), checking the hard drive (scanning), error correction and data recovery (if errors cannot be corrected using software).
In principle, the utility programs themselves for diagnosing a hard drive should be divided according to their direct functions (informants, scanners, “doctors” and restorers). They will be discussed in more detail a little later, although today there are many software packages that combine all these functions.
The most common HDD problems
When considering the question of what the best programs for diagnosing a hard drive are, it is worth dwelling on the most common problems and errors that they can correct.
First of all, the most common are system errors that can occur when the Windows OS itself malfunctions, applications are not shut down correctly, files and folders are incorrectly copied or moved to other areas of the HDD, a sudden power outage, etc. In principle, most Such problems are identified and fixed by hard drive diagnostic programs.

It's another matter when the user is faced with a situation of physical damage to the surface of the hard drive. Here the problem is much more complicated. It is sometimes possible to transfer information to another area or section using software, but, alas, damaged areas cannot be restored. If there are too many of them, in the worst case you will have to change the hard drive. Of course, you can try to restore some of the information yourself, but in especially serious cases, say, after a temperature jump when the hard drive melted, such a procedure without the intervention of specialists will simply be impossible.
Information Preview
Now let's look at specialized utilities that allow you to collect and view complete information about the status, operation and main characteristics of the hard drive. According to experts and users, the most popular utilities are Everest, CPU-Z, CrystalDiscInfo, etc.

Any hard drive diagnostic program of this type allows you to view a full report, and it will contain much more information than in standard Windows OS reports, although using such tools you can still see something.
By the way, it is wrong to believe that monitoring applications fix any errors or problems. They were initially created only to view all equipment parameters, and not to influence their settings in any way. In this regard, only the CrystalDiscInfo utility can control some HDD parameters.

However, some parameters can be viewed and adjusted even when accessing the BIOS before directly starting the system. But even there the information is far from complete, and changing the parameters will affect, say, a fan or something else. But sometimes you will have to apply some settings of hard drive controllers.
Checking HDD using Windows OS
As for the “operating systems” of the Windows family, there is a minimum set for checking the hard drive for errors, as well as for correcting them. But this only applies to system errors.
In terms of monitoring, information can be viewed by calling the “Properties” menu from the context menu by right-clicking on the “My Computer” icon. More complete information is contained in the DirectX dialog box, which is called up from the Run menu by entering the dxdiag command. In any case, the information contained in these reports cannot be compared to what free utilities offer.
In Windows OS, the “native” program for diagnosing hard drives is called very simply. To do this, in the standard “Explorer”, right-click on the drive or partition letter, and again select the “Properties” line from the drop-down menu. On the “General” (or “Service”) tab there is a special “Run check” button.
In the menu that appears, you can check the box next to the automatic line. If this is not done, the system will simply display a message stating that errors have been detected and need to be corrected. In some cases, it will not be possible to fix problems even with automatic error correction, and with each subsequent boot of the OS, an intrusive message will appear stating that one of the disks requires checking. Agree, it’s quite inconvenient, especially since even a specified hard drive surface test takes a lot of time. Here it is better to use special programs for diagnosing a hard drive with advanced capabilities. By the way, the effect of their use will be felt immediately. Any user will be able to see the result even with, so to speak, an inexperienced eye.
Hard drive diagnostics: programs for testing HDDs for bad sectors

Naturally, among the software for monitoring the operation or basic parameters of hard drives of any type, you can find a lot of paid, shareware or completely free utilities. What’s most interesting is that, as practice shows, free applications are often not inferior to licensed software and cope with the functions assigned to them quite effectively.
Among all the variety, it is worth highlighting utilities such as Norton Disc Doctor, HDD Scan, Hard Disc Sentinel, the same CrystalDiscInfo application, as well as CheckDisc or something else like that. For Western Digital hard drives, a special utility called Data Lifeguard Diagnostics, developed specifically for WD hard drives, is perfect.

Interestingly, some utilities even come in portable versions and take up only a few megabytes of space.
All utilities of this type have a fairly simple interface that is understandable to any user, in which you just need to select the desired drive and set several scanning and error correction parameters. In principle, the same Disc Doctor of “grandfather” Norton allows you to specify a disk or partition, as well as use parameters for checking the hard drive for bad sectors and automatically correcting errors. Separately, in the advanced settings, you can set the Surface of the HDD).
Checking the HDD for physical damage
Unfortunately, physical damage to the surface of the HDD or removable hard drive is a very common problem. This may be due to dust, overheating, short circuits in electrical circuits, etc.
Checking the physical condition of the hard drive is quite simple. You just need to seek help from the appropriate programs and applications, which will detect problems, if any, within a few minutes.
Principles of correcting HDD errors in physically damaged sectors
In principle, testing the surface of disks can be done by some standard HDD utility or diagnostic program for an external hard drive. That's not the point. The main thing is that such utilities can rewrite information (checksums) from damaged sectors to spare areas of the disk. Thus, an interesting effect is achieved. In fact, the logical address of the sector does not change, although in fact the physical location on the hard drive is completely different. In general, almost all applications of this type use this principle. In addition, most of them are designed for completely different file systems and partition table formats.
Victoria: hard drive diagnostic program
It is worth mentioning the Victoria program, which is unique in its kind. It truly has the most powerful capabilities in its field. True, some experts recommend using the version that runs on DOS. Well, in some cases this is a justifiable step.

The application itself was developed by the Belarusian programmer S. O. Kazantsev and has established itself in the computer world at a very high level. It is not surprising that in the West it is now used very often. It must be said that this utility is a multifunctional package that combines the ability to monitor and test hard drives of any type and any manufacturer, the ability to automatically correct errors and restore data even in the event of very significant damage to hard drives.
Although for an uninitiated user this software package may seem somewhat overloaded with capabilities and settings, professionals appreciate it. Perhaps nothing better has been created today, since the program itself can be classified as All-In-One (“all-in-one”).
Data recovery from damaged HDDs
Of course, you can restore data using the Victoria utility, but few ordinary users will understand it. In this case, something simpler should be recommended.
For example, the best hard drive data recovery programs include many powerful utilities. You can use applications like HDD Regenerator.

As the developers of this package themselves state, they have found a unique way of using certain signal sequence algorithms that make it possible to literally restore physically damaged sectors of hard drives, not simply by copying information to other sections, but using the magnetization reversal technique for this. This achieves the effect when information from the damaged area does not disappear anywhere, but is read after restoration.
Naturally, if the read heads or spindle on the hard drive have failed, even the most modern programs will not help. However, in most cases, software and, as we see, even physical problems can be fixed.
Advanced BIOS Settings
As for additional settings, many programs for diagnosing hard drives can sometimes produce errors during the analysis of the hard drive or simply not see it.
In this case, you need to change the SATA controller parameter in the BIOS, most often just change from AHCI to IDE. This should help.

The most common myths and misconceptions
Very often, inexperienced users using diagnostic programs or viewing the parameters of a hard drive or fan in the BIOS for the first time panic, saying that the temperature is too high (for example, 40 degrees), the hard drive will “fly” in this operating mode. Nothing like this! For almost all hard drives, the optimal operating temperature range is from 35 to 45 degrees Celsius. Even a value of 50 degrees is not critical for many hard drives. It's worse when the temperature drops below 25 degrees, which is when the probability of hard drive failure is much higher. However, this is extremely rare, except when working in the cold (I think hardly anyone is smart enough to do this).
Hard drive diagnostics. Which program is better?
So, although briefly, we looked at the question of what hard drive diagnostics are. The program (which is better is up to the user) designed for analysis, testing and error correction, in principle, can be anything. What to use - a specialized or highly targeted product? The answer to this question depends on what exactly the application needs to be able to do. Some people prefer separate programs, while others tend to use packages that combine all the features for working with HDDs.
For inexperienced users, simple free utilities are suitable, especially since even portable versions do not “weigh” that much and have “smart” S.M.A.R.T scanning functions. without damaging the system. But for professionals, the best in its field, of course, is the Victoria program. This is not discussed.
Conclusion
In general, if you understand testing hard drives and monitoring their condition, you can finally add only one thing: in order to prevent catastrophic situations from occurring, at least some kind of hard drive diagnostic program should be used regularly. In some cases, even simply removing dust using a regular vacuum cleaner will help (of course, without fanaticism). As statistics show, for those who check the hard drive at least once a month and monitor the general condition of the computer or laptop, the percentage of HDD failure is much lower than for users who never think about it, but try to correct the situation when everything will go almost to the extreme.


