The audience selection period cannot be set for. Determining retargeting goals in Yandex Direct. Creating audiences in Yandex.Metrica
Many of the customers I encounter during customization work contextual advertising, very often they underestimate the possibilities of advertising in the Yandex Direct Networks. And about the functions and capabilities of such a tool as retargeting in direct , In general, they are hearing it for the first time. Therefore, in this article we will talk about how to set up retargeting in Direct, and I will try to convince you that this tool is really effective in terms of increasing sales.
Let's start with the definition: what is retargeting ?
Retargeting is a technology that allows you to display advertising to that part of the audience who visited your website and took certain actions there that were targeted to you. For example, you need a vacuum cleaner. You dialed in search engine Yandex request “buy a vacuum cleaner”. Next, you have studied search results. We visited 5 sites where vacuum cleaners are sold. And they left safely.
What is good about retargeting technology? And the fact that although you did not buy a vacuum cleaner on my website, you still visited the site. And now I can “catch up” with you with a lucrative super offer, thereby motivating you to purchase this product. And you have very little chance of not making this purchase!

Increase sales by 35 percent - is that bad?
According to Yandex statistics, site conversion on the second and subsequent visits by the same user increases by 35%! Not bad, right?
In what situations can we use retargeting settings in Yandex Direct?
Repeat sales. Why shouldn’t a client who bought a vacuum cleaner from you buy, for example, a refrigerator from you in the future?
“Catching up” with the client. A visitor who was interested in your product but has not yet purchased is, in fact, already 50% yours. He is already familiar with your store and your product, all that remains is to help him make a decision to purchase the product.
Notification about promotions and discounts. It is your duty to notify “old” customers about the profitable promotions and discounts that you are running in your store!
How to set up retargeting in Direct. Practice.
Ad impressions based on retargeting conditions can be configured:
- For the audience who visited the site and performed certain targeted actions on it.
- According to conditions for selecting an audience in Direct: such as gender, age, time on the site, referral source, etc.
In this part, I will tell you and show you how to set up the retargeting function for targeted actions. So let's get started.
Step No. 1 Create retargeting goals in Yandex Metrica
Note:
Works only on networks.
Limitations-technology does not work in adult and medical topics (you can find out more on the Yandex. Help page).
Consider the following situation. When visiting the site, the visitor is invited to receive a free video course, for which he needs to fill out simple form and confirm your subscription. We will be interested in that part of the audience that visited the site page where it was proposed to confirm the subscription, but did not visit the site page with thanks about the confirmed subscription. That is, in order for me to understand how many subscribers dropped off at the subscription confirmation stage, I need two goals:
First, I visited a page asking you to confirm your subscription.
Second, visited the thank you page for your confirmed subscription.

To create goals, we take the following steps:
- Go to the “Settings” tab and then to the “Goals” tab.
- Click on the “Add goal” button and enter the necessary data: the name of our goal. For example, “Subscription was not confirmed.”
- Be sure to check the box next to “Retargeting”.
- If the purpose is to visit specific page, then in the drop-down window select “matches” and insert the page address.
- Next, click on the “Add target” button and after that be sure to click on the “Save” button to save it.
We create the second goal in exactly the same way, only we indicate the page with thanks for the completed subscription as the address.
Step No. 2 Create ads based on retargeting conditions
In the Direct interface, go to the ad group creation tab. Click on “Add group”.
On the ad group creation tab, enter:
- Group name. For example, “Subscription was not confirmed.”
- Next, we create the title and text of the ad and indicate the path where the ad will send the user.
The texts and titles of such ads should be different from other ads in the campaign. You must understand that you are addressing people who have already been to your site. Therefore, we need turnover that will grab attention and force people to click on the ad.
- Leave the field for entering phrases empty.
- We begin to set up the conditions for selecting an audience, for which, opposite this entry, click on “Add”.
- Enter the name of the condition at your discretion.
- Now we need to create two conditions. The first is why our visitors visited the subscription page, but did not sign up. The second reason why our visitors visited the thank you page.
- We save our condition: click on the “Save” button.
It looks like this:

As a result, we received a condition according to which our ad will be shown to that part of the audience that visited the subscription page but did not confirm it.
The number of days during which the system will display an ad can be changed. Maximum amount days – 90.
So, we have created an ad that will work according to the conditions of retargeting for certain purposes.
In part two, we'll talk about how to create a retargeting ad for a specific audience segment.
R.s. Thank you for reading to the end :)
Retargeting is an advertising mechanism through which online advertising is aimed at those users who have already viewed the promoted product by visiting the advertiser’s website or landing page, but have not made a purchase or completed any conversion action on the resource (in more complex strategies, you can also refer to real customers in order to optimize the average check).
In our example, we will consider the condition under which a visitor who makes a purchase goes to the thank you page. Therefore, someone who simply visited the landing page and left it will not get to the thank you page.
Such visitors are more likely to be interested in our other offers or promotions. Based on this assumption, we will select a group to advertise to and will be able to show ads tailored specifically to that audience.
Creating goals in Yandex.Metrica
1. Go to Yandex.Metrica - https://metrika.yandex.ru
If a metric counter has already been added to your landing page, then proceed to creating a goal - step 7; if there is no counter, follow the instructions step by step.
2. Click “Add counter”, enter a custom name for the counter, as well as the address of your website and agree to the terms user agreement, click “Create counter”.
For example:
3. Leave the "Asynchronous code" checkbox and check the box next to "Webvisor, scroll map, form analytics":

4. Copy the received code:

5. Click on the “Scripts” tool in visual editor LPgenerator platforms. Next, in the window that opens, click the “Add script” button and paste the copied code inside the tag
. Save the page.
6. Return to Yandex.Metrica and click the “Save” button under the counter code:


We need to add two goals: "Visited the site" and "Visited the thank you page"
To get started, click on the “Add target” button:

Enter the name of the goal - "Visited the site"
In the lower left field ("Condition") indicate: "URL contains",
in the right (“Value”) enter the address of your landing page.
Remove the second condition (if present) and click "Add Target":

Add another goal called "Visited Thank You Page"
In the "Condition" field, enter "URL contains", in the "Value" enter the address of your thank you page.
In our example this is website/thankyou:

Click Add Goal.

You can read more about setting up goals and counters .
The goals have been created, now let's start creating the ad.
1. Go to Yandex.Direct - https://direct.yandex.ru
Click "Create Campaign" and select "Text and Image Ads":

2. On the page that opens, enter a custom campaign name.
Basic settings will depend on the requirements of your advertising campaign. We will focus only on those points that are important for further work with retargeting.
Make sure that the manual bid management strategy is selected:

3. Fill in “Single address and phone number for all ads” (this greatly increases the CTR of ads):

6. Make sure that the checkbox next to “Link markup for Metrics” is checked and click “Next”:

● the title of the ad must be written in such a way that it attracts the attention of the visitor;
● in the Description you need to indicate why it is worth continuing cooperation with you;
● in the URL, if the user has not completed an application, provide a link, for example, to another landing page option. You can also link to another landing page with a special offer;
● be sure to add an image of the product or company logo so that the user of the thematic site knows that he has already been to your site before;
● the virtual business card must also be filled out;
● keywords there is no need to select because we display ads as part of a retargeting strategy.
Setting up retargeting
In our example, the ad will be shown to users who visited the landing page, but did not visit the thank you page.
1. At the bottom, opposite the “Audience selection conditions” item, click “Add”:


3. Come up with a name for the first condition. Select "At least one completed".
Select the "Visited site" goal that you created in step 7:

4. Add a set of rules:

Select the condition "None met".

5. In the end you should get the following:


6. Retargeting is set up.
Check current settings, click the “Next” button, enter the remaining ad settings and send it for moderation.
As a result, after launching the campaign, our ads will be shown to potential customers who were on the site, but did not place an order and therefore did not get to the thank you page.
High conversions to you!
Retargeting (remarketing) is a tool for displaying advertising to people who have previously visited your website.
In this article, you will learn how to set up retargeting in Yandex Direct using our step-by-step guide.
To “gather a retargeting audience,” you need to use the Yandex Metrics counter.
If Metrica is missing, installing it will not take much work; for this you need:
- log in (registration or login)
- create an informer (in the “Add counter” section, enter the required data)
- carry out initial setup
- add code to the site
- check the operation of the meter
Read detailed information about installing Metrica! Having found out what retargeting (remarketing) is, you can begin to define its goals.
Determining retargeting goals in Yandex Direct
Retargeting in Yandex Direct is most often used as an addition to main advertising projects, but at the same time it is indispensable when it is important to return potential client.
Thus,
- The first goal of retargeting is to “pressure” the visitor, push him to buy a product or order a service.
- the second main goal is to offer a number of products/services to a person who has already completed the target action in your online store. The main advantage of such advertising is that the person is already familiar with the store and trusts it, therefore, most likely, they will prefer it again.
If you need to achieve several goals at once, create different retargeting campaigns.
When will it not work to use retargeting in Yandex Direct?
Yandex Direct remarketing cannot be used in all cases.
For example, if the settings of advertising campaigns that use retargeting have disabled impressions in YAN. Retargeting only works in affiliate network Yandex and such an ad will not appear on a user’s request in a search engine.
It is also prohibited to use retargeting if your ads are related to medical topics or adult products. Such content is not acceptable for retargeting.
How to link Metrica and Direct
First you need to make sure that the installed system is working correctly. Yandex counter Metrics on your pages. If the counter was created on the account from which remarketing will be placed, then Direct and Metrica are already connected.
If campaigns and Metrics counter are located on different accounts, then you need to open Direct access for the counter. To do this you need:
- Open Yandex Metrics settings, click on “Access”
- Click on “Add user” and enter login (account name)
- Enter a comment (not mandatory, but helps to personalize the user) and click “Add”

How to Create Audiences for Retargeting
To set up audiences, you can use Metrics tools such as “Goals” and “Segments”.
Working with Goals begins with settings in Metrica, going to the “Goals” tab and clicking on the “Add goal” shortcut.

You can use one of these options:
- number of views (indicates a certain number of pages viewed by the user)
- visit desired page(for example, “Thank you for your purchase”, if you need to send an advertisement to a person who has already completed the target action)
- JavaScript event (the action performed by the visitor is selected, for example, clicking on “Order” or “Feedback”)
- composite goal (the desired sequence of actions of the site guest is selected), consists of 2–5 possible steps
For example, you need to retarget people who visited the “sofas” section. To do this, you need to specify the name of the goal and check the “Retargeting” checkbox. Next, select the “Page Visits” type and specify in the condition: “url: contains /divany/”. And finally click on “Add goal”.

"Segments"- a modern innovation from Metrica 2.0, which is designed to highlight a certain contingent from the crowd of site guests. For example, you need to run an ad for residents of Paris - old site visitors who viewed the large sofas page and did not make a purchase. To do this you need:
- go to any of the Metrica reports
- add a promotion region, for example Paris

- select guests who viewed the large sofas page, as well as those who did not make a purchase


- save the segment by calling it “Old visitors / Paris / Large sofas / 0 purchases
As a result, this segment can be used as a parameter for retargeting, which, in turn, becomes personalized (dynamic). It is important that in Direct you can connect retargeting only to individual ads, and not to the campaign as a whole.
Preparation of proposals for advertising
Yandex remarketing is very different from regular ones advertisements and this is important to consider when creating proposals. Retargeting will be seen by people who are already familiar with your site, but for some reason have not completed the targeted action. Therefore, there is no point in offering them the same thing in the same form.
How then to prepare a workable proposal?
Use the following types of effective sentences:
1. If you want to offer the same product/service, you can:
- offer a certain discount
- focus on very fast delivery
- increase the warranty period
- interest in an individual approach to problem solving
- come up with special bonuses
2. If you want to offer another product/service, you can present:
- cheaper/more expensive products from the same category
- other goods/services at the same price
- unique model
- more masculine/feminine style, etc.
3. If you want to offer to subscribe to the newsletter, you can submit:
- catalog of goods/services with price list
- discount promo code
- special books, etc.
What do we get as a result?
- The first is the structure of the advertising campaign. All the above goals are unique advertising campaigns. At the same time, audience segments are groups of ads that are compiled individually and in different variations.
- The second is point sentences. Dividing the audience into segments and creating different offers increases the effectiveness of advertising. After all, there is no point in sending the same offer to everyone, without taking into account their needs.
Preparation of advertisements
- Headings. Their length should not exceed 35 characters. To control the length of the title, special formulas are used: LENGTH (for Excel); and Len (for Google Sheets).
- Announcement text. Its total length should not exceed 81 characters. It is important to consider that the message sent to the client has only a few seconds to attract attention and motivate them to follow the link. Therefore, it is necessary to load the maximum semantic load into the text and specifically call for action.
- Links. They are an additional link in the advertisement. The maximum quantity is limited to four pieces. Their purpose is not only to redirect a person to the site, but also to increase the visibility of the ad - expansion. It is important that the link reads as an addition: “Website promotion in the CIS”; “Direct link to the site”, etc. Through links you can also indicate some benefits: “35% discount”.
Link length must not exceed 30 characters, and all links must be less than 66 characters in length. The quick (auxiliary) link should lead the client to the same page to which the main (main) link of the ad redirects.
When filling out the advertising table, be sure to take into account the client’s benefits - why should he click on the link? Don't limit yourself to one ad - create 4-5 for each segment and experiment, analyze the results, choose your best campaigns.
Preparing pictures and photographs
Advertising campaigns in YAN produce results, to a greater extent, due to high-quality pictures- they are more important than the text. Therefore, you will have to devote a lot of time to their preparation. When working with images for ads, it is important to keep these basic rules in mind:
- You should not download photos to Google or Yandex, this can lead to a violation of property rights. It is better to use your own or purchased pictures ( paid services greatly facilitate the search for the required thematic image)
- Pictures must be of sufficient quality and very clear
- Images should not be limited to standard (familiar) objects. It is better to use creative, original, non-standard photos that differ from clichés and will attract the attention of the visitor
- The photo may have text, which should not exceed 20% of the entire image. It is important that the text is readable against the background of the picture
There are generally accepted technical requirements to images:
- The photo volume should not be higher than 10 MB
- Acceptable image formats are PNG, GIF, JPG (uploading animated GIF image It is important to know that only the first frame is saved; You can't upload videos)
- aspect ratio can vary from 1:1 to 4:3 (standard), as well as 16:9 (widescreen)
- some advertising campaigns in mandatory must have widescreen images
- image sizes: standard - 450–5000 pixels; widescreen - from 1080×607 5000×2812 pixels
It is recommended to use 2 formats for each photo (both regular and wide format). First, an ad is created with a large-format photograph. Then we create a copy of the ad, where we leave the test the same and replace the image with the same one, only in a standard format.
Using Yandex Direct, you can create an image ad. To do this, you need to use an internal constructor or create one yourself.
Preparing UTM tags
UTM tags are tags that complement the site address to allow analytics tools to collect necessary information about the traffic source. They can be prepared either manually or using special constructors (for example, the URL builder from Google Analytics or UTM Tag Composer).
Setting up ads
Having become familiar with preparatory stage, you can start directly setting up your ads. Let's first look at the creation of text and graphic advertisements. To create them you need:

Your ad set is now ready. Then you can create any other groups using a similar scheme. To do this, you need to click on “Add ad group”, or submit for moderation if necessary groups have already been created.
To launch an image ad when creating retargeting in Direct, you need to do separate group ads to the same audience segment. For this you will need:
1. Go to “Add ad group” and name them.
2.
Click “Add” and create new ones using the prepared template or create a new creative. 
Important: When creating an image ad for maximum coverage, you should not exclude any formats in the designer.
All image ads contain the following elements:
- "Background picture";
- “Main text” (up to 36 characters - main heading);
- “Button” (up to 17 characters, you can choose any color);
- “Tone” (highlight the text and the demand for the product/service will increase);
- “Logo” (if you do not upload the logo, the web resource address will appear in its place);
- « Additional text"(up to 43 characters);
- “Domain” (will be shown if no logo is selected);
- “Age restriction” (for example, “children from 6 years old”);
- "Warning" (eg explosive);
- “Legal information” (up to 700 characters; it is not recommended to ignore this item).
3. Fill text information- enter headings in the “Body text”, enter a call to action in the button text.
4. Upload logo. If we don’t use a logo, add a domain (up to 26 characters)
5. Enter “Additional text” (we shorten the text from the ad), for example, you can remove the call to action.
6. Install or select age restrictions, warnings and legal information (as appropriate).
7. Add an image (you can upload or select a previously used one, or go to the Yandex Direct library).
8. Crop image to required format using Preview.
9. Adjust color settings
10. View all ready-made advertisements using the “Show all” function and click “Create” if everything is satisfactory
11. Select creatives, enter website address
12. Select the audience segment for which the created ads are intended
How to set up a retargeting campaign
You can set up a remarketing campaign for a category in several steps:
- Defining Settings
- Creating ad groups (text-graphics and graphics)
- Selecting conditions for selecting an audience (goals and segments created at previous stages)
- Audience name
- Determining the desired cost per click
To set up remarketing for the abandoned cart page you need to:
- Create a remarketing list (make a test purchase)
- The page where the purchase is successful must be excluded from the list
- Select a product/brand/category to promote
- Add key phrases and remarketing list in targeting
- Leading guests to the right page
Conclusion
Retargeting in Yandex Direct - great way return a potential client to the site or invite him to buy/order even more goods/services.
To create retargeting you need:
- Installing the Metrics counter
- Connection between Metrica and Direct
- Setting up goals and/or segments in Metrica
- Creating advertisements and launching a company
Follow the basic rules and tips for creating a campaign to “bring customers back to the site”, and it will certainly bear fruit!
Watch the video on setting up retargeting in Yandex Direct
Retargeting of all visitors in Yandex Direct
In this article, we will take a closer look at retargeting and its setup in Yandex Direct. Retargeting only works in accordance with its display technology.
- Campaign name. A standard name consisting of the subject of advertising and the method. Region in in this case We don’t specify; in most cases, retargeting can be general.
- We do not touch upon the items before the strategy; their values will be set by default. In the strategy, select the item “Only in networks” and “Manual control of bids”.
- A single region for displaying ads. We select “All Russia”, or if your organization works exclusively in a certain region, then select it. If you have delivery throughout the Russian Federation, then we indicate all regions.
- Single address and telephone number for all advertisements. Fill in with available information.
- We skip changing the fields to the site monitoring points and the counter code for traffic analytics. Check the first box and paste the Yandex Metrics code into the second box.
- Enable link markup.
- We do not affect advanced settings.
- Let's move on to the second setup step.
Create an ad group for retargeting
Let's create a group of ads that will be shown to users who visited our site and did not convert. In this case we're talking about about the application. For this we will also need to set up Yandex Metrica with conversion tracking: how to do this, see our previous article and the corresponding video. Let's assume that you have already set up this goal and move on to setting up an advertising campaign.
Fill in the fields in step No. 2:
- Group name. We create a name in accordance with the type of retargeting. For us it will be a “Visit without an order.”
- Ad type. Select “Text-graphic”.
- Title and ad text. We fill it out, taking into account the fact that users have already visited our website.
- Link. We also insert a link to a page on our website and add it to it to track and analyze future traffic. We indicate the first label as “rt”, which will mean retargeting as a traffic source.
- Display link. Fill in this field.
- Add-ons - Image. Select our main image, or upload a new one. At your discretion.
- Additions - Quick links. We fill out all four fields, indicating competitive advantages and attractive phrases in the description.
- Clarifications. We add according to the same principle.
And we check our received advertisement: 
How to set up retargeting

Retargeting by website sections in Yandex Direct
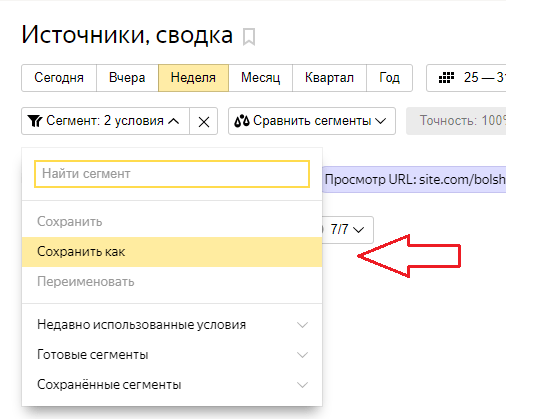
Let's start by setting up Yandex Metrics. Go to the “Reports” => “Sources Summary” section:

Now let's create an audience segment. To do this we do the following actions on the open page:

Click “Visits in which”, select “View URL”.

If you add an asterisk without a space at the end of the specified link, then all visitors to addresses starting with the specified part of the link will be taken into account. It is better to choose this option so that you can later use it for advertising this section and take such traffic into account for subsequent retargeting.
Click on the “Apply” button. In the window that opens you can already see some statistics on the selected section of the site:

Let's save the resulting audience. Select the item “Segment: one condition” and click on “Save as”:

Let’s give the segment a name: “Watched SALE” => “Save”. We return back to . In our advertising campaign, select the “Add ad group” item.
For convenience and speed, we will copy ready-made advertisements:

Next, we proceed to the standard filling of the first step of the ad group. We fill out the title and text of the advertisement taking into account which section visitors were added to the audience. Suppose we segmented visitors to the “Chairs” section on the website of an online furniture store. In this case, you can use “Choosing a chair?” as the title. and enter the appropriate complementary text of the advertisement.
All subsequent steps are completed as standard, as in setting up general retargeting. We edit only the item “Audience selection conditions” => “Add” => “Add condition”.
Let's call our condition “Watched SALE” (section on the website). In “Rule Set 1” in paragraph 1 indicate “Metrics Segment” => “Save”:

Ready! Now this ad will be shown to all future, present and past visitors of the selected section on the site for 90 days.
Let's move on to last step and select a bid for clicks. You can start with a small value and test over time, increasing gradually.
Retargeting in the shopping cart in Yandex Direct
Let's consider another example of setting up retargeting - showing ads to those visitors to our website who added a product/service to the cart, viewed it and did not make a purchase. Using this audience segment can be very effective with a properly tailored advertising campaign. We will tell you exactly how to do this in today’s article, as well as in the video.
First, let's perform a similar action on our website. Add any item without a discount to your cart and view it. Copy url address our basket. In this case it will be: super..

We add a condition for forming an audience segment: click on the plus in the column “Visits in which” => “Behavior” => “View” => “View URL” and indicate our link. Click “Apply”:

We save the resulting segment, as shown in the image:

We place an order. In the window that opens, copy the main part of the link, as shown in the image below. We copy the first part and do not touch the one that follows the equal sign. In our platform, the first part is constant and the same for any order in .

Let's return to Yandex Metrica and create another segment: “Visits in which” => “Behavior” => “View” => “View URL”. Add the copied URL, and in the “Full URL” field add it along with the “*” symbol:

We save the resulting segment. Let’s give it a name: “Place an order.”
Now we have two ready-made audience segments: those who viewed the cart and those who made an order. These audiences partially overlap. Let's go back to Yandex Direct and start setting up retargeting for this part of the audience.

Let's copy everything for convenience from the previous announcement:

Let's work on the name. Since in this case we know that users were interested in the order, but did not complete it, we will offer them something that will attract their attention again and push them to complete the order. For example, a discount.
Copy the link to the cart. In our platform, products added to the cart are stored for a long time, so it would be logical to add a link to the products abandoned by the user. Paste the copied part and, as always, add . Don’t forget to indicate in them that this is cart retargeting using the “rtcart” tag:


Scroll down to the “Audience selection conditions” item and set it up:
1. Let's add our key condition. Let’s call it “Didn’t place an order.”
2. Select the first created metric segment “Viewed cart”.
3. Add set of rules No. 2 with the condition “None met.” This is necessary in order to exclude those users who made an order after visiting the cart. We indicate “Metrics Segment” => “Place an order”. Save.
Let's move on to step No. 2.
Let's check the operation of our promotional code for a discount for those who clicked on the ad. Click on the link on the ad on the left:

The following window should open with an automatically added discount using a promotional code for items in the cart:

When setting up retargeting, there are three main types of audience segmentation: “Takers”, “Non-Takers” and specific segments. By combining audience data, you can create effective retargeting advertising campaigns in Yandex Direct.
Ready! Now all that remains is to send the ad for moderation and check the availability of funds in your personal account balance.
Greetings, dear IM reader! Our post today will tell you how retargeting works in Yandex Direct and how to use it in your advertising campaigns. The article will be presented in the format of step-by-step instructions.
Retargeting is a technology that makes it possible to show specially customized advertising to those users who have already visited the site. Ads are displayed in the Yandex Advertising Network (Google displays Display Network). With the help of retargeting, you can remind regular customers about yourself, increase website conversion, not miss those who forgot to pay for an item in an online store, or simply increase advertising coverage and brand awareness. The ad may broadcast a message about a promotion, gift, additional discount, as motivation to return to the site.
Before setting up retargeting, it is very important select the right audience for it. There is no point in retargeting everyone who visited the site. Using Yandex Metrica goals, it is necessary to identify those who have shown interest in our product. Typically these are the following user actions on the site:
- put items in the cart;
- started but did not complete registration;
- looked at the product/service;
- went to one of the sections: payment, contacts, delivery.
How to set up retargeting in Yandex Direct: step-by-step instructions
Step #1:
Link Yandex Metrics and Direct account
To launch a retargeting campaign based on audience segments that visited the site, we must obtain these segments using the Yandex Metrics counter installed on the site and associated with the company in Direct.
If Direct and Metrica are tied to one account, then information on segments from Metrica can be used without any additional actions and manipulation.
In the case when advertising and analytics are divided into two accounts, then in the Yandex Metrics settings you need to add access for the YaD account, indicating its login or address Email in Yandex. You can organize this in the access section, on the counter settings page, by selecting Individual access and adding a user with viewing or editing rights.
Step #2:
Creating retargeting conditions
Most important step at the beginning is to determine the conditions under which our ads will be shown to people. There is no need to show the same advertisement to everyone who was on the site; it is better to divide them into groups and create a separate company for each group.
Retargeting by goals and segments in Metrica
By purpose

As a condition for retargeting, you can set any of the Metrica retargeting goals, from site visit to abandoned cart and paid purchase.
By segment
Segments Metrics give unique opportunity— select users who meet certain conditions (gender, age, location). For example: “people from Irkutsk” or “girls” or “girls over 25 years old”, etc. Next, you need to save the created segment in order to add it as a retargeting condition.

Step #3:
Setting up a retargeting company in Yandex Direct
Create a new campaign called “Retargeting”, specify “Networks only” as the strategy - since retargeting does not work for search. Next, in the company settings, enter the data as for a regular company in , with the exception of negative keywords (since we do not use queries, but ready-made audiences).
Creating an ad
We are moving on to creating an ad that will be directed to those who visited our website but did not leave a request. We recommend creating from 2 to 5 ad variants for each ad group with different pictures and text.
headline, should remind the user that he has already been to our site and can be framed as a question or special offer. For example: “Would you like to order a bouquet?” or "Promotion! Bouquet for 999 rubles!”.

The page to which the ad leads should anticipate the user’s questions and also reveal the essence of the offer. For example, if you write about an item forgotten in the cart, then the link should be to the cart.
Step #4:
As we said above, there is no need to specify keywords and phrases; here you should scroll a little lower and opposite “Audience selection conditions” click “Add”.

After that, in the window that opens, at the very bottom, click “Add condition” and set the audience parameter to which we will show retargeting ads.
In our case, this is everyone who visited the site in the last 7 days ( At least one completed) and did not leave a request, i.e. was not on the thank you page ( None completed). Maximum period for which you can set up retargeting - 90 days, minimum - 1 day.

After that, all we have to do is assign a cost per click.
Retargeting in the right approach and configuration, allows you to return interested users to the site and increases efficiency significantly!


