Remove windows xp operating system. How to remove the Windows XP operating system? How to remove unnecessary OS from boot
If you installed a new Windows operating system (any version), now when you try to turn on your computer, you probably first see a menu with the choice of the desired OS. This occurs if the hard drive has not been formatted. To prevent this from happening again, just remove the unnecessary version and only one version of Windows will remain on your computer.
Formatting a partition is the simplest and most obvious way
This is an easy way to remove a second operating system that you no longer need. The point of the procedure is to format the partition containing the extra operating system on the hard drive.Before starting any actions, download information that is important to you onto removable media or one of your hard drives.
How do you know which Windows folder to leave and which to keep? For these purposes, go to the Start menu and select “Run” there. You need to enter the following command into the line - %windir%. Now click "OK". As a result of your actions, a folder will appear. You need to remember it - this is exactly the folder that cannot be deleted. It may look like this: “C: Windows”. This working folder cannot be deleted or moved to other partitions, otherwise the operation of the entire system will be disrupted and you will have to roll back.
Reboot the system and make sure that the second OS is no longer there. If, when trying to format a disk, the system gives an error, then you can try using additional utilities for such operations, for example, the Acronis Disc Director program. It needs to be downloaded, installed and launched. It will delete everything itself, and then automatically reboot the system.
How to remove unnecessary OS from boot
This instruction is suitable if you have seven or eight installed. It happens that the second operating system, namely its files, no longer exists, but it appears in downloads. To remove Windows from boot, follow these steps:

Now the download will begin with the version of Windows that you decided to keep.
How to remove seven or eight if you upgraded to ten
If you decide to upgrade to the latest version of Windows, then at the same time you need to clear the disk space. But do this only if you are completely satisfied with the new version of the OS and do not intend to return to older versions.Usually, a standard utility for deleting old (temporary or junk) files is sufficient for these purposes. For example, CCleaner. But if the previous version is still taking up space, then follow the steps that will remove the remnants of the old OS completely.
- Go to the taskbar and search for “Disk Cleanup”. Select the desired shortcut.
- In the tab, mark all temporary data and enable the clear function.
- To delete data from the previous system, click on the “ Clean up system files” option. It is located at the bottom left.
- You will need to select the disk on which the old operating system is located.
- When you see all the files you need to delete, there will be an item “Previous Windows installations”. This is the item you need to select.
- Clean and reboot the computer.
After these steps, it is already very difficult to roll back to the previous version of Windows, so make sure that you decide to permanently leave Windows 10.
How to remove old Windows without programs
Let's say you have Windows XP, and you are happy with it, but Windows 7 is interfering. Maybe it’s the other way around - we’re happy with Seven, but we don’t like XP. In any case, how to remove an old, unnecessary operating system?This method will allow you to remove the old version without using programs - manually.


After this, Windows.old will be deleted as a regular file folder.
How to edit boot.ini
If we are not talking about Windows Vista or seven, then loading the operating system begins with the boot.ini file. It is written in it:- wait information when download option is selected;
- information about the operating system that is turned on first by default if the choice is not made by the user:
- Extra options.
As always, we start by loading into the version of the operating system that should remain the only one on the computer.
- Find “My Computer” on the desktop and click to open the characteristics.
- Select “Properties” - look for the “Advanced” option.
- Next we find “Download and Recovery”. Click on “Parameters”.
- In the new window, select “Edit”. The boot.ini file will open using Notepad. It is very advisable at this stage to save a copy of this file just in case and put it on one of the disks. Don't forget to rename it - Boot.old. Now you can forget about the copy and return to the boot.ini file for editing.
- Find a line in the file indicating that the menu displays two operating systems to choose from. It needs to be removed.
- Now let's save the changes we just made. Click “Save As”, keeping the name as it was originally.
How to remove unnecessary Windows XP?
Windows XP has its own characteristics, which must be taken into account when uninstalling.We boot into the operating system that we plan to keep.
- On the “My Computer” icon, look for the “Properties” option using the right mouse button.
- Now find “Advanced”. There will be a “Options” function.
- We mark the operating system that we plan to remove and confirm our actions.
- Let's go to the section where the old Windows is located.
- We delete the Windows folder, editing with program files and Documents and Settings. There will be pop-up warnings indicating that these are system files and that they are read-only. You can safely ignore them and continue deleting.
Windows.old removal video
If you still have any questions about deleting this impressively sized folder, watch the video.As you can see, the old interfering operating system, if it is no longer needed, can be removed. Depending on which OS is installed, the removal operation has its own characteristics, but in general, almost all methods are suitable. You just need to understand the nuances and carefully follow all the steps. After rebooting, you will successfully get rid of the problem.
Today there will be a post on how to remove the old Windows and cleanly install the new operating system. I'll tell you how to completely remove Windows. For some reason, many people don't understand this.
What does it mean to demolish Windows?
Removing Windows means formatting the disk with Windows installed and installing it on a blank disk. In simple terms, demolishing Windows means correctly removing the old Windows.
Windows installers are divided into 2 types.
The first ones write it to disk. Launch the disk from under the old Windows and begin the installation. This WRONG SOLUTION installation of any Windows.
Disk formatting
With this approach, Windows 7 is completely neutralized during the installation of another system by completely formatting the disk (that is, its contents are completely erased). The installation disks for both XP and Windows 7/8 contain all the necessary tools to implement this function. Let's learn how to use them.
Note. If you do not want to switch to a new system, but simply want to reinstall Windows 7, correctly remove the old distribution and install a new one, you can also use the instructions below.
1. Insert the installation disc of the operating system you want to install (XP, 7, 8 or 10) into your DVD drive.
Attention! Before following the next step in the instructions, find out which key on your computer activates the menu for configuring the boot of disks and devices, or the BIOS (add-on shell) into which this menu is integrated.
2. Click "Start". In the drop-down menu (shutdown), click the left arrow icon and select Restart.
3. During the reboot process, hold down “F2”, or “F8”, “F9”, “F12” (depending on the computer manufacturer! see note).
When the “Please select boot...” window appears:
- use the cursor arrows to select CDROM from the list;
- press "Enter".
If disk boot order is performed in the BIOS, do the following:
in the “BIOS SETUP UTILITY” menu, go to the “Boot” tab;
open the “Boot Device Priority” subsection;

in the additional “Options” window, use the “up” and “down” keys to select “CDROM”.

After completing this setting, when you restart the PC, first of all turn not to the system partition, but to the installation disk. Which is what is required in this case.
Windows XP:

- upon completion of the preparation procedure, when the XP installation menu appears, press “Enter” (thus, you select the first item - “Proceed with installation”);
- press "F8" to accept the agreement;
- select the system partition (the partition on which Windows 7 is currently installed) and press “Enter”;
- select the “Format partition... NTFS” function from the list or the same function marked “Quick”. And press "Enter" again.

 If it is not there, or you simply forget to copy it onto a notepad, you will not be able to completely install Windows on your computer. But all other files remaining on drive “C” (where the OS is installed) will disappear upon uninstallation.
What about a laptop?
If this is a laptop, then you can look at the key to the operating system on the back of it. In the case of a pirate, such a trick will not work. Here you need to write down the key in advance and enter it separately during installation. If the inscription on the back of the laptop is erased, you can find the password on the Internet.
How to remove Windows 7 from your computer if you do not have the original installation disk?
The lack of an original installation disk is not a problem for an advanced user, because you can download the “original” iso image of Windows on almost any corresponding website. If you want to remove Windows 7 from your computer, remember that the pirate key may be different, so be very careful - write down the password that is specified along with the link to the archive with the OS.
Now download the program to burn the image to disk. To do this, you can use the ImgBurn utility. After it has been downloaded, install it on the PC, take a blank DVD +R (or RW - it doesn’t matter) and insert it into the rom. After that, open the recording program, click Browse and select “Windows image”. Click “open”, set it to minimum speed and wait for the utility to write the file.

Next, you will see a window with information that the disc was successfully burned. Click “Ok” and remove the DVD+R from the rom. Don't be alarmed if the disc comes out automatically after recording - that's how the program works. The first step is completed. Now about how to remove Windows 7 from your computer.
First of all, set the BIOS to “First boot device CD-Rom”. You must first reboot or and press delete. In some cases, you can also use the F1, F2, F8 and Ins keys. To avoid confusion, the program itself will tell you on the screen of its monitor which button to press to enter the BIOS.
How to understand that you are already in BIOS?
Here you will see a blue screen with white characters. Now we set I to boot from disk. To do this, use the arrows to go to Advanced Bios Features, then to First Boot Device and select CD-Rom. It is worth noting that even with a Russified version of the OS, the installer language will be English. Stop at the CD-Rom partition, press enter and then esc. Now go to save&exit setup, press enter, Y, and then enter again.

It should be noted that even with different versions of BIOS, the algorithm and the essence of its work do not change. The main thing is to find the First Boot Device section and select CD-Rom in it.
If you did everything correctly, then your computer will automatically reboot. Moreover, upon startup, the white inscription Boot from Cd/Dvd will be displayed on the monitor. After a while, the computer will ask you to press a key on the keyboard (Press any key to boot from Cd). Choose any, even a space - it doesn’t change the essence of the matter. Next, a black screen with an OS installation bar will appear.
The operating system itself is removed automatically; you only need to confirm this action.
Now we face the reinstallation step (including uninstalling the old Windows).
After the black screen with the loading bar, a window should pop up saying “Windows is loading files”. Here you need to wait a few minutes until the language selection window appears. You will have to wait from 5 to 10 minutes.
Now use the arrows on the keyboard to get to the “Install” item and press enter.

At the same time, when the window with “License Terms” appears (this is about 5-6 minutes after pressing “enter”), check the box there. Then press the enter key again.
Select “Full installation”, select the installation disk with the recorded image. Click “Disk Settings” - “Format”. This is where the main thing begins - all files that were previously located on the local drive “C” are uninstalled. How to remove a second Windows 7? Everything happens in the same way as above. All processes and stages follow a similar principle, so there should be no problems with this. Now you know how to completely remove Windows 7.
Over the course of 12 months of working with a computer, each of us accumulates a lot of files and information that we save on drive “C”. Therefore, to see them again after “reanimating” the OS, copy them all to a safe place. This location can be either a flash drive or a local drive “D”, the files in which are not deleted when reinstalling Windows. As practice shows, the latter option is more convenient and simpler, since there may often not be free space on the flash drive for your data. Therefore, move all important documents to drive “D”.
 And for the future, install all programs there and store all files, and display shortcuts on the desktop. This way there will be much less hassle when installing new drivers, programs and everything else.
Uninstalling Windows
How to remove Windows 7 from your computer? After clicking the “Format” button, the system will automatically clear drive “C” of all files - necessary and unnecessary, old and new. The OS also uninstalls itself. All this will take about 20-30 minutes. At this point, you can go make a cup of coffee or just watch the computer delete data. In any case, no action needs to be taken until the disk is formatted.

When the disk formatting is complete, you will see a window on the screen with fields for entering your username. Here we need to enter a name, password (optional) and product key. If you accidentally clicked “Next” and did not enter the key, the computer will ask you to enter it again, but a little later. Now you need to select one of three update options. You can choose any one, but, as practice shows, the first one will be the most suitable.
We determine the time zone and wait a few minutes until the window with “Windows 7” appears on the screen.
Now you will know for sure 7 when you reinstall the OS. As you can see, there is nothing complicated here - most of the operations are performed by the computer itself. The main thing is to copy all important files and folders to local drive D in advance, otherwise they will all be permanently deleted along with the operating system.
Why does my computer have DirectX?

In general, DirectX is needed to ensure normal graphics operation. Without it, games simply won't work properly. This determines its importance. This set of dynamic libraries is installed immediately after uninstalling the old OS. It can also be included in the archive with any game, which allows the user to fully enjoy the magnificent game graphics.
However, if your installation of DirectX fails, or its version is too old, you will need to reinstall it. You won't be able to update it. Only its complete uninstallation and installation will save you.
Which program is suitable?
And before you remove DirectX Windows 7, first you need to download a special utility. The most popular of them is the DirectX Happy Uninstall program.
 Thanks to it, you can completely remove the DirectX package from the OS, while maintaining its stability and performance.
It is worth noting that this program supports all versions of packages. Also, before you remove DirectX from your computer, it creates a backup copy, which allows you to abandon the removal if the process fails and roll back to the original state of the system. Happy Uninstall can also identify errors that were made by other programs when trying to uninstall DirectX. This utility is absolutely free, and you can download it from the official website. How to delete Windows 7 files from DirectX folder? They are uninstalled automatically, so there is no need to do anything manually in this folder.
DirectX Eradicator
An equally popular program is DirectX Eradicator, which also works with all versions of this package and removes components and files from the system without harm to the OS. Another important advantage of this utility is its ability to work without installation.
How to restore DirectX?
After uninstallation, you can download the drivers via the Windows installation disk. You can also download any version of DirectX from the Internet in advance. Its image should be written to a blank DVD-R or RW disk or flash memory. In addition, you can find it in the file of a game, for example in GTA SA. 
How from a computer?
In general, you shouldn’t delete them, as this may have a bad effect on the operation of the OS. However, if you have already decided to take this step, follow the instructions:
- Click Start, go to Control Panel and open Installed Updates.
- In the Programs section, click View installed updates.
- Select the update you want to uninstall. Then click the "Delete" button.
- That's it, the update has been successfully uninstalled!
So, we found out how to remove Windows 7 from a computer and learned all the steps to reinstall the operating system. As practice shows, even beginners can cope with such a task. However, after uninstallation, you need to take care of one important detail - the drivers. The main ones are realtek and DirectX. But in fact there are dozens of them. It has its own drivers for the modem, webcam, microphone and USB devices. Therefore, in order not to search for and download them again every time, download them to a separate disk and after installing the operating system, load it into the rom and install it.
Is it time to free your hard drive from the now unnecessary “seven”? There is nothing complicated about this, but many users are hesitant to delete it in one fell swoop - simply by formatting the partition, for fear of erasing important data or disrupting the performance of the second OS. And they are right: if you immediately format the system partition, all its contents will be irretrievably lost. And it may contain both user files and loaders of other operating systems, if there are several of them on the computer.
Let's talk about how to remove Windows 7 safely.
Removing the only Windows 7 operating system
How to remove Windows 7 from a PC if there are no other operating systems on it? Before you begin deleting, transfer the data that is important to you from the system partition to another medium. You can use other partitions of the same disk, DVD, flash drives, cloud storage, etc. as new media.
User data is saved in the user's account folder by default. It is located in the C:Usres section (Drive C, Users folder).

Once there, simply copy the directory of your account and paste it onto any drive of suitable capacity.

Now the system partition can be freed. While Windows 7 is loaded, you will not be able to delete its directories and files - you will first have to start the computer from another medium - a Live CD or an installation disk of any operating system.
So, after booting from a Windows XP Live CD, we can go to disk management, find the partition with “seven” and format it (formatting, like other operations with the partition, is launched from the context menu). After this, the partition will be completely cleared of data while maintaining the NTFS structure - it will, as before, be visible in Explorer.

If you select the “Delete Partition” option from the menu, the system partition will turn into unallocated space, which will also have to be pre-formatted in order to be used.

You can also achieve deletion of data from the Windows 7 partition by formatting it from the installation disk. The remaining (non-system) partitions will not be affected.

Removing the old system (Windows.old folders)
Now let's consider the case when the new operating system was installed on a partition with the old one without prior formatting. During the installation process of Windows on a non-free partition, the installation program renames the old Windows directory to Windows.old. The Windows.old folder remains on the PC only as a backup copy of data and is not used in any way, so you can safely delete it.

How to uninstall Windows 7 from a previous installation? The safest way to do this is through Disk Cleanup.
- Going to the “Computer” folder, open the properties of the partition where both systems are installed - the old and the new. Click the Disk Cleanup button on the General tab.

- Click Clean up system files.

- Check the box next to "Previous Windows installations" and click OK.

Confirm that you agree to delete files and wait until the cleaning is completed. After this, Windows.old - the old Windows 7 directory from the previous installation - will disappear.
How to remove "seven" from a multi-system configuration
How to remove Windows 7 if you have multiple operating systems installed on your PC? This is done in two steps:
- format the section with “seven” according to the instructions given at the beginning of the article;
- remove it from the operating systems boot menu.
After formatting frees up the partition, Windows 7 will still be present in the boot list.

To remove it from there, boot the remaining OS on your computer (for example, Windows XP or 8) and log into it with administrator rights. Through the search, run the system configuration utility msconfig.exe.


Restart your computer for the settings to take effect. "Seven" will no longer appear on the boot configuration screen.

The partition freed after formatting can be attached to one of the remaining ones, used to install another operating system or to store data.
This question has been raised more than once on forums by various Internet users who communicate with a computer. I will answer this question for you right away. You cannot simply remove an operating system, be it Windows 7 or 8.
The fact is that to remove the OS, you need to format the hard drive, and installing another operating system on top of the system is not very good, as it can lead to cluttering the system and further slowing it down.
Attention. Do not forget that all documents, photographs, and other information that was located on the system disk will be deleted. Therefore, before formatting the disk, transfer all the necessary information either to another partition of the hard drive or to a flash drive. It is very important. If you have one system drive, then it's time to split it. how to divide using the program.
Removing Windows XP
This operating system can be completely replaced with a new one thanks to the XP boot disk. The fact is that before you start installing XP, you can easily format the disk, after which everything will be installed anew on a clean hard drive.To do this, insert Windows XP into the drive, wait until the Windows Installer shell loads, and press the F8 key to agree with the regulations.
By pressing the F8 key, you will be able to select the disk on which the OS will be installed, but before that you can format it.

If you were able to format the disk, then reinstalling Windows XP will not cause you much difficulty.
Removing Windows 8 and indeed any OS
In principle, any operating system can be removed using Hiren's BootCD.It is also worth remembering that after deleting all information from the disk, you will have to install a new Operating System, if you know how to do this, then let's learn how to erase all information from the hard drive.
1. We will need to download and install the program "Hiren's BootCD"
2. We need to write the downloaded image onto a disc. .
3. If the recording was successful, there is a boot disk in your drive that can be loaded BEFORE loading any operating system. Just restart your computer and you should be able to see the following shell

4. There’s just a little bit left, or rather to launch the Mini Windows Xp shell 
By launching the Mini Windows shell, you will be able to delete absolutely any information from hard drives, including various viruses. Next we need to open the My Computer icon, here we can see our hard drives and all the files stored on it.

If Windows is installed on drive C, and you no longer need the necessary data, right-click on the drive and then select “Format”.


That's all. Now you have a clean hard drive on which you can install a new operating system.
Today I decided to prepare a short article in which I will talk about how to remove one Windows system from a computer on which you have installed two operating systems, for example, Windows 8 and Windows 7. I have already written an article on how to do this correctly. This article can be considered a small addition.
It is clear that if you installed two operating systems on your computer, for example, in order to test Windows 8, then sooner or later you will want to remove one of the systems. Either leave the new eight and remove Windows 7, or vice versa, remove Windows 8.
I don't see much point in having two systems on a computer. Although, now hard drives are of such capacity that you can install about ten of them :) But, for example, on my 120 GB SSD drive, this is not very correct. Therefore, when you have already checked everything and made your decision, the question arises, how to remove Windows 7 or Windows 8. Now I will write how I did it.
You probably already thought that what’s complicated here is that you formatted the partition with an unnecessary system, and that’s all. But not everything is so simple, the bootloader still remains intact. You also need to remove the system from the boot menu. There is nothing difficult about this, I’ll demonstrate it now.
Completely remove Windows (if two systems are installed)
It is best to remove it from the system that you decided to leave. I don't know how important this is, but it's better to do it this way.
For example, I decided to leave Windows 8, and I will show you how to remove Windows 7.
This means that in this case, we carry out all actions from the figure eight. First we will make our system, which we decided to keep, the main one (it should load by default), and then remove the system we don’t need from the download.
Go to your desktop and press the keys Win+R. In the Run window, enter the command msconfig, and press OK.
 In the new window, go to the tab, select the operating system that we want to keep (in our case, this is Windows 8), and press the button Use as default (opposite OS, the corresponding status “Default OS” should appear).
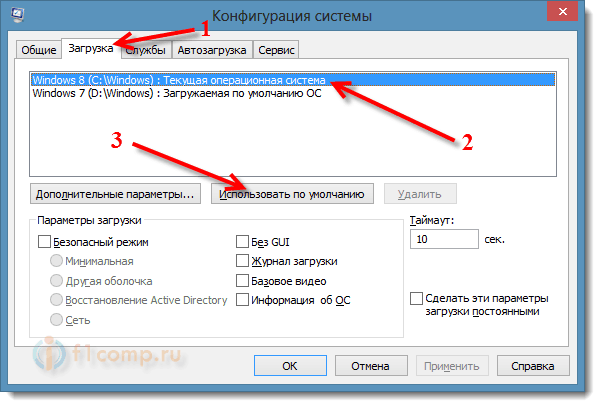
Now, select the system that we want to delete (in our case, this is WIndows 7), and press the button Delete.

A window will appear, I advise you to select .
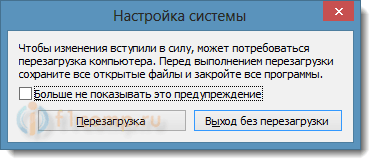
The computer will reboot, and without the ability to select an operating system, the system that we left should immediately boot. In our case, this is Windows 8.
What to do with files from the old system?
Yes, all that remains is to deal with the partition that previously contained the operating system. The easiest way is to format it and store files on it.
Just be careful when you format the partition. Check its contents, there should be folders there: Program Files, Windows, Users, etc. And this cannot be drive C, it will have a different letter.
Attention! Formatting will delete all information on the local drive. If we consider our case specifically, all information that was stored on the local drive C will be deleted (desktop, folder my documents, my photos, etc.), on the operating system we want to remove.

Second way.
You can delete a partition, and add the free space that appears after deleting it to an existing partition. I don’t know how much of a necessary procedure this is, because it’s much easier to just leave this section for storing files.
But, if you decide to remove it completely, then this can be done using a standard tool Disk management, which I wrote about in this article ““. Do not pay attention that the article was written for Windows 7, on eight, everything is exactly the same.
In Disk Management, right-click on the partition you want to delete and select Delete volume...“.
Then, right-click on the partition to which you want to add memory from the deleted partition and select Extend volume. Follow the instructions, everything is simple.
Afterword
Here is a proven way to remove an operating system if you have two or even more of them on your computer. I think that there should not be any problems. The main thing is to be careful not to delete something wrong or format a section with valuable information.
If anything, ask your questions in the comments, I will try to help. Share information, perhaps you did this procedure differently. Best wishes!
Also on the site:
How to remove one Windows operating system from a computer if two systems are installed? updated: February 6, 2018 by: admin
There are two ways to get rid of Windows 10 after upgrading to it from a previous version of the operating system: rollback and complete removal of the system. The first method involves returning to a previously installed OS, and the second, discussed below, will help erase all references to the system from the hard drive without installing another version of Windows.
Removing Windows 10 system
Removing a system from a hard drive can be done in three ways:
- via BIOS and bootable media;
- through command execution;
- through a third party program.
You can save documents and other items not stored on the main partition of your hard drive using any method. You just need to determine in advance which partition carries the operating system and which contains all the other files.
Because the drive names required to work with them in the command line may differ from those you see on the main Explorer page, you need to know the correct names in advance:
Removing Windows 10 by running commands
- Using Microsoft's official Windows 10 upgrade tool, create a bootable USB flash drive. We will not use it to install the system, but will use it to go to the command line.
 Create a bootable USB flash drive with Windows 10
 - Insert the created media into your computer, reboot the machine and go to the BIOS settings.
- In the BIOS, change the boot order so that the name of the installation media you created comes first. This is necessary so that when you turn on the computer again, it will start booting not from the hard drive, but from the flash drive, entering the OS installation program.
 Move the bootable flash drive to the first place (1st Boot Device)
 - Save the changes made to the BIOS and exit it.
 Save the changes and exit the BIOS
 - Once Windows 10 Setup loads, use the Shift + F10 key combination to load Command Prompt.
 Press the key combination Shift+F10 to go to the command line
 - Since you know the number of the partition to be deleted in advance, use the sel part 2 command to select it. If you don't know which partition you need to delete, then go back to the instructions above and find out the name of the partition on which Windows 10 is currently installed.
 Execute the command sel part 2
 - Run del par override to erase the partition you selected in the previous step. Done, the system is removed, now you have a hard drive filled only with files located on additional partitions.
 Execute the command del par override
Uninstalling Windows 10 via BIOS
This method is similar to the previous one, since the first three steps are repeated.
- Create a Windows 10 installation flash drive using Microsoft's official OS installation tool.
- Insert the flash drive into the computer, reboot and go to BIOS.
- Change the boot order of your computer, putting the created installation media first, save your changes and wait until the computer starts the system installation program.
 In the BIOS, move the installation flash drive to the first place in the list
 - In the first step of installing Windows 10, select the language and other options that suit you.
 Select the required language settings
 - In the second step, confirm that you want to start the installation. We will not install the system, but use this program to clean up the disk.
 Click the “Install” button
 - Skip entering the license key; activating the system is useless now.
 Skip the step of entering the key
 - Select any OS version.
 Select any version of the operating system
 - Skip the license agreement by accepting it.
 We accept the license terms
 - Select the manual installation type to be able to work with the hard drive.
 Choosing manual installation
 - A window will open with a list of hard drive partitions; click on the “Disk Setup” button to see additional buttons.
 Click the “Disk Setup” button
 - Select the partition with the system installed and use the "Format" button to erase all data located on the selected partition.
 Select the partition and click the “Format” button
Done, the system is completely deleted, and partitions with backups, third-party files and other elements remain intact. If you want to clean your hard drive completely, then format it right there. After finishing working with disks, you can close the program and start using the cleaned disk to your advantage.
Through a third party program
To edit disk partitions, a third-party program, EaseUS, will be used, which you must download and install from the developer’s official website. There is no Russian language in it, but all actions will be described in detail below. Please note that after deleting the main partition using this program, the computer will enter reboot mode to make all changes, but will not be able to exit it because the system will deleted. Instead, it will display an appropriate error confirming that the disk is empty.

Removing a previous installed system
By default, when migrating from an old operating system to a new one, the Windows.old folder is created, which contains all the necessary files to restore the previous installed OS. It is needed so that, if desired, the user can easily return to the old version of the system, using standard Windows capabilities and without resorting to reinstalling the system. The folder is automatically erased after 30 days from the date of switching to the new OS, but you can delete it earlier by following these steps:
- Using the Win+R key combination on your keyboard, launch the Run window.
 Press the Win+R combination to open the Run window
 - Use the cleanmgr command to go to the disk cleanup program.
 Run the command cleanmgr
 - Click on the “Clean up system files” button. Please note that for this action you must be logged into the system under an administrator account.
 Click on the “Clean up system files” button
 - Check the box next to "Previous Windows installations". Don't forget to uncheck all other checkboxes so you don't accidentally delete unnecessary files.
Deleting restore points
Restore points are created by the system automatically and manually. They are needed so that it is always possible to roll back the computer to a certain state when all functions and processes worked fully. Over time, there may be too many points, and they take up some of the disk memory, so they should be deleted:

What to do if an error appears during deletion
If, when trying to delete a system or a folder located on it, an error with code 0x80004005 appears, then the reasons for this may be the following:
- virus;
- failure of system files or registry data.

File recovery

Repairing the registry
By default, the system stores files of the initial version of the registry, intended specifically for recovery in case of malfunctions. They are located along the path Primary_disk:\Windows\System32\config\RegBack.

What to do if nothing helps
If none of the above methods help, roll back the system using restore points or returning to the original settings. Please note that some personal data will be lost, so please back it up in advance.
There are several ways to remove a system from a disk, using bootable media or a third-party program. Getting rid of Windows will lead to the fact that you will get a hard drive that is clean of systems, but with the presence of user files on it, unless you erased them separately. You can also delete restore points and the folder with the previous version of Windows. Uninstallation problems can be resolved by checking for viruses and restoring system files and the registry.
If a person is looking for an option on how to remove Windows 7 from a computer, then most likely he needs to clean the computer from the old version of the operating system. Residual data will load the computer's hard drive. And this is a great way to free him.
Removing the old operating system
Removing an old operating system is carried out in two stages: first you need to clean your computer of residual files. They are concentrated in a folder Windows.old. You also need to erase the record of the previous OS from the boot file boot.ini.
Step 1: Removing the Windows.old folder
The main part of the files from the previous version of the "seven" will be stored in the directory Windows.old. Erasing it can free up more than 10 GB of hard drive memory. But you shouldn't delete the folder directly. In this case, you should use a special function.
Go to the main directory of your computer and open the properties of the system partition. Then click "Disk Cleanup". And then "Clear temporary...". Select all the items and click "OK".
Then open Command Prompt with administrative capabilities. Enter a request there with the following content:
rd /s /q c:\windows.old
If a message appears with the text “It’s not possible...”, then the directory Windows.old no longer exists. 
Stage 2: Removing the system from boot.ini
But information about the previous OS version may still be stored in boot.ini. This is the name of the system boot file. It shouldn't be edited directly either. Use the msconfig utility. It is convenient to run it through the window "Run". Go to the tab  There should be a single line indicating the current OS. If this is not the case, then remove the unnecessary elements. As a result, there should be one record left.


