How to save a disk image from. What can be packed into an ISO image. Free program for creating and burning ISO files
ISO image This is a file with an ISO extension that contains files and folders. Typically, an ISO file is created during the process of copying an optical disc using special programs. But, an ISO file can be created without an optical disc. In this article you will learn how to make an ISO image from a real optical disc, as well as without it.
To make an ISO image from real disk we need a computer with a floppy drive, an optical disc, and an imaging program. There are many various programs to create images. The most popular paid programs of this kind are UltraISO, Alcohol 120%, Ashampoo Burning Studio and DAEMON Tools Pro. Among the free programs, the most popular are Ashampoo Burning Studio FREE, CDBurnerXP and ImgBurn.
In this article we will talk about how to make an ISO image using the example of a free program. This program has a minimum of functions and a very simple interface, which means that even a novice user can use it.
Insert the optical disc into the drive and run the ImgBurn program. In the window that opens, click on the “Create image file from disk” button.
After this, a window will appear in front of you to create an ISO image from an optical disc. Here you need to select the drive that will be used to create discs.

And also specify the folder in which the ISO image will be saved.

After selecting the drive and folder to save, you can start the process of copying the disc to an ISO image. To do this, click on the button at the bottom of the window.

After this process is completed, the ISO disk image will be located in the folder you specified.
How to make an ISO image from files
In order to make an ISO image simply from files without using a real CD, you will need. This program is paid and costs about $30. Before purchasing, you can check out the trial version.
To make an ISO image from files, run UltraISO program and add necessary files to the main program window.

Hello readers of the blog of the ComService company (Naberezhnye Chelny)!
In this article we will figure out how to create an ISO image from files and folders and how to make boot image. For example an operating system. You can read how to make an ISO image from a disk. Usually, I use Ashampoo Burning Studio FREE to create images, and UltraISO to write to a flash drive. In this article we will create bootable ISO images from files and folders from which you can install Windows using CDBurnerXP.
This article could have been called “How to edit ISO images.” Image editing programs cost money. In this article I will show you how you can keep this money for yourself.
Article structure
1. Download CDBurnerXP
Go to the site
https://cdburnerxp.se/ru/download
Click on the link " More download options»
To avoid installing additional program download CDBurnerXP for .


Choose Data disk and click OK

At the top left, open the folder from the contents of which you want to create an ISO image. At the top right, select everything and drag it down with the mouse.
 You can also add files to the project by selecting them and clicking

Set the name of the ISO image, location and click Save

We are waiting for the image to be created

The ISO image has been created.
3. How to create a bootable ISO image
This is the part for which this article was written. For example, we need to edit ISO- Windows image 7 or Windows 8. We downloaded the original image of Windows 7 Ultimate. Therefore, you can install Windows 7 Ultimate from it. To be able to choose others when installing Windows versions 7 (for example, Basic, Home Basic, Home Advanced, Professional and Ultimate) you need to delete the file in the image ei.cfg. You can do this as follows
Unpacking the image

We go into the unpacked archive into the folder sources and delete the file ei.cfg

Now from the unpacked folder we will create bootable iso Windows 7 image
We add files to the project in the same way as described in the second paragraph.
Expanding the menu Disk and choose Boot options...

Check the box Make the disk bootable and click to set the path to the boot image

In the folder with the unpacked image, go to the directory boot. From the drop-down menu at the bottom right, select All files. Choose etfsboot.com and click Open

In chapter Emulation type choose No emulation
In chapter Sectors put 8 (Value depends on size etfsboot.com. If the size is 4 KB, set it to 8, since the size of one sector is 512 Bytes or 0.5 KB (4/0.5=8). If the file size etfsboot.com 2 KB - set 4) (Thanks for this valuable information oszone.net). In Windows 7 and Windows 8.1 images, the etfsboot.com file has a size of 4 KB - set it to 8.
In chapter Platform chose x86-32 since I have the image of 32 bit Windows 7
Click OK
 .
.
Conclusion
In this article, we figured out how to create an ISO image from files, folders and make it bootable if necessary. In general, we now know how to edit Windows ISO images. You can delete everything you don’t like (for example, a file ei.cfg) and add what you need (program distributions, portable programs, drivers, etc.). In the video below I will show whether this works with Windows 8.1 images.
Almost every advanced computer user knows what an ISO image is, but does not know how to create one correctly.
Let's look at the topic of how to create ISO images from files and folders and how to create ISO images from disk. We will use several programs that are still used on the Internet today. Creating an iso image is not like that difficult process as it seems. Just a couple of clicks and the image is ready.
List of programs:
- Ultra ISO
- Poweriso
- BurnAware Free
- imgBurn
These programs are divided into paid and free categories. Paid programs It is possible to use it for trial, but with a limit of 300mV. But free ones are also not inferior to paid ones and even lead. Let's look at these programs.
How to create ISO images from files using the ultra ISO program.
First, go to the developer’s website and download this program. The installation process is the usual: install and run.
The program has paid license and there is an opportunity to try it for free. In trial use, the ultra ISO program is limited to 300 mV. The program has a function to convert an image for similar utilities, for example:
- CloneCD
- Nero (.NRG)
- It also fits the .CUE and compressed ISO (.ISZ) formats
Creating an image from files and folders
If you decide to create an iso image, then you will need the files that you want to write to the image. In particular, these files are reinstallation disk or files for recording on boot disk or disk with autorun
Open the utility. The program is divided into two windows. In the first top one it finds files prepared for recording, and in the bottom one there are files located on our computer.
To create an iso image, at the bottom of the program, open the files that we want to burn, select them all and click “add”.

Or you can also open the section on the computer where the files are located, select and drag them to the top window of the program.

In my case, I am creating an image for Windows 7.

Using this program and simple steps, we created an image for further recording on a disk or flash drive.
Creating an ISO image from files and folders from an optical disc
This method It is mainly used to copy several copies of a disk you like, for example: great build operating system. Let's consider this method. First, we need a disk from which we want to create an iso image.
On top menu go to “tools” click “create CD image” or just press F8

This window opens, if you have several drives on your computer, select the one you need dvd drive.
And the last section is the format output.
We look at the list and make a choice over the formats, the format in our case is “iso”, if you plan to use it in the future this image in the programs listed in the section, select the appropriate option.

Create ISO image with PowerIso program
This program is the same paid as Ultra ISO and has the same recording limit above 300mV. The program also has the ability to convert the image into formats
- BIN/CUE
Create iso images from files and folders using Poweriso
Similar to the previous program, download the program, install it and launch it. To create an iso image, you need to load into the program all the files from which we will create the image. To do this, on the top toolbar there is an “add” button; click it.
Or drag and drop from the computer where these files are located onto the program window.
Select everything necessary files and add.

Create iso image from optical disc with Poweriso program
To create an iso from a disk, go to “tools” on the top panel and click “create CD/DVD-ROM image file”


Create an iso image with BurnAware Free
We download this software, it is completely free and is a leader among competitors, and you yourself know why. Install and launch. A window with great opportunities will open.

Create an iso image from files with the BurnAware Free program
In this section, to record an ISO image, click “create iso”. Then this window will open
Choose file system“Iso 9660” click “ok”.

on top panel click on the “add files” icon, select all the necessary files, click “add” and after adding, click “close”

Now go to “file”, hover the mouse over “compilation” and click “create”. Next, as always, write the name, indicate the saving location and click “save”.

Create an iso image from an optical disc with BurnAware Free
In this program, the window is divided into 4 masonry
Multimedia
In the window that opens, select the DVD drive as usual and specify the iso or bin format, then click copy, then wait for the process to complete.

Create iso using imgBurn utility
The first thing you need to do is download, install and run the imgBurn utility. The program is distributed free of charge. imgBurn has English interface, but it can also be Russified. To do this, go to the website of the program developer. Let's go to the download section.

Which is located in the folder where you installed the imgBurn program

Create an iso image from files using the imgBurn utility
Open the program and to create an iso, select the section “Create an image from files/folders”


Select all the necessary files and click open. After completing these steps to create, you need to click on this icon

We write the name, indicate the location and save the image.
Create an iso image from a disk using the utility imgBurn
In order to create an iso image from a disk, open the imgBurn program and in the window that opens, go to the “create an image from disk” section


And now the final stage is to click on this button

Software to create ISO image from disc only
Creating an iso image from a disk with ISODisk program
ISODisk software is used to create an image from a disk. With support from the ISODisk utility, it is possible to create an ISO image from any disk in two clicks.
First, download the program from the official website, install and launch. The program has a simple appearance and will be understandable even to a teapot. The interface of this program is English language. ISODisk includes two partitions:
Mounting an ISO Image as a Virtual Disk
Create an image from an optical disk
Select the section “create an image from an optical disk”

In the window that opens, select the DVD drive and click on this icon
Creating an iso image from a disk using Ashampoo Burning Studio 14
Download and open the program. This utility, in my opinion, has a very beautiful interface that is simply pleasing to the eye. The program has many functions for different works and disks.
In our case, we need the “image creation” section. Hover your mouse over this section and select “create image”

Select your DVD drive and wait for the program to load the disc.

In the next window, indicate the location to save the image, write a name, select the iso format and click “next”
Creating an iso image from a disk using DAEMON Tools Lite
This program is easy to use and has a simple interface that everyone can understand. Open the program.
On the toolbar located in the center of the window, click on the “create disk image” icon

As in all of the above programs, select the drive, indicate the storage path, and press start

Creating an iso image from a disk with the Alcohol 120% utility
Download, install and launch the Alcohol 120% program. Like some, this utility is paid.
But despite this, you can use the program by waiting for about 8 seconds to start. In the window that opens, on the left toolbar, select “image creation”


Here we indicate the name, path, format created image iso and click “start”
Creating an iso image from a disk using Nero 2015
To create an iso image from an optical disk using this program, insert the disk from which you want to create the image into the drive and run Nero program 2015.

Now select the path, specify the drive and write a name for given iso. Next, click on the “copy” button

Creating an iso image from a disk using CDBurnerXP
The installation process is the same as in all cases. Opening CDBurnerXP program, then select the “copy disk” section, click “ok”.

A window will open there, just like in all cases, select the drive, indicate the path, write the name. Next, insert a checkbox “ HDD" and click "copy disk".

Conclusion
In this article I talked about the most famous methods creating iso images from files and folders and from an optical disc.
In my opinion, recording with an iso image is much more convenient and efficient than simply copying a disk, since when recording with an iso image we get a 100% copy of the original.
As everyone already knows that optical discs They don't last very long if you use them more often.
Therefore, in order not to risk it, it is better to make a copy of your disk using the recommendations in this article and sleep peacefully.
This is where I end the article. Hope this information was helpful. If you have any questions, write in the comments. Bye!
You might be interested

Today I want to tell you how to make a disk image using a very simple and useful program"R-Drive Image". What is an image anyway? hard drive and why do we need to do it? I will provide a link to the program itself at the end of this article.
The answer to the first question might sound something like this: a disk image (in in this case- hard drive) is a file of arbitrary size with the extension “iso” (or any other), which represents exact copy data hard section disk at the time this image was created.
When we make a copy of a disk, we are, in fact, creating a backup of it (an exact backup copy of it). And when copying system partition the final image file will include not only the user's documents, but also such things as desktop settings, computer settings, etc. In a word - a complete copy.
Now - the answer to the question why do we need to make a copy of the disk (create a system image)? Imagine a situation where . In this case we need to produce many various operations to restore the operating system and it is still unknown how it will all end? And from a pre-made image of the system, we can restore it in about ten minutes completely in the same state as at the time of its creation! This is a kind of save (preservation) of your operating system and data (like in computer games) and you can return to it at any time.
Moreover, there can be as many such “saves” as you like (you can make them at least every day or before making important changes to the settings of the OS itself), the main thing is that there is enough space. In the same way, the damage caused to the system can be neutralized computer viruses. We'll just roll it back to previous state, when she was not yet infected! Naturally, all device drivers installed at the time of backup are restored, so there is no need to search for and install them again.
I will show how the program works to create an image of a hard drive and transfer it to another (working) one. real example. On one of the computers in our organization it was discovered that it periodically turned off spontaneously. Moreover, the further, the more often. It was decided (out of harm’s way) to make his image and then “deploy” it on another (functional) medium.
That is, literally we need to completely transfer (clone) all programs and settings from the left HD (pictured below) to the right one, and then place the second HD in the source computer:
To do this, we connect the removed hard drive (as an additional one) to the one on which we will make a disk image (English image) and where the “R-Drive Image” program is installed.
We launch it and see the main window:

We will gradually get acquainted with the main capabilities of the program, but now we will be interested in its main function: “Image creation”. Click on this inscription and go to the next window:

In the photo above (indicated by arrows) we see symbolic images of our disks numbered “1” (20 gigabytes) and “2” (150 gigabytes) connected to the computer. We must select the partition whose image we will create. In our case, this is disk “F” with a capacity of 7.5 GB. To designate it as an object for cloning, we must left-click on it. After that, a red line will appear under it (as shown in the screenshot above), and the “Next” button at the bottom will immediately become active.
Click it and go to the next window called “Image Location”. We must not only make a disk image, but indicate in which folder to save it and give it a name.

I previously created the “Image” folder in the root of the “C” partition and in the “File name” field I specified the file name of the image we were creating as “myimage”. Click the “Next” button.

In the window above we may be interested in the following possibility: using the slider marked in red we can select the compression ratio final file when creating it. The slider that is closer to the words “Faster in speed” will provide us with more fast process creating the final clone file. If it is located closer to the inscription “Smaller in size,” then the file creation time will increase, but its size will be smaller.
If you have no problems with space for storing files, then you can simply look at the two information signs on the right side of the screen: “ Free place on disk" (where we will save our image) and - "Approximate size" (of the image file) and click the "Next" button.
We see the “Backup Options” window:

There's not much we need here. Perhaps the option “Ignore disk read errors (bad sectors)”. We can check the box if there really are some on the hard drive that are preventing us from making a disk image.

If necessary, we can press the "Back" button and change previous settings. If everything suits us, then click “Start”. After which the process of creating a disk image starts directly.

We wait for it to finish and in the end we see this inscription:

We have just, in fact, completed the entire section. Let's see what kind of file we got as a result? To do this, go to the folder that we specified at one of the first stages of the “wizard”. I have this: C:image

We see that we have a file there with the extension “ arc"(this is the extension the program works with), slightly larger than one gigabyte. This is our disk image that we made! We'll get back to working with it now, but let's talk a little about another possibility.
Since, as we said earlier, the image is a backup copy of the disk, we can connect it at any time in read mode from our program and copy the files we need from there.
Why do we need this? Imagine a situation (I had a similar one) that the system “saved” by us in this way works successfully, but some important files(or documents) have been deleted and due to the passage of time they cannot be detected using standard means information recovery. And we desperately need them! Shouldn’t we, in fact, restore the entire section from the image for their sake?!
And here it will come to our aid very much useful opportunity, accessible from the main window of the program “Mounting an image as a virtual logical disk”.
![]()
Let's master it in practice. After clicking on the inscription, we will be taken to the window of the corresponding connection “wizard”:

Select the backup we made (the “myimage” file). Click “Next”. In the next window, we will need to mark (left-click) the drive to be connected and select a letter for it (you can select any letter that is not occupied by the system, I chose “ L»).

After the operation is successfully completed, we will see this window:

Now let’s go to “My Computer” and see the “L” drive that appears there:

Naturally, you can go to it and copy any of its files contained there at the time the system image was created.

After use backup, we must turn off virtual disk. In the main menu of the “R-Drive Image” program the corresponding inscription will become active:
![]()
In the window that appears, check the box for the letter “L” that we want to disable:
And after the procedure is completed we see:

So, we have mastered this procedure. Remember it, it will come in handy :) Let's return to how to make a disk image? More precisely, now - restore it from the “arc” file. For this, as you may have guessed, there is a special function in the main program window:
![]()
Before “unfolding” the image on another disk, we, of course, must first physically connect it to the computer on which the “imprint” we took is located. What am I doing? I turn off the computer, disconnect the secondary hard drive from which we made the “clone” and attach another hard drive in its place, onto which we will “deploy” the image. I boot the computer and after Windows boot I launch “R-Drive Image”. I think everything is clear here?
So, we get into the “wizard” that we are already familiar with and select the file “myimage.arc” created at the first stage


This is where we need to be very careful (I once “restored” the image to my main working partition “D”, which contained all my data)! It helped that, at one time, I also made a backup copy of them :)
Attentively! At the top we have “Image” (select it with the left mouse click), at the bottom we have “Destination” (in my case, the “F” drive, where we “expand” the backup), and select it so that a red underline appears. We check again that the “object” and “target” for recovery are specified correctly and click “Next”.
In the next window, before restoring the system image, we are asked what to do with the unallocated space remaining after “overlaying” the image on the target disk?

The fact is that the source partition (the first hard drive from which we “removed” the image) and the final partition (partition of hard drive number two) do not match in size. The second one is bigger. The situation is normal, since we do not need to achieve the identity of the “donor” and “receiving” sections, byte by byte. We can always correct this point during the work process.
It is the “Free space after” field that shows us this difference in megabytes. In the schematic diagram at the top of the screenshot it is indicated green. All we need to do is to “hook” the slider circled in red with the mouse and move it all the way in the direction indicated by the arrow. At the same time, the “Free space after” field will decrease to zero, and the “Partition size” field will increase proportionally.
Also pay attention to the possibility of changing the partition type: “Primary” or “Logical”. The partition from which the operating system is loaded is always marked (flag) “active”.
The last field that may interest us here is “File system for the selected partition”. During the process of “deploying” the image, we can change (convert) the file system at our discretion and as necessary. Click “Next” and in the next window - “Start”.
The process of recreating the system from the ashes will begin, i.e. - from the image :)

At the end of it, we will see a promising inscription:

We can go to our “F” partition and make sure that we were able to not only make a disk image, but also successfully transfer all the files (and the OS itself) to another physical device.

Now we just have to learn how to make a copy of a disk using a bootable CD or DVD created in the R-Drive Image program? Why do we need to know this? The simplest option: imagine that our saved system image file is located on “D”, and the OS installed on “C” has stopped loading. Question: how do we run the program and get to drive “D” with the “arc” file? And what should we do if we don’t have a second computer at hand so that we can connect our hard drive to it to restore the system to it?
This is where a pre-prepared bootable CD (or DVD) of our program comes in handy. To create it, we need to select the appropriate item in the main window:
![]()
And now, as promised, I give “R_Drive Image”.
The topic of today's article is how to create a copy, or more correctly, an image, from a physical CD/DVD.
The information will be relevant for users who need to make an exact copy of the driver disk, operating system, computer game, and happy owners of netbooks.
Today, drivers for a laptop, computer or various peripherals are supplied mainly on CDs/DVDs. As you know, this physical device does not last forever, and it’s good if more fresh driver You can always download from the official website on the Internet. And if not? Then you have to cherish this disk and literally blow away the specks of dust from it.
The same can be said about any boot disk, including a disk with an operating system distribution. Fortunately, there is a way out of this situation: with the help special software you can make an exact copy, a “snapshot,” of this disk, called an ISO image, which can be stored on your hard drive or storage.
You can convert any boot, installation or regular disk: with the game, operating system distribution and any other software, requiring a licensed CD/DVD disk in the physical drive of the computer.
It is important here not to confuse the concept of an ISO disk image with simple copying. A CD/DVD disk image is a virtual clone of it, in which the same data is recorded as in the original, strictly in an identical organization, with a repeating set of sectors, as on a physical disk.
Unlike the most physical disk, The ISO image is usually stored in a safe place and will no longer be physical impact, plus it can be used at any time for the same recording on a disc or flash drive. Transferring the contents of old CDs/DVDs to a virtual format is an ideal option to get rid of junk in your workplace and not lose the ability to access this data in the future.
Below we will look at the process of converting the contents of a physical CD/DVD into an ISO image - the most universal and popular format. One of my favorite programs called ImgBurn will help us with this.
About ImgBurn
ImgBurn is a completely free program with a user-friendly interface that is designed to work with CD/DVD discs and ISO images. With its help, you can both burn CD/DVD discs from an image and convert their contents into disc image formats, including ISO. By the way, I already discussed working with this program in the article “How to burn a Windows image to disk.” You can read this article.
Downloading, installing and Russifying the ImgBurn program
Download the program from the official website developer. It is distributed with an English-language interface, but if this confuses you, then just below in the “ImgBurn Translation Language Files” section you can download a crack file.
During the installation process, the installer will offer two options: express installation and custom. If you don't want to install third party software In addition, I recommend choosing a custom installation.
After successfully installing ImgBurn, close the installer window and unpack the archive with the crack file.
This file russian.lng must be copied to the program directory in the “Languages” folder. The default is:
- C:\Program Files (x86)\ImgBurn\Languages - if Windows is 64-bit,
- C:\Program Files\ImgBurn\Languages - if Windows is 32-bit.
We complete the process by confirming administrator rights. We launch the program, and if you did everything correctly, it will start with the Russian interface.
Creating an ISO image from a disk
Let's create a bootable ISO image from installation disk from the operating room Windows system. By the way, the ImgBurn program is among the recommended software from Microsoft. I believe that she received such recognition due to the successful user interface and free distribution.
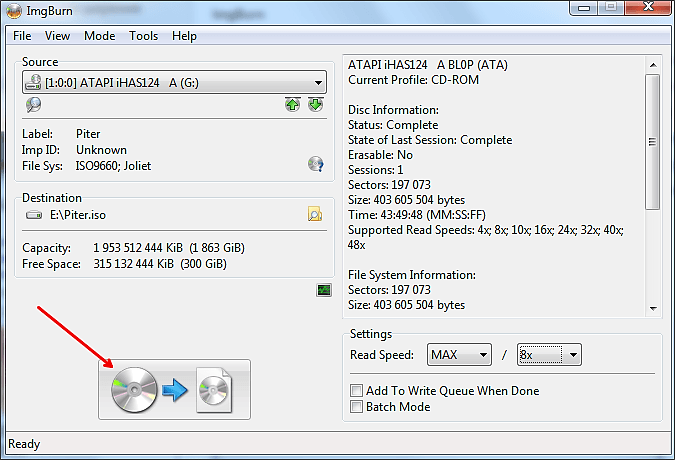
Insert a physical CD/DVD with Windows into the drive, and in the main program window select “Create an image from disk”.
If the computer has several drives, then in the “Source” column you need to select the drive into which the disk was inserted for subsequent image creation. The “Destination” column is the path to save already finished image disk. ISO format is selected by default when saving.
Everything is ready: save path ISO file given, we can start the process. Press the button as indicated in the screenshot.
The process of creating an ISO image from a disk has started. It lasts relatively short, and our task is to monitor the program report in the corresponding window, which is not recommended to be closed.
The ISO image creation process has completed successfully. This is indicated by the message “Export Successfully Completed” in the report.


