Burn a bootable USB flash drive from the iso image. Creating a bootable USB flash drive from an iso image
A disk image is an exact digital copy of the files that were written to the disk. Images turn out to be useful in various situations when it is not possible to use a disk or for storing information that constantly has to be rewritten to disks. However, you can burn images not only to a disk, but also to a flash drive, and this article will show you how to do this.
To write an image to a disk or flash drive, you need one of the following, and one of the most popular programs of this kind is UltraISO. In this article we will look in detail at how to burn a disk image to a flash drive.
First, you need to figure out why you need to burn a disk image to a flash drive. And there are many answers here, but the most popular reason for this is writing Windows to a flash drive to install it from a USB drive. You can burn Windows to a flash drive using UltraISO just like any other image, and the advantage of writing to a flash drive is that they deteriorate less often and last much longer than regular disks.
But you can write a disk image to a flash drive not only for this reason. For example, you can create a copy of a licensed disc in this way, which will allow you to play without using the disc; however, you will still have to use a flash drive, but this is much more convenient.
Burning an image
Now that we have figured out why you might need to write a disk image to a flash drive, let’s proceed to the procedure itself. First, we need to open the program and insert the USB flash drive into the computer. If there are files on the flash drive that you need, then copy them, otherwise they will be lost forever.
It is better to run the program as an administrator so that there are no problems with rights.
After the program starts, click “Open” and find the image that you need to burn to the USB flash drive.


Now make sure that the parameters highlighted in the image below match the settings in your program.

If your flash drive is not formatted, then you should click “Format” and format it to the FAT32 file system. If you have already formatted the flash drive, then click “Write” and agree that all information will be erased.

After this, all that remains is to wait (about 5-6 minutes per 1 gigabyte of data) for the end of recording. When the program finishes recording, you can safely turn it off and use your flash drive, which can now essentially replace a disk.
If you followed everything exactly according to the instructions, then the name of your flash drive should change to the name of the image. In this way, you can burn any image to a flash drive, but the most useful quality of this function is that this way you can reinstall the system from a flash drive without using a disk.
Often when your computer breaks down you have to use a bootable flash drive. With its help, you can get to the recovery partition, launch the command line or edit the registry even if the system itself does not start or does not respond. In this way, you can solve many startup problems and avoid reinstalling the system, and if this does not help, then the same flash drive will be useful for reinstalling the OS. So it doesn’t hurt to have a bootable flash drive at home in reserve.
Usually, bootable flash drives are made from an iso image. This is a file that represents copy of optical drive. You can unpack it using conventional archivers and work with it, you can use special programs that can emulate the operation of optical drives and work with the file through them, there are also many applications that will allow you to write the image to another medium, which will be discussed in this article.
Preparing a flash drive
For starters, it's worth transfer from flash drive all information, because during the recording process, all data will be deleted. If you don’t mind losing information, you can leave it on the drive; in most cases, the programs themselves will delete it during operation. You can also format flash drive, this is required to record some images, it is worth finding out what type of file system is required, ntfs or fat32, and re-encoding the flash drive to it.
Third Party Applications
This section will list the utilities that are best used to create a bootable drive.
Ultra ISO
It is better to download the program from the official website; others may contain versions with malware or with additional files, link to the page https://www.ultraiso.com/. After downloading, you will need install file, there is nothing complicated about it, all actions are performed using the usual installation wizard. After starting the program, you should click on the file - open, and then specify the path to the downloaded image. Then, a complete list of files will appear in the window. Next you need to click on Bootstrap - Burn a hard disk image.
After which a window will open in which you should select drive, and then all you have to do is click on record and wait for the process to complete.
Rufus
It is also better to download this program from trusted sources; you can download it from the link https://rufus.akeo.ie/?locale. Unlike the previous utility, this one specializes only in creating boot and multiboot drives. In the top line you should select the drive to which recording will be made, in the next paragraph you need to specify partition scheme, which will depend on the system being installed. In the bottom block you should definitely note “ Create a boot disk", indicate the downloaded iso as the source. 
The remaining parameters can be left as default.
WinSetupFromUSB
You can find the utility at http://www.winsetupfromusb.com/downloads/. The program itself is quite easy to understand and use. You only need to indicate the drive, check the box below it if this is the first image to be recorded, then check the box for the required system version and indicate the path to the downloaded element.  Further required click ongo and wait for the process to complete.
Windows 7 USB/DVD Download Tool
The official utility, which can be obtained directly from the developer’s website https://www.microsoft.com/ru-ru/store/b/home?rtc=1. The program is easy to use, in the first window you need to specify the file, in the next you need to specify the drive, and then you just have to wait for the recording. 
Daemon Tools Ultra
This application has many options for working with virtual drives and disk images; you can download it on the official website https://www.daemon-tools.cc/rus/products/dtultra. After installation, all you have to do is click on tools, then on burn image, after which you will only need to specify the flash drive, image and select recording options that you can leave with default settings.
UnetBootin
A utility for creating bootable flash drives based on Linux, you can download it at https://unetbootin.github.io/. Here you should indicate the system version, after which the program will download it, or the path to the image, as well as the drive on which the recording will be made. 
WinToFlash
You can download the program at https://wintoflash.com/home/ru/. In the first window, which is called the transfer wizard, you need to press only on further, and in the second indicate the image file and the path to the flash drive. 
Possible faults
Some utilities refuse to work without NET Framework, usually, it is installed on every computer because many applications require it to work. If the user does not have it, then the latest version can be downloaded from the Microsoft website, but the rest will have to be searched. The problem may also be a mismatch between versions; 64-bit systems may refuse to write to a flash drive if the action itself is performed in a 32-bit environment. In this case, you should try using a different image or another utility.
If you want to create a bootable USB flash drive or burn a distribution kit of some utility/program onto it, you need the appropriate software. This article will present several of the most convenient and easy-to-use programs and utilities. All that remains is to choose the most suitable one for yourself.
The first solution is the official program from Microsoft, called Media Creation Tool. Its functionality is small, and all it can do is update the current version of Windows to the latest 10 and/or write its image to a flash drive.

The advantage is that it will save you from searching for a clean and working image, thanks to the fact that it will record the official distribution kit on a USB drive.
Rufus
This is a more serious program that has all the necessary functions to create a full-fledged bootable USB drive. Firstly, Rufus suggests formatting before burning the distribution. Secondly, it carefully scans the flash drive for damaged sectors so that you can replace the media if necessary. Thirdly, it offers two types of formatting: quick and full. Of course, the second will delete information more efficiently.

Rufus supports all types of file systems and is portable. By the way, thanks to the Windows To Go feature, you can burn Windows 8, 8.1, 10 to a flash drive and run this system on any PC.
WinSetupFromUSB
The next solution is Win Setup From USB. Unlike the previous program, this utility is capable of recording several images at once, creating multiboot media.

Before you start using it, it suggests making a backup copy of all information on the media, as well as setting up the boot menu. However, the utility is not Russified, and the menu through which control takes place is quite complex.
SARDU
This program will save you from having to search for the necessary distributions on the Internet, since you can select the ones you need directly in its interface. She will download everything she needs from official websites and record it on the required media. The created image can be easily tested for functionality through the built-in QEMU emulator, which was also not the case in previous software solutions.

There were some downsides too. The fact is that most images can be downloaded via the SARDU interface for subsequent recording on media only after purchasing the PRO version, otherwise the choice is limited.
XBoot
This program is easy to use. All that is required to get started is using the mouse to drag the required distribution kits into the main program window. There you can distribute them into categories and create a description for convenience. In the main window you can see the total size of all distributions loaded into the program in order to select the media of the required size.

As in the previous solution, you can download some images from the Internet directly through the XBut interface. The choice, of course, is small, but everything is free, unlike SARDU. The only negative of the program is the lack of Russian language.
Butler
This is a utility created by a Russian developer, which is not very different from previous solutions. With it, you can record multiple images and create unique names for them so as not to get confused.

The only thing that distinguishes it from other similar programs is the ability to choose the design of the menu of your future bootable media, but you can also select a regular text mode. One bad thing is that Butler does not provide the ability to format a flash drive before recording.
UltraISO is a multifunctional program for burning images not only to a flash drive, but also to CDs. Unlike some previous programs and utilities, this one can create an image from an existing disk with a Windows distribution for subsequent recording on another medium.
Another good feature is creating an image from an operating system already installed on the hard drive. If you need to run a distribution, but don't have time to burn it, there is a mount function that allows you to do this. In addition to all this, you can compress and convert images to other formats. The program has only one drawback: it is paid, but there is a trial version for testing.
UNetBootin
This is a simple and portable utility for burning images to a flash drive. As in some previous programs and utilities, the functionality of YunetButin is limited to recording an existing image on media and the ability to download what you need from the Internet through its interface.

The main disadvantage of this solution is the inability to simultaneously record several images on one drive.
PeToUSB
Another free, portable utility for creating bootable media. Among its capabilities, it is worth noting the formatting of a USB drive before recording, which is clearly lacking in the same UNetBooting. However, the manufacturer has long stopped supporting its brainchild.

It supports writing OS images to a flash drive with a capacity of no more than 4 GB, which will not be sufficient for all versions. In addition, the utility is not yet Russified.
WinToFlash
The selection is completed by a functional program for recording images – WinToFlash. Using it, you can burn several distributions at once and create multi-boot media, unlike Rufus. As with UltraISO, through this program you can create and burn an image of an existing disk with a Windows distribution. It is also worth noting the function of preparing the media for recording - formatting and checking for bad sectors.

Among the features there is also the function of creating a bootable USB flash drive with MS-DOS. VinTuFlash provides a separate item that allows you to create a LiveCD, which may be necessary, for example, to restore Windows. There are also paid versions of this program, but the functionality of the free version is quite enough to easily create a bootable flash drive or disk. In fact, WinToFlash combines all the useful features of the previous software solutions we discussed above.
All the programs and utilities listed in this article allow you to create a bootable USB flash drive, and some even a CD. Some of them are modest in terms of functionality, while others offer a range of features. You just need to choose the most suitable solution and download it.
It is convenient to backup or duplicate data from any media using ISO files. An image containing a copy of documents and a file structure can be easily reproduced if necessary and used in the absence of the original. All that is needed for this is to write the file onto a storage medium of suitable size, for example, a flash drive. To ensure that the image is read correctly later, third-party software UltraISO is used. Let's find out how to correctly write an image to a flash drive via UltraISO, and what difficulties you may encounter in the process.
Install the program and download the ISO file
A tool for working with ISO files (creating, analyzing, editing) UltraISO is not built-in for any operating system. To use it, you must first download the program and install it on Drive C (System, System, Local C). The software is distributed online for free and is convenient because it has a Russian-language interface. After downloading the UltraISO burning tool, install it:- Double click on the downloaded object;
- In the “Installation Wizard” select “Next”;
- Click on “I accept...” and select “Next” three times;
- In “Additional tasks” select “Next” again;
- Click “Install”;
- Select “Finish” by unchecking the “Run...” menu.
How to properly download an image?
Let's assume that a PC user needs to make a bootable USB flash drive for Windows 10. Let's also assume that an ISO file from the original media has already been made and saved on the hard drive. Loading it into UltraISO is done like this:

Confirmation that the image has been loaded into the program will be the copied objects that appear on the right side of the program window. If they are not there, the procedure should be repeated.

Burning an image to a USB flash drive
Before recording, you should check the flash drive to ensure that it contains important information. Once the procedure is completed, it will no longer be restored. To record, do this:
We wait until the recording process is completed. It will take some time. If the procedure was performed incorrectly or there are failures in the process, the program will definitely notify the user about this. But if you strictly follow the instructions and correctly create the ISO file, there will be no problems.
Each of us has ever thought about what to do if there is no CD/DVD drive in the computer/laptop, and loading a game or program from the image is simply vital. In this article we will tell you one of the easiest ways to burn an ISO image to a Flash card. The task at hand will seem so simple to you that even if you are a user with minimal PC knowledge, it will take you just a few minutes to complete.
To complete this you will need:
- Access to the Internet.
- Downloaded ISO image of the required program.
- Blank Flash card.
UltraISO is one of the best software solutions that allows you not only to write images to memory cards, but also to remove images from hard drives, CD/DVD drives, work with the information contained in the images and create your own files, which can then be written to bootable media.Please note that if there is any data on the card, it will be erased when the image is recorded.
We go to the website https://ultraiso.ru.softonic.com and click on the “Download” button, then “Download” again. The site is verified and is guaranteed not to cause problems for your device. 

Go to the downloads folder and run the downloaded file. In the window that opens, be sure to select the item “I accept the terms of the agreement” and press the following buttons: “Next” - “Next” - “Install” - “Finish”. At the same time, do not remove the selection from the “Run UltraISO” item. 

When you launch the program, a window will pop up on the screen saying that the program is paid and asking you to purchase a license. We will not pay attention to this, since the trial version of the program has no restrictions on duration and functionality. Click the “Trial period...” button 

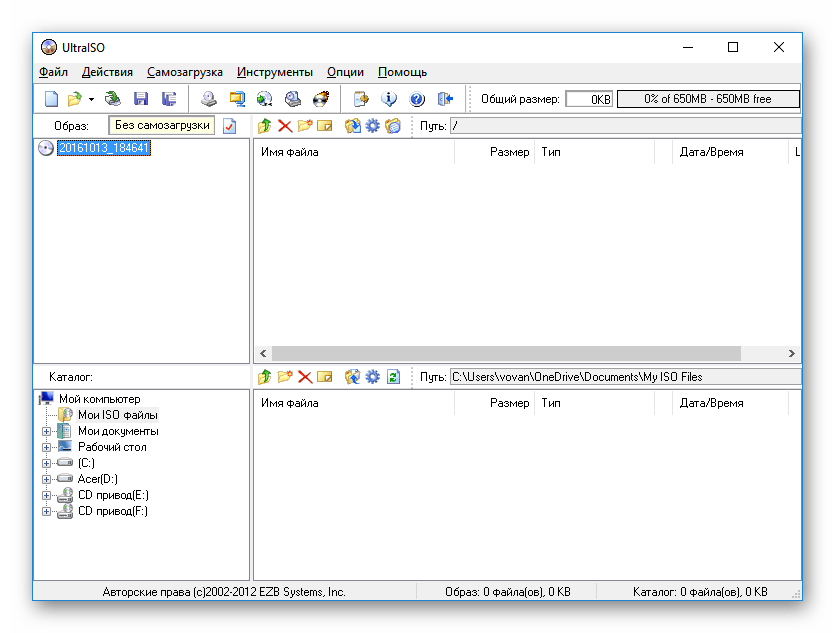
Now we have the program window open before our eyes, which is divided into two parts. In the first part (above) we will see the components of the image, and in the second (below) we will see the image file itself, which we will write to the memory card. The program's interface is quite friendly, which allows us to work with it without any difficulties. In the lower window, in the directory, select the location of the ISO file and double-click on it. The name of the image and everything it contains will appear at the top (usually the installation file plus additional modules). 
At the top, click on the “Boot” item and select “Burn hard disk image.” Now we have before our eyes the image recording window. There is nothing complicated here either. In the “Disk Drive” field, select the media on which our ISO image will be written (don’t forget to insert the flash drive into the computer before doing this, otherwise nothing will work). 

In the “Recording method” field, select USB-HDD +v2. You can also make the “Check” item active, but this is not necessary. This function checks the correctness of the image we created. If the matter is urgent, then you don’t need to use the function, as it will take another 3-5 minutes of your precious time. Click the “Record” button. After clicking this button, we will see the step-by-step process of recording the image. You don’t have to watch the process closely; you can just roll up the window and calmly go about your business. Ready! The bootable memory card has been created, now you can safely use it.


In this article, we got acquainted with not the only, but one of the simplest ways to write an image to a memory card. The program we recommend using is absolutely free and does not require additional computer skills.


