Disk error what to do. Causes and methods of treating the boot error disk read error occurred
If the appearance of a blue screen of death can be seriously alarming, then what can we say about those cases when, when you turn on the computer, a black screen appears with one or several lines in English. Today we will try to deal with one of the most dangerous and common mistakes disk read error occurred press ctrl+alt+del to restart. It translates as “I can’t read the disk, press ctrl+alt+del and restart the computer.”
The reasons for disk read error occurred can be different, but one way or another they are associated either with damage to the data on the disk, or with damage to the magnetic surface of the disk itself, or with a cable or other hardware components, which is much less common. Below you can familiarize yourself with the main methods of treating the error, but first, let's find out what could be its primary cause.
- Incorrect installation of the second operating system
- Installation old version Windows over new
- Manipulations with logical partitions in the presence of unstable sectors
- Falling of a working laptop (damage to mechanics)
- Restoring the system from an image to a clogged partition
- Turning off a running computer using the power button
- Erroneous deletion of boot record by antivirus
- Virus damage to boot record
- Physical wear of the disk and the presence of many bad sectors on it
- Problems with contacts, cables, controllers
- Power supply malfunctions
So, if you encounter a disk read error occurred error, first of all make sure there are no hardware problems. Go into the BIOS and see if the drive is detected at all. If not, check the contacts. To be sure, you can try connecting the drive to your work computer. If the disk is not detected by the BIOS or is detected incorrectly, the data on it has turned into a “mush” - take the computer to service center, in this case it is better to trust the specialists.
Often the appearance of the disk read error occurred error is associated with partial or complete destruction of the MBR - the boot record located in the zero sector of the disk and providing identification of logical partitions. If the MBR information is correct, control is transferred to the “Reserved by the system” partition and further along the chain to the system partition C. If a discrepancy is detected, a disk error read error occurred or Reboot and select proper boot device. However, there are known cases when the disk read error occurred error appeared when the boot files hidden section “Reserved by the system”.
Checking a hidden partition
Boot from Acronis Disk Director or a similar program and first make sure that the “System Reserved” partition is marked as active (checked). If there is no such mark, click on the section right click mouse and select the “Mark as active” option.
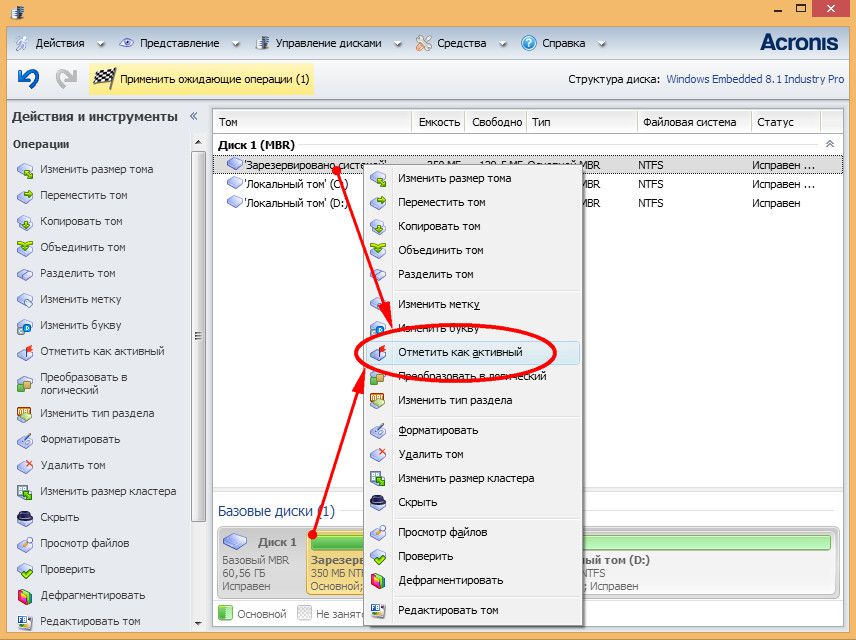
At the same time, make sure that the bootmgr file and the Boot folder necessary to boot the system are in place. If one of these elements is missing, this is most likely the cause of the error.
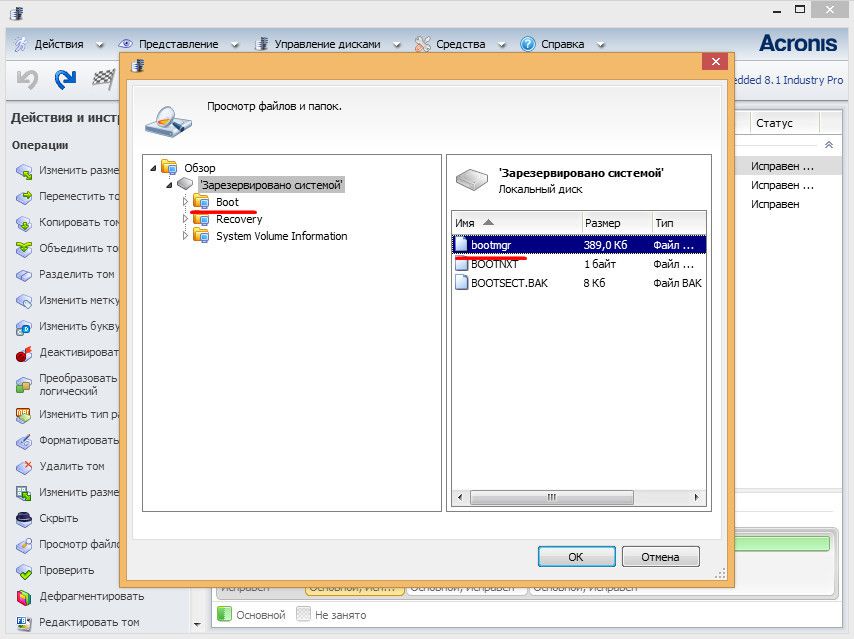
Recovering files from a hidden partition
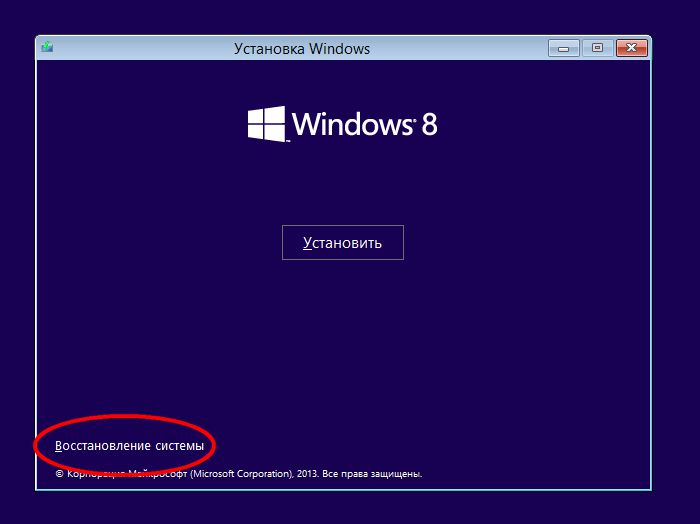
To recover the boot files of a hidden partition you will need boot image with Windows 8.1. Boot from it, click “System Restore”, “Diagnostics”, “ Extra options", "Command line".
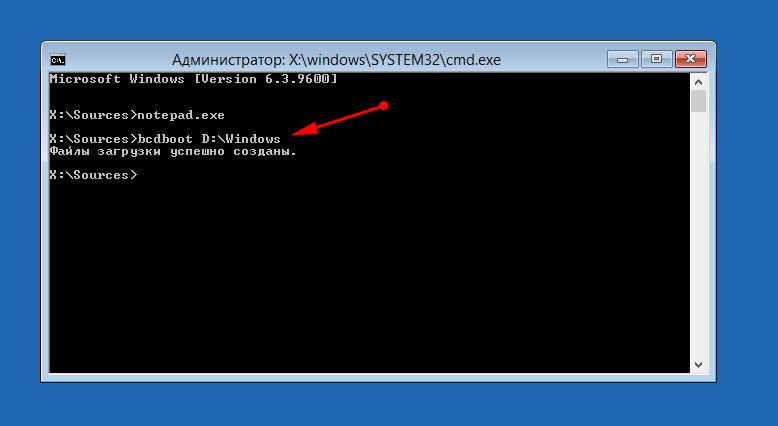
To determine the drive letters, run the notepad.exe command. In the Notepad that opens, select “File”, “Open”, “This PC” and look at the letters of the sections. In our example, the hidden section has the letter C, the section with Windows letter D, a boot disk letter X.

Let's restore the download files by running the command bcdboot D:/Windows. If the error was due to corrupted download files, the problem will be resolved.
Checking the file system and repairing the boot record
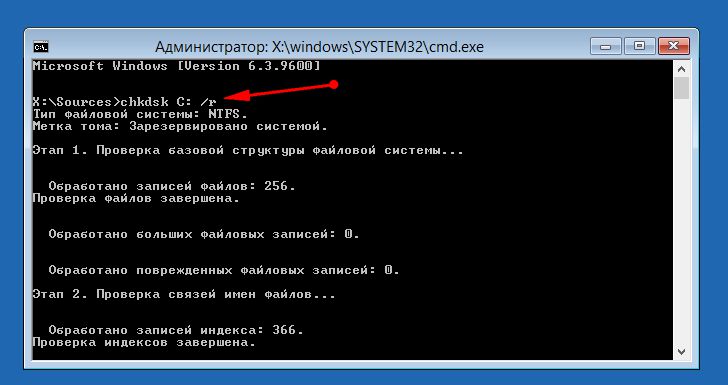
The disk read error occurred error may be caused by corruption file system. To analyze and fix disk errors, run the following commands from the boot environment command line: chkdsk C: /r And chkdsk C: /f, and then repeat the same for the main partition with the system (partition D).

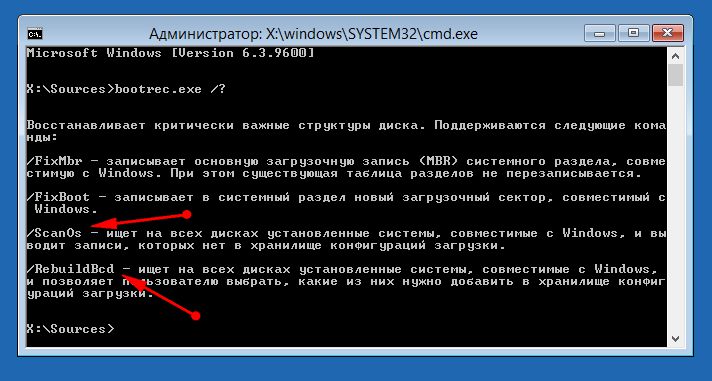
If the check does not reveal any problems, we try to restore boot entry. To do this, run these commands on the command line:
bootrec.exe /fixmbr
bootrec.exe /fixboot

After that we search operating systems and add them to the boot menu list:
bootrec.exe /rebuildBcd
Note
To recover MBR entries you can use third party programs, for example, the Paragon Partition Manager boot image. The same programs can be used to check and eliminate errors on the hard drive if the chkdsk analysis does not produce results.
Other options
If the above methods did not help, you can try to reinstall the system, having previously removed both the main system and reserved sections. Better yet, remove the disk, connect it to another computer and copy all valuable information, completely format it, and at the same time check for errors. After that on blank disk the system is installed.
Alternatively, you can try the following method. From the user section with Acronis or another similar program unallocated space is separated and installed in it copy of Windows. After this, two systems should appear in the boot menu, one of which, and maybe even both, will be completely working.
Have a great day!
The problem a disk read error occurred press can seriously frighten any PC user. The problem is this: during Windows startup, the system tries to read the files necessary for this action, located in hidden section. Such data is extremely important, therefore, in cases of its absence or malfunction, we will encounter such an error. We will consider further which options for the current situation can be corrected and which cannot.
Possible sources of malfunction
First, you should determine the sources of the problem when it says a disk read error occurred. There are quite a few of them, but some are easy to diagnose, so let’s get started:
- The virus has damaged the system's boot sector;
- The antivirus messed up something and erased the necessary entries;
- The error appeared after incorrect installation Windows or installing one OS on top of another;
- Have you partitioned the HDD into logical drives. In general, this is not a problem, but if there is bad sectors, some kind of failure may occur;
- Perhaps you dropped the system unit/laptop or the HDD;
- The cables have come loose or broken; there are only two of them and therefore easy to check;
- The likely cause is a worn-out power supply; if there is not enough voltage, the drive will not be able to work correctly;
- Sometimes controllers on the motherboard break down;
- System recovery or rollback, in cases of insufficient storage space. Thus, some files are interrupted, while others remain the same, creating problems.
- Breaking hard drive or availability large quantity unstable sectors.
Most situations with a disk read error occurred can be corrected, mainly those related to software glitches or connection cables.
When the so-called blue screen death, most users experience horror and shock. Therefore, you can imagine their emotions when, instead of a normal boot, a message about an error in reading data from the hard drive and recognizing it is displayed on a black background, which is usually represented by the line A disk read error occurred.
The article will discuss ways to solve this problem.
The message A disk read error occurred. Causes, consequences and methods of correction First, you need to determine the reasons that can cause errors of this type. For example, the message A disk read error occurred appeared on the screen. Press. How to fix this error, not every user knows. Most of them don't even know what it is. It was probably the user who caused irreparable damage to the operating system. The most simple reasons are:
Installing a second system on local computer terminal;
installation of old Windows versions on top of an improved modification;
damage boot sector what happened as a result incorrect termination work;
physical damage hard drive, as well as connected cables;
conflicts between the system and antivirus programs And so on.
As you can see, there are many reasons for this problem. However, now we will talk about how to interpret the computer message. What are the ways to correct such situations? Everything is quite simple, so don't panic in advance. There's nothing wrong with that. There are several solutions to the problem that need to be considered in more detail.
The role of the BIOS in restoring system functionality
First you need to decide on the BIOS. It is worth noting that it is integral software component the motherboard, where, as a rule, all other devices are mounted. In other words, it can recognize all the hardware that is connected using cables, and also change the basic parameters supported by these devices during use. One way or another, it makes no sense to argue that it is the BIOS that allows you to fix such an error. As you know, no one is immune from it.
How to fix the situation using BIOS settings?
First you need to make sure of the boot sequence. To do this, you need to call up the BIOS settings before starting the operating system. Windows systems. As a rule, this is done at the very beginning of loading, after initialization. In this case, the “Del” or “F2”, “F12” and others keys are pressed. IN in this case depends on the modification of the equipment used and BIOS version or the manufacturer. Next, you should look at the boot priority in relation to the primary device. System disk should be set first when no other option is enabled. This is also where problems arise. In this case, they are related to the operating mode of the hard drive.
Very often, as a result of incorrect switching of IDE/SCSI modes for the SATA controller in the BIOS, the entire system “breaks,” which leads not only to the inability to read data, but also to the system’s failure to detect the hard drive itself. Secondary BIOS function consists precisely in setting boot priorities. There is a point here that the operating system must start booting from a specific media.
How to fix it via BIOS?
It's time to decide BIOS settings. To First, you need to go to the download settings and familiarize yourself with the system section in the download. Nim can perform Boot Device Priority, Boot Sequence and more.
Examination physical connection hard drives
Next, it’s worth considering a situation in which a line on a black screen appears again and again. What to do in this case? If you are using a stationary computer terminal, it is advisable to check the cables with which the hard drive is connected to motherboard. However, the line A disk read error occurred may still remain. In this case, everything is a little more complicated, since all the “iron” components are non-removable. But not every user would want to get into a laptop and break the seals on their own. At least to fix it similar situation you will have to use software.
System Restore
Before using drastic methods, you need to make sure that the system is operational and that reading data from the hard drive is carried out without problems. It does not matter whether the system boots normally or not. First of all, you should use the download to safe mode. Next you should go to the rollback function from control point. If such actions are unsuccessful, you need to try booting from the installation or recovery disk, where you need to select exactly the point in time to which you want to restore the system. True, this is not always effective.
Checking the boot record
As a rule, problems with the hard drive are indicated by the message A disk read error occurred. In this case, you can use at least the simplest methods provided by the system itself. You will need to pay attention to certain commands that are executed by the system itself to restore data, the registry, and other things. You should also take into account the presence special teams, executable by using the Run menu. It is recommended to use it instead command line, and then proceed to the commands themselves.
Special teams
XP (Windows), although it supports many commands, is somewhat backward even in terms of algorithms for their execution. But when you call the command line, some of them work identically. You need to set the BIOS CD/DVD with the installation or system recovery disc to primary priority and boot from it. Next, you need to go to the console and apply the bootloader recovery partition. However, it is recommended to go straight to the command line, and then enter the commands one by one.
Let's consider a situation where your system has more than one hard drive. One of them already has an operating system installed, and on the second you installed Windows 7. There was a need to remove hard system a disk on which Windows 7 is not installed. But it turned out that without this disk your system does not want to boot.
This happened because one of the three conditions for a successful download was no longer met:
* the disk from which the boot is performed must be active;
* MBR must be compatible with bootmgr;
* the active disk must contain operating system boot files. For Windows 7, this is the bootmgr file and the Boot Configuration Data (BCD) store located in the hidden and system folder Boot.
Let's consider the solution to the problem using the example of the configuration shown in the figure.
The screenshot of Disk Management shows that the C: drive on which Windows 7 is installed is not active. The active drive is D:. Windows 7 download files (they are hidden and system files) will also not be found on drive C:. Task: transfer the bootloader from drive D: to drive C:, that is, ensure compliance with the above conditions.
Usage installation disk or disk Windows recovery 7
With these disks, transferring boot files is easy. Physically disconnect the "unnecessary" hard drive, boot from the disk, setting it in the BIOS CD-DVD drive first boot device, enter the recovery environment. After scanning and searching for installed operating systems is completed, perform Startup Repair. The recovery program will prepare in the right way hard drive and copy it to it necessary files. After a reboot, downloading will be restored.
If you do not have either an installation disk or a recovery disk, you can use the method described below.
Transferring boot files using the bcdboot.exe utility
Conventionally, we can divide the upcoming operation into three stages, corresponding to three necessary conditions successful download.
1. Make the disk active. There are two ways to make the desired section active.
First: go to the Disk Management snap-in (Win + R, in the Run line, type diskmgmt.msc and click OK) and see what letter is assigned to the first left partition of the disk that you plan to keep. We will make this partition bootable and active: right-click on the selected partition and select context menu"Make the section active." Please note that this section must have a "primary" attribute.
Second: Run Command Prompt with Administrator rights. All commands discussed below will be executed sequentially without exiting the command line.
Code:
DISKPART
list disk
seldisk X
list partition
sel part 1
active
exit
where X is the number of the disk that is supposed to be left in the list of disks (list disk command).
2. Rewrite the bootloader (MBR) (make it compatible with bootmgr):
To do this you will need the bootsect.exe utility. Download and unpack it in advance, for example, into the root directory of the C: partition.
Code: [Select]
c:\bootsect /nt60 All /force
note: experience shows that if there are 2 or more HDDs in the configuration, the /force key is required.
3. Transfer the BCD and bootmgr file to the new active partition:
Code: [Select]
bcdboot %Windir% /l ru-Ru /s C: (maybe C:\windows\system32)
Key /l - select the language parameters of the boot manager. If your system is not Russian-language, use other values for this key, for example, for in English- en-Us, for German - de-DE, etc.
The /s switch specifies the volume letter assigned to the target system partition to which the boot environment files are copied. This is the section that we have made active. Because the command firmware defaults to the current system partition(before removing the hard drive - this is partition D:), using this key with the letter of the intended boot partition is mandatory!
Checking and editing BCD
Run the command
Code: [Select]
bcdedit /store C:\boot\bcd

Based on the results of the command, check the parameters (underlined in the screenshot):
* in the "Windows Boot Manager" section, the device parameter must be equal to the letter of the new active partition, in our case - C:.
* in section " Booting Windows"The device and osdevice parameters must be equal to the letter of the partition on which the Windows directories are currently located. In our case, this is also C:.
* in case of discrepancy, please enter necessary changes using commands:
Code: [Select]
bcdedit /store С:\boot\bcd /set (bootmgr) device partition=С:
bcdedit /store С:\boot\bcd /set (current) device partition=С:
bcdedit /store С:\boot\bcd /set (current) osdevice partition=С:
Usually there is no need to run commands, but it doesn't hurt to check.
So, moving download files to another drive is not such a difficult task.
Instead of a conclusion, or "Russian-language multiboot menu"
Due to the fact that the startup recovery program running from the recovery environment uses the default parameters, the boot manager language becomes English. If there is one bootable system, this is not noticeable, but if there is a multiboot menu, it is noticeable. If you are not satisfied with this, run on the command line:
Code: [Select]
bcdboot %Windir% /l ru-Ru
You need to run it after transferring the download files to new section. If it doesn't start after that:
Options:
1. as said above - pull the cables on the hard drive.
2. The bootloader has crashed or a required component is missing:
a) insert the disk with the operating system distribution.
b) select language settings.
c) click system restore.
2.a. If there is no "System Restore" in the menu that appears:
=> Boot into the command line and run bcdedit.
Most likely you will see device unknown and/or osdevice unknown.
Then you need to run the commands:
bcdedit /set (default) device partition=С:
bcdedit /set (default) osdevice partition=C:
P.S This is if, as EXGNF said, it’s not a dead screw.


