Windows 7 boot file for flash drive. Five programs to create a bootable USB flash drive
Fastest creation Bootable USB flash drive with Windows 7. Three working methods. The first method is about creating a bootable USB flash drive with Windows 7 of all editions, including 64-bit.
Perhaps you were looking for:
How to install/reinstall Windows Xp from disk
How to install/reinstall Windows Xp without a disk (from a flash drive)
How to install/reinstall Windows 7 from disk
How to install/reinstall Windows 7 without a disk (from a flash drive) +UEFI
How to install/reinstall Windows 8 from disk
How to install/reinstall Windows 8 from a +UEFI flash drive
How to install/reinstall Windows 10 from a +UEFI flash drive
How to install/reinstall Windows 10 from disk
Before reading this article, I recommend that you read the article on what to do before reinstalling Windows
What is needed to create a bootable USB flash drive with Windows 7
- Flash drive with a capacity of at least 4 GB
- Iso image of Windows 7
- Ability to install simple programs
Creating a bootable USB flash drive Windows 7 32/64 bit + UEFI (Rufus 1st method)
So, I haven’t updated this article for a long time, although I admit I should have! So, today I will add another way to create a bootable USB flash drive with Windows 7 32/64 bit using the rufus program
Download rufus
Super! Second point! You need Windows. I can't tell you which one is best for you. I know that you need to download the OEM version (pure Windows) and activate it with your original key. If you don't know where to look for Windows, watch the video at the beginning of this article.
So, Windows 7 32/64 bit (one of them) was downloaded, rufus was downloaded. Now insert the USB flash drive with which you will make bootable Windows 7 + UEFI if necessary
Launch rufus.
Attention!
When you create a bootable USB flash drive with Windows 7, the data from your FLASH DRIVE will be deleted.
If you have UEFI on a laptop or stationary, select everything as in the screenshot
By the way, if you are choosing and thinking between a 32-bit and a 64-bit system, then the instructions for creating a bootable flash drive are the same
If you have a regular BIOS, then the NTFS flash drive format is also suitable (UEFI does not read NTFS at boot) 
Super! Now click on the disk and select the image with our Windows 7 system in iso format 
Now let's press start! 
In 10-15 minutes our Bootable USB flash drive with Windows 7 + UEFI ready and we can start installing the system from a flash drive!
Creating a bootable USB flash drive for Windows 7 32/64 bit without UEFI - method 2
To record its operating system, Windows Corporation has created a special utility called Windows7-USB-DVD-tool, which is intended specifically for creating a bootable USB flash drive with Windows 7. Download the Windows 7 USB TOOLS utility
Download Windows 7 USB TOOLS
We install it on our computer. If there is no icon on the desktop, then go to Start -> All Programs -> Windows 7 USB DVD Download Tool -> Windows 7 USB DVD Download Tool. After starting the program, insert the USB flash drive into your computer if it is not already there.
Click Browse and select iso. 7 image and click open 
Select our Windows 7 image 
After selecting the image, click Next 
Select USB device 
In the list of suggested devices, select our flash drive and click Begin copying. If it is not formatted, then the program will automatically format it
Warning: This will delete all data from the flash drive. Be careful
The data has started to be copied. If you did everything correctly, the message Backup completed will appear at the end. 


Ready! Bootable USB flash drive with Windows 7 - created!
How to install Windows 7 from a bootable USB flash drive?
Installing Windows 7 from a bootable drive, is no different from a regular installation from a DVD. The only step we need to take is to set our flash drive in Bios, in hard drive priorities, so that loading starts from it [Don’t know how?], and then install Windows 7 as usual!
Gone are the days when to install a system you needed a DVD, which in turn could get scratched and freeze during installation. A bootable USB flash drive for Windows 10, Windows 7, Windows XP for installing the system on your computer will be faster and more convenient. Let's create a bootable USB flash drive using Rufus And . When installing the system, I recommend inserting the drive into the rear USB ports of the computer.
Let's start the procedure for a PC with a UEFI bios (you can read the types of bios) because They may not be suitable for old computers and laptops; for older PCs we will consider them below. Using Microsoft's own utility. Download Windows 10 Installation Media Creation Tool, run the downloaded program and select “Create installation drive”.
- There should be a checkmark, then it will automatically adapt to your system.
- You can manually select what you need; to do this, you need to uncheck the box in step 1.

- We indicate the medium that will be a USB device.

- You specify (select) the path to the device. We are waiting for the download and recording to finish. That's all!!!

Windows 8.1 installation drive
Download Windows 8 Installation Media Creation Tool similar situation. We do as described above with the tenth version.
Create a bootable USB flash drive for Windows 10 without programs
Let's look at the option without programs (suitable only for UEFI bios). You will need a downloaded distribution in ISO format and a USB drive formatted in FAT32.
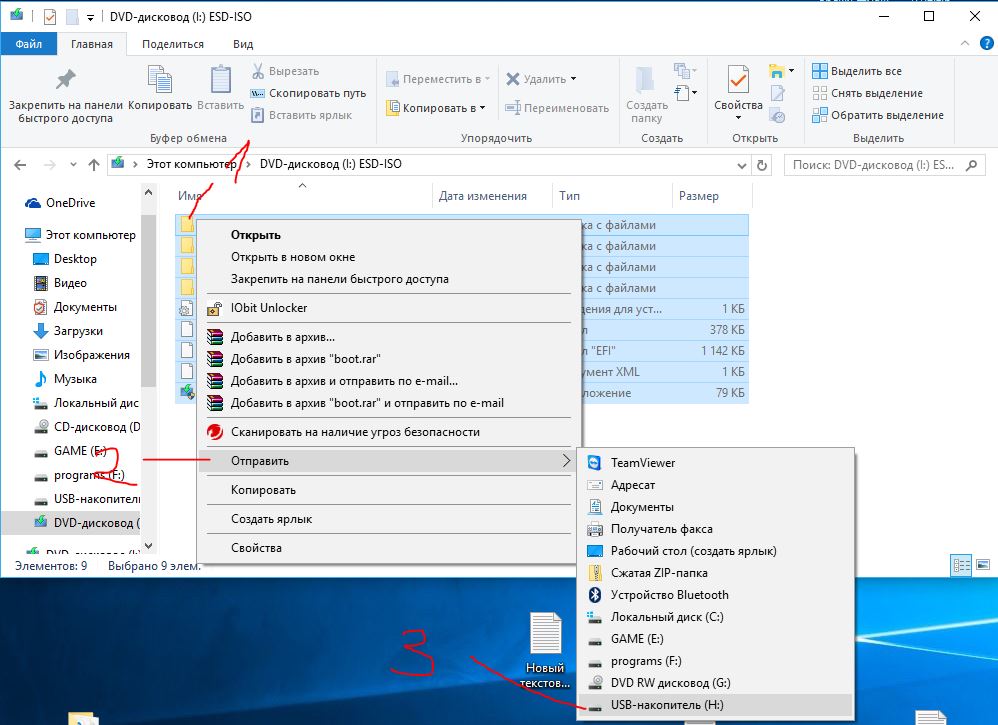
- Select the windows image and right-click on it.
- In the context menu, click "connect".
- A disk like the one in the picture with Windows files and folders will appear.

- Circle (select) everything and right-click on the file or folder.
- Click "send" in the context menu.
- Select a USB device.
Create a bootable USB flash drive for Windows 10, 7, XP using Ultraiso
The seventh version is old, so we will create Windows 7 installation media using the UltraISO program. With this program you can also burn Windows 10 and XP to a USB flash drive. Download the program and install it.
- Open our downloaded image with Windows 7, 8, 10, xp.
- Make sure the disk icon is highlighted.
- Select "Burn Hard Disk Image".
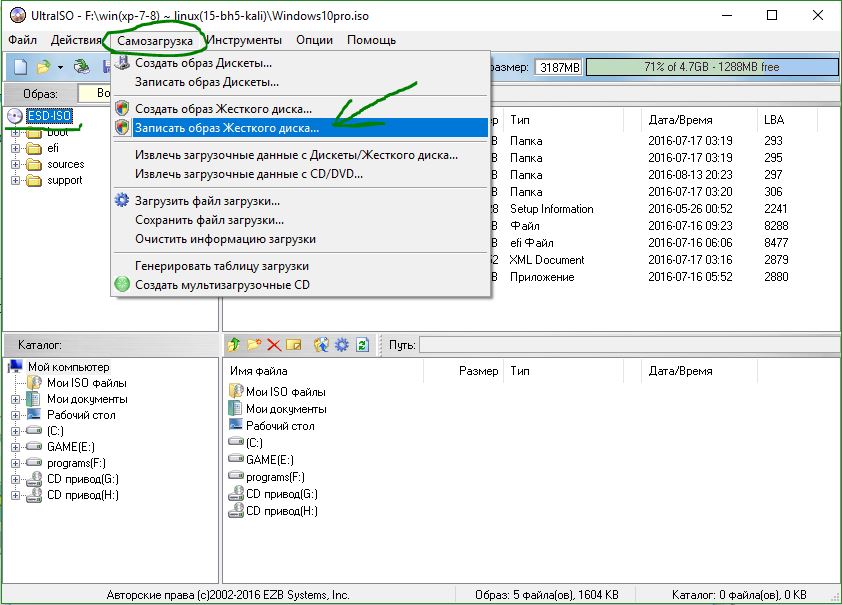
- We look carefully to see that he is standing USB drive so as not to format your hard drive.
- Select the recording method "USB-HDD+". (When booting the computer, select USB-HDD+ in BootMenu).
- Click "record".

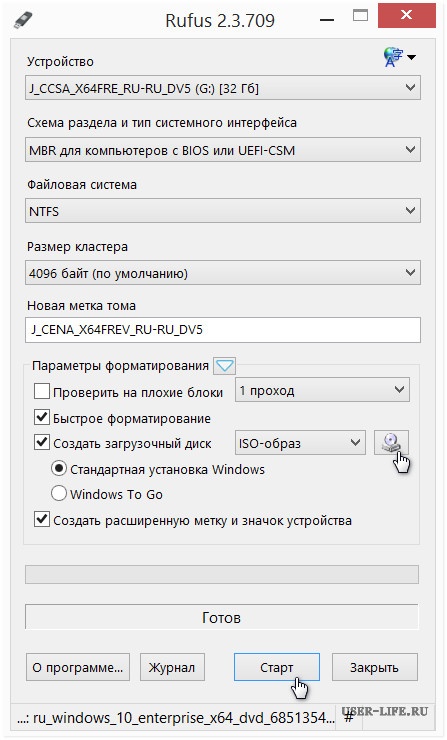
Bootable USB flash drive for Windows 7, 10, XP using Rufus
If your old bios is not uefi, then Rufus is created for this. Suitable for all versions of Windows. Select in the "Partition layout and system interface type" column: For old BIOS, select MBR. For modern UEFI. Download and install the rufus program.
Bootable Windows 7 USB flash drive using USB/DVD Download Tool
A utility from Microsoft created in ancient times is very relevant to this day to create Windows 7 installation media using the Windows USB/DVD Download Tool. Download and install on your computer.
- Select USB drive.

- Click "Erase".

- We press “Yes”, it formats the drive, writes it, and everything is ready.

Create a high-quality product that works without glitches Windows 7 bootable USB flash drive , as it turned out, is not entirely easy. Having tried a bunch of programs, you could become completely disappointed in this thankless task. But then Windows Corporation decided to help us all with this difficult task, and released a specialized program, Windows 7 USB/DVD Download Tool.
This is an excellent helper in a situation where the device you need physically does not have a DVD drive or it does not work. Then installing files and unpacking images can only occur when using a USB flash drive. The Windows 7 USB/DVD Download Tool allows you to create a bootable USB flash drive in just a couple of mouse clicks. All that is required of you, after installing this program and launching it, is to follow the step-by-step (step-by-step) instructions in the program window.
Create a flash drive with an installation image
Creating a flash drive with an installation image, having in your arsenal the Windows 7 USB/DVD Download Tool, will take you very little time. The classic interface of the program is very accessible and easy to understand. The whole process is divided into four steps, thanks to which you will definitely not get lost and will do everything correctly:1. Specify the path to the Windows image

2. Then specify the type of removable storage: USB or DVD

3. Then specify the path to the drive
Make a bootable USB flash drive with Windows 7
Where to download the Windows 7 image - watch the video below
Very often, when reinstalling Windows, you need a bootable USB flash drive with Windows 7. How to do it? The process itself is not complicated, but let's try to figure it out.
Here we will describe 2 very different methods in order to create a bootable USB flash drive from an iso image.
We will analyze everything from beginning to end, we will try to clarify all the details of creating a bootable installation flash drive with Windows 7
We also recommend reading the article on how to properly install Windows from a flash drive; sooner or later it may come in handy. All programs used here work perfectly under windows 7, 8, 10.
The 2nd method is also very noteworthy; with it we will make a bootable Windows 7 flash drive without any programs, using the Windows command line, although it is noticeably more complicated.
It is important to keep in mind that the USB ports must be in order (or at least one of them is what we need). The fact is that if we use a faulty USB, then there may simply be a loss of contact and nothing may work out. Plus, of course, the flash drive should also be in order, in general, keep this in mind.

Original Windows 7 images for flash drive here: http://nnm-club.me/forum/viewforum.php?f=504
Let us clarify the following points when creating a bootable USB flash drive with Windows 7:
- First we need to find a windows iso image(to do this, in any search engine we write - download Windows 7 torrent, download one of the proposed options using the free torrent program. However, do not forget that you have a good antivirus, plus you can download only from trusted sites, ask your friends and acquaintances about such ). We will assume that we have found
- Let's move on to the flash drive, we will completely clear it, so copy all important data from it in advance
- Also, don’t forget about the size of the flash drive.. You need at least four GB, although more correctly it is no less than the size of the iso image
How to make a bootable USB flash drive for Windows 7-10? Step-by-step instruction
Now let's prepare the flash drive, for this we need to format it. We do it like this:
- We go to “My Computer”, find the flash drive we need there
- Right-click on it
- Select "Format"
- In the window that appears, you can also check the box for “Quick, clearing only the table of contents” - this will be quite enough in most cases
- That’s it, click “Start”, an additional warning may appear, we agree
- We wait for the process to complete (usually no more than a minute)
- At the end, the flash drive is ready for further actions, it is completely empty

If you have any questions with formatting or would like to learn more about this important and useful process for information storage devices, we recommend that you view the corresponding section. In which, by the way, you can select a program for formatting a flash drive, if it does not want to succumb to this process in the standard way (as described above), plus with the help of additional programs for formatting a flash drive, you can improve its technical condition.
Now we are almost close to the process of creating a bootable USB flash drive with Windows 7, for this we will consider a very interesting and simple program .
Download the original ISO image of Windows 7
The simplest, most convenient and free program to solve our problem is Windows 7 USB/DVD Download Tool
Very convenient, bootable fleshka is done in just 4 clicks, and it can also be made into a boot disk.
Or you can do it from the official website using this direct link http://wudt.codeplex.com/ (copy, paste into the address bar of the browser and press enter).
The Microsoft .NET Framework_Online_Setup is also required in the system (completely free, online loader, which means the Internet must be turned on), usually this utility is already installed in different windows assemblies. In general, this is an official application from Microsoft, it is also important for the operation of other programs and games.
And so, you downloaded Windows 7 USB/DVD Download Tool. Now install it.
Open the program. We see this window.

Click on “Browse” and look for the Windows iso image we need on the computer.

Now if you specified an iso image, click “Next”. Now click on “USB device”.

Here we click on “Begin copying”.

And so began the process of recording an ISO image of Windows 7 onto a USB flash drive. We are waiting for the end.
The Windows 7 bootable USB flash drive is ready.
We recommend that you read the article on how to properly install Windows 7 on a netbook. So you will know what to do if the question arises of reinstalling Winows 7 on a netbook, laptop or computer without disk drive.
The second method is not simple. It is interesting for those who do not want to install any additional programs on their computer
This method uses the Windows command line, through which, by the way, you can do many more interesting things.
And so, let's go. We connect the flash drive to the USB port. Please note that a 4 GB flash drive will be used here. Open the command line like this, “Start” - “Run”:

Enter the command “cmd” and press “Enter”:

This is what should appear:

The first command we enter is “diskpart”, a special editor that gives us the ability to manage disks, press “Enter”:

Now we write “list disk” and press “Enter”, thereby getting a list of devices:

Now you need to determine without errors where your flash drive is located, in our case it is “Disk 3”. It most likely will not match yours, just make sure that you have found your flash drive correctly. If you have, for example, a flash drive “Disk 1”, then write it in the line and press “Enter”.
Attention! If you do not correctly identify the flash drive, you can format one of your hard drives and lose all the information on it.
- So, enter “select disk 3″, press “enter”
- The program detects our flash drive
- Now enter “clean”, which will delete files on the flash drive, press “enter”
- Next, enter “create partition primary”, press “enter”
- With this command we created a section
- Now enter “select partition 1”, press “enter”
- Now enter “active”, again “enter”
- Now we need to make the file system format for the flash drive NTFS by formatting it using “format fs=NTFS” or for quick formatting we write “format fs=NTFS QUICK”, press “enter”
- We are waiting for the completion of the formatting process
- All is ready
- We write “assign” and the flash drive will automatically receive a letter, for us it is J
- Upon completion, a window with the flash drive will automatically open
- Now we need to exit using the “Exit” command
- That's it, the bootable USB flash drive has been created, now you need to copy all the files from the installation operating system to it
It’s just important to understand that it’s not the iso image that should be copied in one file, but all the folders that are included in this iso image. To do this, you just need to mount it with some program, for example DAEMON Tools.
That's all, we have looked at the question of how to create a bootable USB flash drive with the Windows 7 operating system.
Boot into the Windows PE environment and roll back to a previously created restore point if Windows does not boot, or restore the computer from a pre-created image if it was not possible to resuscitate the system by returning to the restore point. + creating a bootable USB flash drive is much easier than creating a disk. In general, I encourage everyone to use flash drives instead of disks.
Friends! In the previous article about creating an installation disk, I discussed this in detail. Here I will go over the main points.
- I go to http://idimm72.ucoz.net/ and see which version of the assembly is current at the moment
- I'm looking for this assembly on torrent trackers - for example. and I shake her.
After I have an ISO image on my hard drive whose checksums match, I move on to creating a Windows 7 installation flash drive.
You can read and see how and where to download the original image of Windows 7. How to edit a Windows ISO image can be viewed and read in this article.
Windows 7 installation flash drive using UltraISO
Using UltraISO, I am able to make fewer body movements and, accordingly, create bootable flash drives more efficiently. I hope you enjoy this method as much.
Download and install UltraISO

Select additional functions. I don't need a desktop shortcut and an emulator. I uncheck these boxes and press Next >

Click Install

Click Complete

When starting UltraISO, select Trial period...

UltraISO launches. Click File > Open...


Click Format

We check that we want to format the flash drive. My default file system is set to NTFS. This suits me, since I can then add a movie or image larger than 4 GB. I leave the Quick checkbox and press Begin

Before clicking OK in the next window, it’s time to check and copy all important data from the flash drive. Once this is done, click OK

My flash drive is used for ReadyBoost technology, so another warning is issued. I press Yes

Wait for formatting to complete and click OK


We check that in the Disk Drive field the flash drive that we formatted is selected. Click Write down

A warning appears that all information that you can still try to recover will be deleted or overwritten. Click Yes

The process of creating a Windows 7 installation flash drive will begin.

Close the image recording window with the button Back or with a cross at the top right

Close UltraISO.
The Windows 7 installation flash drive has been successfully created.
Using UltraISO you can also create an installation disk.

If you inserted a DVD-RW, you can erase it first, then select the writing speed. Typically, high-quality discs are obtained when recording at a speed two times slower than what is written on the disc itself. I have 8x on my disk, so I set it to 4x. Click Write down

Must receive an installation disk.
Bootable Windows 7 USB Flash Drive Using Windows 7 USB/DVD Download Tool
Let's find and download this utility.

From the drop-down list, select the desired flash drive (if you have several inserted) and click Begin copying

Now is the time to check the flash drive for important data and copy it to a safe place (Dropbox for example). To erase the flash drive, click Erase USB Device

Another warning about data loss on the flash drive is displayed. Click Yes


