What kind of image viewer program is it? FastStone Image Viewer: detailed review
FastStone Image Viewer- a free program for viewing, organizing, editing and converting images. In addition to the function convenient viewing, the program contains necessary tools for working with images.
IN FastStone Image Viewer has built-in image manager functions for organizing storage graphic files on the computer. FastStone Image Viewer is free for non- commercial use.
The FastStone Image Viewer photo viewer has many useful functionality, works quickly, the application is simple and clear interface, convenient navigation using the keyboard.
Key features of FastStone Image Viewer:
- support for major graphic formats;
- image editing;
- full-screen view with pop-up menu;
- applying effects to the image;
- comparison of images;
- scaling and cropping;
- batch image processing;
- batch conversion (conversion) of images to other graphic formats;
- creating slideshows with more than 150 transition effects and music;
- support for working with a scanner.
In the FastStone Image Viewer program, you can perform the necessary actions with photos: crop, rotate, resize the image, reduce red-eye, correct colors and lighting, set sharpness or blur, add a watermark, apply effects (relief, sketch, oil painting , lens), add a stencil or frame, batch rename or convert graphic files, etc.
The following graphic formats are opened in FastStone Image Viewer:
- JPEG, JPEG 2000, GIF, PNG, PCX, TIFF, BMP, PSD, ICO, TGA, EPS, WMF, CUR.
Saving is done in the following formats:
- JPEG, JPEG 2000, GIF, PNG, PCX, TIFF, BMP, TGA, PDF.
The program supports different kinds RAW format for popular cameras:
- CRW, CR2, NEF, PEF, RAF, ARW, SRF, SR2, MRW, RW2, ORF, DNG.
All operations to change image parameters are carried out in separate windows. You can immediately see the result and, if necessary, cancel the changes.
You can download the FastStone Image Viewer program from the official website of the manufacturer, FastStone Soft. The download page contains a regular version of the program, which is installed on a computer, and a portable version, which does not need to be installed on a computer. Portable version applications can be launched from a computer or removable media, for example, from a USB flash drive.
download FastStone Image Viewer
FastStone Image Viewer running in the operating room Windows system in Russian.
FastStone Image Viewer Interface
At the top of the FastStone Image Viewer main program window there is a menu bar for controlling all actions in the program. Below the menu bar is a toolbar with the most popular tools needed to work in the application. Call necessary functions carried out by pressing the corresponding buttons.
On the left is a folder tree resembling Windows Explorer. Under the folder tree there is an area preview.
Most of the window is occupied by the area in which the open content is displayed, in this moment, folders.
FastStone Image Viewer Settings
You can enter the settings of the FastStone Image Viewer program from the “Settings” menu, or using the F12 key. Here you can change given parameters default program operation: change file associations, adjust the magnification ratio of the Magnifier, change settings for saving files in JPEG format, etc.

You can add the “Browse in FastStone” item to the Explorer context menu. To do this, go to the program settings (F12), in the “Settings” window, open the “Associations” tab, check the box next to “Add the “Browse to FastStone” item in the Windows Explorer menu.”
Full screen mode in FastStone Image Viewer
After switching to full screen mode (context menu item “Full screen”), it becomes possible to view individual images on the entire screen. In this mode, all the program's capabilities for editing, sorting and processing photos are available.
Move the mouse cursor to the edge of the monitor screen to access necessary functions(separate program controls will pop up at each part of the screen edge).
Using the Loupe tool, you can zoom in on a specific area of an image to see more detail.
Taking a screenshot in FastStone Image Viewer
Using FastStone Image Viewer, you can take screenshots (screenshots) without the help of other programs. The Screen Capture function is accessed from the File menu, or by clicking the Screen Capture button on the toolbar.
Select the desired context menu item:
- Capture active window - a screenshot of the active window will be taken.
- Capture window/object - the window or object will be captured in active window, which is highlighted with a red frame when you move the mouse cursor.
- Capture a rectangular area - capture an arbitrary rectangular area on the monitor screen.
- Capture an arbitrary area - capture an arbitrary area on the monitor screen that is selected by the mouse cursor.
- Full Screen Capture - A snapshot of the entire screen.
Select save location:
- In the viewing window - by default the file opens in FastStone Image Viewer.
- To clipboard - the file is saved to the clipboard, from where it can be pasted into a program or document.
- To file - the screenshot is saved to a file on your computer.

Slideshow in FastStone Image Viewer
Create a slideshow in FastStone Image Viewer for playback using the program, or a slideshow in an EXE file for later viewing of photos without using the program.
First, we will create a slide show to view in the Fast Stone Image Viewer window.
On the toolbar, click on the “Slideshow” button. In the Slideshow window, select necessary settings.
If you do not need information about image files, uncheck the box next to “Show text (name, date/time and EXIF)”. Set the playback order (autoplay, random, repeat in a circle, autoplay by folder).
Add music. Check the box next to “Music”, and then click on the button that appears.

In the “Settings” window, in the “Music” tab, using the “Add” button, select an audio file (or several audio files) from your computer. The program supports the following audio formats: MP3, WAV, MIDI, WMA.
Use the Up or Down buttons to place the audio files in the desired order.

Click the button to select effects. Select desired effects, their duration, see what it looks like in the preview window.

If necessary, configure the display of text in the slideshow.
After completing the settings, click on the “Start” button to automatic viewing slides.
Creating a Slideshow File in FastStone Image Viewer
Enter the “Create” menu, click on the “Create slideshow file” context menu item.
In the “Create Slideshow File” window, use the “Add Files” or “Add Folders” buttons to add images or folders with images.
Add music, the necessary effects, customize the display of images according to your preferences.
You can create an initial window to launch the file. In the initial window, add a title, description, select a cover photo, add, if necessary, “List” and “Export” buttons.

The slide show file will be saved to your computer with the selected name. To start playing the slide show, click on EXE file, and then in the initial window click on the “Play” button.

Conclusions of the article
Free FastStone program Image Viewer is designed to view, edit and convert images. The application performs the necessary actions to organize photos, edit images, batch processing, converting image files to other graphic formats, the program supports creating slide shows.
To make interaction with the program as convenient as possible, you will need to make basic settings when starting it.
To open the settings window, you can take the following steps:
- Open the program settings menu in the settings menu,
- click on the icon quick access to the settings at the top of the preview,
- Click on the “F12” key.
Using one of these principles, call up the settings window, which looks like this:

Let's deal with everything one by one.
View is the widest menu. The initial folder helps to open in the preview area system folder, which in turn improves the software loading speed. You can also set the auto-opening of the folder that was last used in dialogues. You can also select the optimal folder from file manager programs.

Users can also change the viewing background and full screen background. To do this, you need to click on one of these LMB settings. The system will display a palette of colors from which you can choose the option you like.

The following line helps enable or disable the file information that appears in full screen mode. In this case, editing fonts, display positions and other text parameters is allowed.

By checking the box “File name on full screen: background", the user will be able to highlight the file name in a convenient color in full-screen display mode.

The rest of the functions on the left side of the settings panel are relatively self-explanatory, so we won't focus too much on them. Basically, this is where you configure the optimal display of the program menu.

IN right side screen you can make the following settings:
- Associated files can be opened in overview, windowed or full screen modes,
- scale photos to optimal size(several options for performing similar actions are available),
- set measurement units in inches or centimeters,
- assign commands to the arrows on the keyboard of your working computer according to your convenience,
- Assign commands to the mouse wheel,
- set preferred commands for mouse buttons,
- optimize the principles of moving files and copying them,
- confirm the need for confirmation when deleting files or moving them to the trash,
- establishing the basic principles of program interaction with personal computers with touch screens.

Tab " Miniatures» is intended for installation and settings of the principles of design and storage of thumbnails that will be displayed in preview mode.

The setting helps you work with the preview database, which is located on the device’s hard drive. The user will be able to independently set the optimal storage location, but it is still more rational to choose the system folder.
In the thumbnail browser window you can set:
- thumbnail display sizes,
- miniature frame type,
- background color of the menu with their display,
- file name color scheme,
- color design of the frame around the photo miniature,
- the color on which the frame will change when selecting a specific thumbnail,
- the color of the frame that will symbolize the dragged thumbnail.

By checking and unchecking the boxes in the settings, the user will be able to indicate whether he wants the file name to be displayed. If such permission is given, a special window will be displayed that allows you to set the preferred color of the label.
You can also activate the display of four previews on the folder icon or display the folder icon.
By selecting video thumbnails, the user can work through a demonstration of the captured frame or text that helps describe the specified file.
At the bottom left there is a menu for setting the display of the file manager area. Here you can change the colors of the text and background. If you click on the tracking option, the system will show changes to the directory tree.

On the right side of the thumbnail settings window there is a thumbnail preview menu. It is there that the user will be able to view the basic principles of changing the settings of these elements and set the optimal one for themselves color scheme display.

The Loupe tab helps you set the following parameters:
- Multiplicity of thumbnail display,
- magnifying glass size. So, it can be set either in full screen or enlarged by percentage.
- Magnifying glass shape. This is not only the familiar circle, but also rectangles.
- Magnifying glass background color. You can set it using the color menu by clicking LMB on the color field next to the name of the function itself,
- Activate smoothing mode. Allows you to straighten the design along the edges.

Tab " JPEG» is intended for setting the quality and overall size of files that will be saved in the appropriate format. Moreover, you can either improve or deteriorate the original quality of the photo.
If the user does not want to change these parameters, you can check the box next to saving them at the original level.
Color subsampling is a special photo encoding method that reduces color resolution. The program itself helps set the optimal compression level. In addition, it can be turned off at almost any time. In this situation, the photo will be saved in higher quality.
"Optimize Huffman Table" is a menu that enables optimal encoding and minimizes redundancy.

Tab " RAW» controls views of raw files in embedded thumbnail format. It can be opened either in full size or in a compressed version.
Batch conversion such files are permissible in this same mode. It can also be activated in both half and full size.
If you want to open a full-size drawing without unnecessary actions, click on the “A” button.
When choosing full or half display, try to do additional settings: Activate or disable color interpolation, display photos with auto white balance, change brightness levels and other picture quality settings.

Tab " Second monitor» can connect additional monitor for parallel viewing of thumbnails and full screen display.

Tab " CMS» turns the color management system on or off.
It is important that using this option slows down the loading of photos. The function can also work exclusively with files JPEG format and TIFF, since they have a built-in ICC profile.

Tab " Associations» allows you to integrate the program into the menu of additional file managers. If the user wants to enable this option, he will need to click the checkbox next to the function “Add the Browse in FastStone item to the Windows Explorer menu.”
This tab will allow you to designate the program we are considering as the default software for files with the specified extensions. This way we can not only redirect them to be opened by the program, but also process them further. If you want it to open all the suggested files, you can quickly mark them with the “select all” button.

Tab " Favorites» will display a menu listing the names of the selected folders and their locations. If you click on the name, you can delete such a folder using the corresponding button.
By clicking on the “Add” option, you can display a file manager in which you can select additional folders and move them to your favorites list.
You can move through the list using standard computer navigation buttons.

Tab " Programs» opens access to a menu in which you need to specify additional program to process such files. If you click on the name of such a program, you can remove it using the corresponding function.
To add new external programs, click on the button of the same name. So the system will display a manager that contains all the software available for this.
The “Clear” button will help you remove all programs from this list. You can navigate through the list using standard navigation buttons.
In this window, the developers left a note that if you click on the button to go to additional editor, the very first program in the list will be opened (if there are several available at once).

Tab " Music» allows you to combine a folder with audio files that are often used by the user to develop slideshows. By clicking on “Add”, the user will be able to see the Explorer window from which he will have to select the right music. To delete a track, click on its name and the function of the same name. To clear all files, press the corresponding key. Moving through the list is carried out using standard navigation buttons.
Pressing the “Start” button activates playback of the audio recording.

All user-made settings can be reset at any time using the “Reset” button.

This concludes our introduction to the settings and settings of the program. In the following reviews, we will take a closer look at the main nuances of working with the FastStone Image Viewer program.
Image viewer is fast, stable, image browser, converter and editor.
We continue to get acquainted with the interface of the FastStone Image Viewer program.
Left area of the interface: the browser itself, displaying a tree of disks, directories and files. Navigation is carried out by scrolling with the mouse wheel or using the slider.

Below is the “Preview” window indicating the size in pixels, file size, extension, name and time of saving the file. It displays the selected image. The window can be minimized and expanded, change display modes: 1:1, fit to window and full screen. When you hover the cursor over an image, its pointer changes its display to the “Magnifying Glass” icon; by clicking the left mouse button, the display automatically switches to a 1:1 scale.

If you select a video file in the preview field, then from the preview window by clicking on the “Play” icon, the work will begin in the preinstalled video player.

Right area of the interface: its central part displays a preview of the folders, files or images you have selected in the file manager.

By hovering the mouse cursor over an image of a preview, its name and extension, date and time of saving, dimension in pixels and volume are displayed.

By left-clicking on it, select this file for further processing. Parallel preview image of this file appear in the window preliminary inspection, where you can view it in more detail using the Loupe tool.
At the top of the preview window there is a line of the path to the location of the selected file. In it you can view the history of files used by clicking on the button that expands the field with the browsing history. To the right of the line of browsing paths there is a functional button “Trash”; by clicking on it you can clear your browsing history.

At the bottom, under the preview field, there is a line where it is noted how many folders, files and their total size, as well as the number of selected files.

Above the preview window there is a line with quick access buttons:
˗ moving up directory tree,
˗ preview window updates,
˗ adding to the “Favorites” folder and setting up this folder,
˗ creation new folder,
˗ copying to the specified folder,
˗ moving to the specified folder,
˗ deleting selected files.

Next are the functional buttons for displaying a list of files, either in the form of thumbnails or detailed list indicating the file attributes, or simple list with listing.

Even further to the right is a button for selecting displayed files related to graphics, video, or displaying all of them. Extreme right key sort files by name, volume, date, size or file type.

Three buttons located on the right top corner interface, allow you to change the location of program elements (areas) in the display window. We can choose a “standard” arrangement of program windows, an arrangement with a sequential horizontal arrangement, or display only the preview window on the entire screen and top panel management.

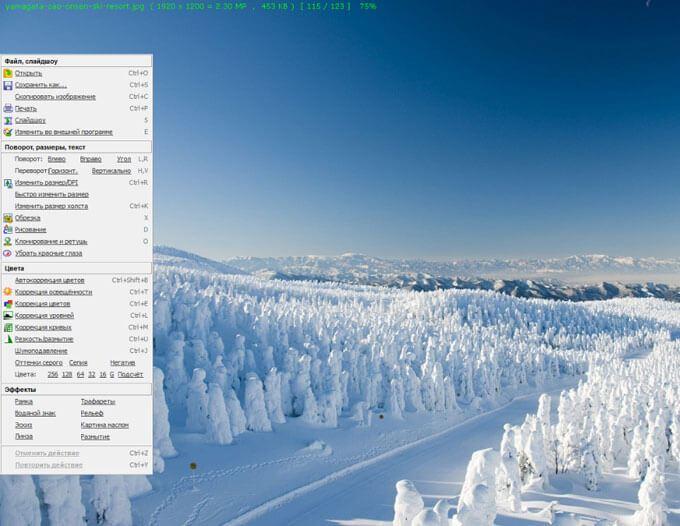
And the last button of the program interface expands the selected image to full screen viewing mode.

Once in full-screen viewing mode, we see an image with the scale that you specified in the settings. A line with the file name, its size and scale will be displayed at the top.

By touching one of the edges of the screen with the mouse pointer, auxiliary panels drop out.
Top: A ribbon with folders and files nested within the folder selected in the folder tree. You can move around the ribbon by scrolling with the mouse wheel or slider.

The folder tree itself can be viewed or selected from it required file by clicking the button that expands the panel with the file manager directory (bottom left).
By clicking on the button, the “Image Properties” panel will open at the bottom right, which contains file attributes, bookmarks with EXIF data, histogram, JPEG comments.

On the left side: a panel that contains the tabs “File, slide show”, “Rotation, sizes, text”, “Colors”, “Effects”.

At the bottom of the screen: a navigator window and buttons for quick access to the main functions of the program.

The program provides great assistance in cataloging, converting and processing your images. It has a full range of functions for correcting and processing images, including printing or posting on social networks.
This is where we finished our acquaintance with the program interface, which, along with its functionality, is quite intuitive and easy to use.
Continuation of the story about the program in lesson 3.
If you don’t want to miss interesting lessons on working with images in Photoshop and others useful materials- subscribe to the newsletter. The subscription form is below.
Hello, dear readers of the blog site. Today I want to talk about pretty useful utility called FastStone Image Viewer. In fact, this is an analogue, but applied only to images.
From the name, it probably becomes clear that this is definitely a viewer (), but the functionality is not limited to this. Although even regarding its main functionality, it is ahead of many of its competitors.
In addition, even a novice computer user can easily post them on the Internet ( digital cameras generate photos of monstrous sizes), crop them if necessary (for example, crop them to fit the photo paper format), and also reduce their weight (compress).
Download and customize FastStone Image Viewer to suit your needs
Do you know Photoshop or any other graphic editor (for example, his)? Then this will not be a problem for you.
But I, for example, am still with raster graphics to “You” and therefore for me FastStone now serves to a greater extent not as a viewer, but as a the simplest graphic editor, which helps me reduce the size of images (even in batches), optimize their weight or add watermarks, if necessary. Yes, and inserting inscriptions or any other explanations into a photo using it will also not be at all difficult. But let's talk about everything in order.
Last Current version The program number is 4.8 and you can download it completely free from the following link:
True, in the case of commercial use of this program, you will have to enter into an agreement with the author and pay a certain amount. But this, naturally, does not threaten us. Except regular version You can download it from the official website FastStone Image Viewer 4.8 Portable, which does not require installation in operating system, and it can be placed on a flash drive for working with photos in a convenient and familiar viewer on any computer (and so that your photos do not fall into the wrong hands if it is lost or stolen).
If you still remember what the first versions of ACDSee looked like (modern incarnations of this viewer are monstrously bulky and clumsy), then the Faststone interface will seem very familiar to you. It arises (the similarity will increase even more if from top menu select Settings - Interface theme and change the skin to classic).

Almost identical actions for switching to full-screen mode for viewing individual photos (double-click) and switching between images from open folder in this very full-screen mode (mouse wheel or arrows). Well, exiting full-screen mode is done using the same Enter or Escape keys.
However, the developers of FastStone Image Viewer significantly improved the usability of our viewer and added four full-screen pop-up panels on each side. Actually, the first time you try to open a photo in full screen, the helpful program will inform you about this:

When you move the mouse cursor to the top edge of the screen (assuming that you are currently viewing the picture in full screen mode), a panel will appear with thumbnails of all the photos that live in the same folder as the one you are viewing. But not only that.
At the top there will be a panel with tool icons that will allow you to navigate through various folders on your computer, move or copy there this photo, produce simple steps above open image(rotate, delete, print, etc.), start a slideshow or compare several photos:

If you move your mouse to the right edge of the screen, you will find out all the ins and outs of the photo you are viewing - its size (weight), resolution (width and height in pixels), the name and location of the file with the image you are viewing and other information, right down to what the camera leaves when shooting .
From the bottom edge of the FastStone Image Viewer screen (when viewing a photo in full width) you can find a panel with tools, similar to the one we already had the honor of seeing when we touched the top edge of the screen with the mouse. And finally, the most delicious thing, in my opinion, lies behind the left side of the other world:
What is there? And changing the size of a photo opened in FastStone, and cropping it, rotating it, various filters and overlays. Moreover, all this is designed for novice users (like my blog, in fact), so unnecessary questions usually do not arise when mastering this program. But I’ll still try to deepen and expand my manual about this popular viewer a little.
However, it wouldn't hurt to start go to settings FastStone Image Viewer by selecting the item of the same name from the top menu and adjusting everything to suit you. Most of us have to work with photographs quite often and it would be great if the program for viewing them did not create inconvenience (little things in everyday affairs can be very annoying).

By the way, this Viewer is different in that almost all default settings correspond to my requests (unlike the old ACDSee). Or I made them so long ago that I forgot. However, you are free to experiment with the image viewing mode settings, the size and color scheme of photo thumbnails, magnifying glass settings, associations (those file extensions that will be opened in this viewer by default) and the like. Everything is in Russian and has a fairly accurate description.
At one time I really liked the opportunity to use two monitors for viewing photos, if you have them. You can open a manager with thumbnails on one monitor, and a photo in full-screen view on another, which adds clarity and ease of use. I have a large diagonal TFT TV installed as a second monitor for all the computers in the house.
So, you can set the settings so that the FastStone Image Viewer program open on your main monitor displays the slideshow you are running on another monitor (in my case, a TV), which is an extension of the desktop. Your guests will undoubtedly appreciate this when viewing new photos, although now TVs themselves are capable of playing slideshows from a flash drive, but nevertheless, five years ago it was cool.
Yes, Faststone also understands RAW formats(something like a digital negative) of almost all popular cameras, and you can set in the settings how thumbnails are generated when viewing unprocessed Ravs. Well, also in the settings of this viewer (viewer), you can set external programs for photo editing and select musical compositions, which will please the soul of the audience when viewing the slideshow.
How to reduce the size and weight of a photo (compress it) in FastStone
Changing the image size (its resolution), optimizing weight (compression), and cropping (cropping) are the most popular operations when working with photographs. More than once I have encountered the fact that people simply did not understand why this or that Internet site did not want to accept their wonderful photo, demanding that its weight or dimensions be reduced.
Or rather, they did not understand where and how exactly these shamanic actions could be performed on the images. Some people use online resources for this purpose, but we will go a different route.
Personally, I do this in the program Image viewer Viewer, because everything is implemented there quite simply and clearly. Let's start in order. Let's say we want resize an existing photo or even a whole series of photographs. In many cases, you will be able to resort to batch processing if you need to bring everything to the same format.
But we’ll start with an individual reduction of a photograph (I’m not talking about enlarging it, because in raster graphics this action leads to a serious deterioration in quality), which, for example, was obtained from a modern monstrous pixel camera. At the same time, if you are in full-screen photo viewing mode, then simply move the mouse pointer to the left edge of the screen and select one of three possible items responsible for changing the resolution:

We can say that there are only two options for changing the size of the image itself, because the third option changes the dimensions of the canvas. In this case, the resolution of the photo does not change - when you increase the size, the background area of the color you specify will increase along the edges, and when you decrease it, the photo will be cropped on the right and bottom.
If you need to get photo standard format (for example, to upload to a bulletin board or somewhere else), then the easiest way would be to use the “Quickly resize” item. In this case, you will see a drop-down list with these most standard formats:

They are given both in pixels (resolution - width and height) and as a percentage of the size of the original photo. After clicking on one of the items, the photo opened in full screen mode will change its size. If you are happy with everything, then right-click on it and select “Save As” from the context menu, and if you are not happy, then select another option from the “Quick Change” item.
Yes, if you forget to save a file with a thumbnail image, FastStone Image Viewer will definitely remind you of this (ask a question about its future fate). Well, if you don’t need just any size, but a specific one (for example, equal to the width of the page of your site), then select an option from the left drop-down list "Change size/dpi":

You can set the width or height of the image in pixels, percentage of original size photographs or in inches (indicating DPI - the number of dots per square inch). You can again choose one of standard resolutions from the list below.
In most cases, you won't want to change the aspect ratio of the image, so the "Maintain proportions" checkbox is checked by default. In this case, you can only set the desired height or width of the photo, and the second size will be recalculated automatically so that the photo is not skewed.
Well, if you have a lot of time, you can experiment with filters that will be used to perform interpolation. What it is? Raster image consists of a finite and an integer number of points. When changing its size, most likely, you will not get an exact division into an integer number of points, which is why they are used various methods reduction without visible deterioration in image quality when compressed.
For example, try it with text (read about how and how to do it quickly in) and clearly see my words.
Actually, click OK, and then save the photo with the resized dimensions. From the thumbnail viewing mode in Faststone, you can also get to the window shown in the last screenshot. To do this, just click once on the thumbnail desired image(to select it) and select the “Edit” - “Resize” menu from the top FastStone Image Viewer. The sequence of actions will be the same.
How to compress photos in FastStone Image Viewer
We'll talk about batch changes in image resolution a little later, but now I would like to dwell on the issue of image compression to reduce its final weight (measured in kilobytes). At the same time, you need to understand that there are formats raster graphics, which save original photo with loss of quality (for example, jpg) and without loss of quality (for example, png). By the way, FastStone is notable for the fact that it allows you to work with the jpg format without loss.
In order to understand which file types are best to use when saving images, check out my article about (they are the ones used for uploading photos to). Only one is correct choosing a format can significantly reduce the weight of a photo.
Such images saved in jpg will have color noise at the text border and to avoid this you have to use maximum quality when saving as jpeg, which greatly affects the weight of the final file.
Therefore, screenshots with text (or any other images with sharply contrasting borders) are best compressed (have the least weight) when choosing the Png format (or Gif, but this is somewhat outdated). You will not notice any distortion (unless you later resize this screenshot). Particularly significant savings in photo weight will be achieved by choosing PNG 8 with 256 colors, but this can impair the display of smooth color transitions, so you should always look at the compression result.
But there are times when the Jpg format will be more preferable. This choice will be especially relevant when, when saving pictures, it will be possible to significantly reduce its quality (do not forget that JPG implies a deterioration in quality, which can be adjusted) without fear of visible distortions (for example, this applies to regular photos With smooth transitions colors).
But let's talk about photo compression in relation to FastStone Image Viewer. We have already considered reducing the size (resolution), and it is this that provides significant savings in weight. One of my friends (a smart guy, but he was simply not in the know) unknowingly uploaded several photos weighing five megabytes each to the site and set the width and height of 100 by 100 pixels when inserting them onto the site (if you remember, then for , where attributes and its dimensions are specified).
Everything would be fine, but these pictures took a dozen or even more seconds to load, causing him genuine surprise. He heard that it directly affects the ranking of a site in Yandex and Google, and also affects behavioral factors(read about). He didn’t immediately understand my explanations about the dependence of the image’s weight on its physical resolution, because he thought that the attributes of width and height IMG tag and had to solve all the problems.
That's why first resize the photo up to the permission required for insertion into the site or for its comfortable viewing on the computer. And we are also trying to determine in what format this miracle will have the least weight. How to do it? In Image Viewer I do this in the save dialog (right-click on the image and select “Save As” from the context menu):

As I already said, in the case of screenshots top scores compression is usually achieved when saving as PNG. This is what I select from the drop-down list, and then click on the “Options” button to, if possible, reduce the weight of the image even more, and at the same time see its estimated weight in this format:

As you can see, by default the weight of this photo is PNG format the result was 52 kilobytes (when trying to save in the format JPG weight it turns out the same, but distortions on the letters are already visible and further compression by reducing the quality is no longer possible), which is clearly too much for posting on the site.
But having chosen the PNG option with 256 colors (the so-called PNG 8) I received a reduction in size (weight) photo to a modest and acceptable 14 kilobytes. Beauty. As a result, the weight decreased by more than three times, which will approximately increase the loading speed of my blog page by the same amount. And you say...
If your photo compresses better in JPG format, then you need to use it. In addition, in the Save dialog of the FastStone Image Viewer program, when you click on the “Options” button, you will have the opportunity to lower the quality (thereby reducing the final weight of the image) until the option on the right begins to look noticeably worse than the similar option on the left:

The same can be said about GIF format— to reduce the weight of the photo, it will be possible to reduce the number of colors below the default 256 pieces. Optimal ratio determined again by viewing and comparing the original and the compressed copy. In general, FastStone is quite suitable for photo compression, especially since, in general, you don’t really need to understand it - everything is intuitive and natural.
Other features of FastStone Image Viewer
I also promised to mention batch change photo sizes, so we’ll talk about that now. In batches (simultaneously for large quantity photo) you can do several things in FastStone:
- Rename image files by several types of masks (the same can be done successfully in Total Commander with more big amount mask options)
- Convert a whole bunch of files (you can also different formats) into any one format you need
- Batch reduce the size (resolution) of a whole bunch of photos at once
- Apply a watermark that you prepared in advance to this whole heap, or simply add some text to everything (very useful in terms of subsequent proof for hosters or search engines when dealing with cases or
- Rotate all photos in the desired direction
- Crop all selected images to a specific size
- Enclose them all in the selected frames
- Change brightness and color depth (limit the number of colors used)
- And one more minor thing to do
In order to get into all this splendor, you need to select the items “Tools” - “Convert selected” from the top menu of FastStone Image Viewer (you can also “Rename selected”, because both of these tabs will still be present in the window that opens):

If you only need to rename a group of pictures or change their format, then all the settings are given on these two tabs. Required photos you can select in the left column and add them to the right column using the corresponding button in the middle.
But Image Viewer also supports drag-and-drop from another program (for example, Windows Explorer or Total Commander). Next, select a folder to save the converted files, as well as a mask for renaming or graphic format for conversion.
If you want resize all photos in batch(or do something else from the list above), then you will have to check the “Change settings (dimensions...)” box and click on the “Advanced” button located to the right. As a result, a window will open with an even larger bunch of tabs and settings on them (here you go simple program to view photos):

Make the necessary settings on required tabs and click OK. If you plan to use the same settings again in the future, then save them to a file using the corresponding button located at the bottom of the window. And after all this, click on the “Start” button (see previous screenshot) and go to the selected folder to evaluate the result of the batch conversion.
Also, for all selected photos you can remove meta data(Service - Remove metadata). In addition to those described above, FastStone Image Viewer can do the following things:
- Screenshots of the entire screen or selected area (File - Screen Capture)
- Scan (File - Receive image from scanner)
- Compress the image file for subsequent sending by mail (File - Send by E-mail)
- Crop the photo (for example, removing the same watermark and putting it on the copyright) by selecting required format for its future printing (Edit - Cropping)
- Add arrows, frame highlights, inscriptions to the original photo using the built-in graphics editor(Edit - Draw)
- Remove red eye (also in the Edit menu)
- In the Effects menu you will find the opportunity to add ready-made frames, your own watermarks and other ways to mock your photos
- You can launch a slideshow with music and photos from the folder currently open in FastStone, or create a slideshow file with photos specially selected by you
- Create an image file with all the miniatures you need (Create - Create index list)
Well, now I will describe all of the above in as much detail as possible. Don't be afraid, I'm just joking because I'm tired. That's all I wanted to say about such a wonderful tool for viewing and editing images as Image Viewer. Hurray, comrades.
Good luck to you! Before see you soon on the pages of the blog site
You can watch more videos by going to");">

You might be interested
 Graphics for the Web - how to prepare an image in Photoshop and insert a picture or photo on the site
  How to get a fast website - optimization (compression) of images and scripts, as well as reducing the number Http requests
 How to upload photos and transfer videos from iPhone or any other phone to your computer
I would like to tell you a little about such an excellent program as FastStone Image Viewer, which I constantly use and recommend to everyone. Very often it helps me out, especially when I need to compress a large number of photos before uploading to a mobile phone or e-book. This program is good because it can stream compress your photos, but its capabilities don’t end there. In batch mode, it does almost everything it can, changes the resolution, crops, rotates, adjusts colors, adds text or a watermark, renames, etc. and so on.
I mostly edit photos in Photoshop, but when I need to convert a hundred or more images at once, FastStone is more convenient in this regard. Most often in it I do such basic (but tedious when editing individually) operations such as: renaming, sorting, resizing, adding signatures. Therefore, I will describe these operations in more detail, and you can probe the rest of its capabilities at random; by the way, almost all the photos for this site were prepared with its help.
- 5. How to add signatures, logo to photos (watermark)
Quickly navigate through page chapters
1. How to sort pictures and rename them.
Launch FastStone, in the left window of Explorer, find on the computer the desired folder with pictures and highlight it. After which, the contents of this folder will appear as thumbnails on the right.

If you need photos to go to a certain sequence, then arrange the sketches as you intended and thereby form the order you need. Thumbnails are moved in the same way as desktop icons (with the left mouse button (LMB)).

Right-click (RMB) on any thumbnail and select Select All, thereby selecting all the images in this folder. You can use the keyboard shortcuts Ctrl+A

Right-click on the thumbnail again, this time select Batch renaming. Or press F4

A window like this will open (photo below), where our pictures will be shown on the left, and on the right they are the same, but already lined up the way we need them. The trick is to select them all after manual sorting and only then proceed to batch processing or renaming. If you do not select everything at once, then when you go to the Batch Conversion/Rename window, the right window in it will be empty or with only one picture. And when you add photos from left to right, the file name order will be respected, not manual. Here you can also play with the pattern of names assigned to files, their numbering and the style of extensions. Once everything is set up, click Start, bottom right.

A confirmation request for file renaming will pop up, we agree.

This window will show the process of renaming files, and you can also see that the extension is being rewritten from uppercase to lowercase. When the renaming is complete, click Finish.

Result automatic change file names. Since I have the show turned on hidden files and folders, you can also see here system file fssort.ini, which created FastStone. This file is created immediately as soon as you start doing manual re-sorting.

After you have renamed all the pictures, click Remove custom sorting. I don’t know, maybe in the new version of the program it is deleted automatically, but I often found it in folders with pictures, I had to delete it manually, or with this button.

After this, the fssort.ini file will disappear from the folder.

By the way, FastStone can do end-to-end renaming, that is, when pictures are divided into several folders, in this case the names are assigned as if there were no folders at all.
2. How to compress photos (without changing resolution).
I myself do not compress pictures from the camera, since it already saves them in JPG-eg, but if you have a different format that takes up a lot of space, you can convert them to JPG-eg. We launch the program and indicate in Explorer the path to the folder with photos.

Using RMB, select all the images.

Using RMB again, select Batch Conversion. Or F3 key

Specify the destination folder, uncheck the box Change settings (Dimensions) and click Settings

Compression settings will appear, the default is 90, but by trial and error you can select the desired quality value yourself, then click OK.

Returning back, click Convert.
For example, I compressed JPGs; in the Savings column you can see how much we compressed this or that photo. But since it was originally a JPG-eg, the increase free space insignificant. Now, if you compress other formats with a change in resolution, then the benefit from this will be many times greater.

By the way, if you convert to small resolution(for example, for mobile), then in the compression settings, uncheck the Save EXIF / IPTC data option.

This will lighten the photos by 10-15 KB by removing EXIF metadata from the pictures, which contains information about the camera and the image. For small images this is a very significant space saving.
3. How to compress photos (change resolution).
I think I use this compression method most often because uploading 2-3 MB photos to a website is very wasteful. Open FastStone again.
Select all images using RMB.
Then open Batch Conversion.
Specify the save path and click on the Advanced settings button.

The Advanced Conversion Settings window will open, in which there are many inactive tabs; at the moment we are interested in the first tab, Resize. Let's activate it by checking the box.

Here you set the desired resolution for future photos and click OK

Then you start the conversion, during which you can see the sizes of the images before and after conversion.

4. How to change the size of pictures on one side.
This conversion method is useful when there are many pictures mixed with horizontal and vertical orientation. That is, it is no longer enough to simply indicate the horizontal and vertical resolution, since in this case deformation (stretching and compression) of the photographs will occur. This conversion method helped me a lot when compressing these photos from the Motor Show 2008 exhibition, where the orientation was mixed up.
Run the program again and point in Explorer to the folder with photos.

Through right button select all images.

Let's go to Batch Conversion.

As usual, specify the destination folder and click advanced settings.

Here, in the Resize tab, activate the Resize item (calculation on one of the sides). Select the side on which the conversion will take place and enter the required resolution. After which, click OK.

Again, we are watching the conversion process.

Go to the destination folder, now all photos have same height, the proportions are not violated.

5. How to add signatures, logo to photos (watermark).
Well, the last thing I would like to talk about is the possibility of adding captions to photographs, or rather not even signatures, but so-called watermarks. FastStone has a separate tool for captions, but I prefer to overlay a picture with text on photos. Launch FastStone again, specify the folder with pictures in Explorer.
Select all photos using RMB.
Using RMB, go to the Batch Conversion window.
As usual, specify the destination folder for finished photos and click Advanced settings.
If converting images is not required, then uncheck the Resize tab, if it was active, of course. And in general, try to look more often at which tabs are active in this window, since FastStone remembers the settings of the previous conversion. Activate the Watermark tab; as an example, FastStone has loaded its logo, bottom right.

Therefore, click on the button to the right of the line File for watermark: and indicate the path to the image that we will overlay on the photos as a watermark. I made the inscription MnogoHlama.ru in Photoshop in advance and saved it in PNG format to preserve the transparency of the inscription.

Now using FastStone We set the desired position and indentations for our seal. Then click OK.

Let's start the conversion.

Now all our photos have an unobtrusive signature.

I use it mainly as a batch converter, but nothing prevents you from editing images individually. In general, I described only those features of the program that I use most often; in fact, it can do much more. In addition, many tasks can be combined into one, that is, sorted, renamed, compressed, added a watermark, and all this in one approach to the program.


