The highest quality image format. Digital imaging, JPEG and RAW formats: learning the basics
© 2016 site
Depending on the size of the photosensitive material (film or digital matrix) various systems Cameras are usually divided into three main groups: large, medium and small format cameras. The more physical size photographic material, the higher the detail, and, therefore, the potential technical quality of the image, but at the same time, the more cumbersome the system as a whole becomes. Let's consider all formats in order.
Large format (aka wide, aka large)
Historically, large format is the oldest of all photographic formats, but it is too early to write it off. You might be surprised, but old-fashioned, bulky large-format cameras are still in the most active way used by photographers who strive for uncompromising image quality. Large format cameras are completely devoid of any automation, and therefore require certain skills from the photographer in traditional photography. As a result, they are not very popular among hobbyists.
The large-format camera consists of two walls connected by accordion-like bellows. On the front wall there is a lens connected to the shutter. The back wall is a frame with frosted glass, along which the frame is framed and the lens is aimed for sharpness. Immediately before shooting, a cassette with a sheet of film is inserted into the camera.
The walls of the chamber can move within limits limited by the extensibility of the fur. By decreasing or increasing the distance between the walls, the photographer focuses. By moving the walls in planes parallel to each other, you can correct perspective distortions, and by tilting or rotating the walls relative to each other, you can thereby change the position of the focusing plane, making it non-parallel to the frame plane.
Absolute control over the frame's perspective and depth of field is a unique feature of a large format camera. Yes, there are special tilt-shift lenses for both small and medium format cameras, but, firstly, they do not provide as much movement as is possible in a large format camera, and secondly, a large format camera allows you to use shifts with any without exception the lens.
Large format cameras use film in the form of individual sheets, most often 4x5 inches in size (much less often 8x10 inches). Single sheets Film, unlike reels, allows each frame to be developed individually by varying development time and reagents, which gives the photographer additional control over the brightness and contrast of the future image.

Relative sizes frames 8x10 and 4x5
In front of everyone undeniable advantages large-format cameras, it must be admitted that working with them is difficult and cannot be rushed. That is why they are used today only where there is no need for haste: in landscape photography, in studio photography, and also for scientific and technical purposes.
To date, there are no full-fledged large-format mass-produced digital cameras. Scanning backdrops (for example, those produced by Better Light) are applicable only in conditions where the subject is completely motionless and the lighting remains unchanged, because scanning stretches the exposure over many minutes.
Most large format photographers shoot on film and then scan the resulting negatives or slides onto regular scanner. Even the simplest flatbed scanner with a resolution of 1200 dpi allows you to get a digital image with a resolution of 28.8 megapixels from a frame measuring 4x5 inches. Take a more serious scanner, and the final resolution will be measured in hundreds of megapixels.
Medium format
Medium format cameras represent a compromise between image quality and ease of use. Before the spread of 35 mm cameras, medium format cameras were considered very compact (compared to large format, of course), and therefore more suitable for reportage, modeling and wedding photography, i.e. where the photographer simply has no time to tinker with bulky large-format equipment.
Nowadays, when small format cameras (especially digital) produce quite decent image quality, the scope of medium format is quite narrow - this is, as a rule, professional studio shooting, when 35 mm is not enough, and you are too lazy to bother with a large format.
Almost all medium format cameras are designed for 120 film. This is unperforated film 61.5 mm wide, wound on a reel. Frame size depends on specific model cameras. One side of the frame is always 6 cm, while the other side may vary. The most popular square format is 6x6 cm. Slightly less common are the sizes 6x4.5 (645 format), 6x7 (the so-called “ideal format”), 6x9, as well as even more elongated exotic panoramic formats. Depending on the frame size, one 120 type film allows you to make from 8 to 16 exposures. When using twice the length of 220 film, which some cameras support, the number of frames is doubled.

Relative frame sizes of large format (4x5), medium format (6x9, 6x7, 6x6 and 645) and small format (35mm).
The design of medium format cameras is different. Most simple cameras These are two-lens reflex cameras. Both lenses of such a camera have the same focal length. One of them is used for shooting, and the second one forms an image on the frosted glass of the viewfinder. For synchronous focusing, a gear train is used to connect the lenses.
Most medium format cameras are single-lens reflex cameras. Light passing through the lens is reflected upward by the angled mirror into the viewfinder, allowing the photographer to compose the shot and achieve focus. Immediately before the moment of shooting, the mirror is raised so that the light falls unobstructed on the film. This scheme is convenient due to the ability to see the image in the viewfinder exactly as it will appear in the photograph, as well as the ease of using interchangeable lenses that do not require modification of the viewfinder.
Rangefinder medium format cameras are quite rare, the viewfinder of which is a separate through window in the camera body, and an optical rangefinder coupled with the viewfinder is used for focusing. The main advantage of this design is the camera’s very compact dimensions for medium format.
Almost all digital Medium format cameras are classified as single-lens reflex cameras. There are also mirrorless cameras with an electronic viewfinder instead of an optical one. The resolution of medium format digital cameras reaches 100 megapixels, although the matrix size is usually less than 6x4.5 cm.
Possessing the highest resolution among full-fledged digital cameras, digital medium format cameras are distinguished by their significant size and weight, as well as by far from optimal ergonomics. This, as well as the enormous price, make such cameras a tool for only a very few demanding professionals, and also a toy for wealthy amateurs.
Medium format digital SLR cameras are produced by Hasselblad, Phase One, Mamiya, Leica, Pentax and Fujifilm.
Small format (aka narrow, aka 35 mm)
Small format cameras are the most popular due to their compactness and high degree of automation. They have proven to be indispensable for professional photography of sports and wildlife, and in the amateur environment they are often the only commonly used format. The small format is characterized by a huge variety of cameras, interchangeable lenses and other accessories.
Film type 135 has a width of 35 mm including perforation. Width work area 24 mm. The frames are arranged horizontally and the size of one frame is 36 x 24 mm. 35 mm film is available in reels of 36, 24 and 12 frames.
Digital cameras can have a sensor the size of a traditional 35mm film frame, i.e. 36 x 24 mm (so-called full frame), or smaller size(crop). The dominant crop factor sensor standards are APS-C (crop factor 1.5-1.6), 4/3" (crop factor 2) and 1" (crop factor 2.7).
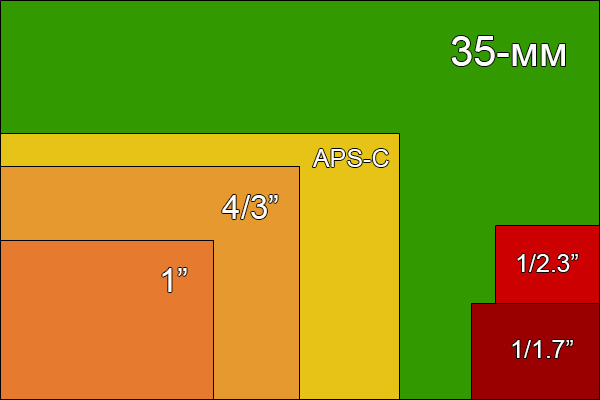
Relative sizes of full frame (35mm), cropped sensors (APS-C, 4/3" and 1"), and compact digital camera sensors (1/1.7" and 1/2.3").
Small format film cameras come in two main classes: rangefinder cameras and single-lens reflex cameras. The latter were especially popular due to their versatility and ease of use.
Currently, the use of 35 mm film cameras has completely lost its practical meaning. Digital models are superior to their film predecessors, both in image quality and ergonomics, while having relatively affordable price. Today you can shoot on 35mm film either for purely sentimental reasons, or in the case when you go to some place so remote that recharging the battery of a digital camera becomes basically impossible and a completely mechanical film camera is the only solution to the problem. However, such cases are rare.
Rangefinders digital cameras Produced exclusively by Leica. The main manufacturers of SLR cameras are Canon and Nikon.
There is also a relatively young class of mirrorless digital cameras with electronic viewfinders that deserve mention in this section, since they have sensors of a size comparable to a small-format frame, as well as interchangeable lenses. Cameras of this type are now available from almost all photographic equipment manufacturers.
Less small
In addition to the three main formats mentioned above, there are also several types of film, so to speak, ultra-small format, intended for use in extremely compact cameras. These systems (APS, 110, disc film, etc.) were intended for purely amateur purposes and were never particularly popular. The image quality was mediocre, and the price was clearly overpriced. Forget about film microformats. They have sunk into oblivion, for which I congratulate them.
But digital compact cameras with compact matrices lived and flourished until the widespread dominance of smartphones. Despite their tiny sensors, modern compacts produce quite acceptable quality, especially in good lighting. The best option for travel and protocol shooting, when picture quality is not a factor of paramount importance.
The matrix sizes of compact cameras are measured diagonally in fractions of the so-called. Vidicon inch. One Vidicon inch is equal to 2/3 of a regular inch, i.e. 16.93 mm. For example, with a diagonal of 1/1.7”, i.e. ~10 mm, the sensor will have dimensions of 7.6 x 5.7 mm. The size range is usually between 1/2.7-2/3”, depending on the model.
IN last years There is a noticeable tendency to increase the size of the matrix in compact digital cameras up to a full 35 mm frame while maintaining the small size of the device itself, which is good news.
Thank you for your attention!
Vasily A.
Post scriptum
If you found the article useful and informative, you can kindly support the project by making a contribution to its development. If you didn’t like the article, but you have thoughts on how to make it better, your criticism will be accepted with no less gratitude.
Please remember that this article is subject to copyright. Reprinting and quoting are acceptable if available. valid link to the original source, and the text used should not be distorted or modified in any way.
Not long ago we had a lesson about the structure of modern cameras and their types. There we touched a little on the topic of photographic image formation. Today we have to understand in more detail what exactly happens after the light passes through the camera lens, how the camera matrix is structured and what the finished digital photograph is.

The principle of operation of the matrix of a digital camera. What is permission?
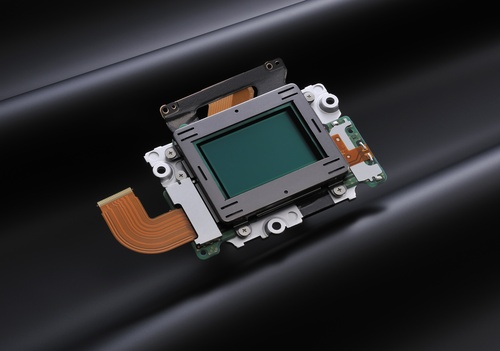
The camera matrix is a microcircuit on which millions of light-sensitive sensors are mounted. Each sensor records the brightness of the light falling on it. Thus, a “mosaic” of our image is made up of them. Please note: the sensor on the sensor only records the brightness of the light falling on it, but cannot obtain any information about color. It would seem that in this way you can only get monochrome, black and white images. To obtain a color image, a more complex solution is used. To collect color information, at least three photosensitive elements are needed, sensitive to only one of them. basic colors spectrum Therefore, each element is equipped with a color filter, which transmits rays of only one color and cuts off the rest.
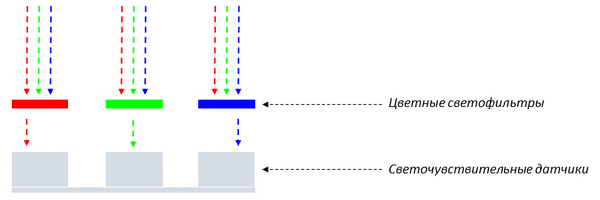
Today, in matrices, a color image is built from three basic colors: red, green and blue. Therefore, the matrix of the device is a lattice consisting of “green”, “red” and “blue” sensors. In this case, multi-colored sensors on the matrix can be located differently. For example, the most widely used is the so-called Bayer filter, named after its inventor.

You will notice that there are twice as many green elements on it as red or blue ones. This is done to compensate high sensitivity to the green color of the human eye and produce digital images with colors familiar to humans.
As a result, having data on brightness and color from each sensor, you can create an overall color image. For this purpose, a processor is installed in the camera. It analyzes the data coming from the matrix and compiles from them finished image. In addition, the processor is responsible for making adjustments to the original image that are set by the photographer, such as the white balance he has chosen, and various processing effects. The processor is also responsible for creating final file with a photo.

We found out that both the camera matrix and the digital image obtained from it are a mosaic consisting of tiny dots and pixels. Naturally than large quantity The number of points the image contains, the more detailed and better quality it will be. How many pixels does the image taken from the camera contain? This characteristic is called resolution. The same quantity, resolution, can be expressed in several ways. In the case of camera matrix resolution, the number of pixels located on it is simply measured. Since the number of pixels placed on the matrix is in the millions, they are measured in these same millions. One million pixels is called a megapixel. In the case of the resolution of the finished photograph, a different method is often used. Permission digital photography can be characterized by the number of points horizontally and vertically in the image.

Of all this information, it is important to remember the main thing:
The camera matrix consists of light-sensitive elements, each of which collects information about the color and intensity of light. Next, from this data a digital image is constructed, also consisting of dots - pixels. However, you shouldn’t put an equal sign between one photosensitive element on the matrix and one pixel on the finished image: a lot here depends on the algorithms of the matrix and processor. The resolution of finished images is not always equal to the number of sensors on the matrix. Some of the matrix sensors are used for internal, technological tasks. Therefore, in the characteristics of many cameras you can find two columns - “the number of effective pixels” and simply “the number of pixels”. It is assumed that effective pixels will directly take part in creating a photograph.
It is important to keep in mind that high matrix resolution is not the only factor in the high quality of the final images. For quality final result many factors will influence - the correct exposure and the correct focusing and the quality of the optics. So the mere presence of a matrix with high resolution in the camera allows you to get high-quality images, but does not guarantee this at all.
Today, the most common matrices are those made using CCD (CCD) and CMOS (CMOS) technologies. Without plunging into the theoretical jungle, it is only worth noting that CMOS is more promising technology, as it allows you to achieve greater photosensitivity, reduce digital noise, and reduce power consumption. Almost all modern cameras today have CMOS matrices.
Digital noise
What is digital noise? Surely everyone has noticed that sometimes “noise”, “grain”, small dots of different colors appear in photographs. This is digital noise. Quantity digital noise in the photo directly depends on the characteristics of the camera matrix, on the shooting conditions and parameters.


Digital noise is most noticeable when shooting at high sensitivities or when insufficient lighting. Sometimes small-sized, not very high-quality matrices (most often matrices in smartphones) simply cannot produce an image without noise. Digital noise may also appear during image processing.
RAW and JPEG
After the shooting is completed, an equally important task remains - saving the resulting photo on a memory card. It is advisable to do this with maximum quality, without losing any information obtained during shooting. Today, most cameras allow you to save pictures in two ways: different formats- RAW and JPEG. RAW is raw, unprocessed information from the matrix, recorded in a file. It is assumed that further with the file RAW photographer will work independently, converting it on a computer to obtain a finished photo. JPEG is actually a finished photograph.

Let's figure out how RAW and JPEG files are produced.
|
When shooting in JPEG, the camera processor converts the raw signal (essentially the same RAW) into a file, applying settings selected by the photographer to it. Adjusts white balance, performs noise reduction (if it was turned on on the camera), applies various effects (increasing color saturation, converting to monochrome, etc.) and color settings. Finally, the processor compresses the file using the user's chosen save settings. All information that ultimately remains unnecessary is discarded, and only the final image is saved. To ensure that the file takes up less space on the memory card, it is compressed. JPEG file compression settings can be adjusted when selecting the image quality in the camera. Strong compression may result in loss of detail in the image. |


In the case of Nikon cameras, when processing a future JPEG file, the processor can expand the dynamic range of the photo using the D-Lightning function - this will help preserve details in the photo in dark and light areas when shooting contrasting scenes: landscapes, backlit portraits. The same can be done when processing RAW, but this will require special skills, programs and time.
|
The English word “raw” is translated into Russian as “raw”, “unprocessed”. The way it is. When shooting in RAW, the signal coming from the camera matrix is converted by the processor into a file suitable for recording on a memory card without any corrections to the image itself. All information received from the matrix is recorded in the file. RAW files in cameras different manufacturers can have various extensions: NEF, CR2, ARW... However, for the photographer this does not change the essence. In order to move from a “raw” file to RAW format To obtain a finished image, you will have to convert it on a computer using special programs - RAW converters. In the RAW converter, the photographer can adjust the white balance, correct the file exposure, and make many other corrections. |

Among the well-known RAW converters are: Adobe programs Lightroom, Adobe Camera RAW, Capture One. All manufacturers produce special RAW converters for their cameras. For example, Nikon produces two converters. Nikon Capture NX is designed for advanced, professional work, while the free Nikon View NX is suitable for beginner amateur photographers. The main advantage of the RAW format is its incredible processing flexibility. After all, during processing, absolutely all the information obtained during shooting is available.
Comparison of RAW and JPEG. Image quality
Let's study what image quality can be obtained using JPEG and RAW. To begin with, let's just evaluate the quality of images taken directly from the camera.


You can see that the JPEG file looks even a little sharper. Thanks to the processing and saving algorithms built into the camera. But to achieve the same sharpness from a RAW image, you will have to resort to processing.
Now let's look at the possibilities of image processing. Let's evaluate the possibility of correcting the exposure of frames taken in JPEG or RAW.

A classic situation: the photo turned out to be too dark. Let's try to lighten JPEG and RAW frames.

It's no secret that when shooting at high sensitivity values, digital noise appears in photographs. In all modern cameras There is an option for in-camera noise reduction. The processor processes the resulting image in such a way as to reduce the amount of digital noise in the image. Typically, in-camera noise reduction systems work better than noise reduction in RAW converters. After all, they are “tailored” for a specific camera with its own characteristics. In-camera noise reduction can only be applied to JPEG files.


A fragment converted from RAW without applying any noise reduction.
Digital noise is quite noticeable.
Many RAW converters have noise reduction options, but their effectiveness depends on the specific program and the settings selected by the user.
And another classic situation: white balance error. Let's try to fix it when working with JPEG and RAW.


When to use RAW format?
First of all, when you want to get high-quality photographs that are also as flexible as possible in processing. You will also need time and the opportunity to convert and process the files after shooting. Most often, RAW is used in professional photography: portrait, landscape, studio.
Many amateur photographers shoot in RAW simply to “squeeze” the maximum out of each photo and practice processing. But if you are engaged in reporting, everything is not so simple. It is possible that while you are converting RAWs with your report, the captured photos will already lose their relevance. If you are taking a simple photo for memory, RAW is also not very useful: photos in this format cannot be immediately emailed to friends or published on social networks.
When shooting in RAW, the photographer may not pay attention to the white balance setting at all, because you can correct the white balance without any loss in image quality when converting on a computer. Also, the RAW format is more tolerant of minor exposure flaws - as a rule, they can also be corrected during processing. Perhaps, what definitely cannot be corrected when processing a RAW file is focusing errors and “shaking”. There are, of course, computer sharpening tools, but they will not eliminate the problem, will not add missing details to the picture, but will only “mask” the problem a little.
Pros of the RAW format:
- allows you to save absolutely all the details, all the information in the photo obtained during shooting;
- incredible processing flexibility. The RAW format allows you to “save” many frames that were lost during shooting, and allows you to use special computer processing techniques that are unthinkable when shooting in JPEG.
Disadvantages of the RAW format:
- the difficulty of working with RAW for beginners: you will have to deal with special programs and learn the basics of computer processing;
- to work with RAW you will need quite powerful computer;
- working with RAW on a computer will take time;
- RAW files take up much more space on the memory card than JPEGs.
When to use JPEG format?
Of course, most of all this format popular among amateur photographers. Not everyone wants to study computer processing, dealing with quite complex programs- RAW converters. JPEG files can be opened immediately after shooting on any electronic device, send by mail, post on the Internet. Today you don’t even need a computer for this; a smartphone or tablet is enough.
However, professionals also sometimes use JPEG. They are attracted by the speed of work, because time is money. It is not always necessary to obtain images of the highest quality suitable for processing, but what is more important is speed and ease of operation. When shooting reportage, it is sometimes important to publish (or send to the editor or agency) photographs immediately after the event: the sooner the better. Then JPEG comes to the aid of the photographer-reporter.
By the way, when shooting in JPEG, many image enhancement functions found in any modern camera are available: noise reduction, color and contrast enhancement, expansion functions dynamic range And so on. We can ensure that our photo will look great without any computer processing. At the same time, shooting in JPEG imposes increased responsibility on the photographer: you will have to monitor all parameters without relying on processing capabilities. Errors with white balance and exposure errors cannot be corrected after shooting without serious loss of image quality.
Pros of the JPEG format:
- speed of working with files: immediately after shooting we receive the finished photo;
- rich in-camera photo processing capabilities when shooting in JPEG;
- a photo in JPEG format can be opened on any electronic device;
- JPEG files have a much smaller volume than RAW, much more photos in JPEG format will fit on a memory card.
Disadvantages of the JPEG format:
- less flexibility in computer processing;
- Consequently previous paragraph- all parameters have to be monitored very strictly when shooting.
TIFF format
Sometimes cameras allow you to shoot in another format - TIFF. Without going into unnecessary theoretical details, we can say that for a photographer TIFF is a very high-quality JPEG. If you want to take pictures without any loss in quality, but don’t want to waste time on RAW, you can choose TIFF. This format is often used in printing and design: it gives better results than JPEG quality images and greater processing flexibility. When saving to TIFF, lossless image compression is used (as is the case with JPEG). But still, when processing, the TIFF format is not as flexible as RAW. After all, if RAW is data from the matrix, then TIFF is just a high-quality picture.

RAW+JPEG
Haven't decided on the format yet or would you like to get a photo recorded in both RAW and JPEG? Nothing could be simpler. All modern cameras offer the option of shooting in two formats at once. This is also convenient if you first want to quickly view the footage on a laptop, smartphone, tablet (after all, JPEG can be opened on any device), select the frames you like, and then process the RAW files on a work computer that can work with them. There is only one obvious disadvantage of this option: it will be twice as much on the memory card. more files, so it fills up much faster.

Selecting the “RAW+JPEG” option in the Nikon D5300 camera menu. As you can see, you can choose what quality of JPEG file the RAW file will be saved. This is convenient: if you want, you can save space on your memory card by selecting the “RAW+JPEG” option Low quality" Such photos are quite suitable for viewing, and RAW will allow you to have a copy of the image in maximum quality.
Image compression formats
Image compression is the application of data compression techniques to a digital image. By reducing image data redundancy, image storage and transmission efficiency can be improved.
Image compression can be lossy or lossless. Lossless compression methods are used to archive images before applying any filters (cropping, resizing, color correction, etc.), while lossy methods, especially those with high compression ratios, introduce distortion into the image. Lossy methods are well suited for natural images, such as photographs in applications, where slight (sometimes unnoticeable) image distortion is acceptable to achieve a given compression ratio. Lossy compression is convenient for publishing photos on the Internet.
JPEG is a compression format that degrades the quality slightly to reduce the file size of a photo. Almost all cameras save images in this format unless you specify otherwise. JPEG images are saved using a lossy compression algorithm, and you can choose the compression ratio you want: Less compression for better quality, or more compression for better quality. worse quality. The only argument in favor of greater compression is the small size of the resulting files, for convenient transfer of photos via e-mail or via the website, as well as the ability to save a large number of pictures on the memory card. Most cameras provide the ability to select two or three compression levels: normal, good, excellent.
TIFF is a widely accepted image format. Typically, cameras save uncompressed images, or compressed images using a lossless algorithm, in the TIFF format. It means high quality, but, in return, big size files. Some cameras allow you to save photos in this format, and this is enough popular format, thanks to the use of lossless compression method. The only problem is that so many people have modified this format that there are now 50 or more variations of this format, and not all of them are supported by programs.
PNG is an image format developed as a replacement for some of the older formats common in the 1990s. It is a lossless compression format like TIFF, but it is more compact. While it's likely your camera doesn't support the PNG format, many people specifically convert photos to this format after transferring them to their computer. Unlike JPEG, PNG images do not lose quality when recompressed after modification. digiKam fully supports the PNG format, in addition, the module batch processing can convert images from any supported format to PNG format in one step. See section Settings, for getting detailed information about use additional modules in digiKam
PNG is an extensible, portable storage format. raster images lossless, with good compression. PNG is a non-proprietary replacement GIF format, can also usually replace the TIFF format. PNG was designed for viewing images on the web, so it allows images to be read in sequential (streaming) mode. Additionally, PNG preserves gamma and chroma values for improved color rendering on heterogeneous platforms. PNG supports color depths of 8 and 16 bits per color per pixel. This is an ideal format for archiving photos. To learn more about this format, visit the PNG home page.
Some, usually more expensive, cameras offer to save photos in raw (RAW) format. For the raw format, there are no specific standards. they differ from manufacturer to manufacturer. The raw format contains all the data received directly from the photosensitive element before software the camera will change the white balance or something else. Saving a photo in a raw format allows you to make better adjustments to settings such as white balance after the photo is saved to your PC. Most professional photographers use the raw format because it gives them the most flexibility. prepress. back side flexibility - “raw” photos take up an extremely large amount of space on the memory card.
If you want to learn more about the raw format, read The Luminous Landscape and Cambridge in Color guide. In digiKam you can convert raw photos to JPEG or TIFF using the module raw image conversion. Check out the section Settings for help using extension modules in digiKam.
digiKam supports the creation of thumbnails for raw images thanks to the DCRAW program. Support for the RAW format in the image editor has not yet been implemented. The main RAW formats supported by digiKam are listed below:
| RAW format | Description |
|---|---|
| CRW, CR2 | Canon camera format |
| MRW | Minolta camera format |
| NEF | Nikon camera format |
| ORF | Olympus camera format |
| RAF | Fuji camera format |
| PEF | Pentax camera format |
| X3F | Sigma camera format |
| DCR, KDC | Kodak camera format |
| SRF | Sony camera format |
| RAW | Camera format Panasonic, Casio, Leica |
| DNG | Adobe Format (Digital Negative) |
digiKam available big number formats.
Dependence on libraries means that it is impossible to compile an unconditional list of formats supported by your system. At least JPEG, PNG and TIFF are definitely available
digiKam only displays files whose formats it understands. The format is determined by the file extension. digiKam checks the file extension against the available list. If the extension is present in the list, then digiKam shows the contents of the file in the image viewer. You can modify the list to find out how - see section
Modern digital cameras, starting with advanced models, offer the user a choice of several file formats in which photos can be recorded on a memory card. Most often this JPEG formats and RAW, sometimes the TIFF format is added to them. In this article I will talk about the features of these three formats and help you decide on the choice of format for shooting. To understand how a particular format is formed in a camera, let's briefly look at the main stages of image formation, from exposing the matrix to recording the finished result on a memory card.
Light hitting the matrix changes the value electric charge element (which will later become an image pixel). The charge values from all elements of the matrix are recorded and digitized analog-to-digital converter, and then encoded into special format, which received the general name RAW (from the English “raw”). Strictly speaking, this is not a format, but the name of many formats of raw data from the camera sensor. Each manufacturer has its own data format, so when a new camera model is released, programs for RAW processing-files cannot open an image until an update is released that includes data about the file format of new cameras.
The data set is then processed by the camera's computer. In this case, white balance, brightness, contrast are corrected, noise is removed, sharpness is increased, and color depth is reduced to 8 bits. That is, the camera does everything for us, according to its own algorithm, without taking into account the individual characteristics of the image. Some of the original information contained in the RAW format is lost during such conversions, but there is no significant deterioration in quality, since a lossless compression algorithm is used. Some camera models allow you to record the image to a memory card after this processing stage. This will be in TIFF format.
Next, the image information is compressed. In this case, a lossy compression algorithm is used, that is, an irreversible deterioration in image quality occurs. Such a file will take up significantly less space, but it will contain only 30-40% of the original information recorded by the camera sensor.
Now more about each format, its advantages and disadvantages
JPEG format.
The most common image format is JPEG (Joint Photografic Experts Group - a group of photography experts who developed this encoding algorithm). It allows you to receive images good quality with a small file size.
Advantages of the format: small file size, high compatibility with all devices (images can be viewed on any computer or mobile device), full support for all Internet browsers.
Disadvantages of the format: caused by the use of a lossy compression algorithm. With a high compression ratio, the file size is reduced, but the image quality deteriorates significantly, and blocky compression artifacts appear.
It is not advisable to re-edit and save an image in JPEG format, since each re-saving is a new compression of the image with corresponding losses. If you need to continue working on the image, save it in TIFF or PSD format. These formats use lossless data compression algorithms, so there is no deterioration in quality when resaving multiple times.
TIFF format
TIFF (Tagged Image File Format) is also a common image format. It uses lossless compression algorithms and can also store data without compression. Files TIFF format significantly larger in volume than JPEG files. Since compression occurs losslessly or not at all, this format provides higher image quality and is often used for high-quality preparation of images for printing, especially in large formats.
Advantages of the format: high image quality, use of lossless data compression
Disadvantages of the format: very large volume of files, 8-10 times larger than JPEG images. If 16-bit color depth is used, the file size is doubled.
RAW format
A RAW file, as we have already said, is data from the camera sensor, digitized by the processor and “packed” using special algorithm into a format standardized by the camera manufacturer and losslessly compressed, without any processing. At the same time, the RAW format takes up significantly less space than TIFF, but more than JPEG, and contains 10 - 16 bit data, depending on the camera model.
In general, all digital cameras shoot in RAW format, even the simplest compact ones. It's just that not all cameras have this format available to the user. In cases where the camera supports shooting in RAW format, it must be accompanied by software that allows you to make basic corrections in this format and convert it to others, for example, JPEG and TIFF.

A file in RAW format cannot be damaged by inept processing - it is not directly edited and always remains unchanged. All processing is recorded in a small instruction file, which is used by the program to read information about processing and visualize what is extracted from RAW file images taking into account the applied adjustments. In addition, the RAW format allows you to edit many parameters with minimal loss of quality, such as correcting white balance, restoring seemingly lost detail in light or dark areas, correcting optical distortions, and much more. To better demonstrate the benefits of the RAW format, I recorded a short video in which I show the restoration of blown-out areas of the image.
Advantages of the RAW format: the broadest opportunities image editing with minimal loss of quality, the inability to spoil the original file with inept processing.
Disadvantages of the RAW format: large file size required special programs for viewing and editing.
What format should I shoot in?
The choice of image format for shooting depends on many factors. Many novice photographers make a big mistake by shooting only in RAW format, ignoring the JPEG format as defective. Indeed, in cases where the situation allows, it is best to use the RAW format. But in reportage or sports photography, for example, neglecting the JPEG format can cost you missed amazing shots. The thing is that the RAW format requires a large buffer memory in the camera, as well as a fast processor. When shooting a long series in RAW format, even fast cards memory - the camera buffer will still fill up and the camera will not be able to shoot until it is freed. This time takes about a few seconds, quite enough to skip good shot. In this case, the JPEG format will allow you not to limit yourself and shoot as long a series of frames as you like. In a studio setting or during staged photography, as well as under any conditions where quick continuous shooting, it is better to use the RAW format.
It is not advisable to use the TIFF format for shooting - it takes up a lot of space on the memory card, and less data is recorded in it than in the RAW format.


