Batch conversion and renaming of photos in FastStone Image Viewer. Basic setup of Faststone Image Viewer
Modern digital photography has made it possible for anyone to take virtually unlimited photographs. There is no longer any need to save film, and there is no need to print photos, everything is stored on the computer. Now any amateur photographer has thousands of photographs stored on his computer.
FastStone Image Viewer (or FS Image Viewer) is one of the most popular programs for viewing, editing and managing photos. The program has a huge range of functions that will be more than enough for any amateur photographer. Moreover, the program is completely free and can be downloaded from the official website ().
FastStone Image Viewer is also regularly updated with new features. At the time of writing, the current version of the program is 4.6. In addition, the program is completely Russified. Therefore, understanding its capabilities will not be difficult.
With FS Image Viewer you can work with photos in all popular formats. The program supports BMP, GIF, CUR, ICO, JPEG, JPEG 2000, PCX, PNG, TGA, PSD, TIFF and WMF. In addition, FS Image Viewer allows you to view some RAW formats from popular cameras (CRW, NEF, PEF, CR2, RAF, ORF, MRW, SRF and DNG).
The FastStone Image Viewer program interface consists of two parts: a full-screen interface for viewing and editing photos, and a file manager for managing your photo archive.
Opening any photo (with a simple double-click) opens a full-screen interface for viewing and editing. This interface has hidden toolbars. You can open these panels by moving your mouse pointer to the right, left, top, or bottom edge of the screen.
You can see one of these panels in the screenshot. This is a panel designed to launch photo editing tools. This panel can be considered the main one; it is the one you will use most often. Among the main functions that can be launched from this panel are functions such as photo cropping, resizing, red-eye removal, lighting correction, color correction, level correction, curve correction and sharpening/blur. These features are more than enough for any amateur photographer.

The file manager (screenshot above) can be launched by clicking on the FastStone Image Viewer program shortcut or from the full-screen interface. The file manager interface is divided into three parts: a folder tree, a photo preview and a list of files in a folder.
At first glance, the file manager seems like a useless feature that only gets in the way. But over time you get very used to it. Using a file manager, you can manage your photo catalog much faster and more efficiently. You can launch any of the photo editing tools described above directly from the file manager.

Also worth mentioning are features such as batch conversion and batch renaming. You can see the window interface for batch conversion in the screenshot above.
Sometimes these functions turn out to be incredibly useful. For example, you need to send several photos by email. If your photos are 5-10 megabytes, this could be a problem. In this case, the batch conversion function will help us. With its help, you can quickly reduce the weight of photos by choosing a lower resolution and specifying the compression level. Moreover, these parameters can be applied to a group of files at once, thus saving a lot of time.
What kind of viewers, resizers, and graphic editors have been on my computer. But of all the freely distributed programs for viewing, cataloging and editing, in the end there was only one left on the computer - and this is FastStone Image Viewer. This program is very similar in appearance and functionality to the much-loved but paid program ACDSee. In fact, it was the introduction of fees for ACDSee that prompted us to look for a replacement.
FastStone Image Viewer became such a replacement. And it must be said that the replacement turned out to be better than the original - faster, lighter, easier to use.
To complete the review, the latest version 5.1 was downloaded. The download was carried out from the official website - http://www.faststone.org. And now the program is downloaded and installed. Let's begin to study it in detail.
The first characteristic of the program is the list of supported graphic file formats that the program can work with. With FastStone Image Viewer you can work with photos in all popular formats. The program supports BMP, GIF, CUR, ICO, JPEG, JPEG 2000, PCX, PNG, TGA, PSD, TIFF and WMF. In addition, FS Image Viewer allows you to view some RAW formats from popular cameras (CRW, NEF, PEF, CR2, RAF, ORF, MRW, SRF and DNG). In general, the program is perfectly compatible with all common formats.
After installing the program, it is logical to compare it with common graphic file formats on the computer. This is done through the context menu - select programs - open with - select FastStone from the list of suggested programs. And now, when the program is associated with the necessary files, open its main window.
 FastStone Image viewer - main program window
 The program has a classic interface. The header is reserved for main menu items - through the functionality of the main menu of the program, you can perform all the necessary actions. But this is for those who like to work through the menu.
Almost all features of the program are duplicated in the form of buttons located under the main menu. I personally work using buttons and the context menu. Perhaps I almost never use the main menu.
Let's look at the main window of the program - it is divided into 4 main areas
1. top - area of the main menu and buttons
2. The upper left part is the file manager. It is very convenient to use. You can quickly get to any folder on your computer with any nesting level.
3. lower left part - preview window for the selected image
4. large window on the right - designed to display all images in the selected folder.
FastStone Image Viewer - button functionality
All buttons are located under the main menu.
faststone image viewer - buttonsLet's look at their purpose one by one
1. Launches the wizard for uploading photos from a camera or memory card. In the wizard you can batch rename copied files
2. Calls up the file open dialog box
4. Go to view the previous one in the list in the image folder
5. Go to view the next image in the list in the folder
6. Zoom button in the viewport
7. Zoom out button in the viewport
8. The button returns the viewed image in the viewing window to its original scale
9. Click to enable or disable anti-aliasing of highly scaled image
10. Actually not a button, but just a drop-down list. Again, you can select the image scale for the viewing window (similar to button 6, only round ones are set purely)
11. Tool for working with the image viewed in the viewing window. The default is hand. It allows you to simply drag and drop the enlarged image. You can also select a rectangular selection tool, a circular selection tool, or a Magic Lasso selection tool.
12. Launches a slideshow consisting of images located in the current folder
13. Allows you to change the image size (resizer)
14. Allows you to crop the image
15. Launches the image drawing tool (the tool is similar to MS Paint)
16. Image cloning/retouching tool
17. Lighting correction tool (light, shadow, brightness, contrast). A handy thing if you need to quickly make out the shadows in a bad photo.
18. Rotate the image 90 degrees counterclockwise
19. Rotate the image 90 degrees clockwise
20. Image comparison wizard (up to 4 at a time). Just like in the children's game about 10 differences
21. Screen capture tool. Like PrintScreen, but more functional. You can select an arbitrary area.
22. Scan Wizard. A very convenient thing. And a good replacement for the standard Windows Scan Wizard
23. Wizard for sending images by mail. Before sending, it can resize the images being sent. Very convenient, but for full operation you need an email client configured on your PC
24. Print selected images
25. Calls up a window of all program settings.
26. Selecting and changing the appearance of the program
27. Button to switch to full screen mode
And now the purpose of the buttons on the panel below:
1. Return to last viewed folder button
2. Forward button. If you understand what it is for, write in the comments
3. Move a folder up in the folder hierarchy
4. Update the contents of the directory being viewed
5. Add the current folder to your favorites list
6. Create a new folder in the current one
7. Copy content to target folder
8. Move content to target folder
9. Delete marked objects
10. Display images in a folder as thumbnails
11. Display images in a folder as a detailed list
12. Display images in a folder as a simple list
13. Folder content filter (selects what the program will display) - only graphics, video, and graphics and video
14. Sort files in a folder by various attributes.
15. Delete button. No. Not deleted. Delete was number 9. This is the button to clear the browsing history. So that.
Experienced users know very well that in Windows programs the same result can be achieved in several ways. FastStone Image Viewer is no exception.
Many of the actions with images can be performed through the context menu. Let's see what options it offers:

As you can see, many functions are duplicated and this is normal. One user will go one way, and the other - you guessed it, right? - to others! This kind of duplication is good. After all, someone has mastered one way to achieve a goal, while someone acts differently, but still achieves success.
The program capabilities we have considered are not all. The most interesting thing happens when you open any selected image in full screen. This is where the small and very pleasant know-how of the program in question comes into play. The image expands to full screen. There is not a single button. It can be viewed in its entirety, the picture is not cluttered with panels and buttons. This is what it looks like

It’s hard for you to see, but in the upper left corner the program displays some information about the open image - name, memory size, size in pixels. It would seem - what else can be done here. But it is possible. The program supports simple gesture control. If you hover your cursor left, up and right in sequence, toolbars will appear.
This is what it looks like:

If you point the course upward, a ribbon appears in which you can select an image to view, and above the ribbon you can see the path to the folder with images on the left, and a panel with additional buttons on the right.
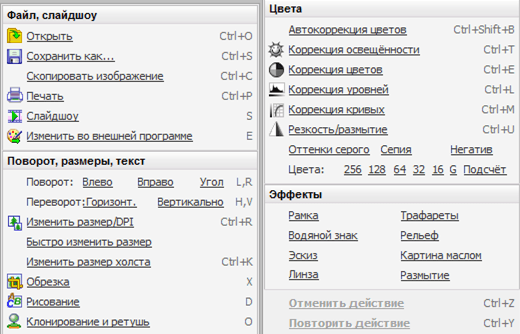
We move the cursor to the left edge of the screen and get a toolbar like this

I won’t list the list of possibilities - you can already clearly see what is offered in the pop-up menu. I can only say that the range of possibilities is large and will be sufficient for most users who decide to correct a slightly necessary image.
Now look at the panel that appears when you hover your cursor over the right edge of the screen

And at the same time a panel with EXIF information appears, you can also call up a histogram and edit comments for this JPEG file.
Exit full screen mode by pressing ESCAPE on your keyboard
So we went over the appearance and capabilities of the FastStone Image Viewer version 5.1 program
Let me add in conclusion that the program is also equipped with a batch file renaming wizard and a batch file conversion wizard (this means converting them from one graphic format to an arc). I won’t tell you where these masters are hidden in the menu. If you carefully study the program's capabilities, you will find them yourself.
Image viewer is fast, stable, image browser, converter and editor.
We continue to get acquainted with the interface of the FastStone Image Viewer program.
Left area of the interface: the browser itself, displaying a tree of disks, directories and files. Navigation is carried out by scrolling with the mouse wheel or using the slider.

Below is the “Preview” window indicating the size in pixels, file size, extension, name and time of saving the file. It displays the selected image. The window can be minimized and expanded, change display modes: 1:1, fit to window and full screen. When you hover the cursor over an image, its pointer changes its display to the “Magnifying Glass” icon; by clicking the left mouse button, the display automatically switches to a 1:1 scale.

If you select a video file in the preview field, then from the preview window by clicking on the “Play” icon, the work will begin in the preinstalled video player.

Right area of the interface: its central part displays a preview of the folders, files or images you have selected in the file manager.

By hovering the mouse cursor over an image of a preview, its name and extension, date and time of saving, dimension in pixels and volume are displayed.

By left-clicking on it, select this file for further processing. At the same time, a preview image of this file will be displayed in the preview window, where you can view it in more detail using the Loupe tool.
At the top of the preview window there is a line of the path to the location of the selected file. In it you can view the history of files used by clicking on the button that expands the field with the browsing history. To the right of the line of viewing paths there is a functional button “Trash”, by clicking on it you can clear your browsing history.

At the bottom, under the preview field, there is a line where it is noted how many folders, files and their total size, as well as the number of selected files.

Above the preview window there is a line with quick access buttons:
˗ moving up the directory tree,
˗ preview window updates,
˗ adding to the “Favorites” folder and setting up this folder,
˗ creating a new folder,
˗ copying to the specified folder,
˗ moving to the specified folder,
˗ deleting selected files.

Next are functional buttons for displaying a list of files, either in the form of thumbnails, or a detailed list indicating file attributes, or a simple list with enumeration.

Even further to the right is a button for selecting displayed files related to graphics, video, or displaying all of them. The rightmost key to sort files by name, volume, date, size or file type.

Three buttons located in the upper right corner of the interface allow you to change the location of program elements (areas) in the display window. We can choose a “standard” arrangement of program windows, a horizontally sequential arrangement, or display only the full-screen preview window and the top control panel.

And the last button of the program interface expands the selected image to full screen viewing mode.

Once in full-screen viewing mode, we see an image with the scale that you specified in the settings. A line with the file name, its size and scale will be displayed at the top.

By touching one of the edges of the screen with the mouse pointer, auxiliary panels drop out.
Top: A ribbon with folders and files nested within the folder selected in the folder tree. You can move around the ribbon by scrolling with the mouse wheel or slider.

You can view the folder tree itself or select the required file from it by clicking the expand panel button with the file manager directory (bottom left).
By clicking on the button, the “Image Properties” panel will open at the bottom right, which contains file attributes, bookmarks with EXIF data, a histogram, and JPEG comments.

On the left side: a panel that contains the tabs “File, slide show”, “Rotation, sizes, text”, “Colors”, “Effects”.

At the bottom of the screen: a navigator window and buttons for quick access to the main functions of the program.

The program provides great assistance in cataloging, converting and processing your images. It has a full range of functions for correcting and processing images, up to printing or posting on pages on social networks.
This is where we finished our acquaintance with the program interface, which, along with its functionality, is quite intuitive and easy to use.
Continuation of the story about the program in lesson 3.
If you don’t want to miss interesting lessons on working with images in Photoshop and other useful materials, subscribe to the newsletter. The subscription form is below.
Hello, dear readers! Today I would like to start a conversation about a very useful program called FastStone Image Viewer. Those who are familiar with the English language will undoubtedly immediately understand from the name that this is a program for viewing images. This name, I admit, initially misled me when I accidentally came across this program on the Internet.
The fact is that its functionality is much wider than the name suggests, and the options that it offers make it simply irreplaceable, especially for webmasters. Rather, we are dealing with an easy-to-use graphic editor rather than just a viewer. Judge for yourself, the FastStone Image Viewer interface is very clear, the program is very correctly translated into Russian.
Where to download for free and how to set up the Faststone program, program capabilities
You can download the program for viewing images, absolutely free of charge, from the official website, where you select the download file with the latest version. In addition to the usual option it is possible to download FastStone Image Viewer Portable(portable version), which does not require installation and can be easily placed on a flash drive to work in the photo viewer from any computer.
Installation of the stationary version occurs in the usual way very quickly. After installation, open the program. The first thing that would be nice to do is to configure FastStone Image Viewer according to your wishes. To do this, click “Settings” in the top panel and select “Program Settings” from the context menu. A window will pop up in front of you:

I think the chosen default settings option is very good and if you perform, for example, normal actions with photographs or images of your site, you don’t need to change anything, at least I’m very pleased that I saved time on this, which is very expensive, as you you understand.
However, you can experiment with the settings. For example, change the image viewing mode, the size and color scheme of photo thumbnails, change the magnifying glass settings, etc. Note that in the settings there is an option to use the second monitor to show photos or even slideshows while the image viewer window is open on the main monitor.
Yes, it should also be mentioned that Faststone understands the so-called RAW format, in which you can save pictures when using modern photographic equipment. Why is it needed and for what? It’s just that if you correct a photo saved in jpeg and received with optical errors during shooting, then under certain conditions the correction of such a photo occurs with a significant loss of image quality.
While when using RAW such losses are minimal. But there is a downside - RAW files take up a lot of space. But this is what they call, by the way, it had to be. In general, the FastStone Image Viewer settings are simple and clear, there is a clear explanation everywhere and they are easy to understand intuitively.

In addition to actually viewing photos, there are ample opportunities for editing them: reducing the size and weight of your photos, cutting them, cloning and retouching, reducing the red-eye effect. Moreover, Faststone is not a secret even for novice users, and they can easily process photos in batch mode, including renaming, converting to another format, and resizing.

The figure above shows all the main viewer options. As you can see, the capabilities this program provides are comparable to the functionality of a good graphics editor. For webmasters, FastStone Image Viewer is a real godsend, because it is very easy to create high-quality and beautiful screenshots, which you can see right now on the pages of my blog.
I recently had a period when I did not publish my articles for a long time, because I was optimizing my projects, including this resource. So, with the help of Faststone, I managed reduce the total weight of all images almost twice as much, and with virtually no loss of quality!
True, I had to work hard, since a lot of such pictures had accumulated. But I don’t regret it one bit, because the correct content on the site greatly helps speed up the loading of web pages and ultimately promote the resource; there are no trifles in SEO promotion.
I can state that after such a significant reduction in weight, positions for some keywords went up and traffic (how to increase traffic to a site using SMM tools) doubled during my inactivity. And this despite the fact that at that time I was not involved in promotion at all, only in technical aspects.
One of the features of this program for viewing images is the ability to switch to full-screen mode. To do this, first of all, select the desired file by left-clicking on it. Then click on the corresponding icon in the toolbar:

Or you can simply double click on the selected image file. After these simple steps, a field for full-scale activity will open up for you. Moreover, if you move the mouse cursor to each of the edges of the monitor screen, information blocks will be displayed one by one.

If you place the cursor at the left edge of the monitor, you will get a list of various functions that you can use when editing a picture or photograph. When you move to the right edge, a table will appear with various file attribute data, they can be very useful. Go ahead. Drag the cursor alternately to the top and bottom edges of the monitor.

At the top we get a panel, with the help of a set of tools we can easily navigate through folders, as well as perform various simple operations, such as copying, moving photos, rotating, deleting, printing, etc. If you hover your mouse cursor over the bottom edge, a navigator will appear, where icons for various tools for changing the image are also located.
Each of these icons has a tooltip that appears when you hover over it, and the text on these tooltips is very informative. Even a novice user can navigate here without any problems.
Reducing the size, weight of photographs and the process of image compression in the FastStone program
To begin with, I will say that reducing the size (or its resolution), optimizing weight (compression) and cropping (cropping) are the most common actions when working with photos or simple images. This can achieve the most optimized image, which can be uploaded to the desired resource without any problems.
Well, there is no need to say what positive impact internal optimization has on the promotion of a website or blog (read about how to speed up a WordPress website) in the form of correctly processed images.
Therefore, I will dwell in more detail on the above operations, which can also be carried out in batch mode, that is, a lot at once in one fell swoop. But more on that below. First, I'll explain how single photos are reduced. At the same time, I deliberately do not talk about an increase, which, it would seem, in certain cases may be necessary.
However, enlarging the original results in a significant and dramatic deterioration in quality, so let's leave this question. So, in order to make the image smaller, click “Edit” in the top menu and select “Resize/DPI” from the context menu:

In addition to the “Resize/DPI” item in the menu, you will see two more resizing options. If you need to get a standard size photo, you can use “Quick resize”. A list with these standard sizes will pop up, from which you select the one you need. Dimensions will be given in pixels and as a percentage of the original image size.
You need to click on the desired size, after which the photo will change its size. If you are satisfied with the result of these manipulations, right-click on the photo and select “Save As” from the context menu. In general, everything is simple here. The “Change canvas size” item will make it possible to change the size of the background on which the image is located, so under the influence of editing tools, the size of the photo itself will remain unchanged.
But if you want to get a non-standard photo size that is not in the list, then select “Resize”. If you are in full-screen mode, then when you move the cursor to the left edge, as I wrote above, a sign with editing options will appear, from which you need to select the “Change size / DPI” item. After clicking, a window pops up:

As you can see, you can change the image by setting the width and height in pixels. In addition, it is possible to save it as a percentage of the original image. I note that the “Keep proportions” checkbox is checked by default, since in the vast majority of cases it is necessary to preserve the proportional width and height of the original. Otherwise, distortions in the newly received picture may occur. After you mark the required dimensions, click “OK”, save the photo and you’re good to go.
But here it is necessary to explain, this will be especially useful for novice users, which raster graphics format should be selected when saving in order to get optimal result when compressing an image (reducing its weight). This weight is measured in kilobytes (Kb).
The most common ones, which are widely used, at least in webmastering, are JPG or PNG (there is also a common GIF format, but I don’t use it, at least on my resources); we’ll talk about them in more detail in a separate article.
So, if you are reducing the weight of, say, an ordinary photograph where there is a smooth transition of colors, then the most optimal format in which it will be saved is jpg. In this format, compression usually causes a loss of quality, but if you apply it to the desired image, these losses are almost unnoticeable. Moreover, in the Faststone viewer you can manually compress the image until it reaches the weight-quality proportion you need.
If a contrasting image is compressed, for example, various screenshots that you can find on Golbusinessnet and in which the text is adjacent to various pictures, then after reducing the weight it is most optimal to save them in png format, since saving such pictures in jpg can cause serious distortions.
Let's now see how the image compression mechanism works in the Faststone program. To do this, select the desired file, click on the button located next to the one with which we switch to full-screen mode. As a result, we go to the image editing window, where you can make various abuses of the selected picture (more on this below):

After all the abuse you've done to the image in the editing window (the tooltip says it's a windowed view), it's time to save the file. As I said above, if you want to reduce the weight of a screenshot or other contrasting image with text, you should select the png format from the drop-down menu, the FastStone program will automatically compress it to the required format.


As you can see, the default image weight is 51 KB. If you try to save it in jpg format, then with exactly the same weight indicator, noise distortions will already be visible at the boundaries of the text and background. When using png, quality loss is completely eliminated. But such a picture will be too heavy to upload to the site.
Therefore, for example, I select the line “256” from the “Colors” option. In this case, the weight will decrease and reach 16 KB. This is a completely different matter, such a picture can be used for its intended purpose, since her weight has decreased by more than three times!
Now let’s talk about how to reduce the weight of a photograph or image with a smooth color transition. For this case, you need to select the jpg format and save it in it. But even in this case, it would be useful to click “Options” and try to further analyze and, if possible, further compress the photo.

When comparing two images, you can manually move the slider left and right to get the weight-to-photo quality ratio you want. As the weight decreases, the quality deteriorates, however, as you can see from the screenshot, not enough to sound the alarm. The example shows that even more than threefold compression does not lead to a significant deterioration in quality.
This could be the end of this part of the publication, but I want to consider a third option when saving photos or pictures. The fact is that sometimes there are what are called mixed options, and I came across them. That is, when a screenshot contains an area with a color scheme and a dilemma arises in what format to save such an image.
If you reduce the weight using the jpg format, then with the slightest compression, distortions begin to appear at the borders of the text and the main light background. When trying to do the same in png format (with color 256), the following picture emerges:

As you can see, it doesn't turn out very nice. For such a case, there is a fallback option. We save the file in png format, but in the option we set the mode to 24-bit (24-bit bit for displaying colors).

As a result, although the weight of the final image changed by a small amount as a result of compression, the quality was not affected. This is how you need to weigh each time what is more important in this case: slight distortion in the screenshot, but a serious reduction in its weight, or high quality and slight compression. The right choice gives huge dividends in the form of increased traffic to the resource, and overall success in website promotion.
Now let's see how can I reduce the weight of images in batches?, that is, everything in a heap and at once. To do this, select “Tools”→“Batch conversion/renaming” from the top menu of FastStone Image Viewer.

If you want to simply rename or change the format, then all the settings are there. Add the necessary files to the right window and perform the necessary actions with them. To select the folder into which the converted photos or pictures will be loaded, you need to check the “Output folder” checkbox, and then select the desired one by clicking on the “Select” link. First, of course, you need to select the output format into which the modified images will be converted.
If the task is to change the photo size, then click the “Advanced” button, the result of this action will be a new dialog box:

Everything is simple here. Enter the required width and height values. If you do not want to maintain the proportions, uncheck the box, but keep in mind, and I have already said this, that increasing the original dimensions leads to a significant deterioration in quality. Therefore, changing the image size is almost always associated with reducing it. If you are going to repeat the operation in the future, you can save the settings to a file using the button below.
FastStone Image Viewer functions useful for webmasters
By the way, about the benefits for webmasters. For those who have not yet sufficiently mastered the skills of creating images in Adobe Photoshop, the Pixlr program can be a very relevant tool in this area (read more about this online editor).
Now, in order. There is a wide field for activity here: you can edit a previously selected image; create your own drawing using simple drawing tools; “on the fly” create a screenshot and immediately modify it by adding the necessary text or certain elements (frames, arrows, callouts, etc.).
To create a new picture, select “File” → “New” from the top menu. An empty field will open. Then you need to set the boundaries of the canvas on which you will create your masterpiece. Again, from the top row, click “Edit” → “Change Canvas Size”. A window will pop up:

Enter the required width and height numbers, and you can also change the background color if desired. Next, click “OK”. That's it, the canvas is ready. After that, in the toolbar, again at the top, click on the icon with the pop-up hint “Drawing (add color, lines...)”.
A window will appear, on the left side of which there is a vertical panel with drawing tools, through which you can apply a wide variety of elements that will be components of the future drawing or an addition to a previously created screen.

Look at the picture above and you will understand that there is quite a wide choice here for editing any screenshot. Each time you click on the corresponding icon in the left drawing tools panel, you get the opportunity to draw various elements and shapes. Moreover, for each tool, when you click on its designation, another panel appears at the bottom, which makes it possible to adjust the settings belonging to this particular tool.
For example, in order to draw a simple line, after selecting the appropriate drawing tool in the bottom panel, uncheck the “Insole” option. If you want to draw the arrow itself, on the contrary, check this option.

In addition, in the bottom panel you can change for each tool located in the left panel the corresponding components that determine the appearance of the future figure, namely: the color of the elements, the color of the borders, you can set a shadow by checking the box and even customize the appearance of this shadow by clicking on the button next to it.
Now I’ll tell you how to take a screenshot on the fly, using the same editing window. To carry out this task, first of all, open the web page or program for which you want to create a screenshot. Next, again in the top panel of the window where you make all the changes (window mode), click the icon with the “Screen Capture” pop-up tip and from the context menu select the shape of the capture area, for example, “Capture a rectangular area.”

After this, you will be transferred to the desired place, where two red intersecting lines will appear, their task is to mark the coverage area.

You need to press the left mouse button and, without releasing it, circle the required area of the web page. After you release the button, the finished screenshot will be in front of you. Moreover, in the lower right corner the width and height of the future image will be marked. It is very convenient in terms of choosing sizes so that the picture fits optimally on the web page without distortion. As you can see, everything is easy and simple, without unnecessary movements.
Well, in conclusion, I will describe the mechanism for creating such an element as, which can be very useful for a webmaster in terms of counteracting copy-paste and in protecting copyright (about copyright and inserting a copyright icon on the site) on any text or photograph. But first, let's create an image in the form of an inscription so that it is suitable for this purpose.
For my images, I used one of the effects provided by the FastStone Image Viewer functionality, namely, I applied a relief to the inscription representing the name of the blog. In the same window mode we make a small canvas (this action is described above), for me it turned out to be 200x50 pixels.
In the top menu, I again click the icon for drawing, then in the left vertical panel - the symbol for calling the text writing function. I'm creating an inscription.

Now, by right-clicking on the resulting text, I select “Effects” → “Relief” from the context menu and get a dialog box where there are two images: the original and the one that will be obtained after applying the relief effect.

Using the slider located below that controls transparency, you can significantly change the appearance of the future watermark.

Now click “OK” and get final watermark image.

Now we save the resulting image to the desired folder by again calling up the context menu with the right button and selecting “Save as” from it. Don't forget to reduce the weight of the image first by clicking the "Options" button. To add a watermark to a picture or screen that you post on the site, you need to right-click on the image selected and located in the FastStone Image Viewer editor window (windowed mode according to the version of the viewer program).
This can be either a photo from some folder or a freshly taken screenshot. Next, from the menu, click “Effects” → “Watermark”. Faststone will ask you to choose which folder you will use which file from as a watermark. Find the folder in which the drawing was saved for these purposes, then select the desired file from it with a mouse click.

Before saving the watermark that appears, you can freely move it around the canvas space and place it anywhere in the image. Next, click “OK”, then save it completely, after compressing it to optimal conditions using the “Options” function.

Well, now, perhaps, that's all for today. It looks like he set a record for the volume of the manual, but he explained in detail all the capabilities of the FastStone Image Viewer program and, I hope, there are no blank spots left. If you liked the article and found it useful, don’t hesitate to click on any social media button. Well, in conclusion, another video
Hello, dear readers of the blog site. Today I want to talk about a rather useful utility called FastStone Image Viewer. In fact, this is an analogue, but applied only to images.
From the name, it probably becomes clear that this is definitely a viewer (), but the functionality is not limited to this. Although even regarding its main functionality, it is ahead of many of its competitors.
In addition, even a novice computer user can easily post them on the Internet (digital cameras generate photos of monstrous sizes), crop them if necessary (for example, crop them to fit the photo paper format), and also reduce their weight (compress).
Download and customize FastStone Image Viewer to suit your needs
Do you know Photoshop or any other graphic editor (for example, his)? Then this will not be a problem for you.
But I, for example, still use raster graphics on “You” and therefore for me FastStone now serves to a greater extent not as a viewer, but as a the simplest graphic editor, which helps me reduce the size of images (even in batches), optimize their weight or add watermarks, if necessary. Yes, and inserting inscriptions or any other explanations into a photo using it will also not be at all difficult. But let's talk about everything in order.
The latest current version of the program is number 4.8 and you can download it completely free from the following link:
True, in the case of commercial use of this program, you will have to enter into an agreement with the author and pay a certain amount. But this, naturally, does not threaten us. In addition to the regular version, you can download from the official website FastStone Image Viewer 4.8 Portable, which does not require installation into the operating system, and can be placed on a flash drive to work with photos in a convenient and familiar viewer on any computer (and so that your photos do not fall into the wrong hands if it is lost or stolen).
If you still remember what the first versions of ACDSee looked like (modern incarnations of this viewer are monstrously bulky and clumsy), then the Faststone interface will seem very familiar to you. It appears (the similarity will become even stronger if you select Settings - Interface Theme from the top menu and change the skin to classic).

Almost identical actions for switching to full-screen mode for viewing individual photos (double-click) and switching between images from an open folder in this same full-screen mode (mouse wheel or arrows). Well, exiting full-screen mode is done using the same Enter or Escape keys.
However, the developers of FastStone Image Viewer significantly improved the usability of our viewer and added four full-screen pop-up panels on each side. Actually, the first time you try to open a photo in full screen, the helpful program will inform you about this:

When you move the mouse cursor to the top edge of the screen (assuming that you are currently viewing the picture in full screen mode), a panel will appear with thumbnails of all the photos that live in the same folder as the one you are viewing. But not only that.
At the top there will be a panel with tool icons that will allow you to navigate through various folders on your computer, move or copy a given photo there, perform simple actions on an open image (rotate, delete, print, etc.), run a slideshow or compare several photos:

If you move your mouse to the right edge of the screen, you will find out all the ins and outs of the photo you are viewing - its size (weight), resolution (width and height in pixels), the name and location of the file with the image you are viewing and other information, right down to what the camera leaves when shooting .
From the bottom edge of the FastStone Image Viewer screen (when viewing a photo in full width) you can find a panel with tools, similar to the one we already had the honor of seeing when we touched the top edge of the screen with the mouse. And finally, the most delicious thing, in my opinion, lies behind the left side of the other world:
What is there? And changing the size of a photo opened in FastStone, and cropping it, rotating it, various filters and overlays. Moreover, all this is designed for novice users (like my blog, in fact), so unnecessary questions usually do not arise when mastering this program. But I’ll still try to deepen and expand my manual about this popular viewer a little.
However, it wouldn't hurt to start go to settings FastStone Image Viewer, selecting the item of the same name from the top menu, and adjust everything to suit you. Most of us have to work with photographs quite often and it would be great if the program for viewing them did not create inconvenience (little things in everyday affairs can be very annoying).

By the way, this Viewer is different in that almost all default settings correspond to my requests (unlike the old ACDSee). Or I made them so long ago that I forgot. However, you are free to experiment with the image viewing mode settings, the size and color scheme of photo thumbnails, magnifying glass settings, associations (those file extensions that will be opened in this viewer by default) and the like. Everything is in Russian and has a fairly accurate description.
At one time I really liked the opportunity to use two monitors for viewing photos, if you have them. You can open a manager with thumbnails on one monitor, and a photo in full-screen view on another, which adds clarity and ease of use. I have a large diagonal TFT TV installed as a second monitor for all the computers in the house.
So, you can set the settings so that the FastStone Image Viewer program open on your main monitor displays the slideshow you are running on another monitor (in my case, a TV), which is an extension of the desktop. Your guests will undoubtedly appreciate this when viewing new photos, although now TVs themselves are capable of playing slideshows from a flash drive, but nevertheless, five years ago it was cool.
Yes, Faststone also understands RAW formats (something like a digital negative) of almost all popular cameras, and in the settings you can set the method for generating thumbnails when viewing unprocessed RAWs. Well, also in the settings of this viewer (viewer), you can set external programs for photo editing and select musical compositions that will please the soul of the audience when viewing the slideshow.
How to reduce the size and weight of a photo (compress it) in FastStone
Changing the image size (its resolution), optimizing weight (compression), and cropping (cropping) are the most popular operations when working with photographs. More than once I came across the fact that people simply did not understand why this or that Internet site did not want to accept their wonderful photo, demanding that it be reduced in weight or dimensions.
Or rather, they did not understand where and how exactly these shamanic actions could be performed on the images. Some people use online resources for this purpose, but we will go a different route.
Personally, I do this in the Image Viewer program, because everything is implemented there quite simply and clearly. Let's start in order. Let's say we want resize an existing photo or even a whole series of photographs. In many cases, you will be able to resort to batch processing if you need to bring everything to the same format.
But we’ll start with an individual reduction of a photograph (I’m not talking about enlarging it, because in raster graphics this action leads to a serious deterioration in quality), which, for example, was obtained from a modern monstrous pixel camera. At the same time, if you are in full-screen photo viewing mode, then simply move the mouse pointer to the left edge of the screen and select one of three possible items responsible for changing the resolution:

We can say that there are only two options for changing the size of the image itself, because the third option changes the dimensions of the canvas. In this case, the resolution of the photo does not change - when you increase the size, the background area of the color you specify will increase along the edges, and when you decrease it, the photo will be cropped on the right and bottom.
If you need to get standard format photo(for example, to upload to a bulletin board or somewhere else), then the easiest way would be to use the “Quickly resize” item. In this case, you will see a drop-down list with these most standard formats:

They are given both in pixels (resolution - width and height) and as a percentage of the size of the original photo. After clicking on one of the items, the photo opened in full screen mode will change its size. If you are happy with everything, then right-click on it and select “Save As” from the context menu, and if you are not happy, then select another option from the “Quick Change” item.
Yes, if you forget to save a file with a thumbnail image, FastStone Image Viewer will definitely remind you of this (ask a question about its future fate). Well, if you don’t need just any size, but a specific one (for example, equal to the width of the page of your site), then select an option from the left drop-down list "Change size/dpi":

You can set the width or height of the image in pixels, a percentage of the original photo size, or in inches (indicating DPI - the number of dots per square inch). You can again select one of the standard resolutions from the list below.
In most cases, you won't want to change the aspect ratio of the image, so the "Maintain proportions" checkbox is checked by default. In this case, you can only set the desired height or width of the photo, and the second size will be recalculated automatically so that the photo is not skewed.
Well, if you have a lot of time, you can experiment with filters that will be used to perform interpolation. What it is? A raster image consists of a finite and an integer number of points. When changing its size, most likely, it will not be possible to accurately divide it into an integer number of points, which is why various reduction methods are used without any visible deterioration in the quality of the image when it is compressed.
For example, try it with text (read about how and how to do it quickly in) and clearly see my words.
Actually, click OK, and then save the photo with the resized dimensions. From the thumbnail view mode in Faststone, you can also get to the window shown in the last screenshot. To do this, just click once on the thumbnail of the desired image (to select it) and select the “Edit” - “Resize” menu from the top FastStone Image Viewer. The sequence of actions will be the same.
How to compress photos in FastStone Image Viewer
We'll talk about batch changes in image resolution a little later, but now I would like to dwell on the issue of image compression to reduce its final weight (measured in kilobytes). At the same time, you need to understand that there are raster graphics formats that save the original photo with loss of quality (for example, jpg) and without loss of quality (for example, png). By the way, FastStone is notable for the fact that it allows you to work with the jpg format without loss.
In order to understand which file types are best to use when saving images, check out my article about (they are the ones used for uploading photos to). Only one is correct choosing a format can significantly reduce the weight of a photo.
Such pictures saved in jpg will have color noise at the text border and to avoid this you have to use the maximum quality when saving in jpeg, which greatly affects the weight of the final file.
Therefore, screenshots with text (or any other images with sharply contrasting borders) are best compressed (have the least weight) when choosing the Png format (or Gif, but this is somewhat outdated). You will not notice any distortion (unless you later resize this screenshot). Particularly significant savings in photo weight will be achieved by choosing PNG 8 with 256 colors, but this can impair the display of smooth color transitions, so you should always look at the compression result.
But there are times when the Jpg format will be preferable. This choice will be especially relevant when, when saving pictures, it will be possible to significantly reduce its quality (do not forget that JPG implies a deterioration in quality, which can be adjusted) without fear of the appearance of visible distortions (for example, ordinary photographs with smooth color transitions fall into this category) .
But let's talk about photo compression in relation to FastStone Image Viewer. We have already considered reducing the size (resolution), and it is this that provides significant savings in weight. One of my friends (a smart guy, but he was simply not in the know) unknowingly uploaded several photos weighing five megabytes each to the site and set the width and height of 100 by 100 pixels when inserting them onto the site (if you remember, then for , where attributes and its dimensions are specified).
Everything would be fine, but these pictures took a dozen or even more seconds to load, causing him genuine surprise. He heard that it directly affects the ranking of a site in Yandex and Google, and also affects behavioral factors (read about). He didn’t immediately understand my explanation about the dependence of the image’s weight on its physical resolution, because he thought that the width and height attributes of the IMG tag were supposed to solve all the problems.
That's why first resize the photo up to the resolution required for insertion into the site or for comfortable viewing on a computer. And we are also trying to determine in what format this miracle will have the least weight. How to do it? In Image Viewer I do this in the save dialog (right-click on the image and select “Save As” from the context menu):

As I already said, in the case of screenshots, the best compression results are usually achieved when saving as PNG. This is what I select from the drop-down list, and then click on the “Options” button to reduce the weight of the image even more, if possible, and at the same time see its estimated weight in this format:

As you can see, by default the weight of this photo in PNG format is 52 kilobytes (if you try to save it in JPG format, the weight is the same, but distortions on the letters are already visible and further compression by reducing the quality is no longer possible), which is clearly too much to upload to website.
But having chosen the PNG option with 256 colors (the so-called PNG 8) I received a reduction in size (weight) photo to a modest and acceptable 14 kilobytes. Beauty. As a result, the weight decreased by more than three times, which will approximately increase the loading speed of my blog page by the same amount. And you say...
If your photo is better compressed in JPG format, then you should use it. In addition, in the Save dialog of the FastStone Image Viewer program, when you click on the “Options” button, you will have the opportunity to lower the quality (thereby reducing the final weight of the image) until the option on the right begins to look noticeably worse than the similar option on the left:

The same can be said about the GIF format - to reduce the weight of the photo, it will be possible to reduce the number of colors below the default 256 pieces. The optimal ratio is determined again by viewing and comparing the original and the compressed copy. In general, FastStone is quite suitable for photo compression, especially since, in general, you don’t really need to understand it - everything is intuitive and natural.
Other features of FastStone Image Viewer
I also promised to mention batch resizing of photos, so we’ll talk about that now. In a batch manner (for a large number of photos at the same time) you can do several things in FastStone:
- Rename image files for several types of masks (the same can be done successfully in Total Commander with even more mask options)
- Convert a whole bunch of files (you can have different formats) into any one format you need
- Batch reduce the size (resolution) of a whole bunch of photos at once
- Apply a watermark that you prepared in advance to this entire pile, or simply add some text to everything (very useful in terms of subsequent evidence for hosters or search engines when dealing with cases or
- Rotate all photos in the desired direction
- Crop all selected images to a specific size
- Enclose them all in the selected frames
- Change brightness and color depth (limit the number of colors used)
- And one more minor thing to do
In order to get into all this splendor, you need to select the items “Tools” - “Convert selected” from the top menu of FastStone Image Viewer (you can also “Rename selected”, because both of these tabs will still be present in the window that opens):

If you only need to rename a group of pictures or change their format, then all the settings are given on these two tabs. The desired photos can be selected in the left column and added to the right column using the corresponding button in the middle.
But Image Viewer also supports dragging with the mouse from another program (for example, Windows Explorer or Total Commander). Next, select a folder to save the converted files, as well as a mask for renaming or a graphic format for conversion.
If you want resize all photos in batch(or do something else from the list above), then you will have to check the “Change settings (dimensions...)” box and click on the “Advanced” button located to the right. As a result, a window will open with an even larger bunch of tabs and settings on them (here’s a simple program for viewing photos):

Make the necessary settings on the required tabs and click OK. If you plan to use the same settings again in the future, then save them to a file using the corresponding button located at the bottom of the window. And after all this, click on the “Start” button (see previous screenshot) and go to the selected folder to evaluate the result of the batch conversion.
Also, for all selected photos you can remove meta data(Service - Remove metadata). In addition to those described above, FastStone Image Viewer can do the following things:
- Screenshots of the entire screen or selected area (File - Screen Capture)
- Scan (File - Receive image from scanner)
- Compress the image file for subsequent sending by mail (File - Send by E-mail)
- Crop the photo (for example, removing the same watermark and putting it on the copyright), selecting the desired format for its future printing (Edit - Crop)
- Add arrows, frame selections, inscriptions to the original photo using the built-in graphic editor (Edit - Draw)
- Remove red eye (also in the Edit menu)
- In the Effects menu you will find the opportunity to add ready-made frames, your own watermarks and other ways to mock your photos
- You can launch a slideshow with music and photos from the folder currently open in FastStone, or create a slideshow file with photos specially selected by you
- Create an image file with all the miniatures you need (Create - Create index list)
Well, now I will describe all of the above in as much detail as possible. Don't be afraid, I'm just joking because I'm tired. That's all I wanted to say about such a wonderful tool for viewing and editing images as Image Viewer. Hurray, comrades.
Good luck to you! See you soon on the pages of the blog site
You can watch more videos by going to");">

You might be interested
 Graphics for the Web - how to prepare an image in Photoshop and insert a picture or photo on the site
  How to get a fast website - optimization (compression) of images and scripts, as well as reducing the number of Http requests
  How to upload photos and transfer videos from iPhone or any other phone to your computer


