Connecting an additional monitor to a MacBook. How to connect a MacBook to an external monitor
Last week we looked at . "Areas" offer virtual method adding multiple desktops without physical use multiple monitors.
While? Just as Scopes improve the experience and productivity for Mac users, sometimes adding an extra physical monitor is the only way to get things done. I've been using a second monitor for almost two years and I couldn't imagine a better option for my work.
Connecting a second or third monitor to your Mac is something you can do yourself with a little time to set up.
It's important to note that some Macs are limited to connecting only one external monitor ( MacBook Air, for example), while others may support two or more of them. The easiest way to find out how many monitors you can connect to your Mac is to visit Apple's specifications page for your Mac model. Visit this page, search for and select Mac, and then look under the "Monitor Support" heading for the number of external monitors supported.
Choosing a monitor for your Mac.
When you're shopping for a monitor, pay attention to the type of connector that comes with the monitor. Most monitors include either a VGA or DVI connector. If at all possible, it is better to avoid using VGA, as it has far less perfect quality Images. Additionally, if you like a monitor equipped HDMI connector, don't avoid it (even if your Mac doesn't have an HDMI port itself).Since Apple has long abandoned both types of connections, you need to purchase the appropriate adapter Mini Display Port (i.e. Mini DisplayPort-to-VGA, Mini DisplayPort-to-HDMI, or Mini DisplayPort-to-DVI). The adapter converts the signal coming from the monitor, making it compatible with your Mac. Don't worry if you own a newer Mac with a Thunderbolt port - it's even better.
The adapter is not very expensive. For those who prefer to receive accessories directly from the developer, you can find them in the Apple Store. Some users report that official adapters are more reliable, but I've had good luck with third-party adapters.
Or, if you're a fan of Apple's Thunderbolt Display, it has special cable to connect directly to a Mac, although the computer must be Thunderbolt-compatible (and you'll have to fork out $999 to purchase one).
Display layout.
Once you've purchased all the necessary parts, connect your monitor, turn it on, and connect it to your Mac's Thunderbolt port or Mini DisplayPort. On this moment, make sure you are logged into your computer and both screens are turned on.Once connected, your Mac will automatically start showing the same image on the new monitor as on the main one. If you are not currently showing a presentation, such a display is not all that can be done, you need to go to " System Settings> Displays > Location".

In the setup window, you will see that both displays are superimposed to show the same image. To disable image copying, uncheck the box just below the window preview, with the inscription "Synchronize monitors".
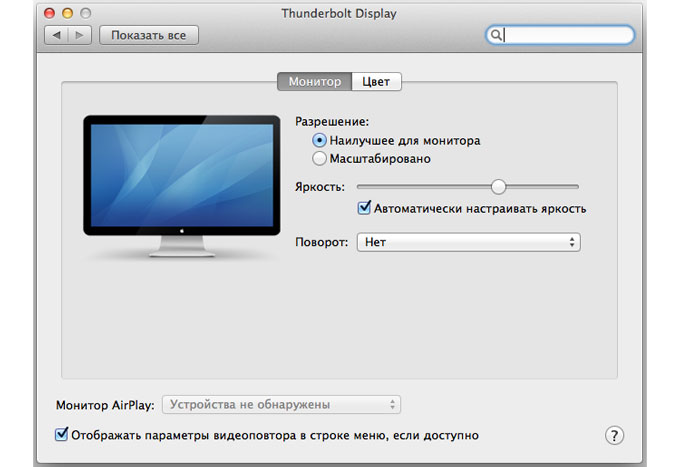
Both displays will go dark for a brief moment. When they turn on, you will see two different desktops, but the Menu and Dock will only be visible on one. OS X will automatically detect the ideal resolution for both screens, but if you want to change this setting, you can do so by selecting the Monitor tab in the Monitor settings panel.
In the "Arrangement" window, you can move and adjust the position of the monitors so that they appear as they are actually located on the table. Keep in mind, this will also determine which side of the screen you move your mouse to to switch between displays. As long as the displays are touching in the arrangement window, you can place the second monitor relative to the main one as you wish: top, bottom, right, left - it doesn’t matter.

As mentioned above, the menu bar and Dock are only present on one display (technically the menu bar is present on the secondary display too, but it's almost completely transparent), making it the main screen. On the same settings panel, you can drag white stripe, representing the menu bar on the screen you want to set as your primary. Again, the displays will go dark but will come back on to show the new settings.
iMac as a second display.
Do you have an unused iMac lying around the house? Did you know you can use it as a second monitor for your MacBook? All you need is a Mini DisplayPort or Thunderbolt-compatible MacBook, iMac and the appropriate cable to connect them. The cable will need to be plugged into the Mini DisplayPort or Thunderbolt port on your MacBook and then back into the corresponding port on the iMac. Apple has published a list of Macs and their corresponding cable requirements.Once connected, log into both devices and then click Command keys and F2 at the same time to activate what is called "Mode external display" on iMac.
Your MacBook will see your iMac as another monitor, and you can use it however you want.
If you are thinking about buying an external monitor, then first read the note about. In it, I told you what you need to pay attention to in order for the macOS interface to be correct size. There are many nuances there.
This note will discuss ways to connect a monitor to a MacBook, as well as three options for using it:
- Video repeat of monitors
- Extended desktop
- MacBook with the lid closed, like system unit
Options for connecting a MacBook to a monitor
It all depends on what kind of MacBook generation. In models before 2015 Apple release I used a Mini DisplayPort connector. Models after 2015 use exclusively USB-C connectors.
In both cases, you will need to use a special adapter to connect your MacBook to an external monitor.
 My MacBook Air has a Mini DisplayPort connector, so I connect it via cable Mini DisplayPort - DisplayPort, which I bought at a local store
  MacBook 12 only has one USB-C, so I had to buy an adapter USB-C - DisplayPort, which also has an additional charging port
 In rare cases, the monitor may support direct connection USB-C cable, and the cable will not only transmit the image from the laptop to the monitor, but also charge the laptop from the monitor.
Alas, such monitors are still rare birds in our area.
Which connector to use on the monitor
There are only two modern options: DisplayPort or HDMI.
I recommend always choosing DisplayPort as HDMI has a frequency limit for high resolutions. If you connect your MacBook to a 4K monitor or TV via HDMI, you will get a picture with a frequency of 30 Hertz. With a DisplayPort connector there will always be the required 60 Hertz. But keep in mind that .
Here are some suitable options:
- mini DisplayPort to DisplayPort, 8- Suitable for all MacBooks up to 2016 release. They have a separate miniDP port;
- USB Type-C to DisplayPort, 15- suitable for everyone MacBook Pro Model 2016 and older. These laptops have 2 or 4 USB-C ports. The wire itself delivers 4K resolution at 60 Hertz;
- USB Type-C to HDMI, 8- the adapter has additional port charging so it is suitable for 12-inch MacBook with one USB-C port. It will accurately produce 60 Hertz at 2K resolution. Not sure about 4K;
1. Mode “Video repeat of monitors”
When you connect the display for the first time, a video repeat of the image will automatically turn on: the same image will appear on the screen of the laptop and the external monitor.
This mode is well suited when connecting a projector or large display for presentations. But for real work- No.
Video Mirroring mode sets macOS to the same maximum supported resolution on both displays. If you have an 11-inch MacBook Air (1366x768 pixels), then an external 2k monitor (2560x1440) will work at the resolution of the MacBook Air. Of course, the picture will be cloudy and large in size.
To turn off video repeat mode, uncheck the box. Enable video repeat of monitors V:
▸ System Settings ▸ Monitors ▸ Location
 Turning off video replay of monitors
 2. Extended desktop
In this mode, both displays become one. Unlike video replay, the screens here operate independently and support their maximum resolutions.
In the screenshot below, the blue rectangles correspond to the connected displays. Their size is proportional established permissions. The larger rectangle (top) corresponds to my Dell P2418P monitor, and the smaller one (bottom) corresponds to the MacBook Air display.
 The monitors are in Extended Desktop mode.
 The white stripe at the top of one of the rectangles represents the menu bar and determines which display is the primary one. To select another display as your primary, click on the white bar and drag it to the desired screen.
The displays can be repositioned by dragging their corresponding rectangles. This is necessary to ensure that the connected displays are arranged in accordance with their actual location on the table, so that the cursor can move correctly.
 Specify how displays are arranged on the desktop and which one should be the main one
 In terms of efficiency, this is the most the best option connections, since you have both screens at your disposal at once. By the way, if you place the monitor on some kind of stand above the MacBook, you can continue to use its keyboard and touchpad, thereby avoiding the expense of purchasing an external keyboard and mouse.
 My Dell monitor acts as my main monitor and my laptop acts as a secondary monitor
 3. MacBook with the lid closed
This mode will appeal to those who want to work with an external monitor as the only and main one, thereby turning the MacBook into something like a “system unit”. Convenient if you want to hide your laptop somewhere away in a drawer, or there is nowhere to place it on the table.


SeenDa Laptop Stand
To “wake up” your MacBook when the screen lid is closed, you need to connect external keyboard and mouse/trackpad, and be sure to connect your computer to external source nutrition. Otherwise, when you close the lid, it will simply “fall asleep.”
If you are using bluetooth mouse and keyboard, make sure they can “wake up” the computer.
▸ System Settings ▸ Bluetooth ▸ Advanced...
 This option will allow you to “wake up” the laptop when the lid is closed
 In conclusion
I personally for a long time used the second method (extended desktop) and continued to use the laptop keyboard and touchpad. Nowadays, I often prefer the option with a closed lid. And as manipulators I use a mechanical keyboard and mouse.
If your laptop is weak, then the option with a closed lid will not load its video system so much. Also a plus.
It would seem that it could be simpler MacBook connections to an external monitor? We take a laptop, a monitor, connect them with a suitable cable and enjoy the picture on big screen. In theory, this is true, but in practice, many users are faced with numerous pitfalls. In this material, we will try to consider the main problems that may arise for a user who decides to increase the display space of his MacBook using an external monitor.
Let's consider the most common situation in which we have a MacBook and any external monitor or even a TV. They must be connected to each other using a suitable cable. Owners Cinema Display And Thunderbolt Display Feel free to skip this part.
How and how to connect an external monitor to a MacBook
All modern Apple computers equipped with a port Thunderbolt, which is backwards compatible with the Mini port DisplayPort. In turn, Mini DisplayPort is used on older MacBook models. Even earlier, in the days of plastic MacBooks, a connector was in use Mini-DVI. Also now Apple has the most common connector in some computers HDMI. They are equipped with it, for example.
Accordingly, the first thing you need to do is make sure what connectors your monitor to which you plan to connect is equipped with. Additionally, it is important to know exactly which port your MacBook has. Anyway, the list possible cables and adapters ultimately comes down to the following set:


This list of adapters and cables will be sufficient to connect most MacBooks to all modern monitors. Moreover, all presented accessories can be purchased directly on the Apple website. Cheaper alternatives are available at any electronics store or on eBay. There are exactly two important notes. Firstly, when purchasing, it is important to make sure that the adapter you are looking at is for Mini DisplayPort, and not regular DisplayPort. Also, if you plan to transmit audio to the monitor, then the cable or adapter must support this feature. Audio transmission via HDMI in MacBooks appeared in 2011 models.
Owners of the latter Apple generations Cinema Display and Thunderbolt Display don't have the pleasure of purchasing any cables separately. Cinema Display, with different variations of the name, has been produced since 1999 and is most often found with a DVI-D connector, and then Mini Display Port. If you are the happy owner of an old Apple monitor and a new MacBook, then you will still need one or another adapter. In other cases there should be no problems. Modern monitors Apple has a built-in cable with a Mini DisplayPort (in Cinema Display) or Thunderbolt (in Thunderbolt Display) immediately have built-in cables with the corresponding connectors, as well as a MagSafe power cable that allows you to charge your MacBook.
Selecting the mode of operation with an external monitor
So, the MacBook is successfully connected to the monitor. Now let's try to decide on the operating mode, which in the case of Apple laptops exactly three.
First and the simplest operating mode is video repeat of monitors. In this mode, the image on the MacBook display and monitor is completely duplicated. In this mode it is convenient to work with a projector or in other situations when you need to display your work on a large screen. Of course, this mode imposes restrictions on maximum resolution external monitor, it will not be able to exceed the resolution MacBook display.

Second and, perhaps, the most popular operating mode is the extended desktop. In this case, one monitor is literally a continuation of the other, and the user has the opportunity to use the area of two displays at once: the built-in MacBook and an external monitor. To activate this mode Just connect the monitor to a running MacBook or connect an external monitor and open the laptop lid.

In the system settings, you can change the order of the monitors, as well as select the main one. The main monitor will display a menu bar at the top of the screen. Additionally, if your monitor is tall enough, it's entirely possible to use your MacBook's trackpad and keyboard as input devices. The same thing, by the way, is true for the first option.
Finally, third the regime assumes using MacBook as a system unit and with a closed lid. For implementation this option You will need to purchase and connect an external keyboard and mouse or trackpad to your computer, since you will not have access to the laptop’s input devices.
To activate this mode, you must close the MacBook lid and put it into sleep mode. Then connects Charger and monitor. To wake the laptop from sleep mode, you will need to press a key on the mouse or keyboard. The MacBook will use the external monitor as its sole and primary image output source.

IN in this case You may not be able to wake up your MacBook. The fact is that in OS X, by default, the ability to wake the computer from sleep using devices connected via Bluetooth is disabled. If you have a keyboard and/or mouse connected in this way, then you need to go to Settings - Bluetooth - Advanced and activate the corresponding option.
We solve possible problems
Now, having connected the monitor and choosing the most convenient operating mode, you can safely use your MacBook with an external monitor. If you periodically work separately on a laptop and separately on a MacBook with an external monitor, then you will probably find the application useful. size control and the position of the windows depending on the display used.
Connecting more than one monitor to MacBook already not such a simple process. For these purposes, it is most convenient to use Thunderbolt Display, and then connect it in series to Apple monitor other displays with Thunderbolt support. Otherwise, often only one or in rare cases two connectors for image output will limit the flight of imagination. As a last resort, you can use a USB to HDMI adapter.
Laptops today have replaced desktop PCs for many. With them you can be as mobile as possible and work anytime and anywhere. Especially when it comes to Macbook Air, which has become a legend thanks to its “airy size” and performance.
How to connect an additional monitor to a MacBook.
Ease of use and portability are great, but there are many situations when it is necessary to display information on a classic monitor or several.
For example:
- for a more comfortable viewing of movies and cartoons;
- during presentations and conferences;
- for simultaneous solution of several tasks. For example, tracking information in several tables at once.
Now that it’s clear why you need to connect a monitor to a MacBook, all that remains is to figure out how to do it correctly.

What you need to connect
An adapter is required to connect the monitor. Which one depends on what model of MacBook you have. In the latest line, devices have a Thunderbolt port, older ones have Mini DisplayPort, and the very “ancient” ones have Mini-DVI. In a number of models you can find HDMI connector. Second thing to check before choosing the required adapter or cable, this is the connector on the monitor to which the connection will be made.
What is the difference between an adapter and an adapter?
The adapter cable has extremely simple function, it connects two connectors of different configurations, transmitting signals from one contact to another according to a certain scheme. The adapter acts on the signal itself, changing it as needed.
As a result, you may need:
Adapters:
- Mini DisplayPort - VGA;
- Mini DisplayPort - DVI.
- Apple HDMI - HDMI;
- Belkin Mini DisplayPort - HDMI.
This set will be enough to connect your MacBook Air to most monitors. The undoubted convenience is that any of them can be purchased on the Apple website. If you want to save money, you can buy more cheap analogues in regular online stores, but their quality may also be noticeably lower. A common mistake is buying a DisplayPort adapter when you need a Mini DisplayPort - watch this carefully.

MacBook Airs released before 2011 did not support HDMI audio, so an adapter or adapter must provide this feature. If we are talking about connecting the latter Apple displays Cinema or Thunderbolt, you won’t have to buy anything extra, since they already have built-in cables with the necessary connectors, plus it will be possible to recharge the laptop from the monitor via MagSafe.

Operating modes
It is not enough to simply connect the monitor to MacBook laptop Air, you still need to choose the right operating mode for it.
There are only three options:
- video replay of monitors;
- extended desktop;
- closed lid mode (system unit).
This mode is the most popular. Its essence is extremely simple. The monitor completely duplicates the image from the MacBook display. This is the very option that is needed for making presentations and working with a projector. The limitation is that the resolution of the connected screen cannot be higher than that of the MacBook.

Not enough laptop screen space to accommodate all the necessary tabs? The problem can be solved very easily by expanding it by connecting an external monitor. At activated mode desktop you can work on two monitors simultaneously. In this case, the main screen is set in the settings, on which the menu bar will be located.
Note. For OS X Mavericks and later, the menu bar will appear on both screens.
Now the additional monitor will become a continuation of the main one and you can simply drag objects between them with the mouse. In any of the main monitor options, you can use a trackpad or laptop keyboard to enter information.

Setting up advanced mode
Sequencing:
- connect an additional monitor;
- select system settings in the menu;
- go to the “Monitors” section;
- select the "Location" tab.
- The item “Enable video repeat of monitors” should be disabled (no checkbox).
How to set display layouts
To make working on two screens as comfortable as possible, you need to configure them mutual arrangement, so that the windows between them move either vertically or horizontally to one side. This is not difficult to do. On the “location” tab you can see a schematic arrangement in the form of blue rectangles, and their size will be proportional to the resolution. By dragging the rectangles with the mouse, you can set the desired location.

System unit
At a stationary workplace in the office or at home, you can use the MacBook Air as the system book of a regular PC. To activate the mode, just put your MacBook into sleep mode and close its lid.
Since there will obviously be no access to the keyboard, then, except additional monitor, you will have to purchase a mouse and an external keyboard. It is recommended to connect a charger so that the battery does not run out at the most inopportune moment. OS X in its default settings does not support waking from sleep when commanded from devices via Bluetooth. Therefore, you need to activate this option in advance.

Is it possible to connect a TV
Yes. To quickly connect modern TV high definition or Apple TV, add a status menu and set the connected device as the main device. A selection menu will appear when connected; to do this, you need to check the “Show video replay options in the menu bar, if available” in the settings. After this, you can watch your favorite movies and any video from your MacBook on the big screen.
How to connect 2 monitors to Macbook Air
If one additional monitor is not enough for you and you need to connect two to your MacBook, then there will be no problems only with new models that have Thunderbolt and HDMI port. Some MacBook Airs have 2 Thunderbolts at once, so theoretically you can connect not 2, but 3 additional monitors to it at once, although the performance will drop significantly, which will be very noticeable when running different videos on each. For older models, you will have to come up with “collective farm” solutions, and if you manage to connect two monitors, it will be in video replay mode, and not in desktop extension mode.
What they say at Apple
There are several official documents regarding connecting external monitors to latest models MakBook Pro line. They talk about connecting via USB connector Type-C monitors with 4K and 5K resolution. Thus, the 15-inch MacBook Pro can work with two additional 5K monitors or four at once with a 4K resolution. But for 13-inch models the quantity is 2 times less. The company also confirmed support for the Dell UP2715K monitor with a 5K resolution and a 27-inch diagonal.
Conclusion
Many users are not even aware of how convenient it is to work on multiple monitors at once, since they have never tried it. Meanwhile, the efficiency of work, when primary, active tasks are displayed on one monitor, and everything secondary is displayed on the other - chats, monitoring, etc., is several times higher. Especially if you use programs like Mission Control, which make application management a breeze. different screens even more convenient.
Learn how to connect an additional monitor to your MacBook Air using our tips and enjoy the results. If you have any questions or technical problems, write about it in the comments and we will help you solve them.
Typically, the computer will automatically recognize the second monitor once connected. All you have to do is go to the OS settings and select a convenient multi-screen mode.
If the new device does not appear in the settings menu, make sure that you have correctly connected it to the computer and power supply, and also did not forget about the power button.
If your monitor has multiple ports for receiving video data, you may have to manually activate the one through which you connected your computer. To do this, use the hardware buttons to call up the screen menu and select desired port: HDMI, VGA or other. Monitors usually have one or two buttons, so you should be able to find the one you need without any problems. If necessary, you can look at the instructions for your model.
How to set up 2 monitors on Windows
Open Screen Settings. This menu is located under Settings → System → Display. In other versions Windows location settings may vary. But on almost any system they can also be opened through the control panel, or context menu by right-clicking on the desktop, or through Windows search for the queries “Screen”, “Display” or “Monitor”.
All displays connected to the computer appear in the settings menu as rectangles. Select one of them below three modes desktop display.
In this mode, both monitors show synchronously same image. But if one of them does not support the resolution of the second, then on a display with more low resolution the desktop will be reduced and black fields will appear.
Duplicating is convenient if you use them, for example, for presentations: one display for you, the other for the audience.

By choosing a desktop extension, you will split it between displays. Each of them will show only a fragment of the available area. You can choose which part of the desktop a particular display will display. To do this, you need to move the rectangles of the screens relative to each other.
This mode is used to improve multitasking. So, you can run on every display different programs and see them in front of you at the same time. Very convenient if you need to work with several windows at once that do not fit on one screen.

This mode leaves only the selected screen active, the second one continues to work, but with the backlight turned off. This option is often used by owners to work on a large external display instead of the built-in one. The external one is left active, and the darkened built-in one is slightly lowered along with the lid so that it does not interfere with looking at the large monitor.
Combination Win+P allows you to switch between display modes on the fly:

By choosing the appropriate mode, you can adjust the resolution of active displays and other familiar settings. After this everything will be ready to go.
How to set up 2 monitors on macOS
Expand apple menu, go to “System Settings” → “Monitors” and click on the “Location” tab. You will see blue rectangles that represent screens connected to the computer. Select one of two desktop display modes from this menu.

This mode works in much the same way on macOS as it does on Windows. The desktop is divided between two screens, and you can freely distribute between them open windows. When the cursor leaves the boundaries of one display, it appears on the other. To adjust which part of the desktop a particular screen displays, simply rearrange the rectangles relative to each other.
One of the displays in this mode is the main one and contains all the shortcuts. Its rectangle displays white stripe. To make another screen the main one, drag the bar onto its rectangle.

Video repeat is similar to the screen mirroring mode in Windows. When it is selected, the rectangles on the diagram merge into one and all displays show the same image. To activate this mode, check the “Enable video repeat of monitors” checkbox.
When you choose desired mode, open the “Monitor” tab and, if necessary, adjust the resolution and other screen parameters. After this you can start working.
Closed display mode
In addition to the above, macOS supports special mode closed display. With its help, you can use your MacBook as a system unit with the lid closed.
This mode is activated automatically under the following conditions. The laptop should be on and sleeping. In addition, a monitor must be connected to it, as well as a keyboard or mouse. If you press the keyboard or mouse button at the same time, the laptop will wake up, external screen will work, but the built-in one will remain turned off.
If you connect a keyboard or mouse via Bluetooth, you will need to enable it to use private display mode. wireless devices wake your Mac from sleep mode. This can be done in the Bluetooth settings.
If you haven't purchased a monitor yet
Before purchasing, check that the monitor and computer support the same signal transmission interface, be it HDMI, DVI, DisplayPort or another. This will help avoid compatibility issues.
If you want to use a TV as a monitor, you will need Lifehacker for Connection.


