Start installing windows 7 from disk. We start the installation correctly. BIOS options for booting from DVD
Hello! Today I will write about the most sacred thing that can be in the computer business, this is about how to install Windows 7. I think that everyone at least once had such a problem as “Windows crashed”, and only specialists can reinstall it and charge you a considerable amount of money.
But you think so, today I will write how to install Windows 7 yourself and completely free. I've been meaning to write this article for a long time, but never got around to it. Until I myself needed to reinstall Windows 7 on my computer. I quickly figured it out and took photos for this article. I apologize in advance for the quality of the photo, I took it with a video camera. And then I will describe point by point what is needed to install Windows 7 and how to actually install it.
This article describes in detail the installation process of Windows 7. But I wrote another article in which I collected. Take a look, I think you will find it useful.
What do you need to install Windows 7?
1. Naturally, we will need a disk with Windows 7. You can buy it in a store or download it on the Internet. After you download it, it will most likely be in .iso format; I wrote about how to burn a disc in the article.
2. Before installation, we need to “save” your files that are located on the disk on which your operating system is installed. Usually this is drive “C”, the fact is that during the installation process we will format it and all files from it will be deleted. If you have new computer(only from the store) then this does not concern you, but in another case you need to transfer all the files from drive “C” to another drive. Data stored on the desktop and in a folder "My Documents" will also be deleted!
3. And the last thing you need to prepare is to put it in BIOS booting from a CD/DVD drive, so that we can boot from it first (By default, the computer boots from the hard drive). I wrote about what BIOS is and how to enter it here and. You can check how your computer is configured; you may already have boot from the drive installed. Just insert the Windows 7 disk into the drive and restart the computer; if the computer boots from the disk, then everything is OK (you will see the white text and dots). Well, if the PC does not boot at all, or Windows starts loading, then you need to configure the BIOS. Preparations for installation are completed, let's move on to installation. I already wrote about that.
Installing Windows 7
1. Place the disc in the drive and restart the computer. If you did everything correctly during preparation, then you should see a white inscription with dots. You need to quickly press any key. Next you should see this picture:


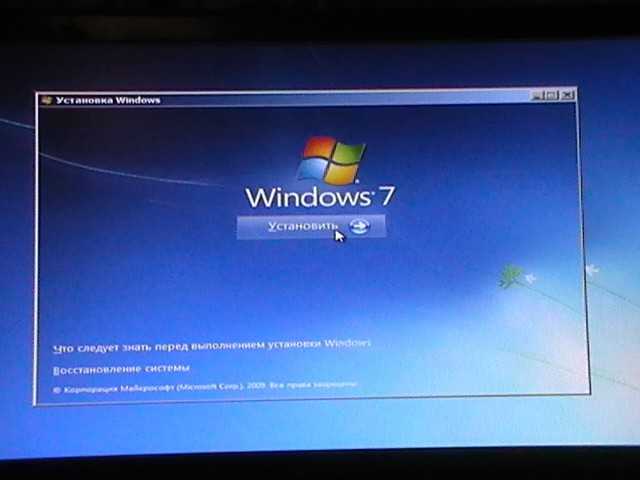
3. After this, we see this picture, on which we click “Install”


5. At the next stage, click “Full installation”

6. Now comes the fun part. If you already had an operating system, and your hard drive is already broken, then do this: We look in the list for the partition that we need (we need drive “C”), opposite it should be written “System”. The names may differ from what I have. For example, I have “Disk 0 Partition 6”, yours may be different. If you are sure of your choice, then click “Disk Settings” and “Format”, confirm, wait for completion, see that our disk is selected (Remains selected) and only after checking everything again, click “Next”. When formatting, all data from the partition you selected will be deleted!
If you have a new computer, then you will need to partition the disk. In your case, you will only have an unmarked area. Breakdown process in detail new hard I described the disk in the article. Do this: Select it (the unmarked area), click “Disk Settings” and “Create” and enter the size of the first partition. The first partition that you will create will be a partition for the system (drive “C”), I advise you to allocate 50-100 GB for this partition. The remaining unmarked area needs to be divided, preferably twice. Let's create again and enter, for example, 200 GB, and with what remains we create another partition and you should get a picture similar to mine:


7. After clicking on the “Next” button in the previous paragraph, the process of copying files and installing Windows 7 will begin.

8. Now let's move on to the actual Windows setup 7. Enter your username and click “Next”

9. Enter the password, or not, as desired and click “Next”

10. If you have a key, then write it down, and if not, then uncheck the “Activate when connected to the Internet” and click “Next”


12. Final stage. Specify time zone, time and date. And of course, click “Next” :)
13. That's it, I congratulate you! Windows 7 installed, a couple more beautiful pictures and the desktop in front of you.


Updated: January 11, 2013 by: admin
It is no secret that one of the main sources of income for computer services and “geeks” is the notorious reinstallation of Windows. Now you can save a lot on this by simply doing everything the same way as in this article. You can install Windows 7-10 on your computer, laptop or netbook yourself. I tried to explain each step as clearly as possible and provide several options for the development of events.
A few words about reinstalling Windows
In fact, everything is quite simple, but for clarity, I divided the process into several steps, and not all steps are required for everyone. At the same time, the points can be completed in several ways, depending on what suits you best. The methods are in order of preference, from my point of view. That is, if the first method worked, then we don’t waste our time on the others.
In short, the whole process looks like this: first download Windows image from the Internet (the image is a copy of the real disc) and is written to your DVD or flash drive. You can take a ready-made disc, for example from a friend. Hereinafter in the text, a flash drive also means a memory card or external HDD.
Then the computer is set to boot from a DVD or from a flash drive and the installation process begins, which is similar to installing one big program. Finally, you will need to install device drivers, if required. The installation process for Windows 7 or 10 is almost the same, and everything described is suitable for any version of Windows.
If you already have an installation disk with Windows 7/10, then go straight to.
If you bought new HDD or SSD disk, then you can simply .
Search for Windows on the Internet and download
I must immediately warn you that using unlicensed Windows is not legal, but, nevertheless, few people use the licensed version at home. Watch the video on how to find it suitable image with Windows 7 on the Internet for free:
If you have 4GB of RAM or more, then, otherwise, take the x86 version. From the editions I advise you to choose “Ultimate” or “Professional”, but not lower than “Home”. I also advise you to download images with a minimum of changes from the original, and not various assemblies, although there are normal options among them.
Here are a couple of sites where you can find something good:
Burning an image to a DVD (if installing from a disk)
You cannot simply copy the downloaded file with the “.iso” extension onto a disk or flash drive; for this we will need a special program. To burn the image to disc, you will need a blank DVD-R or a rewritable DVD-RW disc. CD-R/RW discs will not work because... there is not enough space for them. Look video tutorial on how to burn an image to disk using free Ashampoo programs Burning Studio Free.
When using an external hard drive, instead of a flash drive, no special formatting required!
The second way to prepare a flash drive using RMPrepUSB program
Booting your computer from bootable media
To boot from the newly made bootable DVD or flash drives need to be “explained” to the computer that it needs to boot from it, and not from the hard drive. Your computer may already boot from the recorded device, check this. Those. insert the disk or flash drive and restart the computer. If it starts loading from there, then go to .
For a better understanding, let me explain how a computer or laptop boots. In general, when the computer turns on, it looks at its settings in the so-called BIOS - a program that controls the inclusion and initial setup. The BIOS records which device it should boot from: hard drive, CD/DVD-ROM, flash drive, etc. So we need to set it so that the computer boots from installation DVD or from a flash drive.
There are many types of computers, but they all set it approximately the same. I made several videos for you with different computers. If you have watched the entire video, but your experience is a little different, then still, using the information received, you can easily set the desired boot device in your case.
There are three main types of BIOS interfaces: Award BIOS (Award-Phoenix BIOS), AMI BIOS and UEFI. Award bioses mostly come with blue windows, AMI ones with gray-blue ones, and UEFI ones with beautiful graphical interface(and it’s not a BIOS at all, but out of inertia they call it that, but that doesn’t matter). In order to enter the BIOS, you need to press one button when the computer starts. BUT WHAT BUTTON?
Please note that as soon as the computer turns on, some information is displayed on a black background and at the bottom you are prompted to press one or more keys. One of them is entering the BIOS. For Award BIOSes this is usually Delete key (Del), and for AMI - the F2 or F10 key. At the bottom of the screen it will say something like this “Press Del to enter Setup”. Setup is the same as BIOS. You must press quickly and several times (just in case), otherwise the computer will continue to boot. If you didn’t have time, just reboot it again using the “Reset” button on system unit
or using the key combination “Ctrl+Alt+Del”. If when you turn on the computer the full screen is screen saver
, and nothing is visible behind it, then try pressing the “ESC” key to hide the splash screen and read the information from the screen on how to enter the BIOS. Also, which button to press can be found in the manual for the computer motherboard. All modern computers can boot from the desired boot device without changing BIOS settings. To do this, you need to carefully look at which buttons are asked to press when the system starts. There you may be prompted to call up the boot menu. Then it will say “Press F9 for Boot Menu ", For example. The boot menu button may vary. For Award BIOSes it is usually “F9”, and for AMIs it can be “F12”. Example for Bios Award
I showed above in the corresponding videos. See how to select a boot device on Lenovo laptop and others
https://www.youtube.com/watch?v=OHHMT8Gvuio
If you have a computer with UEFI, then when you get into the BIOS you will see the following picture: At the bottom of the screen there is a section " Boot Priority ", where you can use the mouse to set desired order downloads. You can also click on the right top corner button “Exit/Advanced mode” and select “Advanced mode” in the window that appears. Next, go to the “Boot” tab and in the “Boot Option Priorities” section in the “Boot Option #1” field set boot device

by default a flash drive, DVD-ROM, hard drive or other available device.

If your computer or laptop does not want to boot from your image, then on the “Startup” tab, set the “UEFI/Legacy Boot” value to the “Legacy Only” position

Owners of Hewlett-Packard computers will probably find the following picture in the BIOS: Select, press "Enter", then move it to the very top and press "Enter" again. Save the settings in the “File -> Save and Exit” menu.
Installing Windows on a computer
After downloading from installation disk The installation itself begins. Watch the video tutorial on how to install Windows 7 on your computer:
Installation is almost no different from reinstallation. Only if Windows is installed on a new computer, then during the process you need to create partitions on the hard drive in the “unallocated area”, and when reinstalling, simply format the existing one system partition, having previously copied important data from it to another location (if any).
After installation, Windows must be activated, otherwise the system will only work for 30 days. Owners licensed version Activation is carried out using the built-in wizard (via the Internet or by phone). Unlicensed versions of Windows 7-10 are activated using special programs. I warn you that this is not legal, so for informational purposes only. I recommend purchasing it and not having problems with activation.
I show the most universal method activation using the RemoveWAT program. If possible, activate by following the instructions included on the torrent download page. Also keep in mind that illegal activation does not guarantee stable work systems.
Watch the video on how to activate using the RemoveWAT program https://vimeo.com/109308188
The RemoveWAT program is searched for and downloaded from the Internet on its own, but usually you will already have all the instructions.
Installing drivers
After Windows installation is complete, you need to install drivers. Without them, the computer will not work full force. To check if you need drivers, open Device Manager. To do this, press the “Win + Pause” buttons and select “Device Manager” in the window that opens on the left.

There should be no exclamation marks in the device manager, i.e. there should be a picture like this

If there are exclamation or question marks, then you will have to install the missing drivers

It's good if you have the driver disks that came with your computer. Then insert them one by one and install the drivers from the autorun menu of each disk. If there are no disks, then simply use one of the special programs.
Watch the video tutorial on how to automatically install drivers using Drivers programs Installer Assistant from the SamDrivers package https://www.youtube.com/watch?v=xNmgqrCwBTw
This method does not require an Internet connection, but the downloaded file is an image. Therefore, in order to use it, you need to write it to a flash drive using any of the methods described above. Or just extract the files from ISO image as from regular archive and run the program.
This full version a program that includes a database of all current drivers, so it takes up several gigabytes. It can be downloaded via torrent from the official website of the program. Installing drivers using DriverPack Solution Full does not require an Internet connection.
There is a lightweight version of DriverPack Solution Lite, video https://www.youtube.com/watch?v=JrYY7o85Cis
This method requires an Internet connection, so to use it you must already have the Internet configured.
Conclusion
After Windows reinstallation you can start. If something is not clear, then ask in the comments - I will answer. Also write in the comments feedback, your opinion is very important to me!
If you switched to this page, then you have decided to reinstall Windows 7 and you need help with the installation. Below I will tell you in detail all the stages, starting with Windows boot on your computer and ending with Windows Activation and a short introductory video. And so let's get started. The first thing you need to do is download the Windows 7 image itself; there are two types: 32x and 64x. How to understand what bit depth you need, very simply in the computer properties there is information about your hardware, we are interested in the RAM line ( installed memory). If you have 4 GB or more installed, you need a 64-bit version, everything below is 32-bit.
When we have already decided on the bit depth, we move on to downloading Windows image 7. Click on the green button “Download Windows 7 Ultimate” and a torrent file called ru_windows_7_ultimate_with_sp1_x86.iso.torrent will be downloaded to your computer. We launch it to proceed to downloading via torrent program. If the file asks you to open it through any program, then uTorrent is not installed. follow the link to download it.
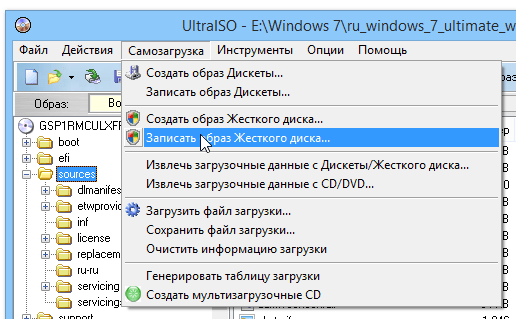
While Windows is in the process of downloading, we will download and install UltraISO program. Using it, we will write the image to a disk or flash drive.

After installing UltraISO and loading Windows, let's start recording to a disk or flash drive. Launch UltraISO and perform the actions as in the screenshot:

Open the image with the program and perform recording.

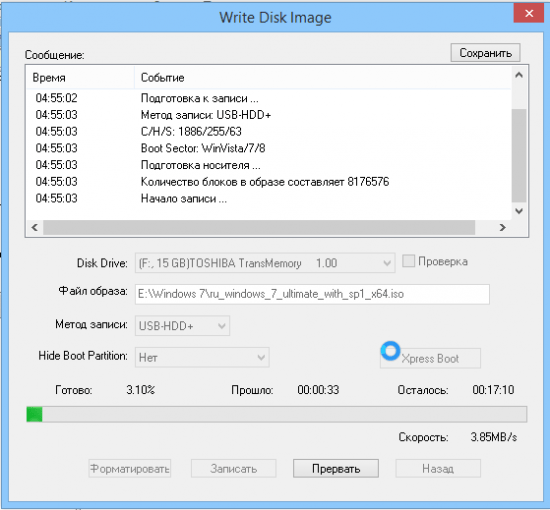
We wait for the process to complete and close the program window. Now your flash drive or disk is ready to start outside the system.
Well, now the most interesting thing is, we need to tell the computer to start from our media; for this we need to call the BOOT MENU. Usually these are the DEL or F8 keys, but there are exceptions, it all depends on the manufacturer of your motherboard - below are the buttons from which you can call the BUTMENU from various motherboards.

If you did everything correctly, you will see a type of menu with a boot selection, control using the arrows and the ENTER key.

After selecting the BUTMENU, copying of files “loading in” will begin Windows file" to start the installation of Windows 7. In the first installation window, you must select a language and click Next.

In the next window, click Install.

Selecting the installation type, click “Full installation (advanced options)

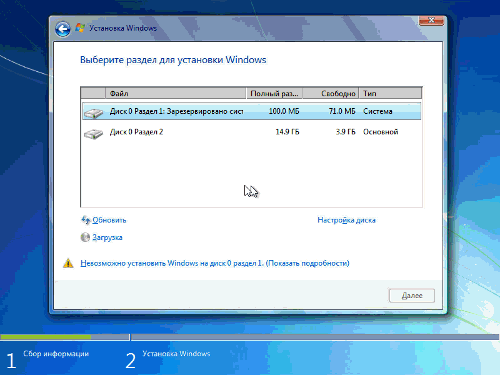
And here is the most important window, selecting the partition on which the installation will be performed. For correct installation you must format the system drive C where your old Windows. Ideally, it is better to delete it and also the partition where the MBR is stored; it usually weighs 100 MB. To do this, select the section and click Delete. “Unallocated disk space” will appear. Click “Create”, specify the disk size or leave it unchanged and click “Apply”
Now it’s a matter of time, as soon as you click Next, copying files to install Windows 7 will begin. You can remove the flash drive or disk after the first reboot and watch the installation process until the Select user name window appears. Enter any desired name and click Next.

In the key entry window Windows product, uncheck “Automatically activate Windows when you connect to the Internet” and click Next.
That's all difficult process installation, the familiar desktop will appear in front of you - this means that Windows 7 Ultimate is installed.
Another important and mandatory process is Windows activation. On the desktop, find a shortcut called “Activator”, launch it and do everything as shown below in the screenshots.
For novice users, installing Windows and programs is a rather labor-intensive process, so we will consider installing an unlicensed assembly like ZVER, because process windows installations and programs in this case will be automated to the limit and require minimal action from the user. Windows-xp assembly ZVER is intended for installation on computers with a processor from 1100 MHz, from one to four cores, (32 bits), with RAM from 500 MB. up to 3.7 GB. , with DVD drive. (when set to more modern computers some of the power will not be used; when set to weaker ones, the work will be noticeably slowed down). Initially, you need to set the boot priority from the drive in the computer BIOS; to do this, enter the BIOS settings, for which, immediately after turning on the computer, press the DEL, or F2, or other key on the keyboard (the method for entering the BIOS is usually indicated on home screen immediately after switching on). Using the arrow keys and the ENTER button on the keyboard (on older computer models, other keys may also be used to set boot priorities - for example, plus and minus, or page up and page down - see the on-screen prompts), find the item BOOT menu, set the drive as the first (FIRST) boot device, the second is a hard drive. For old computers, select ADVANCED, set priorities - FIRST-CD-ROM, SECOND-HARD DISK. If there is more than one hard drive in the computer, then before installation you should leave only one - the one on which Windows will be installed, to do this, disconnect the connectors from the remaining hard drives (all switches inside the computer should be performed with the power off), otherwise it will be necessary to additionally set the priority hard drives (hard drives can be connected again after Windows installations), it is also recommended to disconnect the card reader, if available (remove the card reader connector from motherboard) and take it out flash drives, if they were inserted. To exit the BIOS, press F10 (exit with saving changes) or ESC (exit without saving changes). In case of erroneous user actions - incorrect settings in the BIOS, the computer may not turn on or work incorrectly (even failure is possible, for example, if you try to overclock the processor). To cancel changes to BIOS settings, you should reset the BIOS - i.e. return to factory settings initial settings. To do this, go to the mat. On the board, find the BIOS reset jumper (usually located near the battery), with the computer disconnected from the network, set it to the CMOS CLEAR position for a few seconds, then return the jumper to its place, and turn on the computer. If the jumper cannot be found, then with the computer turned off, remove the CMOS battery for a while (from several minutes to a day, depending on the capacity of the capacitor installed in parallel with the battery), then insert the battery into place. After setting the priority, set to DVD drive disk ZVER. Before installing Windows, it is recommended to check and, if necessary, restore the hard drive using the Victoria program. It is also recommended to check RAM using the memtest program (test programs are located on the ZVER disk and are launched from the boot menu). To install Windows, you should choose a hard drive that has the least wear and tear highest speed work. To install Windows and programs in boot menu(it appears for a few seconds) select item- automatic installation Windows, press ENTER. Installing Windows and programs takes approximately 3-4 hours. During the installation process you will need to set the partition volumes ( logical drives) hard drive - using the prompts on the screen, delete all partitions of the hard drive, then create-disk C - recommended volume, depending on the total capacity of the hard drive - from 12,000 MB to 25,000 MB, disk D - the rest of the capacity. It is not recommended to create only one partition, because... in this case, working on a computer will not be very convenient. One partition is created only if you use a small hard drive - less than forty GB, or if a separate one is used for Windows physical hard disk. Then the installation program will ask you to choose to format drive C - select format to NTFS (FAT formatting is used for very small disks - no more than a few GB). Also, during the installation process, some more requests will appear; no action needs to be taken, the default settings will be selected. After automatic reboot The boot menu will appear again - you don’t need to select anything, by default it will boot from drive C, and the installation will continue. After installing Windows, after a while a menu will appear asking you to select programs; if you are not sure, then no action needs to be taken, a set of programs will be automatically installed, necessary for the user for the first time - different office applications, codecs, plugins, browsers, players, etc. USB will be installed as antivirus GUARD program to prevent viruses from entering flash media and disks. It is recommended to install an antivirus - for example Avast, NOD or another ( free antivirus Avast can be found on the Internet on the website of the Avast manufacturer; when registering at a random email address, a trial registration will be given for a month). After installing Windows and programs, remove the ZVER disk, restart the computer, go to the device manager, make sure that all drivers are installed and the computer devices are recognized correctly. If drivers are not installed on any devices (they will be marked with an exclamation mark or question mark), then install the driver assembly disk into the drive, following the instructions on the screen, install the drivers, then restart the computer. Then install drivers for the printer, MFP or other external devices connected to the computer. To do this, use disks with drivers from the device kit; if there are no drivers, find drivers on the Internet, on the websites of the manufacturers of these devices. After installing Windows, go to the BIOS, install the hard drive as the first boot device, save the changes and exit. If additional hard drives were disconnected, then connect them. Format drive D and other drives, if any. Create folders on drive D - for example, IMAGES, DOCUMENTS, MISCELLANEOUS, MUSIC, VIDEO, PHOTO or others. After installing all necessary programs, games and drivers, defragment drive C. The defragmentation program should be run for each hard drive once every few months - this will reduce wear on the hard drives and increase operating speed. The disk error checking program can be run as needed, for example, after a sudden power outage. Go to the screen settings through the control panel, set the required resolution and frame rate. Set the desired desktop background, set the desired screen saver and the time the screen saver appears, as well as the time when the monitor turns off and the computer goes into sleep mode. Then, in accordance with your provider's instructions, connect your computer to the Internet. Through the start menu - programs - install shortcuts on the desktop for the programs you most often use - for example - WORD, browser shortcut, NERO EXSPRESS and others. Games should not be installed on drive C, which will be offered by default, but on drive D (if available) or another, in separate folder for example in the game folder. It is also recommended to enable the system restore option (Start menu-panel management - recovery) because If the system malfunctions, you can easily return the system to its previous state. To restore the previous state, use the menu start panel control - recovery run the recovery program. Or immediately after turning on the computer, press F8, in the menu that appears, select the item - safe mode (SAFE MODE), it will boot into safe mode and repair system damage. Reinstalling Windows should be done in case of replacement system disk, or in case of significant damage to the system, for example by a virus.
Many novice users personal computers or laptops sooner or later face the need to install or reinstall operating system. And not every newbie knows how to install Windows 7 system. Someone acts at random and installs a system without the slightest idea; as they say, he learns from his mistakes, losing a lot of time. Some people pay a lot of money to hire specialists to install and configure Windows. I strongly recommend that you master all the intricacies once and for all. self-installation system, which will allow you to save a lot of time and money in the future.
Immediately before installing the operating room Windows systems 7, like any other Windows versions, the following preparatory operations should be performed:
- create or purchase boot disk or a USB flash drive with Windows 7, from which the installation will be carried out;
- read the instructions for setting boot priority in the BIOS and installing Windows 7;
- save from “Local Disk C” to some other, for example, “D” or “E”, all the necessary data.
If the above is completed, you can proceed with the installation itself. I draw your attention to the fact that I myself installing Windows 7 on a computer from a flash drive no different from installing from disk. So, as soon as the computer started booting from bootable flash drive or disk, the message “Press any key to boot from CD or DVD” will appear in white letters on a black background. You need to immediately press any key on the keyboard for the installation to begin. This must be done immediately after this message appears. Otherwise, after a few seconds it will disappear and you will need to reboot. 
Installation starts with download necessary files, as shown in the picture below. 
Once the download is complete, the message “Starting Windows” will appear. 
After this, the start window for configuring the installation parameters of the Windows 7 operating system will appear. Here you can select the system installation language, time format and keyboard layout. You can leave everything as shown in the picture. 
Then a window will appear in which you need to click on the “Install” button. 
A window will appear with the message “Starting installation”. 
The system will prompt you to familiarize yourself with the terms and conditions license agreement. If you agree, check the “I accept the license terms” checkbox, and then click the “Next” button to continue installing Windows 7. 
Next step will select the type of installation. The system will prompt you to restore your existing operating system and install a new one. We need the second option - “Full installation”. We choose it. 
Now you will need to select a section ( local disk), on which Windows 7 will be installed. As a rule, this is “Local disk (C:)”. However, it needs to be formatted, that is, cleared of existing unnecessary information. To do this, click the “Disk Setup” button. 
Now left-click once on “Local Disk (C:)” so that it becomes active (selected), and then on the “Format” button below. Please note that out of almost 70 Gigabytes on this disk, only 24 Gigabytes are free. That is, 46 Gigabytes are occupied by various files of the old operating system. 
A message will appear warning you that formatting will delete all files stored on this local drive. We agree by clicking the “OK” button. 
Formatting will complete in just a few seconds. You can find out about the completion of formatting by the updated readings free space on "Local Disk (C:)". As a rule, the free disk space after formatting should be 0.1 GB less common space disk. In my case, out of 69.9 Gigabytes, 69.8 are free after formatting. It turns out that 100 Megabytes are somehow reserved by the system. So, make sure that “Local Disk (C:)” is selected and click the “Next” button. 
If you installed new hard drive(hard drive), it will not be partitioned as shown in the picture. Click the Disk Setup button. 
Select the unallocated space and click the Create button. 
A small field will appear in which you need to specify the size of the new local disk. For the Windows 7 operating system, I recommend choosing about 60-70 Gigabytes. But since the size is in megabytes, 70 must be multiplied by 1024, because one gigabyte contains 1024 megabytes. I got 71680 Megabytes. Enter this value on the keyboard in the “Size” field and click the “Apply” button. 
You can use the remaining unallocated space to create other local disks, the size of which you can choose as you like. So, highlight the created 70 GB local disk and click “Next” to continue installing Windows 7.
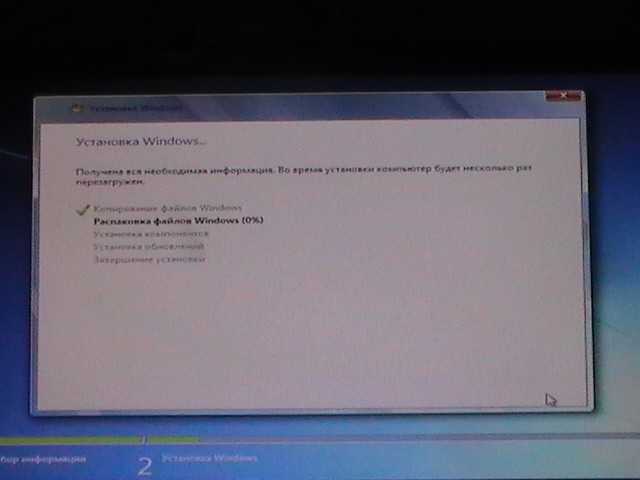
A window will appear showing the currently running this moment Windows 7 installation operations. Unpacking files takes from 3 to 20 minutes, depending on what storage media the Windows 7 operating system is installed from. As I already said, with solid state drives installation will be much faster. 
A message will then appear stating that you will need to restart your computer to continue with the installation. You can wait 10 seconds, and the system will do it itself, or you can save precious seconds and click on the “Restart now” button. 
The computer will begin to reboot. And here I recommend that you immediately go into the BIOS to configure the computer to boot from your hard drive (hard drive), and not from a flash drive or DVD. This can be done according to the principle described in the articles “How to configure the BIOS to boot a computer from a disk” and “How to configure the BIOS to configure a computer to boot from a flash drive.” Only in this case, instead of a DVD drive or flash drive, you will need to select a HDD. Once you have set the BIOS to boot the computer from the hard drive, press the “F10” key and agree to save the changes by pressing “Enter”. The computer will start rebooting from the hard drive - it will continue installation of the Windows 7 operating system from the "Starting Windows" message. 
The message “Setup is updating the registry settings” appears next. 
And behind it - “The installer is starting services.” 
The installation of Windows 7 is nearing completion, as evidenced by the information in the following picture. 
The system will need another reboot. The next time you start your computer, you will see the message “The installer is testing video performance.” 
This will be followed by initial setup Windows 7 operating system, which requires your participation. You must enter a user name, for example, your own, and the computer name. To change the language from Russian to English, you can press the “Shift” and “Alt” key combination on the keyboard (that is, pressing these two keys simultaneously) or with the mouse on the panel at the top. If you entered necessary information, click the “Next” button. 
For your account the system will prompt you to set a password, without which no one will be able to boot your computer. You can create it right away, or you can do it later, after installing the Windows 7 operating system. I usually do not create passwords, since I am the only user of the computer. To continue setting up, click “Next”. 
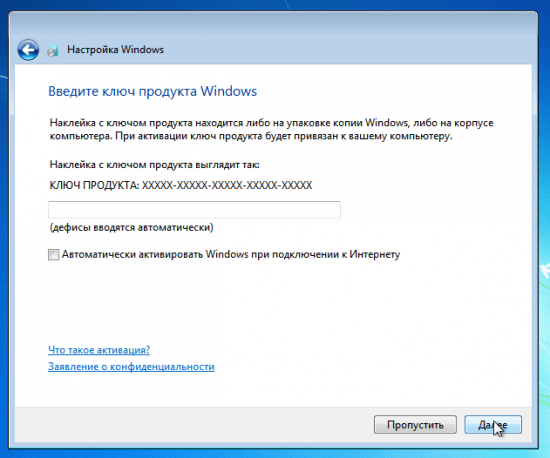
This time you need to enter license key Windows. If you bought a disc, the key will be indicated on the package. If you downloaded Windows 7 from the Internet, do not enter anything; I suggest you activate the system after installation. Also uncheck the box “Automatically activate Windows when you connect to the Internet” and click “Next”. 
In the next window, if you have licensing system with the key, select the first item “Use recommended settings”. If you purchased Windows 7 for free, for example, downloaded it from the Internet, that is, although your version is original, it is still pirated, hacked, select the last option “Delay decision”. Most people, including me, have just such a system. Click "Next". 
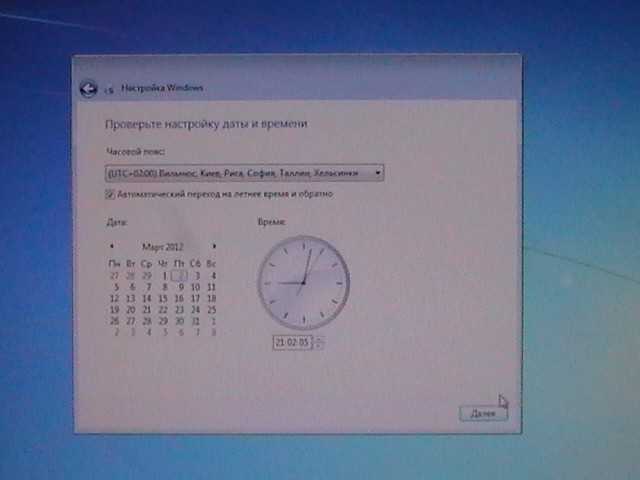
Now configure the date, time and time zone, then click Next. 
If your computer has LAN card or Wi-Fi, the installation system will prompt you to select the network to which your computer will be connected. I usually select "Home Network". 
The computer will begin to connect to the network. 
After this, the message “Preparing the desktop” will appear. 
And finally, the Windows 7 operating system you installed will boot for the first time. 
Congratulations, the installation is completed successfully. The next step is to activate the system, which you can learn about in the article “How to activate Windows 7.”


