How to connect a disk drive to the motherboard. The cheapest way to connect an IDE device to the motherboard
Hi all! Previously, I already wrote an article about how to connect an ide hard drive to the motherboard using a controller. Today I will share with you another great solution to connect an ide device to a new motherboard. In addition, this solution is inexpensive and quite universal.
While upgrading the hardware of one computer, I was faced with a choice: should I buy a new optical drive, or can I use an old one that has an IDE connector. Naturally, the new motherboard does not have this connector, and in response to my proposal not to install a drive at all, the computer owner firmly stated that he uses the drives often and with pleasure.
The cost of a new optical drive with a modern SATA connector is not so high - about 600-700 rubles, but then it is not clear what to do with the old device, because it works great. And the money saved is better spent on improving the performance of a new computer.
After surfing the Internet a little, I came across this wonderful thing:
Similar adapters can be ordered from China at ridiculous prices here: aliexpress.com is a proven, reliable store with a guarantee, the services of which I use quite often.
This is a SATA - IDE adapter and vice versa IDE - SATA. It is quite compact in size and costs only 200 rubles! Obviously, buying such an adapter is more profitable than buying a new drive.
The great thing is that it works both ways. That is, we can connect an old IDE device to a new motherboard, or vice versa, we can connect a SATA drive or hard drive to a motherboard that does not have SATA connectors. In both cases, we can save significantly.

In general, connecting a device through such an adapter does not cause difficulties, but you need to be careful here. The adapter has markings for SATA pins (see right photo above). One SATA connector is used when connecting an IDE device to the motherboard, the other, vice versa, if you need to connect a SATA device to an old motherboard.
In addition to various connectors, the controller has a jumper for selecting the mode:
- 2-3 IDE mainboard to SATA HDD;
- 1-2 SATA mainboard to IDE HDD.
Accordingly, by bridging the necessary contacts 2-3
or 1-2
, we tell the device exactly what type of connection we need.
In any case, just by experimenting with the wires and jumper, you can achieve the desired result, and you don’t have to be afraid that something will burn out (tested from your own experience?).
Connecting an IDE hard drive or drive will look like this:

Having connected the optical drive through such an adapter, I decided to buy myself exactly the same one. Let it sit, I’m sure it will definitely come in handy for that price.)
Here is a simple and cheap solution for connecting IDE devices. I hope this article will help many people make the right choice)
P.S. For those who are unable to connect a hard drive through an adapter (not detected in the system or in the bios), they can try setting the jumpers on the IDE drive itself to the master or slave position. Try different options. Everything will definitely work out! (Thank you! for the addition to Alexey Shchukin)
No laptop is immune from optical drive failure. Repairing it can take quite a long time. To immediately open a disk on a laptop, you can use the disk drive of your home PC. There are several ways to connect a disk drive to a laptop, depending on the device’s drive interface.
If the drive has a USB interface, you need to connect it to the USB port, and then turn on the laptop. After the system detects new hardware, the necessary drivers for the device will be installed. After connecting the drive, a notification will appear indicating that it is ready for use. The drive can be used after the corresponding icon appears in "My computer". If the drive is equipped with a SATA interface, you will need an adapter " USB-IDE/SATA ", which can be purchased at a computer store. You can connect any device that supports the SATA interface to the adapter. Complete with adapter " USB-IDE/SATA "Additional power supplies are available. “USB-IDE/SATA” needs to be connected to the laptop’s USB port, then connect the optical drive to the adapter, then the disk drive. Plug the adapter into AC power. After turning on the laptop, you need to wait until the operating system boots. New equipment should be discovered. Once you are notified that the equipment is ready for use and the icon appears, you can begin using the drive. “My Computer”, select “Properties”. A list of equipment will be displayed in the “Device Manager” tab. Right-click on the top line and “Update Configuration”.
If found in the list "Unidentified device" need to “Update drivers” by right-clicking on the device. In the next window, select “Automatic search for drivers.” You can use the Internet to search for drivers.
The market has been filled with netbooks - devices that fundamentally do not have a CD or DVD drive. Even Apple is moving away from these bulky and outdated devices, but the company at least includes a USB flash drive to reinstall the system or run utility utilities. And ordinary users receive a non-book with an already installed system.
All the instructions for installing or reinstalling Windows on a netbook without using a DVD drive (from a flash drive) are so overloaded and complicated that it’s not easy to understand them. It used to be simpler: put the disc in the drive and off we go. Now this is also possible, but you need an external drive.
External DVDRW drives for laptops connected via regular USB are prohibitively expensive. Today the price starts from 1,650 rubles, and the upper threshold reaches three thousand. A lot of money for something that will be needed a couple of times a year.
Therefore, today we will assemble an external USB-DVD drive from matches and acorns, which will be much cheaper. How significant depends on your ingenuity and resourcefulness.
I purchased the drive itself in the discount department of the DNS store - one laptop drive cost me only 35 rubles. Yes, yes, yes, thirty-five rubles for a DVD cutter! Here are the models that are available right at the time of writing:
It has become a little more expensive, but you can always buy any laptop drive at a flea market or secondhand. If only it worked and had a SATA connection interface. The presence or absence of a front panel does not matter - it is purely a decorative element.
The second part that we definitely need is a USB box for the HDD. We need a box for a laptop drive with a SATA connection. A new box costs from 400 rubles, but you can find it cheaper if you look for this product second-hand.
 It is more profitable (in terms of price) to buy the box not in a store, but at a flea market, from your hands. You won't need a store warranty anyway - we'll disassemble the box down to the screws and improve the design a little.
Why do we choose SATA? This is a more current, faster and less expensive connection method (you have to pay extra for the retro IDE format). In addition, the IDE connection connector on the DVD drive is completely non-standard, and unnecessary problems are unnecessary. In general, SATA!
In addition, you need two pieces of wire (MGTF will do), a stationery knife, (nail clippers), one thin Phillips screwdriver, a toothpick, wire cutters, pliers, a soldering iron and the necessary soldering supplies.
Let's get started!
First you need to gut the drive box and remove the USB to SATA adapter board from there. Each model is understood differently, so I won’t give general advice here. We only need the board, the rest can be thrown away.
The main problem is the power connectors. For some reason, CDs made it shorter and with a different pinout. Although in laptop drives the 12V and 3V lines are not used. In general, we will do the food ourselves. Here is a diagram of the power connectors for the optical drive and hard drive.
 Now let's move on to modifying the drive. It needs to be disassembled to gain access to the board. Disassembly is not difficult: unscrew the screws (there are three of them) on the top cover and remove it.
 The board we need to access is safely hidden under the drive tray. But, as with conventional large drives, the tray can be extended mechanically. To do this on a laptop drive without a muzzle, you need to poke a toothpick into the hole slightly to the right of the eject button. If there is a decorative face on the drive, then there is a hole on it where you need to poke. Although it will probably be a little narrower, so instead of a toothpick you will have to use an unbent thin paperclip.
 Once access to the board is obtained, we will begin finalizing it with a file. We need to gnaw out a hole large enough in the connector and in the lid so that our adapter from the box can fit in there freely. Depending on the accuracy and tools used (I chewed with clippers, wire cutters and pliers), it should look something like this:
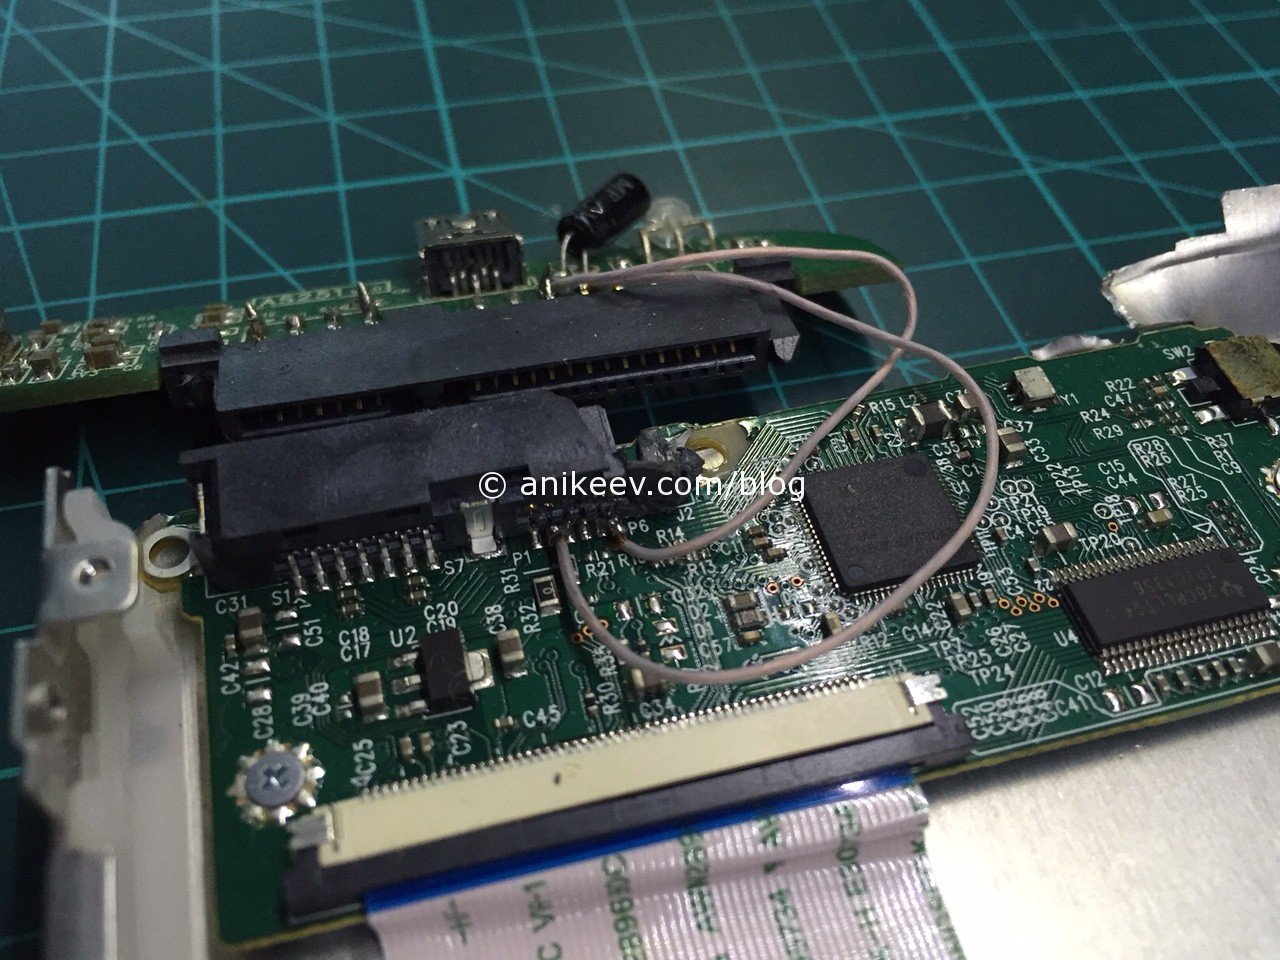
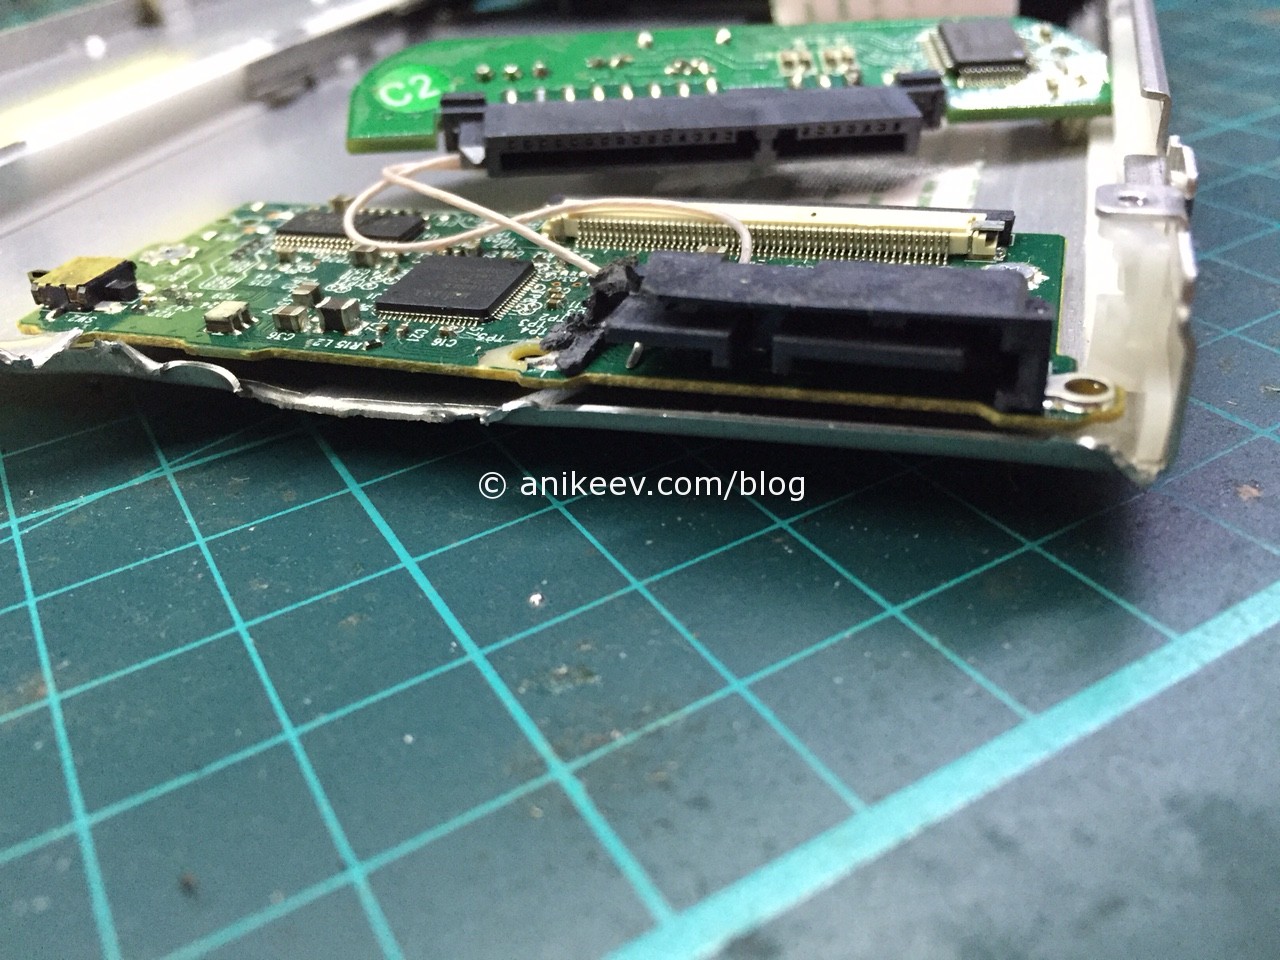 Now take a utility knife and cut the tracks on the back of the power connector on the drive. For reliability, you can make two cuts to cut out a whole strip and certainly open the contact. We do this because the pinout of the power connector for SATA-HDD and SATA-DVD is different. Below you can see that the tracks are cut: compare with the contacts of the SATA data connector (left)
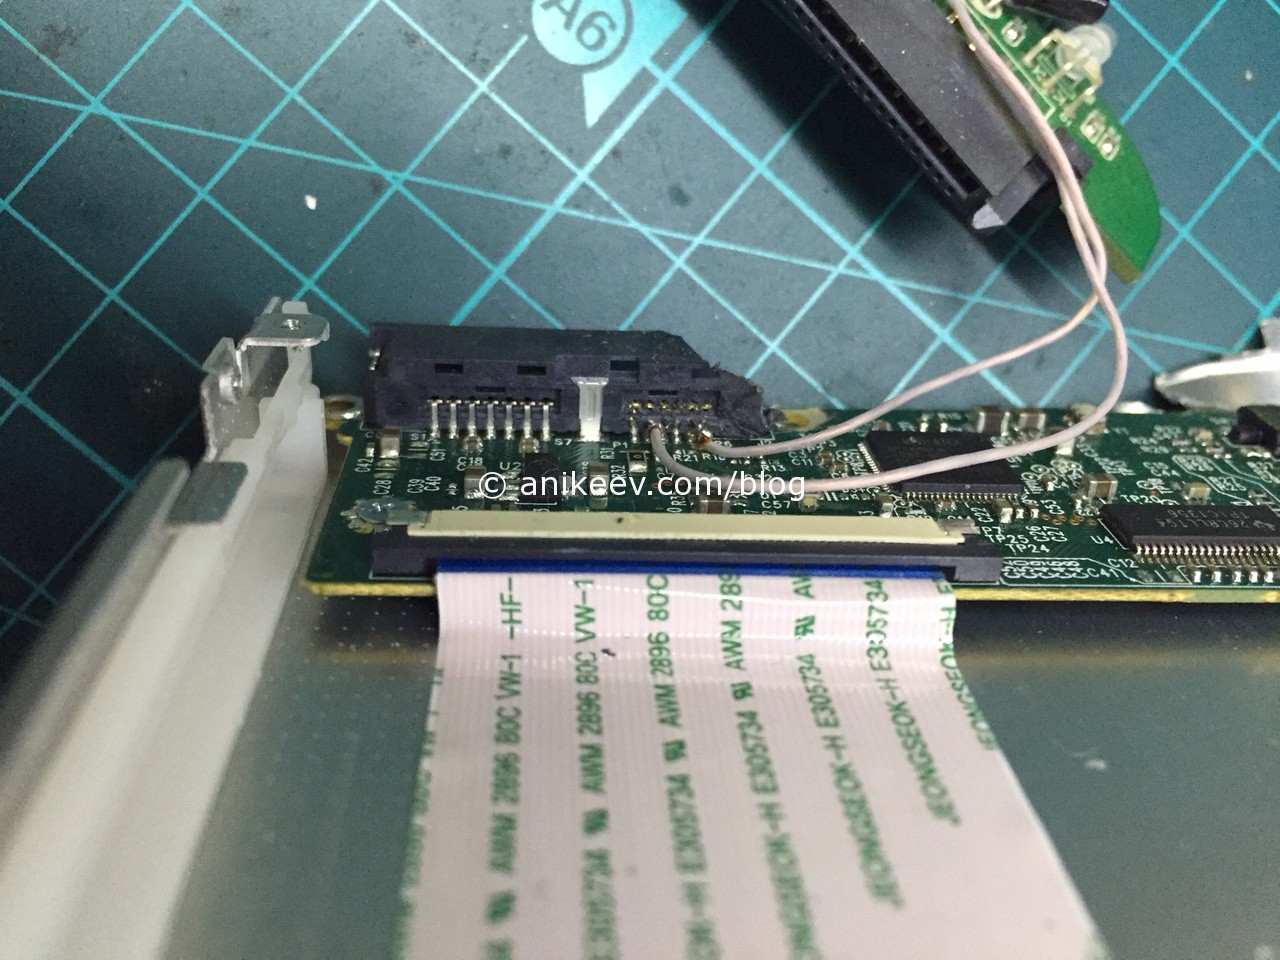 We will supply power with separate wires in accordance with the pinout of both connectors (we need one GND and one +5V). By the way, if you want, you can add a detachable connection to the wires to completely disconnect the drive from the board.
This is how you get an external DVD drive from which you can install windows in case of problems. And no dancing with flash drives. True, you need to be able to hold a soldering iron in your hands. For those who do not have this problem, they save.
 Do you need to make a USB-DVD drive even cheaper and without a soldering iron?
Thank you Chinese brothers! You can buy on Aliexpress
Updated – 2017-02-13
Replacing the drive . If you use a CD or DVD drive frequently, you will have to replace them more than once. Even if you are a very careful user, this still cannot be avoided. I don’t recommend taking the processor to a repair shop because of such nonsense.
At best, you will have to wait your turn or pay for urgency, and at worst, they will slip you some kind of disk drive after repair. And it’s good if something else is not replaced with something worse, or the same after repair.
I don’t know about you, but in our workshops this is exactly what they do. And there is nothing to complain about. You came with one fault, and after a while you come back with another. And their flow of clients does not decrease, and your money smoothly passes into another pocket.
So, my advice to you is to learn how to repair your computer. You will save both money and nerves!
Today we will look at the easiest repair - replacing the drive. This process works for both CD and DVD drives. Unlike replacing or adding or this operation is really simple.
Since the time has come to replace the drive, it is better to immediately change it to a combined DVD, which can both read and write files, music and movies. There is no need to take a very expensive one. If you use a disk drive frequently, then your expensive disk drive might as well fail.
The only thing you need to know when purchasing is the type of connection that your motherboard supports. Because there are SATA drives, and there are IDE drives. In order to decide which drive you need, it is best to open the system unit and see what cable it is connected to the motherboard with.

SATA cable 
If your drive is connected with a SATA cable, then you need a SATA drive, and if you have an IDE cable, then an IDE drive. On some motherboards you can connect both a SATA and an IDE drive. But such boards are becoming less and less common, because... SATA is already used everywhere.
Installing the drive
- First we need to dismantle (pull out) the old drive.
- Disconnect the computer from the electrical outlet.
- Disconnect all cables connected to the connectors on the rear panel of the system unit (mouse, keyboard, monitor, etc.).
- Remove the side covers of the system unit.
- Find the disk drive (usually it's at the very top).
- Disconnect the cables from it.

SATA drive

IDE drive
- Unscrew the screws (two on the right and on the left) that secure it to the chassis of the system unit.

Left-hand side

Right side
In the photo, the screw locations are shown with red arrows. I have them already unscrewed. Some drives are secured with latches, which are usually located at the level of the screw holes, closer to the front panel. They must be pressed on both sides at the same time and push the drive forward.
By the way, the drive is inserted and removed from the front, from the front panel. So don't try to bend or break anything if it doesn't go back.
The drive must be removed from the front, not from the inside!

Get a new drive. For an IDE drive (if you will connect it to the same cable to which the hard drive is connected), you need to set the jumper to the SLAVE position.

It may be different on your drive. Look at how it is drawn on its body and set the jumper in the same way as shown there.
On the hard drive, the jumper should be set to MASTER (if your old drive was connected together with the hard drive using one cable, then you don’t need to change anything on the hard drive).
The best solution is to connect the drive to a separate cable. Then there is no need to install any jumpers.

Carefully insert the drive into the slot at the front, secure it with screws and connect the necessary cables to it.
Close the system unit covers.
Connect all necessary equipment to the system unit (mouse, keyboard, monitor, etc.).
Turn on the computer, wait for the boot to finish, and check if there is a disk drive installed in the system. To do this, open the folder " My computer " The drive icon should appear there.

Insert a disc (preferably with auto-boot) and check the operation of your new drive.
Replacing a SATA drive
Do the same with the SATA drive, but you don’t need to install any jumpers. Connect a thin flat cable to it, and connect the other end to the SATA connector on the motherboard.

This is how the drive is replaced.
A disk drive (also known as an optical drive) is a device for reading and writing optical discs. Now the drive is no longer so necessary for users due to the widespread use of other types of removable media, but it is still too early to abandon it. In any case, users should know how to connect the drive so that they can replace it on their computer if necessary.
Preparation
Before connecting a hard drive, optical drive, or any other equipment, there are a number of preparatory steps you need to take.
Turn off the power to your computer! Don't just shut down the system, but disconnect the wires going to the power supply. This way you are guaranteed to avoid electric shocks.
Remove the side covers.  If when connecting a video card it is enough to remove one side panel, then in this case you need to remove two panels to make it more convenient to connect the equipment.
The walls are secured with four bolts that can be easily unscrewed.
If the system unit has an old disk drive, carefully remove it. To do this, you need to disconnect all the wires going to it (there are two in total) and unscrew the fixing screws.  After this, the drive can be removed from the system unit by slightly pushing it from the inside.
Connection
Once the drive bay is free, you can proceed to installing a new drive. Take the drive and insert it into the empty bay.
Important! The optical drive can only be installed externally! Do not try to push it from the inside by, for example, turning off the power supply.
Secure the drive with the mounting screws. It is better to use all four screws - then the drive will hold tighter and operate more quietly, without vibration or other annoying sounds. 
You have installed the equipment. Now it is important to connect the wires correctly. Depending on the type of drive, it can operate via a SATA or IDE interface. You won’t be able to confuse them – these two interfaces are too different.
Modern drives are equipped with SATA connectors, so we’ll consider them (IDE is connected in a similar way):

Turn on your computer - the system should automatically detect and install new hardware. You can check the presence of the drive and its functionality through “Device Manager” or “My Computer”.
Since you have disassembled the system unit, do not be lazy to connect USB, adding several free ports. They definitely won’t be superfluous, considering how much the device uses this interface to transfer data.


