How to use microsoft word. Underline text by skipping spaces. Create a new Microsoft Word document
This article introduces the basic concepts used in Microsoft Word to help new users get started creating complex, professional-looking documents.

Heading 1
On the panel quick access 2 Preservation, Cancel, And Return
File tab 3 New, Open, Preservation, Seal And Close.
Ribbon 4
Edit window 5
Scroll bar 6
Status bar 7
8
In Word, you need to save the document in order to exit the program without losing data. When you save a document, it is stored as a file on local computer or in network folder. More later version you can open the file, edit it and print it.
Open File Explorer and select documentation. A list of documents will appear.
If the document you want to work on is in the list, click the file name to open the document. If the document is not listed, navigate to the location where the file is stored and double-click the file. The Word splash screen appears, and then the document displays.
Advice: file and selecting the command Open. To open a recently saved document, click latest.
Most text formatting tools can be found by clicking on the tab home, and then selecting in the group “ Font ».

1 this is on the tab home.
2 this group " Font"on tab" home ".
3 Font ».
|
Changing the font. |
||
|
Font size |
Change text size. |
|
|
Font enlargement |
Increase text size. |
|
|
Reducing the font |
Reduce text size. |
|
|
Change case |
Change selected text to uppercase, lowercase, or other common word styles. |
|
|
Removes all formatting from selected text, leaving only plain text. |
||
|
Bold |
Changes the selected text to bold. |
|
|
Italicizes the selected text. |
||
|
Stressed |
Draws a line under the selected text. Click the drop-down arrow to select an underline type. |
|
|
Crossed out |
Draws a centered line over the selected text. |
|
|
Interlinear |
Creates subscript characters. |
|
|
Superscript |
Creates superscript characters. |
|
|
Apply visual effects such as shadows, glows, and reflections to selected text. |
||
|
Text highlight color |
Transforming text marked with a marker into an attractive one. |
|
|
Font color |
Change text color. |
Using Styles
Styles let you quickly format key elements in your document, such as headings, headings, and subheadings. Follow these steps to apply styles to text in your document.
Select the text you want to change.
On the tab home in Group Styles Hover over any style to view dynamically directly in the document. To view full list styles, click the arrow Additionally to open the area styles.
To apply the style that best suits the text, click it.
Once you're ready to apply styles to individual elements, Word allows you to use a set of styles to simultaneously change the appearance of the entire document.
On the "tab" Constructor" in Group Formatting a Document select one of the predefined style sets, for example Regular authentication or ordinary. Hover over any style assigned to view it dynamically directly in the document. To view preset style sets, click the down arrow to the right of the group Formatting a Document.
To apply a style set that best suits the text, click it.
Change line spacing in a document
WITH using Word You can easily change the spacing between lines and paragraphs in your document.
On the "tab" Constructor" select Paragraph spacing to view a drop-down list of paragraph spacing options. Hover over any paragraph spacing style to view dynamically directly in the document.
When you find the right type, click it.
Advice: To set your own paragraph spacing, select Custom spacing between paragraphs.
Preview and printing
Short review custom Word interface

Heading 1 : Displays the file name of the document being edited and the name of the program you are using. It also includes the standard minimize, restore, and close buttons.
On the Quick Access Toolbar 2 : commands that are often used, e.g. Preservation, Cancel, And Return They are here. At the end of the Quick Access Toolbar is a drop-down menu where you can add other commonly used or commonly used commands.
File tab 3 : Click this button to find commands that are executed by the document itself instead of the document content, such as New, Open, Preservation, Seal And Close.
Ribbon 4 : The commands that are needed to work are located here. The appearance on the tape will vary depending on the size on your monitor. Word will compress the ribbons by rearranging their control order to fit smaller monitors.
Edit window 5 : Shows the contents of the document you are changing.
Scroll bar 6 : Allows you to change the position of the screen you are editing a document.
Status bar 7 : You change the display of document information.
View buttons 8 : Allows you to change the display mode you edit the document according to your needs.
Slide zoom control 9 : Allows you to change the zoom settings of the document you are resizing.
Saving and opening a document
Specify a location to save the document in the field Save to. When you save a document for the first time, it is pre-filled as the file name in the field file name Enter the first line of text in the document. To change the file name, enter a new file name.
The document is saved in . Change the file name in the title bar to match the name of the saved file.
Can be opened Word document to continue working. To open a document, do the following:
Click the Start button and select documentation.
Browse to the location where the file is stored and double-click the file. The Word splash screen appears, and then the document displays.
Advice: You can also open the document in Word by going to the tab file and selecting the command Open. To open a recently saved document, select Recent
Editing and formatting text
Before you can edit or format text, you must first select the text. Follow the steps below to select text.
Place the cursor at the beginning of the text you want to edit or format and click left button mice.
While holding down the left mouse button, move it to the right (called "dragging") to select text. A background color will be added at the location to indicate the selection range of the selected text.
Most text formatting tools are found by clicking on the tab home, and then selecting in the group “ Font ».
1 this is on the tab home.
2 this group " Font"on tab" home ".
3 This is the Bold button. See the table below for the names and functions of the "" buttons in the "" group. Font ».
|
Changing the font. |
||
|
Font size |
Change text size. |
|
I will tell you how to work in the Word program included in the Microsoft Office package. In that office suite includes:
- text editor Microsoft Word. Typesetting and editing program text documents;
- spreadsheet Microsoft Excel. Program for calculations, including using complex mathematical formulas, output of results in the form of diagrams;
- Microsoft PowerPoint. Program for creating presentations;
- Microsoft Outlook. Mail program, and several other programs.
The most commonly used are a text editor and spreadsheets. In this lesson we will learn how to create and beautifully design documents in Microsoft editor Word.
Before we begin, a few words about text document formats. On, in the “File Types” section, we looked at what a file extension is and what it is needed for. Text documents have txt extensions, rtf, doc, docx.
- .txt - simple text documents, without formatting elements. To create a document in this format there is standard program“Notepad”, in it you can change the font size or type, but the font of the entire document changes. You cannot change the font or size of an individual word.
- .rtf - from English Rich Text Format, translated as “rich text format”. Main Feature of this format- transfer of text documents between different operating systems. Text typed on a Windows computer can be opened on a Mac computer. In an rtf file you can use various fonts, apply formatting, insert pictures, tables, diagrams into the text of the document. In Windows OS to open, create or edit documents rtf format, there is a standard “WordPad” program.
- .doc (from the English document - document) is a format that has become the de facto standard for text documents, the Microsoft Word program (read Microsoft Word), included in the Microsoft Office package (Microsoft Office). Rich text formatting options, the ability to use multiple fonts, indents, paragraphs, bulleted and numbered lists, use multi-column text, insert images, tables, charts. In 2007, with the advent Microsoft versions Office 2007 introduced the .docx format, which is further development.doc format.
Microsoft Office is paid program. If you have Microsoft Office installed on your computer, it will be easier for you. If not, there are some pretty good alternatives. free packages. In terms of functionality they are very close to Microsoft package Office and often even by appearance, it is difficult to distinguish the interface of these programs. These are Apache OpenOffice and WPS Office packages. At the end of the tutorial, I'll show you how to download and install one of these packages.
Launching Microsoft Word
To launch the Microsoft Word program, click the “Start” button, then “All Programs”, “Microsoft Office”, “Microsoft Word”.
Opens blank page new document. Depending on the version of the package, there will be differences in the interface, but the main points that we will consider will be present everywhere. I will talk on Microsoft example Office 10
At the top we see a menu with tabs with many items. Simply describing them won't do much. Therefore, we will type the text and get acquainted with them as we work. For example, we want to type a statement. Some points will be artificial, but this is solely to show the capabilities of the package.
Fig. 1 To enlarge - click the left mouse button, to return back - click again
First, let's choose a font. When we move the cursor to an icon on the menu ribbon and hold it, a tooltip appears about the purpose of the icon. The frame in Fig. 1 with the number 1 shows the area where the font is selected. Where the number is 2, click on the triangle, the font selection menu opens. Number 3 – font – “Times New Roman”.
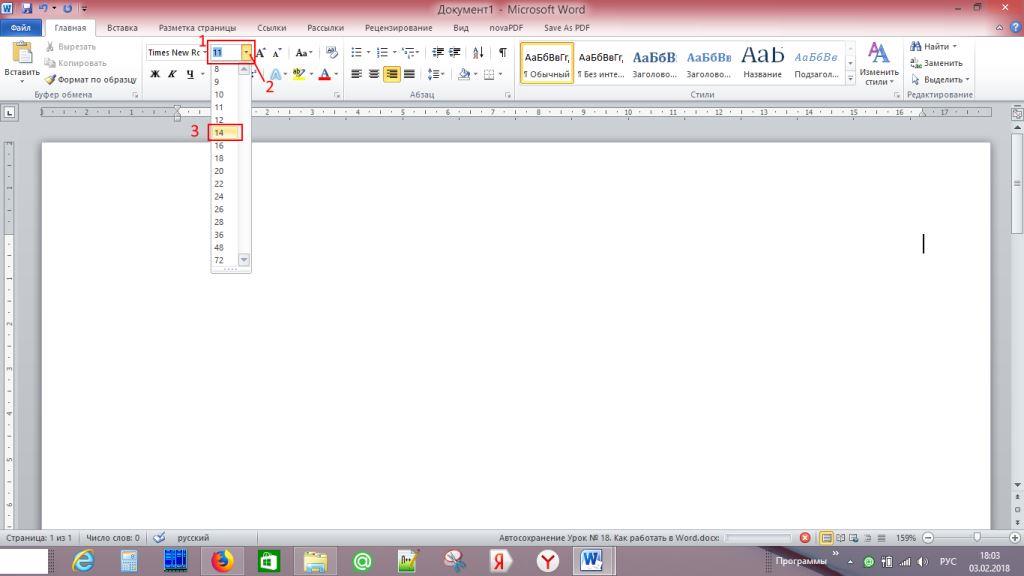
Let's choose the font size. The frame in Fig. 2 with the number 1 shows the area where the font size is selected. Also where the number 2 is, click on the triangle, the font size menu opens. Number 3 – size 14.
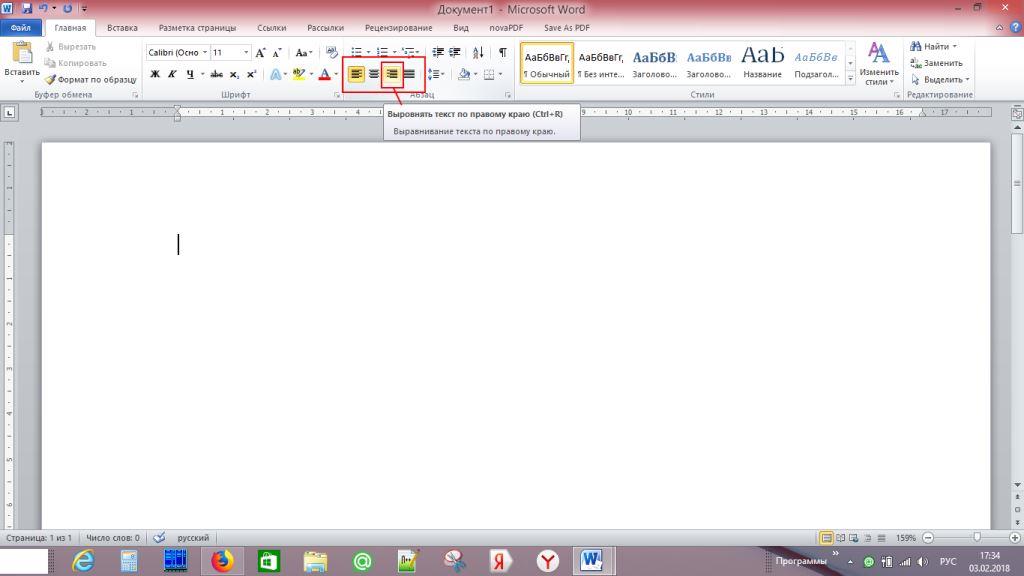
The frame in Fig. 3 marks the text alignment area. It has 4 options.
- Align text left;
- Align to center;
- Align text to the right;
- Align to width.
Click item 3 – “Align text to right”.
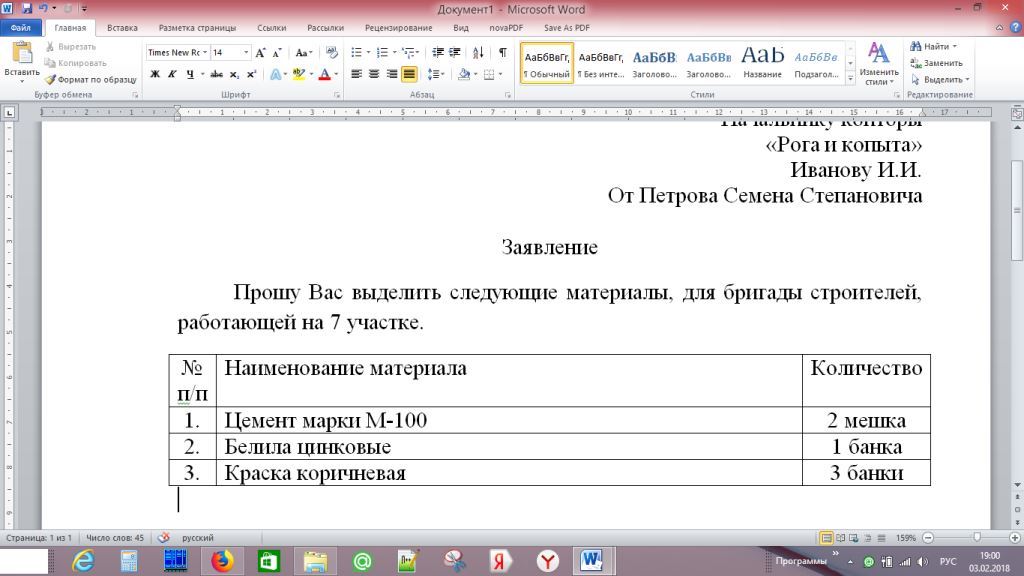
We're starting to recruit. After typing “Office Head”, press the “Enter” key. The cursor moves to next line, we continue to recruit. After we have typed “To” and “From”, press “Enter” and in the text alignment area, click on the 2nd icon – “Align to Center”. We type “Statement” - again “Enter”, in the alignment area - item 4 “Align to width” - “Enter”.
We start writing a paragraph, press the “Tab” key to indent. Let's start writing the text. Within a paragraph, we do not press the “Enter” key; as you type the text, it is evenly distributed in width, aligned to both the left and right edges, adding additional spacing between words.
Press “Enter” for the next paragraph, or as in our example to insert a table.

To insert a table in Fig. 4, click on the “Insert” tab, select the “Table” item, click the arrow below, the table template opens. We move the mouse from the upper left corner to the right, thereby selecting the number of columns, move it down, select the number of rows, in our case 4. A table appears on our sheet. The number of selected rows is not critical; if we didn’t have enough of them, we can easily add them while filling out the table. Simply standing in the lower right cell of the table, press the “Tab” key and a new row will be added.

When we created the table, all columns have same width. In order to change the width of the column, move the cursor to the dividing line in Fig. 5, when it takes the form of two lines with arrows to the right and left, press the left mouse button and move the line in the desired direction, bring it to the place we need and release the button.

To align text in columns, select them - with the left mouse button in Fig. 6, on the “Home” tab in the alignment section, columns 1 and 3 of our table, align to the center, 2nd to the left. Let's fill out the table. After filling, to exit the table, click the left mouse button under the table and continue writing.
Our application is ready. Let's check the spelling for errors. Click tab
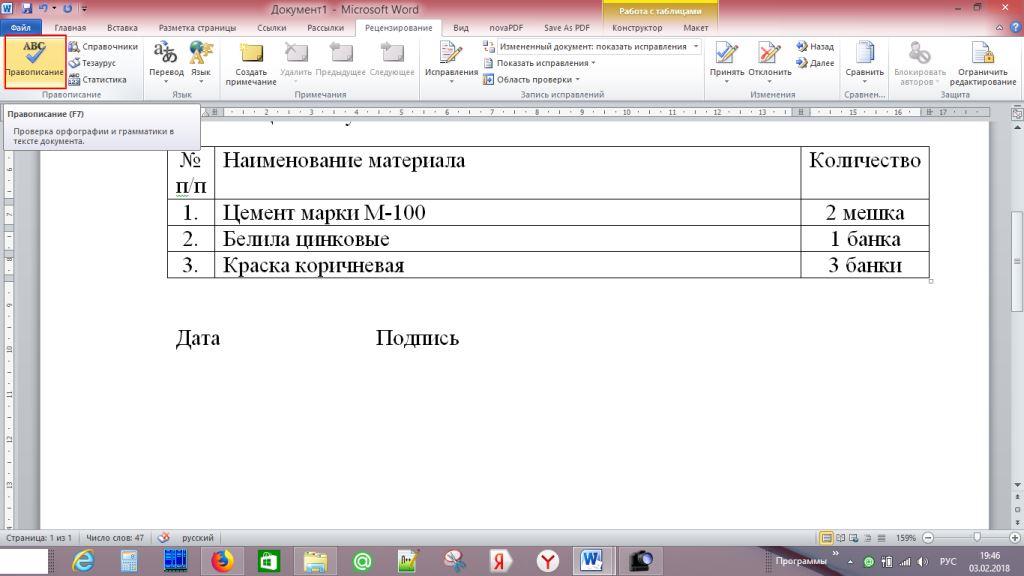
“Reviewing”, “Spelling”. If there is an error, the window in Fig. 9 opens, where the error is described,

an option to correct it is proposed. On the right side of the window you can select the button “Change”, “Skip”, “Skip all”, “Next”. When the check is completed, the “Spell Check Complete” window appears.

If we need to print the typed document (assuming that we have a printer, and it is connected and configured), click on the “File”, “Print” tab.

In Fig. 11, number 3 shows the layout of how the page will look. If we have typed several sheets, the number 4 shows which sheet, we look and use the arrows to see other sheets. Number 5 selects the number of copies to print. In order to send a document to the printer, press the button with the printer, number 6 in the figure.

In order to save the selected document to a file, click on the floppy disk in the left top corner in Fig. 12, number 1. By the way, on the tooltip, number 2, you can see that by pressing the key combination
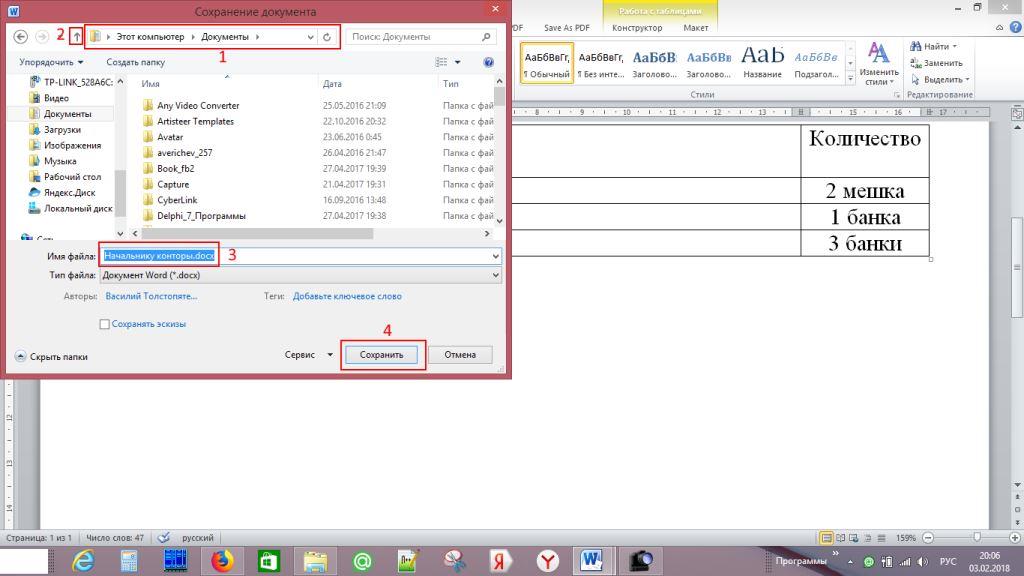
The frame with the number 1 shows where the file will be saved. The arrow in frame 2 will help you select another folder. In box 3 is the file name suggested by the system. We can change it by naming it as it suits us, after which we press button 4 – “Save”. Close Microsoft Word.
If we forgot to add something, launch Word again,

and no matter what we search for for a long time for our document, click the “File” tab, select the “Recent” item, in the list “ Latest documents“We find the one we need, click on it, and it opens.
Greeting card.
When creating a business document, we used a very small part of the capabilities that Microsoft Word gives us.
Let's try to create greeting card in the Word program.
Open Microsoft Word. Select Fig. 15

font “Times New Roman” – (1), font size – 28 (2), bold (3), italics (4), text color (5) – click the arrow next to it – select red (6), alignment – “Align to center" (7). We write “Congratulations” and press “Enter”.
Click on the “Insert” tab (1) Fig. 16,
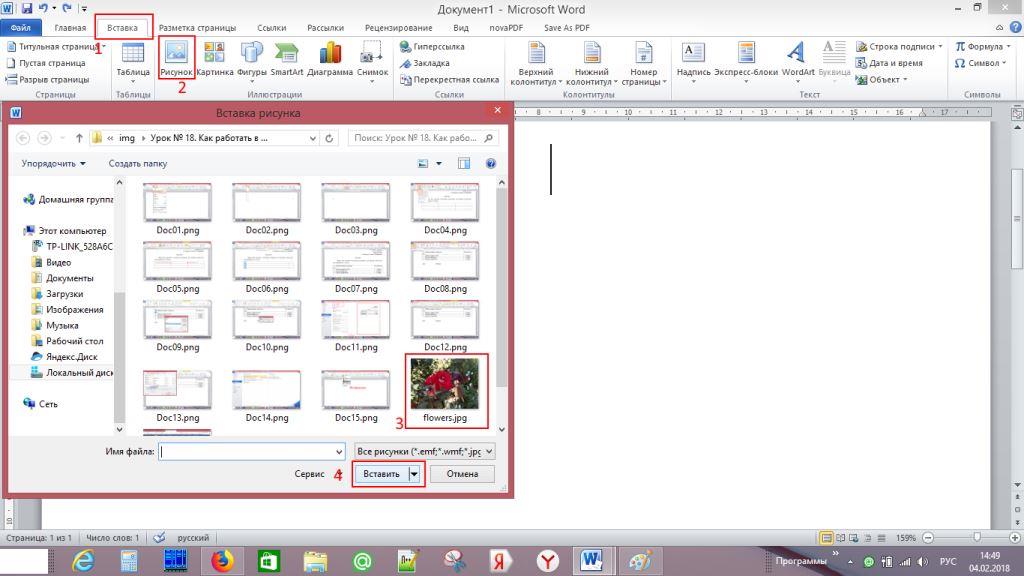
select the “Picture” item (2) and click on it. Opens standard window selecting a file, where we find the folder in which we previously saved beautiful picture(3). Click on it to select it and press the “Insert” key (4).
The result is in Fig. 17.

Click
We write "Happy Birthday"
As a result, we have a postcard like this

greeting card
As I promised, I will tell you how to download and install on your computer free analogue Microsoft Office, WPS Office. Follow this link. We get to the site WPS Office Fig. 18.

There are two download options here - paid for $29.99 and free " Free Download", click on this button and download installation file. After downloading, go to the “Downloads” folder and run the file we downloaded.
The installer window (Fig. 19) opens.

Click the “Install” button.
The installation of the package Fig. 20 is in progress.

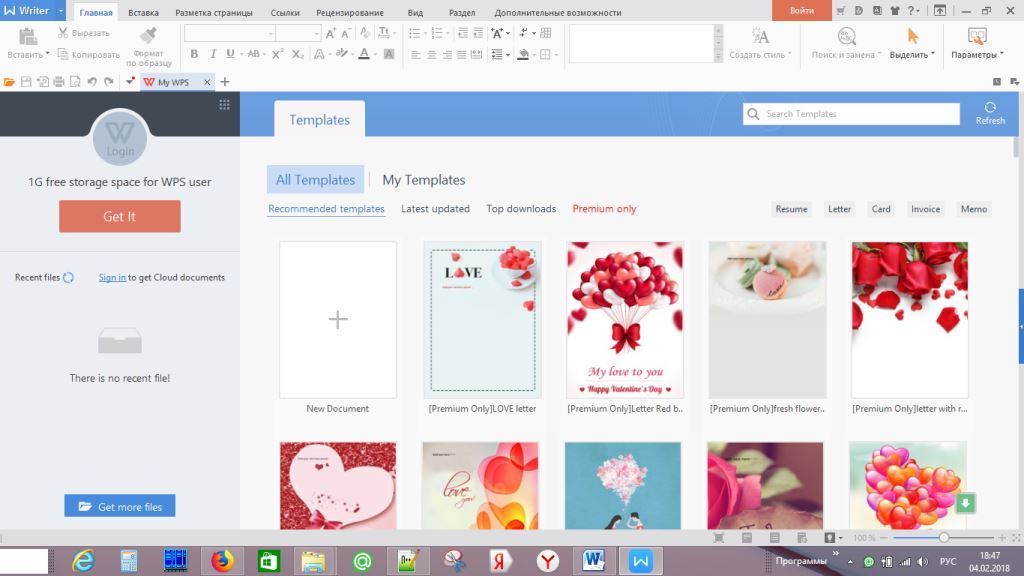
Once the installation is complete, WPS Writer starts analogue of Microsoft Word. Fig.21.

then “Parameters (D)” (2). In the window that opens, Fig. 23

options, select “General and saving” (1), click in the “New document” circle (2) and click “OK” (3).
Next window Fig.24

offers us three options: “New blank document” (1), “Create on another template” (2), “Open” (3). Click the first item in Fig. 25 – the WPS Writer text editor window opens.

As we can see, the interface is very similar to the Microsoft Word interface. All those menu items and tabs that we worked with in Word are here. We can use free alternative Worda.
Now we have three new icons on our desktop (Fig. 26).
WPS Writer is similar to Microsoft Word, WPS Presentation is similar to Microsoft PowerPoint, WPS Spreadsheets is similar to Microsoft Excel.
Since the programs are free, an advertising window opens when launched paid option Fig.27.

Red framed text(1) « You can skip ad in 5s" translates as "You can skip the ad in 5 seconds" and the stopwatch is running. When the stopwatch has passed, Fig. 28,

the inscription “Skip ad” (1) remains - “Skip” - click on it, the ad disappears, we can work.
Video on the topic of the lesson:
In contact with
Word 2010 is a text editor that allows you to create Various types documents such as letters, documents, leaflets, faxes and much more. In this lesson you will get acquainted with the main menu ribbon and the new pop-up menu, learn how to create new documents and open existing ones.
Word 2010 is a little different previous versions. The toolbar is the same as in word 2007 and includes the Main Menu Ribbon and the Quick Access Toolbar. Unlike word 2007 commands like "open" And "seal" are located in the pop-up menu that replaces Microsoft button Office.
Ribbon
The new main menu ribbon was first introduced in word 2007 to replace the traditional menu. The ribbon contains everything you need to perform common commands. It contains numerous tabs, each of which contains several groups of commands. You can also add your own tabs that contain your preferred commands. Some groups have an arrow in the lower right corner that allows you to open more teams.
Some programs such as Adobe Acrobat Reader can add a separate tab to the feed. These tabs are called “built-in elements”.
To collapse and expand the ribbon
The ribbon is designed to meet your current needs and be easy to use. However, you can minimize it if it takes up too much screen space.
- Click the arrow in the top right corner of the ribbon to collapse it.
- To expand the ribbon, click the arrow again.

When the ribbon is minimized, you can temporarily bring it up by clicking on any tab. The ribbon will disappear again if you don't use it.
Setting up the main menu ribbon.
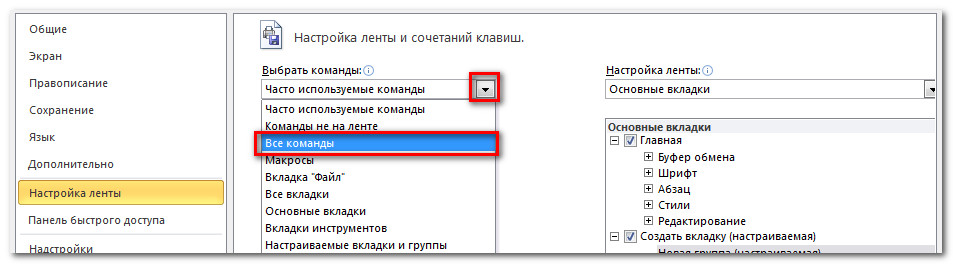
You can customize the ribbon by creating your own tabs with any commands. Commands are always located within a group, and you can create as many groups as you like to organize your tabs. If you wish, you can even add commands to any standard tab by creating a custom command.
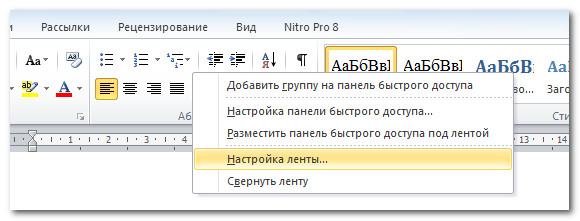
- Click right click mouse over the main menu ribbon and select “Customize Ribbon”. A dialog box will appear.
- Click Create Tab. will appear New inset with a new group.
- Make sure you select a new group.
- Select a command from the list on the left, then select Add. You can also drag commands directly from the group.
- When you're done adding commands, click OK.

If you don't see the command you need, click Select Commands and select All Commands from the menu that appears.
The pop-up menu contains various options with which you can save, create, print and share documents. It is similar to the Word 2007 button menu and the file menu of previous versions. However, unlike a regular menu, it has a full-page layout, making it easy to work with.
To bring up the pop-up menu:
- Click on the File tab.
- The options are on the left side of the page.
- To return to the document, click any tab on the ribbon.

The Quick Access Toolbar sits above the Ribbon and allows you to quickly access standard commands no matter what tab you are on. By default, it shows the Save, Edit, and Redo commands. You can add other commands to make your work more convenient.
To add commands to the Quick Access Toolbar:
- Click the arrow on the right side of the menu
- Select the team you want to add. The command will appear in the quick access menu.

Ruler
The ruler is located at the top and left of the document. It allows you to accurately align your document. Optionally, you can hide the ruler to free up more screen space.

To hide or show the ruler:
- Click the Ruler icon in the scroll bar.
- To show the ruler, click the icon again.

Creating and opening documents
Files in Word are called documents. To get started new project in word, you first need to create new document, which can be either empty or template. You also need to know how to open an existing document.
To create a new document:
- Click on the file tab. A pop-up menu will open.
- Select create.
- Select a new document from the available templates. It will be highlighted by default.
- Click "create". IN word window a new document will appear.

To save time, you can create a document from available templates, which you can select in the new document window. We'll talk about templates in the next lessons.
To open an existing document:
- Click on the "File" tab. A pop-up menu will open.
- Select "open". A dialog box will appear.
- Select your document and click open.

If you opened a document recently, you can open it from the Recent Documents list. Just click on the file tab and select the latest ones.

Compatibility Mode
Sometimes you will need to work with documents that were created in more earlier versions Word programs such as Word 2007 and Word 2003. When you open such documents, they will open in compatibility mode.
Compatibility mode has certain restrictions, so you will only have access to the commands that were in the programs in which they were created. For example, if you open a document created in Word 2007, you can use Word 2007 tabs and commands.
Many users who have to write a lot do not know how to use Microsoft Word 2010, and do not even pay attention to it. Meanwhile, this is the most wonderful program for doing this kind of work.
What's good about it? First of all, this is a spell check. But that's not all. This program is practically the only one in which you can see that punctuation marks are placed incorrectly.
Those who know how to use it can also quickly format text (change font type, color, size, insert a hyperlink, select a background, align text, and much more). However.
Also, we must not forget that Microsoft Word 2010 has a very well developed system for replacing words with synonyms, only the dictionary installed in it is not the largest, but the benefits from it are enormous. So, let's get started with the instructions.
How to use Microsoft Word 2010
Learning to use Microsoft Word 2010 professionally will take time, so I will only focus on the main points, which are enough to write high-quality texts.
First, we'll learn how to insert text. To do this, copy it to the clipboard and click on the icon as shown in the figure:
As soon as you insert the text, and Microsoft Word 2010 detects an error in the word, it will immediately be underlined with a red wavy line.
If the sentence is underlined with a green line, then the punctuation marks are placed incorrectly (in 2013, 2016 the color is different).
If you click on a word (underlined in red), you will be given a choice of others. With punctuation marks it’s a little different, you’ll have to pick them up by trial and error.
I’ll note right away that Microsoft Office 2010 will not correct the error 100 percent, there is no such smart program yet.
Microsoft Word 2010 instructions (synonyms)
Using Microsoft Word 2010 to replace synonyms is simple and convenient. If you need to replace a word, just click on it right key mouse, find synonyms in the window that opens, move the cursor there, select the most suitable one and click on it.
This article covers only a few basic points. If you need to study Word in more detail, then you can use the link ahead for free.
If you need to change the font, text size or formatting (left, right, middle), see as shown in the picture.

Click on these options to select the options you want. This instruction is of course very small, but I think it will help beginners on how to use Microsoft Word 2010.
In conclusion, I would just like to say that the best program than Microsoft Word 2010, I have never seen it for writing text.
Those who disagree, please speak out in the comments, I think many will be grateful, not just me.
Category: UncategorizedIf you have been working with the program for a very long time Microsoft Word, then you might still find mine useful useful tips, which will make your work in Word 2010 even faster. So let's look at these useful techniques.
Now I will tell you how you can quickly launch the program. First you need to press the combination in sequence Windows keys+ R. The “Run” window will appear, in which you must enter “winword” and then press the “Enter” key. Word application launch instantly, and you can immediately start creating a document.
Let's look at how we can convert a list into a table. Let's say I have a list separated and aligned with tab characters. But I want to improve it by converting it into a table.
First, you need to select the text you want to change. Therefore, select all the text and go to the “Insert” tab. Under the "Table" button, click the drop-down list and select "Convert to Table" (1) . The Convert to Table dialog box opens. I already said that I used tabs to create the list, adding them to the list as needed. different places. Therefore, instead of two columns, three will be created. We accept the default settings ( and we will make the necessary corrections further). Click “Ok”.
Notice that three columns appear. Now, just with one click, select the extra column using the downward arrow ( just hover over the top of the extra column until an arrow appears). Right-click the highlighted column and select Remove Columns. It's not difficult at all. You can continue and finish formatting the table. As you can see in the "Table Styles" you have enough standard format. However, you can choose any other - just move your cursor over them. But let’s say I like one specific format.

Let's open the collection by first placing the cursor in the table ( when you place the cursor in a table, table styles automatically appear at the top). Click on the drop down list (2) and select the format called “Light List - Accent 2”. If suddenly your table has moved, you can easily return it back. To do this, click on the table marker (3) and, holding it, drag the table to the desired location. The operations are quite simple and straightforward, and we have a really nice table. This is how you can convert a list into a table.
Tip 3: How to Make Bulleted Lists More Effective
Now I want to show how to convert a list to graphic element SmartArt. First, select the list that needs to be changed. You need to cut the bulleted list so you can paste it into a SmartArt element ( on the main tab, click on the scissors icon or you can select the text and click Ctrl combination+X). Go to the Insert menu, click SmartArt, then select Vertical bulleted list" and click "Ok".

Of course, you can choose any other element. Now in the text area (4) just select the text elements and paste into the list (4) by using Ctrl keys+ V to a SmartArt element in the document.

Now click outside the SmartArt dialog box or on the cross (5) to close the window.

That's how easy it is to convert a Word document list into a SmartArt element.
To draw attention to the image, you can crop it to its original shape. To do this, select the image, go to the “Format” tab, click the arrow on the “Crop” button and select “Crop to Shape”. Here you can choose any shape you like. This is how you can draw attention to an image by cropping it to fit.
If during Word works If you need to quickly enlarge document objects, then hold down the Ctrl key and roll the mouse wheel forward to enlarge them. To make objects smaller, hold down the Ctrl key again and scroll the mouse wheel back. If you select separate object, then you can only enlarge it, the same applies to the text. So, using the Ctrl key and the mouse wheel, you can enlarge or reduce document objects.
Creating documents Word, you should think about where it is more convenient to store them. One of the most practical solutions for storing files is the service Windows Live SkyDrive. If you don't have it yet account, you can get it for free at Office.live.com. Once you sign in to the service, you can add Word documents, as well as any other documents, to it. To do this, in the service itself, click “Add files”. Specify the folder in which you want to save them. Select the “My Documents” folder ( you can also create new folder ). Now you can drag documents into a special small square or select them on your computer. Select your document and click the “Open” button.
When the document is loaded, click the “Continue” button. The document appears in the My Documents folder in List view. If you click on the document, then right side functions will appear with which you can change the document in the browser, open it with using Microsoft Word or perform many other operations, including providing to it sharing. Therefore, adding a document to the service SkyDrive- This is another useful tip.
Let's say during the last review of my document I noticed a mistake in the word “statistics”. It should be written S - T - A - T - I - S - T - I - K - A. Now I need to change all cases of "statistician" to "statistician" and do it quickly. I select this element ( word) and use the replace function ( on the main tab, click “Replace” (6) or the keyboard shortcut Ctrl + H).

The selected item is automatically inserted into the Find box (7) . I need to replace it with statistics (8) . Now I can replace each case individually, but I don't know how many of these words appear in the text. Since I need to replace all these words, I click the “Replace All” button (9) . A message is displayed telling you that 7 substitutions have been made and whether you need to start the search again. Since I don't know the exact number of misspelled words in the text, I have to agree. To make sure all replacements are made, I select "Yes" (10) . Later I got a message saying that 10 replacements had been made. The "Yes" option was the right choice, now you can click “Ok”. This is how you can search and replace text in Microsoft Word.
To make changes to a Word document, you need to select the elements that need to be replaced. So I want to remind you of a few highlighting techniques that are easy to use. First, select some big block text by holding and moving the mouse cursor. You may already know this method. You can also highlight any word by double-clicking it. Double click and the word is highlighted. You can also click three times in a row ( triple click) to highlight an entire paragraph. There are also unconventional highlighting techniques.
The document field has areas ( left empty area of the document), in which the cursor arrow turns towards the text ( as in the picture on the left). Note that as you work on the text, the cursor changes to an I shape and then turns into an arrow pointing to the right. Now move the cursor to the left empty area of the document so that an arrow shape appears and then select the line that the arrow points to with one click. Double-clicking selects a paragraph; triple-clicking selects the entire document.
Mouse clicks can also be combined with keystrokes. One left-click while holding down the Ctrl key selects a sentence from beginning to end. An even less common method is to select individual lines by clicking the mouse while holding down the Ctrl key. The same can be done with words. You can highlight one word, then another, and another. This method allows you to format words separately from the rest of the text. Finally, you can select text using the Shift key.
For example, any two paragraphs can be selected by simply clicking and dragging the cursor down. However, this method is not always convenient, since at times it does not allow us to select exactly what we need. So click at the top of the paragraph at the beginning of the selection and, while holding down Shift key, click at the end of another paragraph - the entire block of text is selected. These are just a few of the possible ways highlighting in Microsoft Word.
Sometimes, when working to improve a document, it is necessary to expand as much as possible. working space. You can achieve this by hiding the feed. Press Ctrl + F1 to hide the ribbon. To return the ribbon to its place, press Ctrl + F1 again. You can also hide the ribbon by double-clicking any tab except the File tab. Repeated double click will return the tape to its place. When the ribbon is hidden, you can still use it—just click one of the tabs. After selecting the desired item, the ribbon disappears again. To make it appear permanently, you need to double-click the tab ( as said earlier). Such simple actions You can show and hide the ribbon in Word.
If you often use certain commands and buttons, you can add them to the quick access toolbar so you can always have them at hand. For example, I use styles a lot, so I'll add the entire collection to the Quick Access Toolbar (11)
. In the “Styles” group ( located on the main tab) I right-click the style and select Add Collection to Quick Access Toolbar. Now, no matter what tab I'm working in, I can quickly access all the styles. This way you can add frequently used tools and even menus to the Quick Access Toolbar. The Quick Access Toolbar appears in the very top left corner of Microsoft Word as icons (11)
.
If you have a list to which you need to add fields with checkboxes ( for example, a to-do list or other list that you want to check off), you can simply replace the markers next to the list. Select any bulleted list, right-click and select Bullets. At the bottom of the dialog box, select Define New Token. Then you need to choose a suitable font. For example, I know that the Wingdings font has a beautiful field for checkboxes. In the "Define a new marker" dialog box, click on the "Symbol" button (12) .

In a new dialog box, using the drop-down list (13) select Wingdings. Then, among the markers available from the bottom, select a marker in the form of a square (14) . Next, click the “Ok” button (15) , then click the “Ok” button in the next window to confirm.

Markers have now been replaced with checkbox fields. Conveniently, if you press the Enter key to add a new item, the list will continue with the checkbox fields already inserted. The only drawback to replacing markers this way is that the checkboxes themselves cannot be selected in this list. If you click the marker field, the checkbox does not appear. So if I want it in my Word list If you could check the boxes, you need to remove those checkboxes and use the so-called content controls on the Developer ribbon.
So, first let's get rid of the markers ( just highlight required text with markers and click on “Markers” again), and then set up and prepare a list for inserting fields with checkboxes. After removing the markers, go to the ribbon and right-click anywhere on it (16) . Select the “Customize Ribbon” command and in the Ribbon Customization dialog box that opens, select the only unselected tab – “Developer” (17) (check the box). Click "OK" button (18) . That's all there is to it. The Developer tab is now active.

On the Developer tab (19) find a field with a checkbox (20) is a checkbox content control. Click where you want to insert the checkbox field, and then click the checkbox content control. (20) . Let's repeat this operation for each field. This can go on ad infinitum.


