How to map a network drive from the Windows command line? NetSetMan - a program for working with network connections
Many users, when administering their home local network are faced with the need to connect network drives. If you are also interested in this issue, then this article should help you. Here we will tell you how to connect network drive, and also correctly open access to the folder for the network drive.
Step No. 1. Open access to the folder (preparing the first computer).
The first thing to do is to open access to the folder that should be used as a network drive on another computer. It's not difficult to do, but there are a few details you need to be aware of.
First you need to configure the network correctly. To do this, open the “Network and Sharing Center” and click on the “Change” link Extra options public access" (screenshot below).
In the window that opens, you need to enable “Network discovery”.

Also here you need to disable “Sharing with password protection"(if you don't need it).

So, how to map a network drive on Windows 10? We already know how to create, but it’s not very convenient to search in network environment the desired shared folder, especially if there are many computers. It is much easier to have it displayed as separate disk, which appears along with your “C” drive when the system boots.
To connect the network hard drive on Windows 10, the first thing you need to do is allow general access to files and folders on your computer. To do this, click right click mouse on the "Start" menu and go to "Network Connections"

Here in the left column click on “Change sharing settings”

- Turn on network discovery
- Enable file and printer sharing
- Let Windows manage your homegroup connection

Mapping a network drive Windows 10
It was preparatory stage- now let's move on to the main question, how to connect a network drive in Windows 10?
To do this, you need to open Explorer and in the left column, where the tree of drives and folders is, find the “My Computer” link - right-click on it and select “Map network drive...”.

In the window that pops up after this, select the letter for our future network Windows disk, for example "X".


After selecting the folder, leave the “Restore at logon” checkbox so that you don’t have to create it again every time you turn off the computer. And click “OK”.
Now, when you go to “Computer” in Explorer, among other system hard drives we will be able to see the “Z” drive in the “Network Location” section. you can get to it provided that the computer on which this network drive-folder placed, included.

Mapping a network drive on Windows XP
The technique for connecting a network drive on Windows XP is similar to that already described above. Therefore, we will describe here the connection method directly from the “Network Neighborhood” section.
Go to “Start > Network Neighborhood” and find the one we need shared folder on one of the computers on the local network. Right-click on it and select the “Map network drive” menu item. You can also simply top menu select “Service” and select the same section.


Now if you go to “My Computer”, you will see hard disks, as well as network folders connected as network drives, indicated by separate icons.

That's all. For those who have not yet understood what it’s like, here’s a video:
If you have a local network, then the presence of network folders in it is a completely natural phenomenon. File storage, separate shared directories on computers. However, every time open in a networked environment the right computer and searching for the desired directory there can be quite tedious. Especially for these and a number of other cases, Windows 7 supports the ability to create a network drive for quick access to online directories. But not everyone knows how to do this correctly. Therefore, in this article, I will tell you about how to connect a network drive in Windows 7, as well as what nuances there are.
From a usage point of view, a network drive is no different from regular disk. You can also record, copy and move files. The only difference is the speed of operations, which must always be remembered. It is smaller, since the files are not read directly from the disk, but are transferred over the network. In addition, it is worth considering that if the local network is loaded, for example, several people will use such a disk, then the speed may be very low.
Now, let's look at how to connect a network drive in Windows 7 through a standard interface:

1. Open File Explorer and go to Computer. This can also be done using the combination "WinKey ( Windows key) + E".
2. In the top menu, click on the "Map network drive" item.
3. In the window that opens, as shown in the figure above, you must specify the network drive letter, then select the network directory. For example, "\\computer1\video" or "\\192.168.0.112\video". You can also specify whether this disk needs to be restored after restarting Windows. If necessary, provide connection credentials.
4. Click the "Done" button at the bottom.
5. The network drive will be available for use.
As you can see, create a network drive using the standard Windows interface 7 is quite simple, but it is always useful to know alternative methods.
Many tools in Windows 7 are available from command line, which is sometimes very convenient and much faster to use. Therefore, now we will look at how to connect a network drive from the console. To do this, we need the "net" command with the "use" parameter. And here are the actions you can do using this combination:
1. Connecting a network drive. Open a command prompt, enter next command and press enter:

net use Z:\\addr\folder
Where " net use"is the team itself," Z:" is the desired drive letter (double quotes are required), " \\addr\folder" is the address of the network directory.
The network drive will be created.
2. Installation automatic connection disks at reboot Windows 7 . So, you have connected a network drive. However, the moment that the disk will or will not connect after rebooting the computer remains unknown (the last execution of the installation command is taken automatic recovery). Therefore, it should be explicitly specified, for which you need to enter the following command:

net use /Persistent:Yes
Where " net use" is the team itself, and " /Persistent:Yes" is a setting that specifies that the network drive needs to be mapped every time the system boots. Please note that this setting applies to the last connected disk and becomes the “default” for all subsequent ones. If you want to indicate that the disk does not need to be restored, then instead of " /Persistent:Yes"must be specified" /Persistent:No".
3. Removing a network drive. Network drives can be temporary, so it is useful to know how to delete them. And here is the corresponding command:
net use Z: /delete
Where " net use"is the team itself," Z:" is a network drive, " /delete" - a parameter that indicates that this network drive needs to be deleted.
If you have set up a local network at home (if Wi-Fi available it is present by default) and created shared directories, then you can go to next level– setting up network drives. Let's look at how to map a network drive so you can increase your storage space or create a shared folder accessible to users from other computers on the network.
Preliminary preparation of the system
Before creating a network drive, you need to check the sharing settings.
You must have it connected on your computer LAN card and the local network is configured.
Open “Network Sharing Center” and click on the “Change sharing settings” link in the menu on the left.
Enable discovery and sharing, as shown in the screenshot. Click the "Save Changes" button. 
Additionally, you must configure the directory to be a public directory. For this:

Once all changes are saved, the folder will become public. Now you can proceed to creating a network drive.
Connection
Attention! To map a network drive, you must have administrator rights.
For all versions of Windows, this procedure is almost identical, so the instructions below are universal. Open “My Computer” and find the “Connect” button in the top menu.  A window will appear on the screen in which you need to specify a letter the disk being created and the directory you want to connect to.
Attention! Try to choose letters from the end of the Latin alphabet to avoid possible conflicts With physical media.
The folder address must be rewritten from its properties on the computer where it is located.  The address must have next view: \\computer name\path\name. You can also click the Browse button and manually select the desired directory on another computer.
The directory must be “shared”, that is, previously prepared for working in the public domain.
You may need to enter a password for your local network (home group). To view it, go to the “Control Panel”, go to the “Network and Internet” tab, and then select the “ Home group" Click the "Show or Print Password" link below.  A window will appear on the screen indicating your homegroup access code.
  Write it in the special field and click “Done”. After this, the network drive you created should appear in “My Computer,” which will have the letter that you assigned to it. Now you can use a shared folder on the network without bothering yourself with questions about how to connect a laptop to a laptop or a PC to a PC.
If you have a local network configured at home or office and use network folders, then for them more convenient use I recommend setting up network drives. For uninitiated users, the network drive will not be any different from other drives (C, D, etc.) used on their computer. The only thing they may notice is that the speed of writing or reading data from a network drive will be lower (depending on the speed of your network).
How to map a network drive in Windows XP
Go to Computer, click "Tools" - "Map network drive"
The Network Drive Mappings window will open. Click "Browse", select the computer on which the network folder is located, click on it and select required folder, click "Ok".

You can change the drive letter if it is busy, to do this, click Drive and select the letter. When finished, click "Done".

As a result, you will see the mapped network drive.

How to connect a network drive in Windows 7.
Before connecting a network drive on Windows7, you need to check network settings, to do this, go to “Start” - “Control Panel” - “Network and Sharing Center” or click on the Network Connection button on the Taskbar and select “Network and Sharing Center”.

In the Network and Sharing Center window that opens, look at what network is being used (in in this example- Working) click on "Change advanced sharing settings".

In the profile you are using (home, work or general), check whether Network discovery is enabled; if it is disabled, enable it. Save your changes.

Now you can proceed directly to connecting a network drive; to do this, go to Computer and click “Map network drive.”

The Network Drive Mappings window will open. Click "Browse", select the computer on which the network folder is located, click on it and select the required folder, click "OK". You can change the drive letter by clicking on the highlighted field yellow and select another letter. At the end, click “Done”.


In addition to this method, you can use a script to connect a network drive.
How to map a network drive in Windows 8.
Before connecting a network drive on Windows8, you need to check the network settings; to do this, go to “Control Panel” - “Network and Sharing Center” or click on the Network connection button on the Taskbar and select “Network and Sharing Center” .
In the window that opens, look at what network is being used (in this example, Public) and click on “Change additional sharing settings.”

In the profile you are using (private, guest or public), enter necessary changes, namely:
Enable network discovery; 
Save your changes.
Now you can connect a network drive, to do this, click on the Computer shortcut, select the “Computer” tab - “Map network drive”.

The Network Drive Mappings window will open. Click "Browse", select the computer on which the network folder is located, click on it and select the required folder, click "OK". You can change the drive letter, to do this, click on the field highlighted in yellow and select the letter. At the end, click “Done”.

As a result, a network drive will appear.

Connecting a network drive using a script in Windows XP, Windows 7, Windows 8.
To connect/disconnect a network drive and network printer The net use command is used, here is the syntax of this command: NET USE[device_name | *] [\\computer_name\resource_name[\volume] [password | *]] username] username] [ | ]NET USE (device_name | *) [password | *] /HOMENET USE The NET USE command connects the computer to shared resource or disconnects the computer from the shared resource. When the command is used without parameters, a list of connections for this computer is displayed.
device_name Assigns a name to connect to a resource or specifies the device from which to disconnect. There are two types of device names: disk devices(letters D: to Z:) and printers (LPT1: to LPT3:). If you enter an asterisk (*) instead of a device name, the next unused name is assigned.
\\computername Specifies the name of the computer that controls the share. If you use spaces in the computer name, you must enclose the entire parameter in quotation marks along with two backslashes (\\). The computer name can be from 1 to 15 characters in length.\sharename Specifies the network name of the share.\volume Specifies the NetWare volume on the server. To access NetWare servers, you must install and run client NetWare services(workers windows stations) or NetWare Gateway Service (Windows Server).password Specifies the password that is required to access the share.* Specifies a password prompt. The password is not displayed when entered at the command line. /USER Specifies a different username to connect to. domain_name Specifies a different domain. If no domain is specified, the current domain used when logging on to the network is assumed.username Specifies the username to log on to the network. /SMARTCARD Specifies that this connection uses smart card credentials. /SAVECRED Specifies that the username and password are save. This parameter is ignored if the command does not prompt for a username and password. /HOME Connects the user to the home directory. /DELETE Disconnects the network connection and removes it from the list permanent connections./PERSISTENT Controls the use of persistent network connections. Default is the last used parameter.YES Saves established connections and restores them the next time you log on to the network.NO Does not save established connections or subsequent connections, as a result they will not be restored the next time you log in. To delete persistent connections, use the /DELETE parameter.
Usage example net commands use:
net use z: /deletenet use z: \\computer1\Shared Foldernet use /Persistent:Yes
net use z: /delete - command to unmount network drive Z.
computer1\Shared Folder - path to the shared folder ( network folder)
net use /Persistent:Yes - when rebooting, restore mounted disks (if you specify NO - reset settings).
To create a script, create text file, enter the necessary commands and save. Change the file extension from TXT to BAT. Now you can just launch with two clicks BAT file and all prescribed commands will be executed.
pk-help.com
How to connect a network drive in Windows?
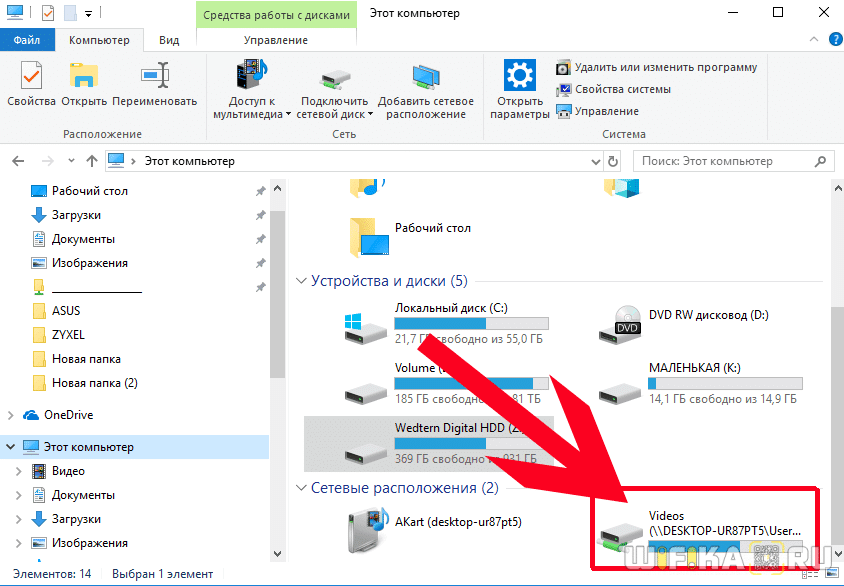
If on any computer on your local network there is a folder that is open for public access, and you often access it, then for convenience it would be better to connect it as a network drive on your computer. After this, you won’t have to go into “Network Neighborhood” every time, find the desired computer in it and select this folder. You will see her in windows explorer on your computer as if it were another local drive.
I have already told you several times how to open shared access to a folder (you can read this article). Therefore, I will not dwell on this issue.
So, let’s say there is already a “shared” folder on one of the computers on the network. Now on your PC we find the “Computer” icon on the desktop (in Windows XP it is called “My Computer”, in Windows 8 it is called “This Computer”). Right-click on it and select “Map network drive”:  In the window that opens, first select the letter of the future network drive - you can leave the default one:
  Then click the “Browse” button and in the network environment find the computer with the “shared” folder - click on it and select this folder - click “OK”:
  There should be a checkmark in the line “Restore connection when logging in” - click the “Finish” button:
  After this, by going to “Computer” we will see next to our local disks new network drive. We can go into it and work with the shared folder as if it were on our own computer:
  Remember: in order for you to be able to access a network drive on your PC, the computer on which the “shared” folder is located must be turned on.
Comments (1)
blogsisadmina.ru
Mapping a network drive in windows
 If you have set up a local network at home (if you have Wi-Fi, it is present by default) and created shared directories, then you can move on to the next level - setting up network drives. Let's look at how to map a network drive so you can increase your storage space or create a shared folder accessible to users from other computers on the network.
Preliminary preparation of the system
Before creating a network drive, you need to check the sharing settings.
You must have a network card connected to your computer and a local network configured.
Open “Network Sharing Center” and click on the “Change sharing settings” link in the menu on the left.
Enable discovery and sharing as shown in the screenshot. Click the "Save Changes" button.
Additionally, you must configure the directory to be a public directory. For this:

Once all changes are saved, the folder will become public. Now you can proceed to creating a network drive.
Connection
Attention! To map a network drive, you must have administrator rights.
For all windows versions this procedure is almost identical, so the instructions below are universal. Open “My Computer” and find the “Connect” button in the top menu.  A window will appear on the screen in which you need to specify the letter of the drive to be created and the directory to which you want to connect.
Attention! Try to choose letters from the end of the Latin alphabet to avoid possible conflicts with physical media.
The folder address must be rewritten from its properties on the computer where it is located.  The address should look like this: \\computer name\path\name. You can also click the Browse button and manually select the desired directory on another computer.
The directory must be “shared”, that is, previously prepared for working in the public domain.
You may need to enter a password for your local network (home group). To view it, go to the “Control Panel”, go to the “Network and Internet” tab, and then select the “Home Group” section. Click the "Show or Print Password" link below.  A window will appear on the screen indicating your homegroup access code.
  Write it in the special field and click “Done”. After this, the network drive you created should appear in “My Computer,” which will have the letter that you assigned to it. Now you can use a shared folder on the network without bothering yourself with questions about how to connect a laptop to a laptop or a PC to a PC.
mysettings.ru
How to share in Windows Xp/7/8/10 and map a network drive
Sharing in Windows is a very convenient solution if you have several computers, tablets, and phones at home. This is convenient because you can download everything onto one computer, open it for general access and log in with different devices to it over the network. This method is convenient for transferring movies, music, documents, etc. This method suitable for all operating rooms windows systems, starting from version XP.
First, you need to create a folder on any of your drives and give it public access.
Step #1. Create a shared folder
To create a shared folder, create any folder on drive C or D. In the example, I will create a Movies folder and share it

Create a Movies folder (How to share in Windows Xp/7/8/10 and connect a network drive)
Step #2. Give the folder access to everyone
To share a folder, click right key by folder, select Properties - Access - Sharing - From the list, select All and add. If you need to make it so that you can only read from the disk (but not add new files), then select where Read and Write - Read

Properties - Access - Sharing
Step #3. Advanced sharing setup
Now check the box next to Share this folder. To do this, click on the Access tab, Advanced settings, check the box (Share this folder) and click OK.

Access - Advanced settings

Share this folder
Step #4. Setting up sharing in the Network and Sharing Center
Go to the Network and Sharing Center. To do this, right-click on your network connection and select Network and Sharing Center.

Network and Sharing Center
Set General, Guest and home network as in the screenshots below
Private

Guest or public

All networks

Step #5. Find out the network address of the computer.
In order to find out network address computer, download and run the Ip2 program (the most quick way find out ip)
Download ip2 (1.04)
Now run it and click Find My Ip Addresses, then copy the network address by clicking on Copy

After we have opened public access and know the IP of the computer, we can already go to the shared folder
Step #6. Checking shared access from another computer
To do this, open any folder (on another PC or laptop) and enter two slashes and the IP address at the top, which we found out in step 5.
Example: \192.168.1.139
Great! Our sharing is almost set up. For convenience, we can create a network drive so that our shared drive was visible in shared drives.
To do this, open My Computer (This Computer) - Map Network Drive - and paste the path to the folder. I shared the movies folder, so my path looks like this: \192.168.1.139movies
Step #7. Sharing between Android phone/tablet and your PC
To set up general Android access and windows, use the article: How to set up a local network ( shared files Android and PC)
How to share in windows (video)
conclusions
As we can see, setting up sharing is not difficult. The main thing is to set read and write if you are sure that no one will throw a couple of Trojans onto your network shared drive.
I look forward to your likes, reposts and comments!
itbc.kiev.ua
How to connect a Yandex disk as a network drive.
Yandex.Disk - cloud service, company-owned Yandex, which allows users to store their data on servers in the cloud and transfer it to other users on the Internet. The advantages of using Yandex disk are obvious:
1) Everything you post on this service will be available from anywhere (where there is Internet) and from any device (laptop, tablet, smartphone);
2) Files and folders on Yandex disk can be easily transferred to another user;
3) Security of data storage. Risk of irretrievable loss of information if a hard drive fails\ USB flash drives very big. If you store files on remote server, upon rearrangement operating system or a disk failure, your data will not disappear;
3) Cloud storage will add free space to your physical disk. Further cloud storage can be increased.
How to connect a Yandex drive to a network drive on Windows 7.
Using Yandex drive through a web page is quite inconvenient... you need to constantly visit the site, get used to the web interface, it is much easier to connect Yandex drive to a network drive and use it just like a regular one hard drive or flash drive. To do this, you need to go to Computer on Windows 7 and find the “Map network drive” button at the top and click it.


