Why does the card jump in msi afterburner. How to use MSI Afterburner and keep your video card in good shape
The first thing to consider when overclocking a video card is its cooling. This is especially true for running the most advanced video games, which create a tremendous load on the video processor. If you have a weak cooler on your video card, or no cooling means at all, then think twice before overclocking the hardware. We also do not recommend overclocking video cards in laptops. Almost any specialist service center will confirm that the number of cases of video cards burning out after overclocking is much higher in laptops than in desktop PCs with an average cooling system. Plus, not all cards support overclocking.
Experienced users try to overclock only old video cards with a good cooling system, when the problem of buying a new one is already brewing GPU. Therefore, they will not be very sorry if their old card cannot withstand the new load. MSI Afterburner can also be used to lower the parameters to reduce average temperature video card and extend its life.
Process
We will overclock using the MSI Afterburner utility. We don't need to log in BIOS settings and change the voltage, as is done when overclocking a processor. Everything is done programmatically.
The overclocking process itself is as follows: we gradually increase the load on the video card and see how this is reflected in additional programs or games. If we suddenly notice artifacts or unstable work, then we immediately return to the previous parameters.
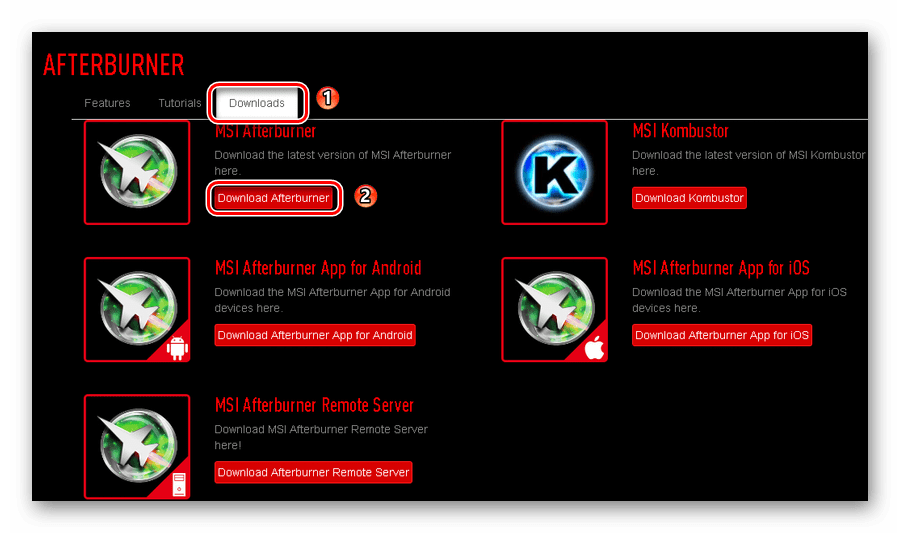
First, we need to download MSI Afterburner from the official website to get latest version. After installing and opening our application, you will see the following window.
P.S. It may differ from the version appearance, but the essence will remain the same.
Our next action will be to move the slider "Core Clock(MHz)" this is the video core frequency. We begin to move the slider, for the first time 40-50 MHz forward and press the button "Apply". After these steps, we check the stability; there are two ways to do this:
First way: Let's launch some kind of heavy game. For example, Metro 2033, GTA V or GTA IV, games from the Battlefield series (3.4 Hardline), Crysis 3 or other similar games are also good, after which we play for 1-2 hours to be sure of stability. If you notice artifacts on the screen, lower the values by about 10 MHz and repeat testing.
Second way: If you don't have it on hand powerful games, then you can use benchmarks and hardware tests. Download the MSI Kombustor utility, install and open.
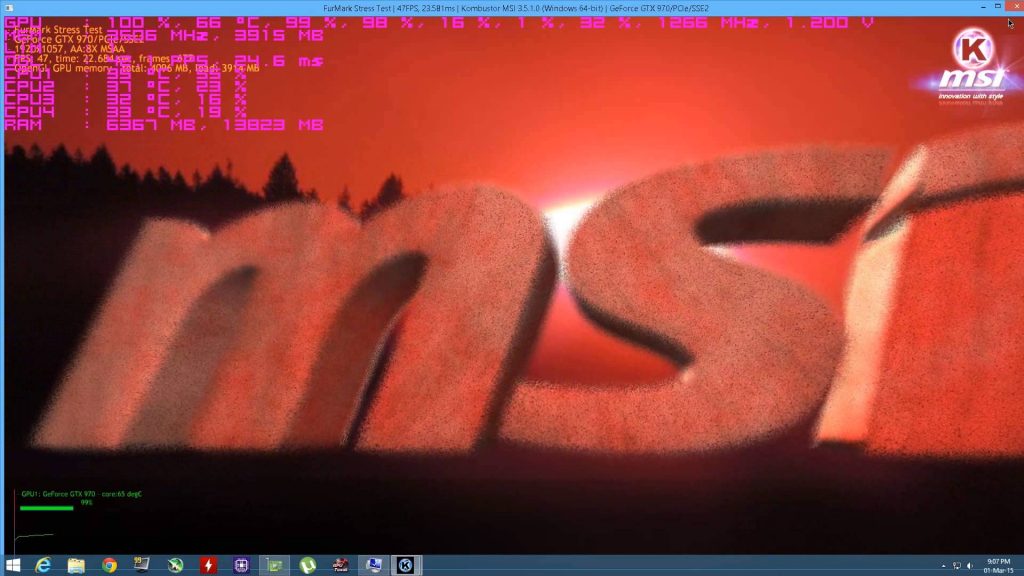
During testing, FPS, temperature and total load video cards. Record this data. After the 1st stage of overclocking, we run this test again and observe the numbers. It’s worth saying right away that in games the performance increase is displayed more clearly than in similar tests. Similar to gaming testing, artifacts and distortions may also appear here. If you noticed such things even before overclocking, this means that there are very serious problems with the video card.
If everything went well, then move the “Core Clock” slider another 20 MHz further and repeat the check for artifacts.
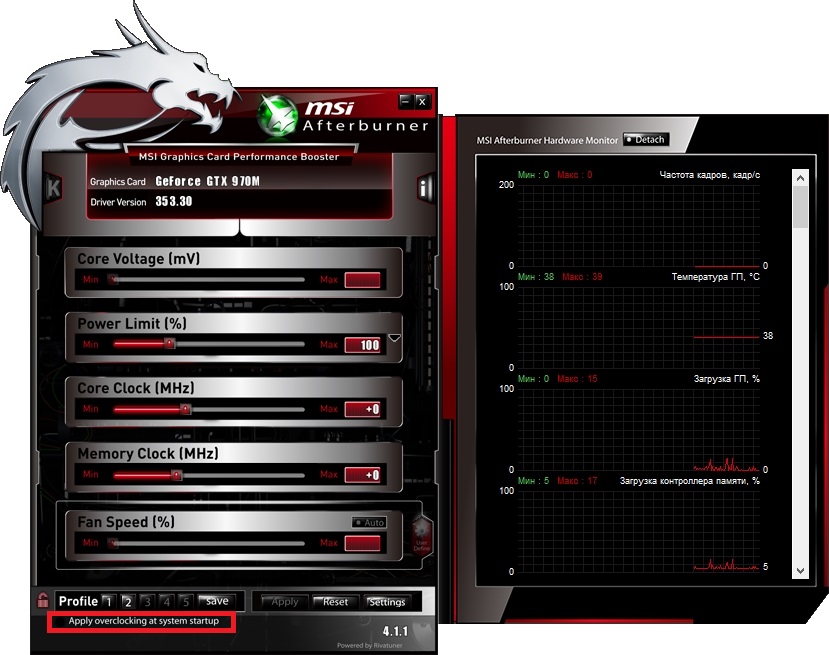
When you have found a limit in overclocking where artifacts do not appear, for example 970MHz[+100MHz], for greater stability, subtract 10MHz from your limit. After all the actions taken, click the “Apply” button and, if desired, click on "Apply oveclocking at system startup" so that overclocking is enabled along with the system. The location is shown below.
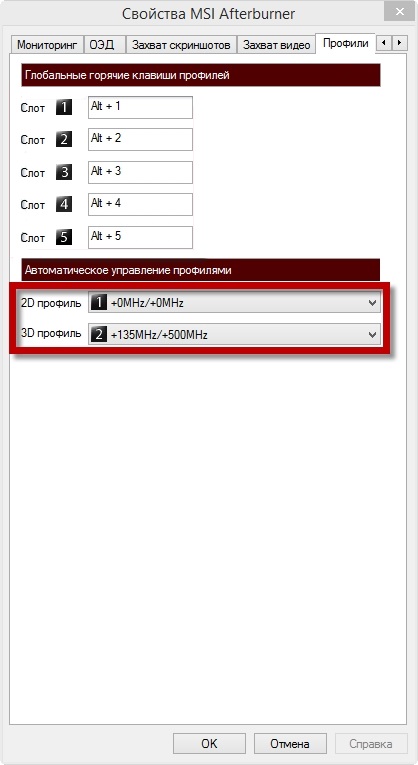
To enable your settings automatically when you launch games, you need to do the following:
We do not touch the 2D profile and leave it as is.
In the 3D profile you need to specify your overclocking settings.
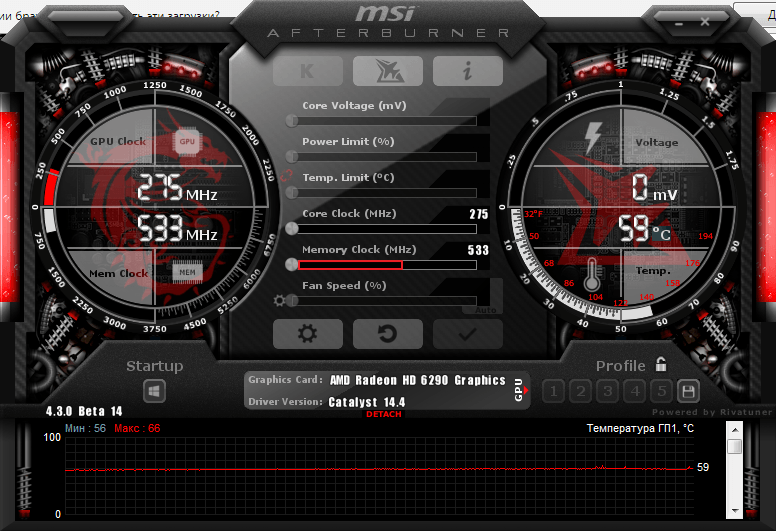
To overclock the memory, we do the same steps as when overclocking the core. We move the “Core Clock” slider to the frequency at which your overclocking worked as much as possible and begin to overclock the memory, that is, “Memory Clock”.
To do this, we need to move the “Memory Clock” slider, for the first time, like the “Core Clock”, 40-50MHz forward and click “Apply”. Then we check for stability again and if everything went well, then we move the slider further to 20Mhz and repeat all the steps again.
Also, a frequently asked question is whether it is possible to somehow remove overclocking restrictions in MSI Afterburner? In addition, some video cards may have limited or completely blocked overclocking options. You can fix this as follows: To do this you need to go to root folder and find the file MSIAfterburner.cfg, open it through notepad and edit it.
We look for the line UnofficialOverclockingEULA and write after the equal sign the sentence “I confirm that I am aware of unofficial overclocking limitations and fully understand that MSI will not provide me any support on it.” That is, we agree with all risks that will follow after the restriction is lifted, and also that MSI does not bear any responsibility for our actions.
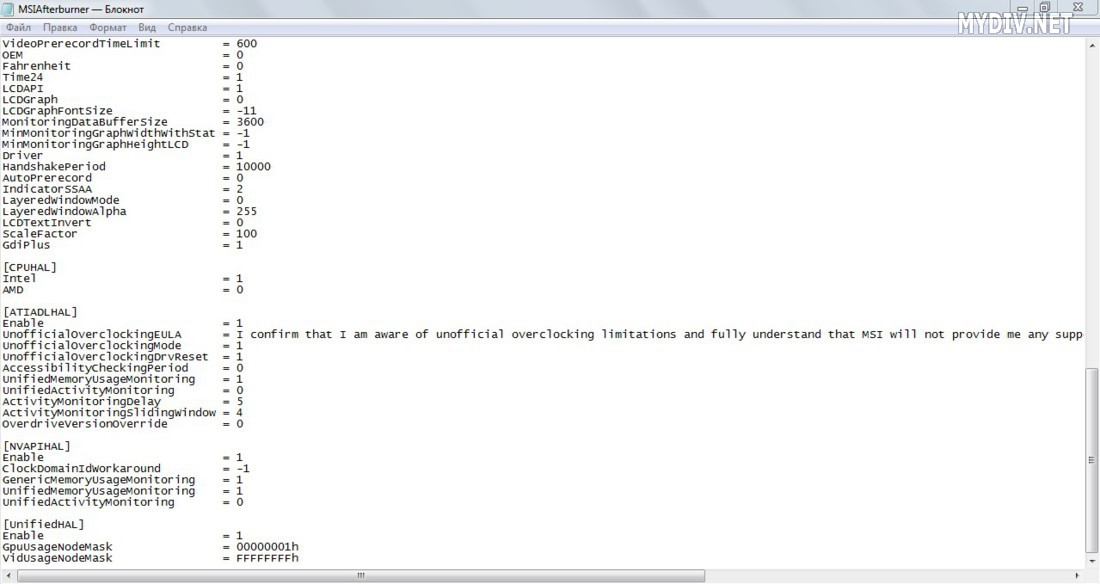
In UnofficialOverclockingMode we set the value to 1.
Please note that not all cards can unlock the overclocking limit or enable voltage and power consumption control without flashing. It also happens that overclocking is only possible at old version drivers.
About flashing AMD video cards We talk about RADEON RX 460 in our!
Some video cards can easily overclock the core frequency, but increasing the memory frequency causes serious problems. And vice versa. And on very old cards, the performance gain can be very low, and overclocking makes no sense at all.
Sometimes, after installing some games, it turns out that the video card’s power is not enough. This is very frustrating for users, because they will either have to abandon the application or buy a new video adapter. In fact, there is another solution to the problem.
The program was created to overclock a video card to full capacity. In addition to the main function, it also performs additional ones. For example, monitoring the system, capturing video and taking screenshots.
How to use MSI Afterburner
Before starting to work with the program, users need to be aware that if they do it incorrectly, the video card can become damaged. Therefore, it is necessary to strictly follow the instructions. Undesirable and auto mode acceleration
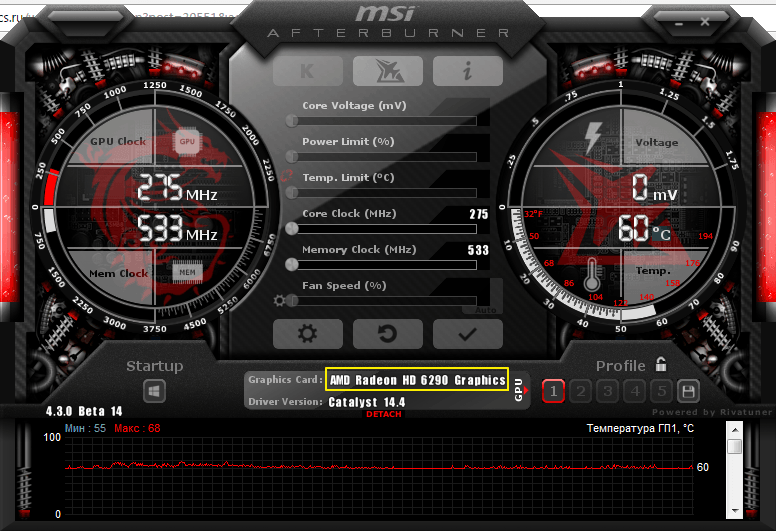
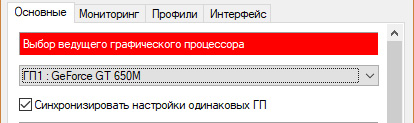
MSI Afterburner supports video cards NVIDIA And AMD. If you have a different manufacturer, then you will not be able to use the tool. You can see the name of your card at the bottom of the program.
Launching and configuring the program
We launch MSI Afterburner through the shortcut that was created on the desktop. We need to ask initial settings, without which many actions in the program will not be available.
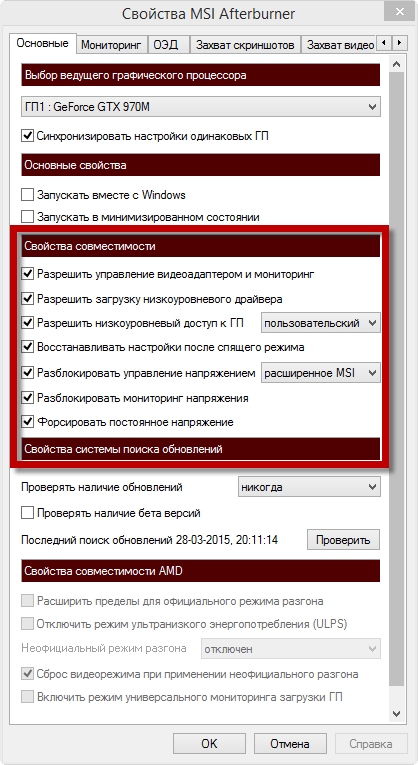
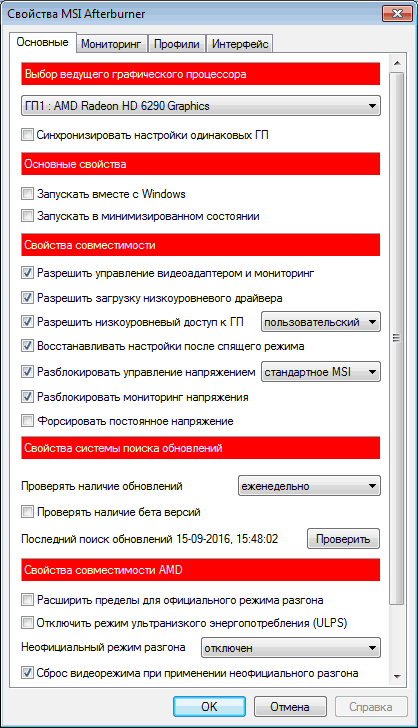
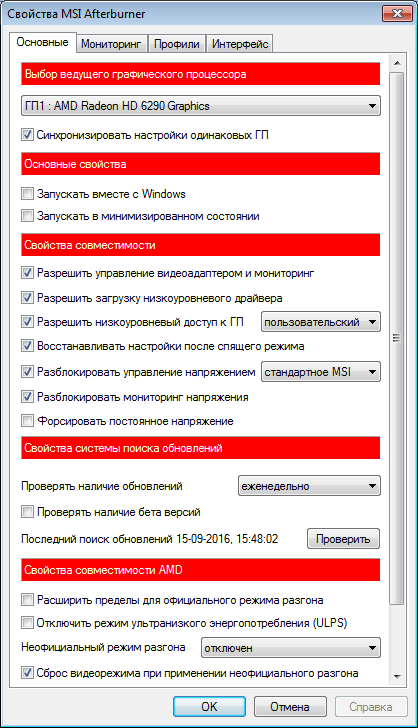
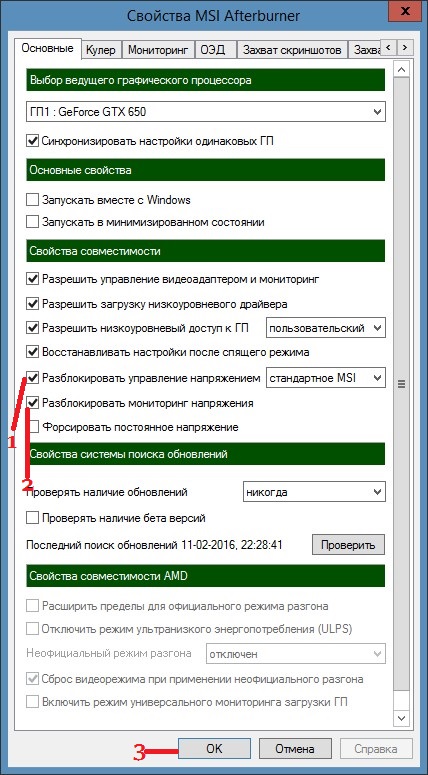
Check all the boxes that are visible in the screenshot. If your computer has two video cards, then add a checkmark to the field “Synchronize settings of identical GPUs”. Then click "OK".
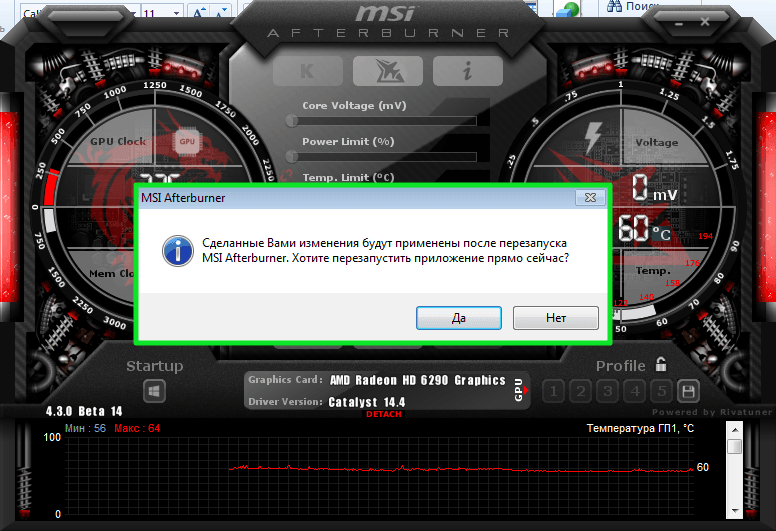
We will see a notification on the screen that the program needs to be restarted. Click "Yes". There is no need to do anything else, the program will be reloaded automatically.
Core Voltage slider
By default, the Core Voltage slider is always locked. However, after we have set the basic settings (Tick in the voltage unlock field), it should start moving. If, after restarting the program, it is still not active, then this function is not supported by your video card model.
Core Clock and Memory Clock slider
The Core Clock slider adjusts the frequency of the video card. In order to start acceleration, you need to move it to the right. It is necessary to move the regulator little by little, no more than 50 MHz. During the overclocking process, it is important to prevent the device from overheating. If the temperature rises above 90 degrees Celsius, the video adapter may break down.
Next we test our video card third party program. For example, VideoTester. If everything is in order, you can repeat the procedure and move the regulator another 20-25 units. We do this until we see image defects on the screen. It is important here to identify the upper limit of the values. When it is determined, we reduce the frequency of units by 20 to eliminate defects.
We do the same with Memory Clock.
To test the changes we have made, we can play some game with high requirements for the video card. In order to monitor the adapter's performance during the process, we configure the monitoring mode.
Monitoring
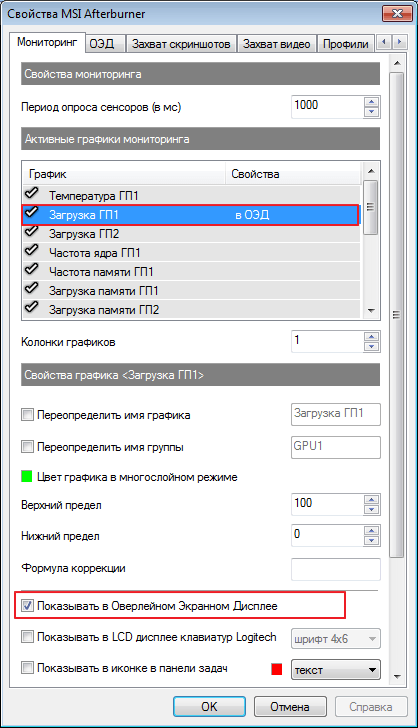
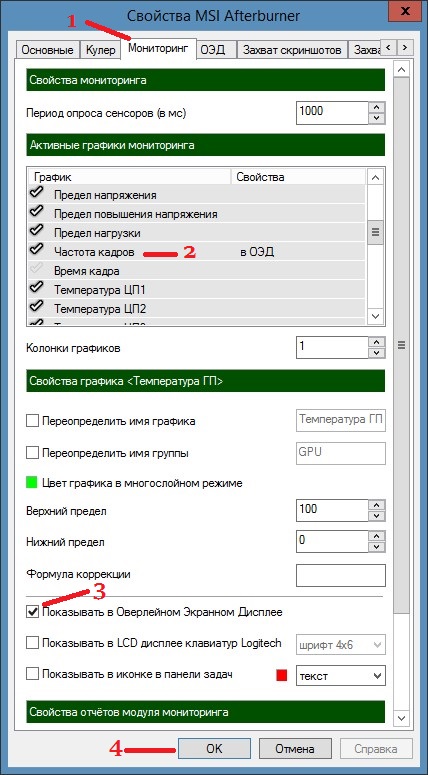
Let's go to "Settings-Monitoring". Select the required indicator from the list, for example. Check the box below "Show in Overlay Screen Display".
Cooler setup
I want to say right away that this function is not available on all computers. If you decide to overclock the video card in new laptop or netbook models, then you simply won’t see the cooler tab there.
For those who have this section, put a tick opposite "Enable software user mode". The information will be displayed in the form of a graph. Where the temperature of the video card is displayed below, and in the left column the speed of the cooler, which can be changed manually by moving the squares. Although this is not recommended.
![]()
— multifunctional program to control the video card. She works with graphic cards from AMD and NVIDIA, allows you to overclock, enable data monitoring functions in games and more. In this publication, we will consider the question “how to configure MSI Afterburner” for proper operation video cards.
Setting up the program
Important! For full-fledged work programs do not uncheck RivaTuner Statistics Server. Install with MSI Afterburner.
The main settings of MSI Afterburner are opened by clicking on the gear. When you first start, there are 7 tabs available in the menu:
To begin with, in the “Basic” tab set:
Click OK and restart the program.
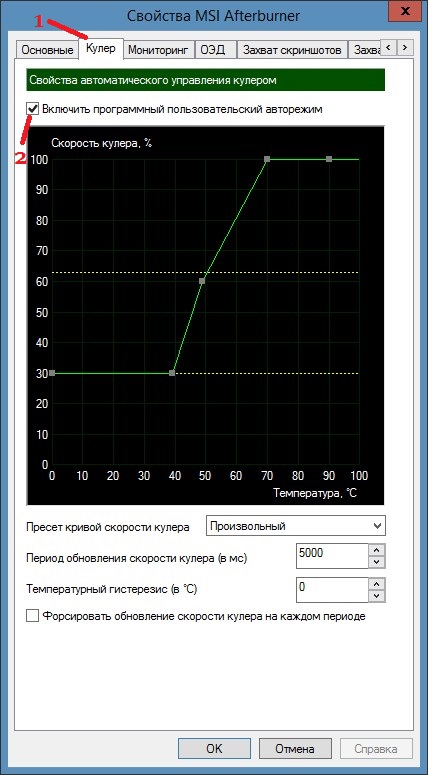
Working with a cooler
In the program you can change the rotation speed of the coolers, which depends on the heating temperature of the video card. Unfortunately, this function Available only for desktop PCs. Open the “Cooler” tab in the properties. You can change parameters by dragging points on the graph. ![]()
Setting FPS in the game
To set up the monitoring mode, in the “Monitoring” tab, click to select the “frame rate” values and click “Show in Overlay Screen Display”.  In addition, you can output other parameters in a similar way. In the game, the necessary monitoring data will be displayed on the screen.
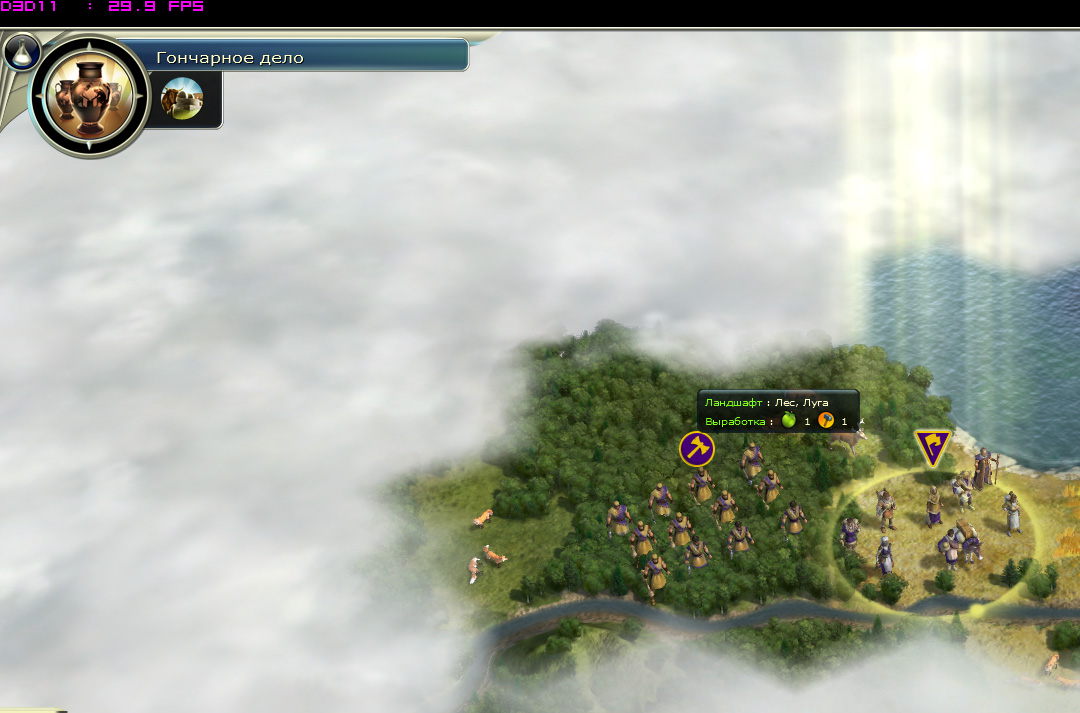
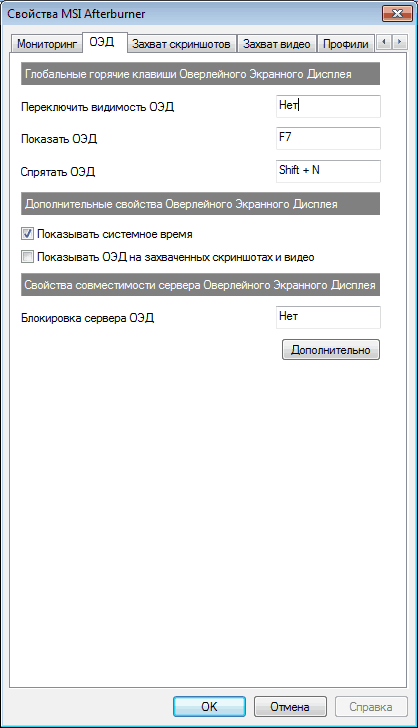
Working with OED
In this tab you can set hotkeys and set additional settings displaying text on the screen in computer games. 
When you click the “Advanced” button, a new window with settings is displayed. 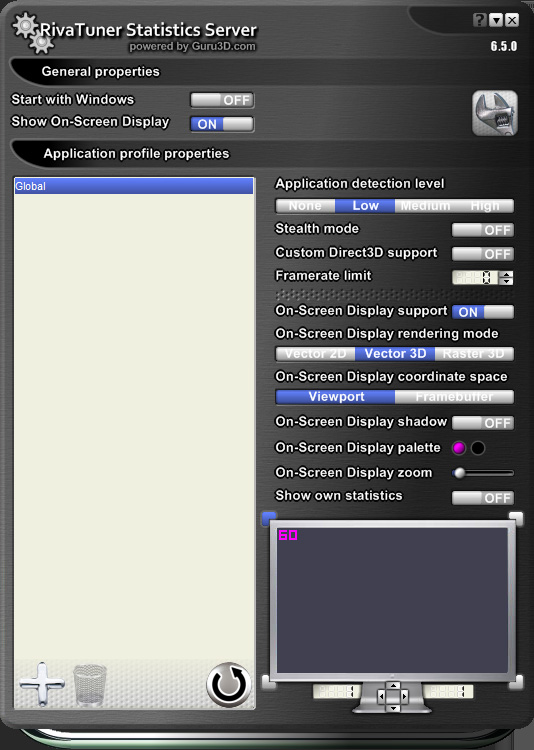
Saving game screenshots
In the “screenshot capture” tab, you can configure the key that will be used to save. In the “Capture screenshots” line, click the mouse pointer and press a key or key combination. In the future, pressing the specified keys will save a fingerprint of the image from the screen. You can also select the folder in which the screenshots will be saved. 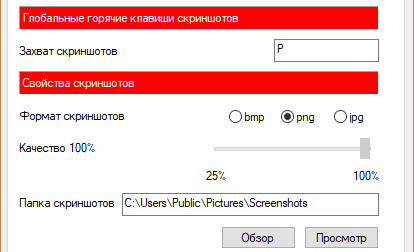
Video Capture
You can capture video in the same way. Assign a key to start video recording. In addition, you can set personal settings records.
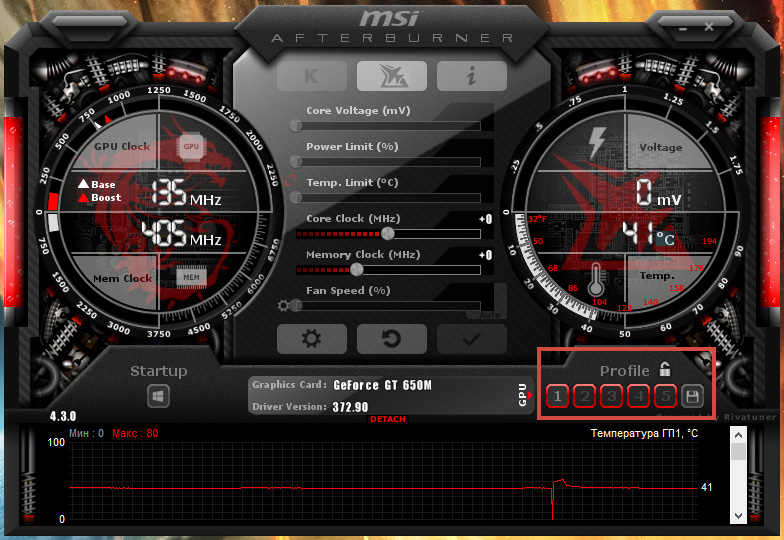
Working with profiles
The profiles tab allows you to save your settings for a specific slot. There are five of them in total. Having configured functions for certain situations and saved them in different slots, you can use a key combination to change them:
It is possible to adjust the fan speed depending on the temperature and to perform overclocking Radeon video cards. The program can work with any video cards, but only in branded ones NVIDIA cards And AMD Radeon All sliders work, but with other video cards problems may arise and sometimes the voltage sliders do not move in MSI Afterburner.
The created overclocking of the MSI Afterburner video card will run at system startup
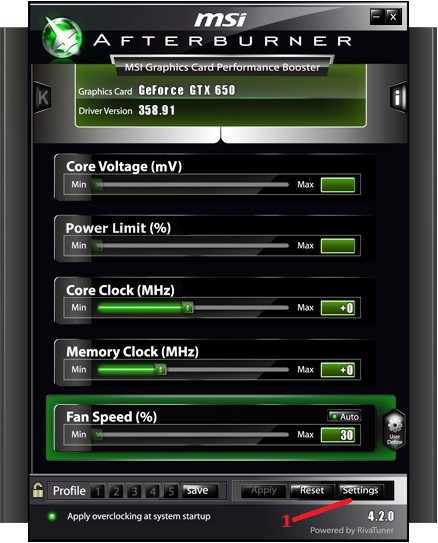
To properly configure MSI Afterburner, you must first make sure that the settings you make for overclocking and cooling are applied in subsequent Windows startups. To do this, in the main program window you need to click on the inscription Apply overclocking at system startup and the green circle in front of the inscription should light up.
Fan speed adjustment
The next thing you need to do is adjust the speed of the video card cooler, and to do this you need to open the settings.
 Made by MSI program Afterburner overclocking will start with the system
 To open the program settings you need to click on the button Settings. A window called MSI Afterburner Properties will open. In this window you need to go to the tab Cooler.
 Setting up video card cooling in Afterburner
 In the window that opens, you need to check the box Enable software user auto mode and a custom graphics card fan speed graph will immediately appear. To build a graph, you need to left-click on the line and, without releasing the mouse button, drag it to the desired location. In this graph, you need to set the fan speed to 100 percent at temperatures of 85 degrees and above, and the initial fan speed when the computer is idle should be stable and it is individual for each video card. When you have built your curve for changing the cooler rotation speed, click OK in the window and the settings will close. After this, you need to launch some game and play it for 15 minutes. After exiting the game in the MSI Afterburner monitoring window, you should make sure that the temperature of the video card does not rise too high. If the temperature rises to 90 degrees at maximum fan speed, then there is no need to overclock the video card.
Overclocking an AMD Radeon video card
After setting up the cooling of the video card, you can start overclocking via MSI Afterburner. In the main window of the program, the video card is overclocked, but before you start overclocking with using MSI Afterburner needs to activate the voltage sliders. Open the program settings and check the boxes Unlock voltage control And Unlock voltage monitoring After that, save the settings by clicking on the OK button and the settings window will close.
 To overclock MSI video card Afterburner needs to activate voltage sliders
 You need to overclock a video card by adding several points to each parameter, and if you add it all at once, the program may crash and the computer will restart. Overclocking a video card through MSI Afterburner should start with the Core Clock item, increase it by only 10 points and click on the Apply button. If no distortion has occurred and no dots or stripes have appeared on the monitor, then you can move on to the next Memory Clock parameter and increase it by 10 points. If you increase the parameters very much in this way, you will need to slightly increase the voltage of the video card, but in this case the video card will start to heat up more and you will need to test it on some game. After playing the game for 15 minutes and if the video card does not heat up more than 90 degrees, then you can leave these parameters.
When increasing the next characteristic, sometimes a crash may occur and your computer will reboot and all parameters will return to the factory settings. Therefore, write down or remember how many points you have already added, so as not to start setting up overclocking your video card all over again. If you don’t like the overclocking of your video card, you can press the button Reset and all settings will return to factory settings.
Monitoring MSI Afterburner in Games
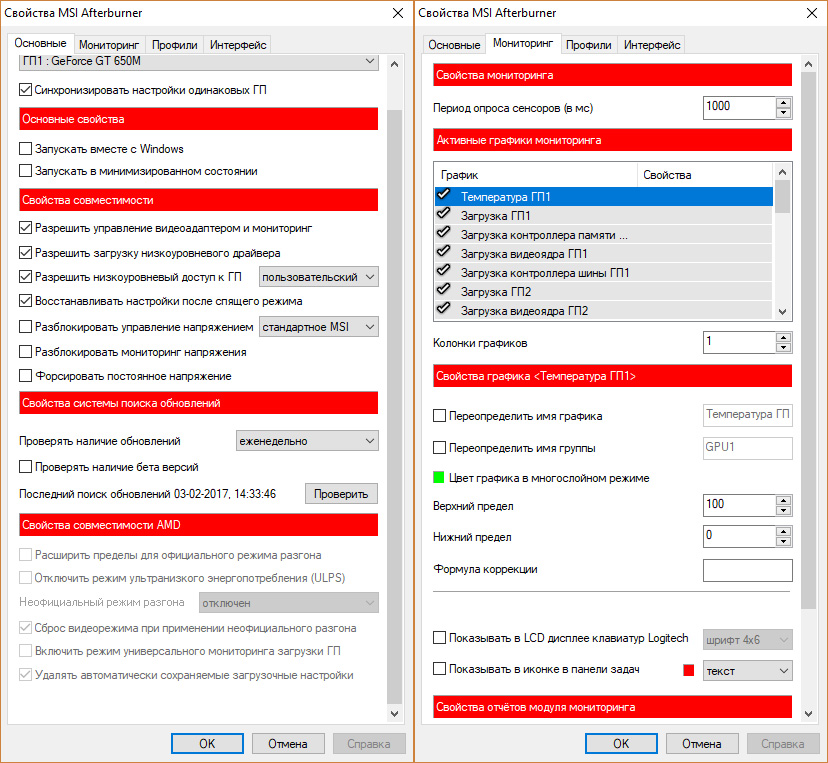
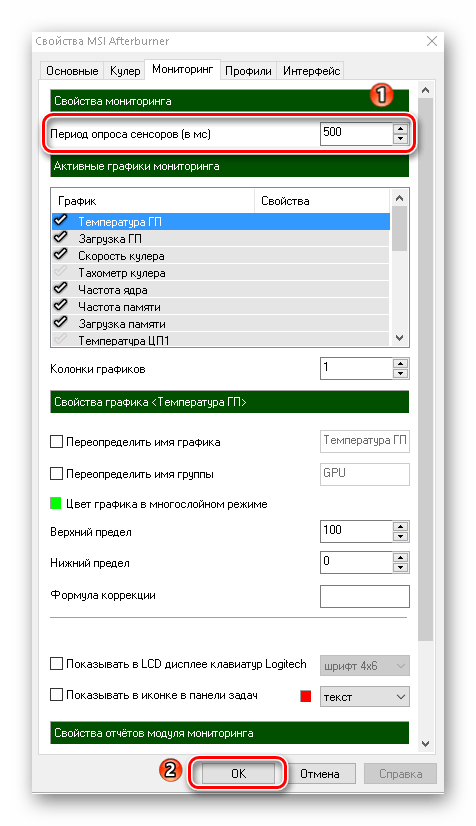
After overclocking the video card, you can MSI setup Afterburner for games, that is, to display the necessary parameters with the current performance of the video card in the game window. To configure MSI Afterburner monitoring in games you need to open the program settings and go to the tab Monitoring.
 IN MSI program Afterburner how to enable FPS
 On this tab, you must first check the box required parameter, and then click on the name of this parameter and check the box Show in Overlay Screen Display. After this, an inscription will appear opposite the parameter in the OED, which means that this parameter will be displayed in the game. Thus, you need to do this with all the parameters that you think should be displayed in the game. Having set all the parameters you need in the OED, you need to press the OK button and wait a bit until the settings window closes. Now you can start the game and the game will display your parameters with your current performance.
Video
This video shows how to use MSI Afterburner.
18.03.2017
The MSI Afterburner utility is primarily designed to overclock the video adapter in computer system. Most often it is used by overclockers - enthusiasts in the field of overclocking computer components who achieve extreme performance. But it is also suitable for casual users who need a slight boost in the performance of their graphics card.
Using the program
In addition to overclocking the video card, MSI Afterburner has a number of additional functions, such as system monitoring with temperature and load graphs of the main computer components.
Installation
To start using the utility, you need to download it from the official website.
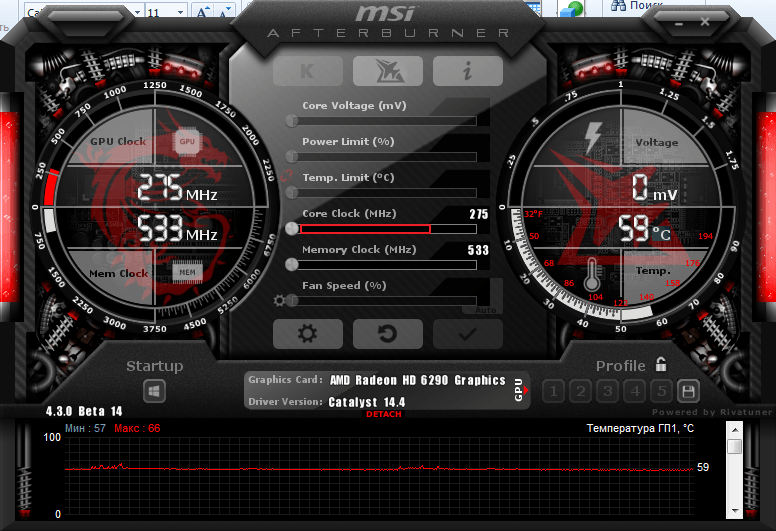
General form
After launch, we see the program divided into 2 sections. In the left section is the main overclocking panel, and on the right is the system monitoring window.
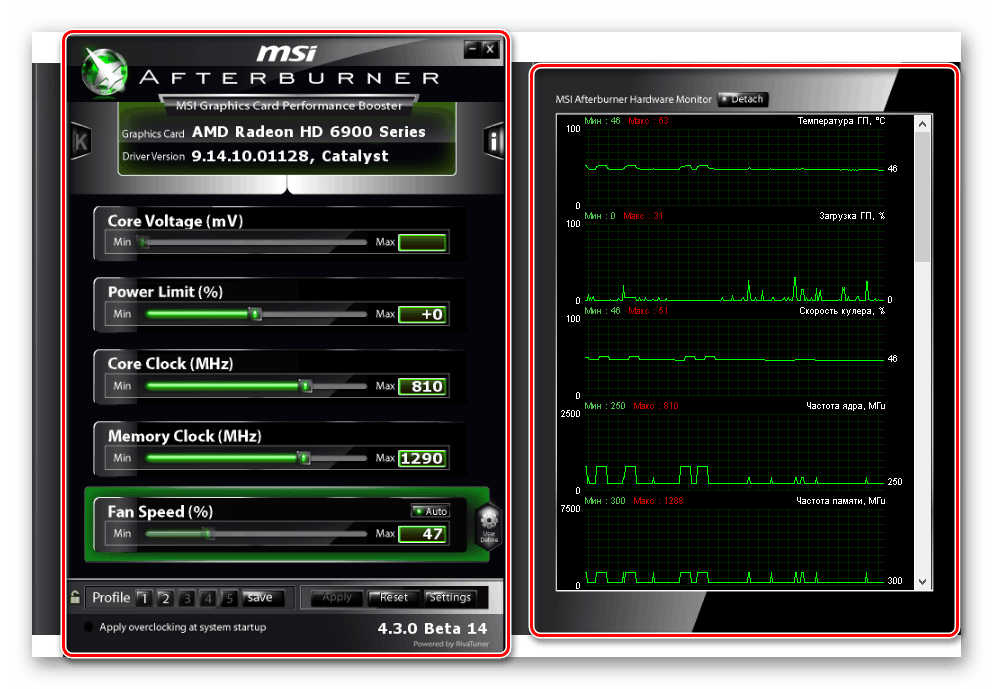
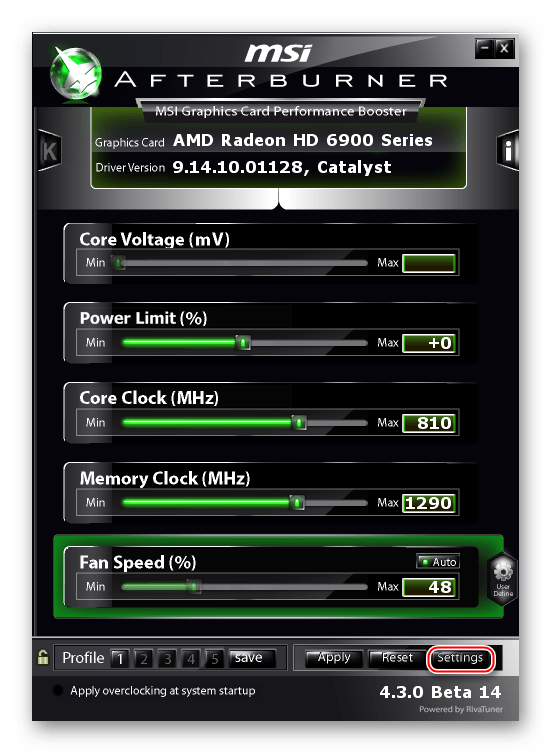
Let's look at the main panel.
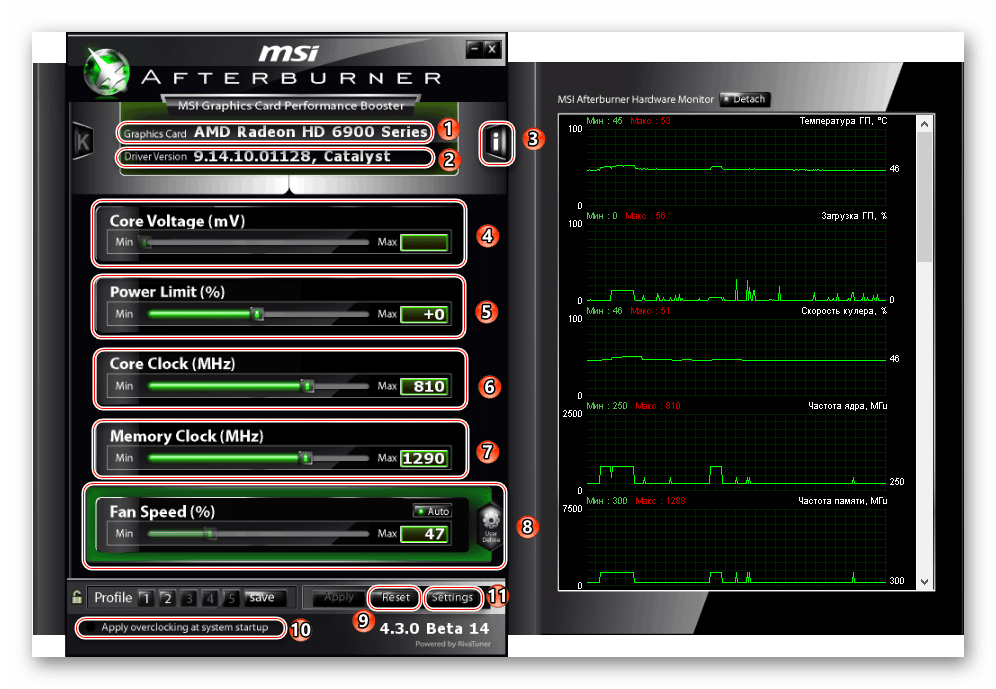
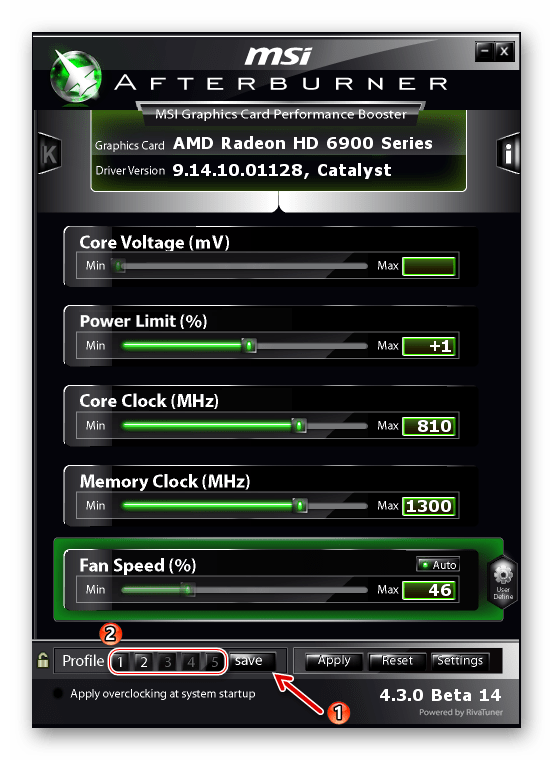
The main panel includes:
- Video adapter model.
- Video card driver version.
- Tab " Information» - information about central processor and about the video adapter.
- « Core Voltage» — core voltage control.
- « Power Limit» — power consumption limit.
- « Core Clock» — GPU core frequency.
- « Memory Clock"—memory frequency.
- « Fan Speed» — speed of the video card cooler.
- Button " Reset"—reset all settings.
- Option " Apply overclocking at system startup"—applying overclocking when starting the operating system.
- button "Settings"— utility settings.
The main points for overclocking a video card at home are the memory frequency and the GPU core frequency. By properly increasing the sliders, the performance of the video card improves. At standard settings There are restrictions on increasing frequencies for the correct operation of the video card. It is not recommended for ordinary users to change the core voltage and power consumption limit. You can also change the speed of the video card cooler to arbitrary, if necessary.
Dashboard 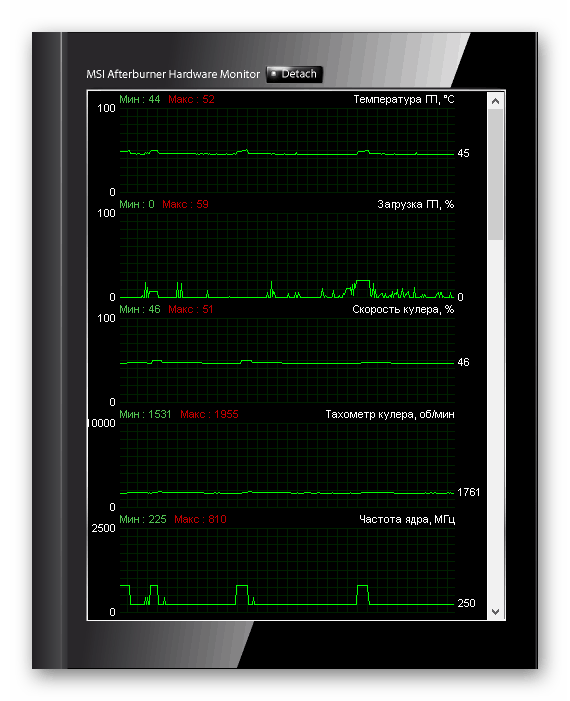
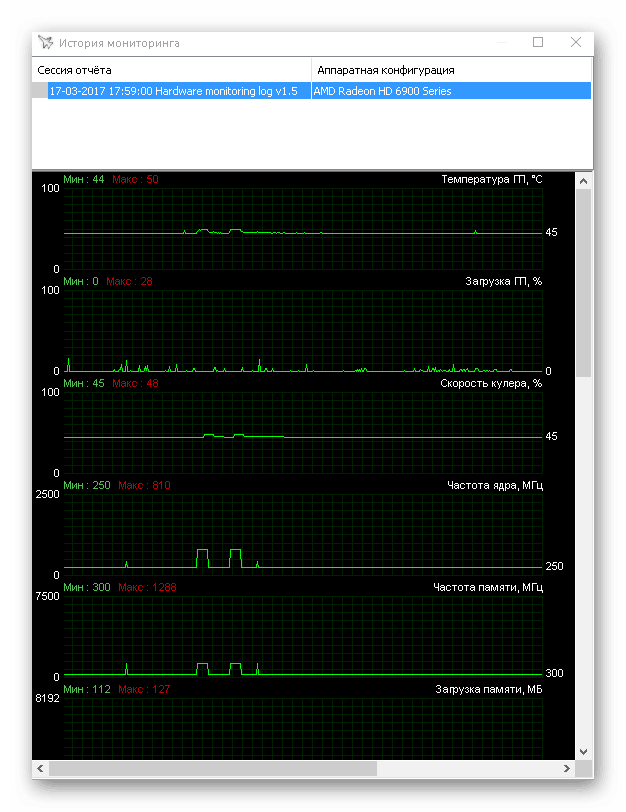
Final graphs
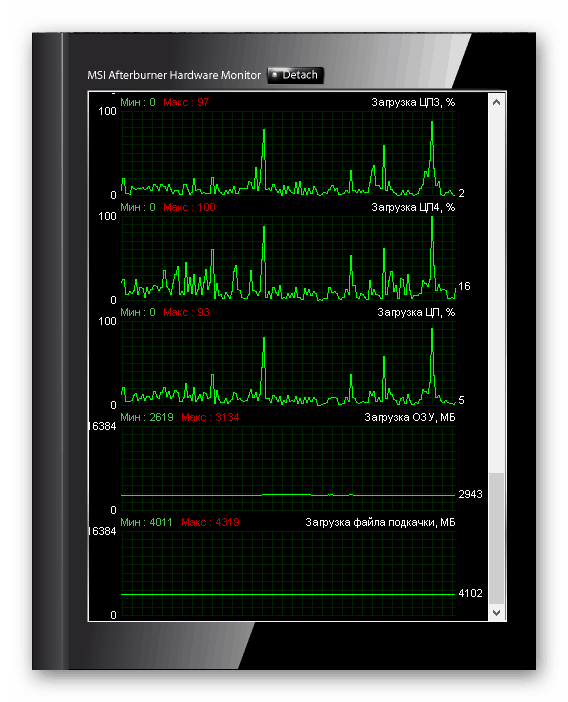
The dashboard includes:
- GPU temperature
- Cooler speed
- Cooler tachometer
- Core frequency
- CPU virtual thread temperature
- CPU temperature
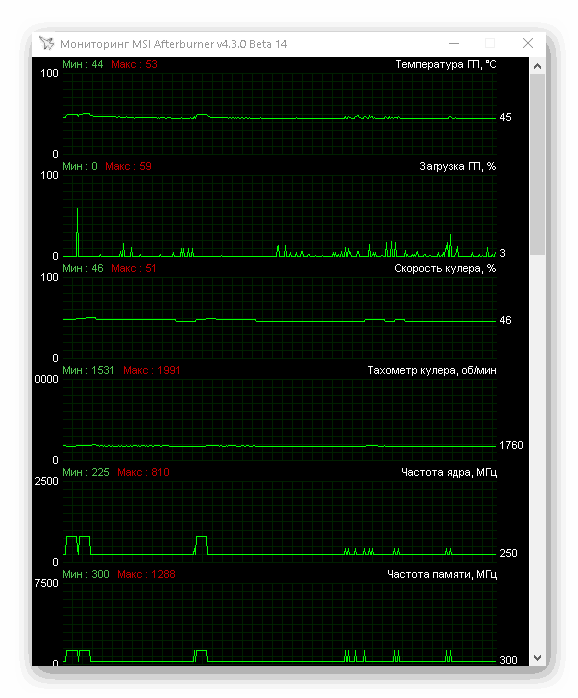
You can also detach the monitoring window from the main panel:
To do this, press the button “ Detach».
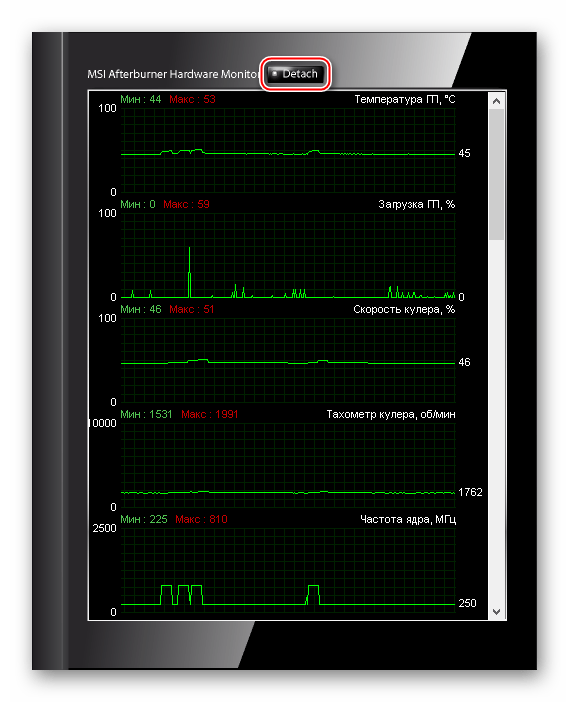
A window will appear that can be fixed anywhere on the screen.
basic settings
To open the settings menu, click " Settings».
The main settings will open.
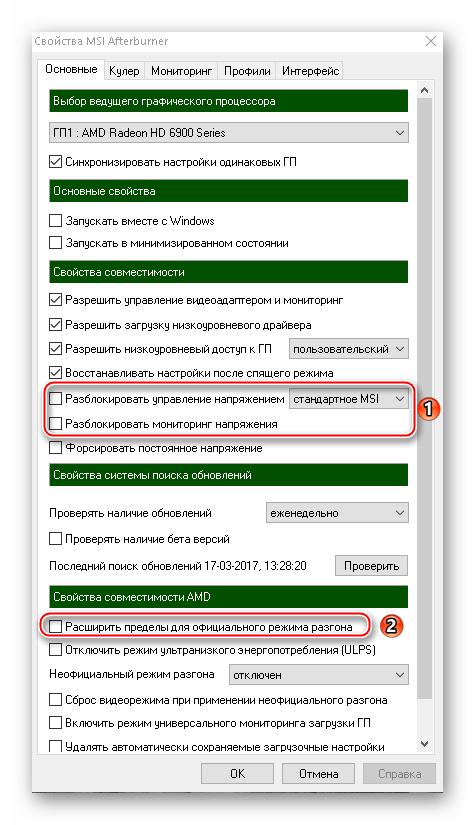
Here we see that management (Core Voltage, Power Limit) and voltage monitoring are disabled by default. Some video cards may not support these features. In the column " AMD Compatibility Properties"there is a function " Expand the limits for official regime acceleration", it increases the overclocking limits of the core and GPU memory, as well as voltage management. Users who are not well versed in overclocking are not advised to enable these features.
Cooler
At this point you can set the relationship between temperature and cooler speed:
Place a checkmark next to the function “ Enable software user auto mode».
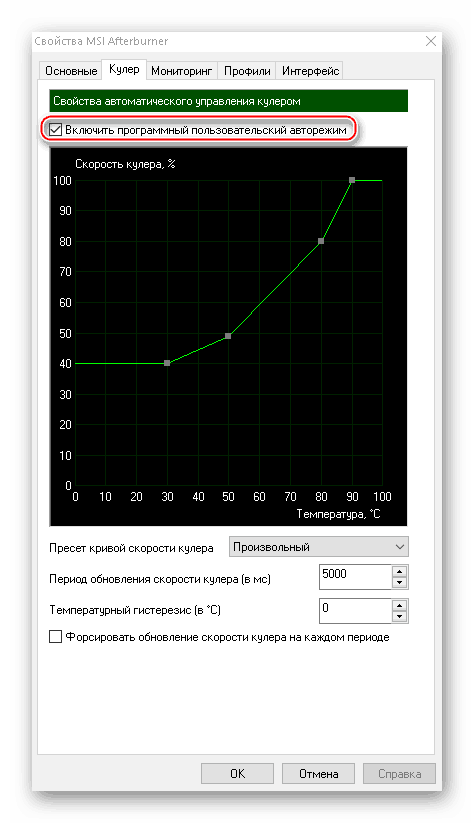
This option is useful for strong overclocking in order to use the cooler to the maximum. Under no circumstances should you set the fan speed to 100%, otherwise it will break. If overclocking is minimal, it is recommended not to check this option.
Monitoring
In this tab you can remove unnecessary graphs from the monitoring window and leave only the main ones:
To do this, before unnecessary point uncheck the box and click " OK».

By default, the data reading frequency is 1000 ms, it can also be changed:
Enter the number and click " OK».
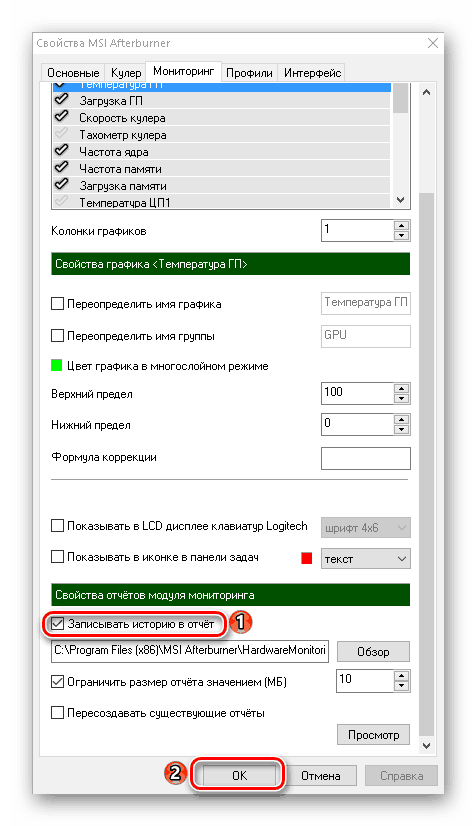
Another advantage of this utility is the ability to record a monitoring report in Text Document. You can specify maximum size file, as well as overwriting reports when starting a new session:
Profiles
In order not to spend a lot of time on overclocking, you can simplify it:
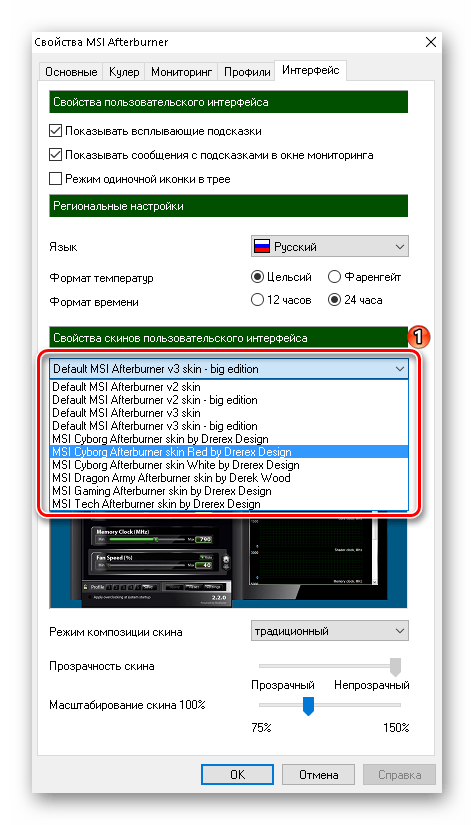
Interface
If necessary, in the " Interface"You can remove tooltips, change the language, change the temperature format, time format and customize the design of the main panel:
It is important to remember: before overclocking the video adapter, you must consult with knowledgeable users or read an overclocking guide on the Internet.


