Msi afterburner how to use on a laptop. Correct setup of MSI Afterburner. Video adapter status monitoring
Posted on January 11, 2016
Want to monitor your system's performance while gaming? What's the best way to see what your equipment can do? Does it fully reveal itself or is something preventing it?
You've probably already seen game reviews with system performance information displayed directly on your computer screen while you're playing and wondered: How did they do it?
This information presented in the left top corner screen is called OSD or OSD menu and is one of the most frequently used features in the MSI Afterburner app. It allows you to monitor the performance of your video card and other hardware during the game, and thus gives you important information about what can be improved to increase productivity. Want to know how to get this information on your screen? Just follow our directions below!
First, you need to get the latest version of MSI Afterburner and Rivatuner Statistics Server. Both programs are included in the MSI Afterburner installer. ()
1. Launch MSI Afterburner
2. Click “ Settings"(Settings) 
3. Click “ Monitoring”(Monitoring) and go to “ Active hardware monitoring graphs”(Monitoring active equipment) and select the information you are interested in to display in the OSD menu (for example, we use “GPU usage”)
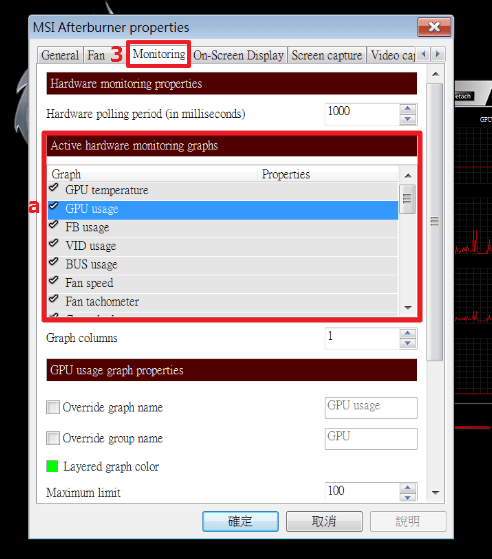
b. To display the information you are interested in on the screen, select the “ Show in On-Screen Display”(Show in OSD menu). 
c. In a collumn " Properties"" (Properties) you will see the inscription " in OSD"(on the menu). Select other information to display on the screen in the same way. You can change the order of information displayed on the screen by dragging the desired menu items up or down the list.
d. Text shown in “ Override group name”(Group Name Change) to be displayed in the OSD menu can be changed as you wish. (Here we changed the name “GPU usage” to “GPU load”)
e. Don't forget to click OK to save your changes and exit to MSI Afterburner. 
Now when you launch the game you will see an OSD menu!
But that is not all! You can also customize appearance menu. You can easily customize the OSD menu using the RivaTuner Statistics Server utility, which is automatically installed with Afterburner.
1. Click on the “ icon Riva Tuner Statistics Server”

2. In the menu that opens, you will see settings that you can change. Here are some of the most interesting options to change:
a. On-Screen Display shadow (OSD Shadow Setting): When this option is enabled, the text will have a dark outline to improve its visibility.
b. On-Screen Display palette (Change OSD Color): Here you can change the OSD text color. You can also change the color of the shadow.
c. On-Screen Display zoom (OSD Enlargement): Here you can change the OSD text size.
d. Position of OSD(Changing OSD Position): Drag the OSD text to any position on the screen. 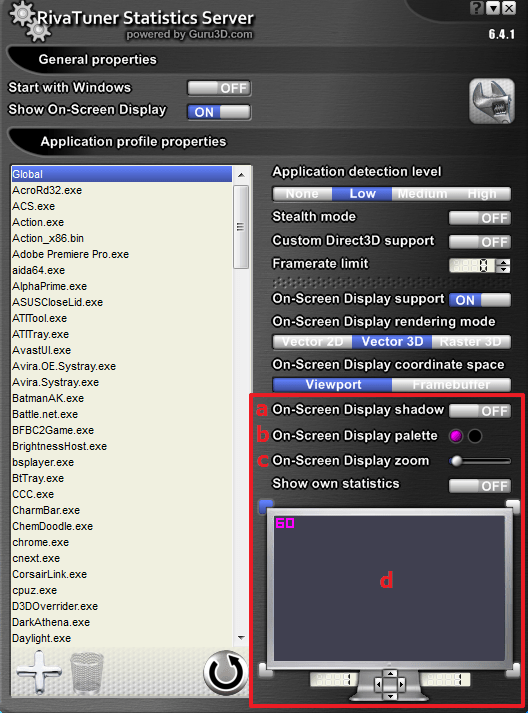
3. After you are done with the OSD settings, launch the game and observe the result. The MSI Afterburner app is very convenient tool any gamer, and not just overclockers. You can use MSI Afterburner to configure optimal performance in games! The application is constantly updated and guarantees excellent stability and compatibility with your equipment. Since new versions are released regularly, make sure you use latest version application, which is available for download at the following link:
Today, modern computer games, more than ever, have become very demanding on hardware. In particular, this applies to video cards. But how to set it up correctly? graphics chip, to game process was it comfortable, and did the card work at its maximum capabilities? For this there is a special free utility MSI Afterburner. at first glance it is very simple. But this is only at first glance, because when exhibiting certain parameters you need to take into account some nuances so that the card does not fail.
MSI Afterburner: Preview
In short, the MSI Afterburner application is a program for controlling all parameters of video cards, adjusting their performance and overclocking. That is why it is very popular among gamers who are trying to squeeze everything possible out of a card, and overlockers.
But there is one caveat here, which is that the MSI Afterburner setting only works for officially released graphics models NVIDIA chips And AMD Radeon. In addition, some application settings may be locked, and the automatic mode of applying settings in the program is not the best. Below we will describe how to work with this utility, and in such a way as not to damage the card.
Installation and initial setup of MSI Afterburner
The first setup step is to correctly install the utility. After launching the installer, the normal installation process will begin, during which the application will offer to additionally install Riva Tuner Statistics Server. This should be agreed with mandatory, since some functions and settings of the main program may not be available.
After installation is complete, setting up MSI Afterburner for games involves changing some key interface elements. If the English version was installed by default, use the Settings menu, where we select the section user interface(User Interface). Here you need to change the language and turn off hints if they are not needed.

After this, you need to use the main settings tab. Here you should check all the boxes except top line synchronizing the settings of identical GPUs (it is used only if there are several video cards), the voltage boost line and the item for checking the presence of beta versions (optional). You can also set the program to start at startup operating system. After saving presets the application will need to be restarted for them to take effect.
Core Clock Options
The initial setup of MSI Afterburner is complete. Now let's look at the main points with available parameters. Let's move on to the GPU frequency section.

To begin with, you can move the slider a little to the right (about 40-50 MHz). A special window will display current frequency. After this, it is advisable to test the video card with any utility designed for this purpose, for example 3D Mark or FurMark. In this case, you should pay attention that during the test the temperature does not rise above 90 degrees, and side effects do not appear on the monitor (strips, flickering, disturbances in color palette etc.). If the test does not reveal anything critical, to be on the safe side, it is better to launch some resource-intensive game and play for at least an hour. If everything is fine here, you can move the frequency slider even further to the right, but to a lower value (say, not 40, but 20 MHz) and test again. The further to the right the slider is moved, the lower the value used.
As you progress through the game, you can display current parameters on the screen in the form of a translucent window. As soon as it is noticed incorrect work cards on a certain value, the slider should be returned to its previous position and stopped there.
Memory Clock Settings
Memory has its own slider located just below. In principle, you can do the same as in the previous case. First, we shift it to the right by 50 units, test it, then add another 20 units, etc. Again, the value will need to be reduced by approximately 1.5-2 times compared to the previous state.
MSI Afterburner: cooler settings
These parameters can be accessed from the settings section, in which the corresponding tab is selected. For full access you should immediately check the box next to the line to enable software user mode.

Just below is a graph showing the direct dependence of the fan rotation speed on You can change the parameters by moving around the gray squares area of the graph, but for more fine tuning it is advisable to use them large quantity by simply clicking on empty space dependence lines and changing the position of certain points. But don’t get carried away with setting maximum values for any temperature. The cooler itself may also fail. By combining the chart parameters and the above settings, you can achieve the optimal result.
Saving settings and profiles
To save current settings, MSI Afterburner setup offers the user a choice of five profiles.

On the corresponding tab in the 2D section, we leave everything unchanged, and in the 3D drop-down menu we select our newly configured profile, which will contain the settings (there is also a value “Auto”, that is, this profile will be used by default when the application starts).
What to do if the settings are not available?
Sometimes you may encounter a situation where all the sliders are shifted to the right, and it is impossible to change their position. This normal blocking in case the video card does not support overclocking. But there is a way out.

To begin, in the directory where the program was installed, find the file MSIAfterburner.cfg and open it using Notepad. Scroll through the contents to the line UnofficialOverclockingEULA. In it, after the equal sign, you need to write the text “I confirm that I am aware of unofficial overlocking limitations and fully understanding that MSI will not provide me any support on it””, and then in the UnoficcialOverlockingMode line after the equal sign we put one.
Overlay monitor
These were the main points related to the question of
MSI Afterburner allows you to manage graphics cards from red and green, namely adjusting the speed of coolers, monitoring, overclocking equipment, capturing video, and much more. The program works with graphics cards from any manufacturer. The user just needs to install MSI Afterburner on his computer, after which he can fully use the program’s capabilities.
This article will tell you how to enable monitoring in the game using the MSI Afterburner program. Let's look at not only how to use MSI Afterburner, but also what monitoring settings are best to set. And also pay attention to how to configure monitoring parameters in the game, for normal display in games, so as not to distract from the game.
Users are looking for how to download MSI Afterburner from the official website in Russian. There really is such a possibility, since you can change the localization of the interface right in the program. It is also recommended to choose a more convenient program skin, since the standard one is not suitable for every user.
It is worth noting before installation that you need to be careful when using MSI programs Afterburner. Because the hardware overclocking functionality and the ability to adjust fan speed can harm the computer, especially in the hands of beginners.
- Go to the official website of the MSI Afterburner program and in the section Downloads press the button Download Afterburner.
- Next, open the downloaded file and follow all the steps of the program installer.
The main thing is to make sure that at the step of selecting the components of the program to be installed, MSI Afterburner and RivaTuner Statistics Server are selected. Since RivaTuner Statistics Server expands the capabilities of MSI Afterburner by adding the ability to enable FPS monitoring.
After installation, we immediately launch and change the program interface language. Just open MSI Afterburner and go to settings by clicking the gear at the bottom of the program. Next go to section Interface and at point Regional settings choose Russian language.

In the monitoring tab, you can also enable other parameters that the user considers necessary to display on the monitor during the game. Note that various parameters downloads graphics core or temperatures are available in MSI Afterburner without additional component RivaTuner Statistics Server. If you do not have frame rate monitoring settings, then make sure that RivaTuner Statistics Server was installed along with MSI Afterburner.

The last step is to customize the appearance of the on-screen display overlay. You can choose one of the available styles or simply customize the fonts and colors to suit your needs.
Style settings are available in MSI Afterburner properties. Just go to the bookmark Monitoring and highlight the desired monitoring schedule and press the button Selecting an Overlay Screen Display Style V the form of three points near the point Show in OED.
In the window that opens, just select the active display style you like or configure the current style by changing its properties.
And additional settings Overlay Screen Display displays can be found in the RivaTuner Statistics Server utility. It is enough to directly open the RivaTuner Statistics Server utility or go to the tab in the properties of MSI Afterburner OED and press the button Additionally. Here, in another interface, you can adjust the color, font, size and select the position of the text. There are also many other parameters available and the ability to immediately view the configured text parameters.
Conclusion
MSI Afterburner is a powerful tool for managing and monitoring settings graphics adapter. The user just needs to download and install the MSI Afterburner program from the official website. The ability to select the Russian interface language is available immediately after installing the program.
MSI Afterburner allows you to enable game monitoring, namely enable the display of frames per second (FPS). We previously looked at, although the MSI Afterburner program was not included in the list, it can also display a counter for the number of frames per second and more. Also take a look, as it is more suitable for beginners and also controls the speed of coolers connected to the motherboard.
The main purpose of the MSI Afterburner program is to overclock a video card. With its help, you can overclock the graphics chip and video card memory, thus increasing its performance. But, in addition, this program can be used to monitor various parameters while running full-screen games.
In this article we will look at MSI Afterburner from a monitoring point of view. Here you will learn how to enable in-game monitoring and use MSI Afterburner.
Step No. 1. Download MSI Afterburner and install it on your computer.
To get started, you will need MSI Afterburner itself. Download it from the official website () and install it on your computer. The installation process for MSI Afterburner is straightforward and no different from installing any other program. Just launch installation file and click on the “Next” button.
On one of the screens, the installer will ask you to select which programs to install. Here the checkboxes both opposite MSI Afterburner and RivaTuner Statistics Server should be selected. Since to enable monitoring in games we will need both of these programs.

After the installation of MSI Afterburner is completed, the RivaTuner Statistics Server installer window will appear.

In this installer, we also click on the “Next” button until this program it won't install either.
Step No. 2. Launch MSI Afterburner and go to settings.
After the installation is complete, launch the MSI Afterburner program. The appearance of this program may differ depending on what version you have. Therefore, do not be surprised if your MSI Afterburner does not look like the screenshot below.

In order to enable monitoring in games, you need to go to the MSI Afterburner settings. To do this, click on the button with the image of a gear.
Step No. 3. Turn on monitoring of the necessary parameters.
In the window with MSI settings Afterburner open the “Monitoring” tab. All settings related to monitoring in games are concentrated here.

On the “Monitoring” tab there is a list of parameters that can be monitored directly during the game.

In this list, you need to select the parameters that you need and enable the “Show in OED” option for them. To do this, you need to select one of the parameters with the mouse and check the box next to this option.

After enabling the “Show in OED” option, you can select the monitoring method this parameter. In the drop-down list you can select “Text”, “Graph” or “Combo”.

As a result, next to the parameter for which you have enabled monitoring, there should be an inscription “in the OED”.

If the “Show in OED” option is inactive and cannot be clicked, this means that this parameter is disabled. To enable the ability to monitor this parameter, check the box on the left side of the list.

Once the monitoring of all the necessary parameters is enabled, save the settings of the MSI Afterburner program by clicking on the “OK” button.
Step No. 4. Launch the game that requires monitoring.
Once the MSI Afterburner program is configured, you can proceed directly to monitoring. To do this, without closing MSI Afterburner, launch the game you need.

If everything was done correctly, monitoring with the parameters you need will appear in the upper left corner of the screen.
Sometimes, after installing some games, it turns out that the video card’s power is not enough. This is very frustrating for users, because they will either have to abandon the application or buy a new video adapter. In fact, there is another solution to the problem.
MSI Afterburner is designed to overclock your video card to full capacity. In addition to the main function, it also performs additional ones. For example, monitoring the system, capturing video and taking screenshots.
How to use MSI Afterburner
Before starting to work with the program, users need to be aware that if they do it incorrectly, the video card can become damaged. Therefore, it is necessary to strictly follow the instructions. Automatic overclocking mode is also undesirable.
MSI Afterburner supports NVIDIA video cards and AMD. If you have a different manufacturer, you will not be able to use the tool. You can see the name of your card at the bottom of the program.

Launching and setting up the program
We launch MSI Afterburner through the shortcut that was created on the desktop. We need to ask initial settings, without which many actions in the program will not be available.
Check all the boxes that are visible in the screenshot. If your computer has two video cards, then add a checkbox to the “Synchronize settings of identical GPUs” field. Then click “Ok”.

We will see a notification on the screen that the program needs to be restarted. Click “Yes”. You don't need to do anything else, the program will be reloaded into automatic mode.

Core Voltage slider
By default, the Core Voltage slider is always locked. However, after we have set the basic settings (Tick in the voltage unlock field), it should start moving. If, after restarting the program, it is still not active, then this function is not supported by your video card model.
Core Clock and Memory Clock slider
The Core Clock slider adjusts the frequency of the video card. In order to start acceleration, you need to move it to the right. It is necessary to move the regulator little by little, no more than 50 MHz. During the overclocking process, it is important to prevent the device from overheating. If the temperature rises above 90 degrees Celsius, the video adapter may break down.

Next we test our video card third party program. For example, VideoTester. If everything is in order, you can repeat the procedure and move the regulator another 20-25 units. We do this until we see image defects on the screen. It is important here to identify the upper limit of the values. When it is determined, we reduce the frequency of units by 20 to eliminate defects.
We do the same with Memory Clock.

To test the changes we have made, we can play some game with high requirements for the video card. In order to monitor the adapter's performance during the process, we configure the monitoring mode.
Monitoring
Go to “Settings-Monitoring”. Select the required indicator from the list, for example “GP1 Load”. At the bottom, check the “Show in Overlay Screen Display” checkbox.


Cooler setup
I want to say right away that this function is not available on all computers. If you decide to overclock the video card in new laptop or netbook models, then you simply won’t see the cooler tab there.

For those who have this section, check the box next to “Enable software user mode”. The information will be displayed in the form of a graph. Where the temperature of the video card is displayed below, and in the left column the speed of the cooler, which can be changed manually by moving the squares. Although this is not recommended.

Saving settings
At the final stage of overclocking the video card, we must save the settings made. To do this, click the “Save” icon and select one of 5 profiles. You also need to use the “Windows” button to launch new settings when the system starts.

Now go to the “Profiles” section and select your profile there in the “3D” line.

If necessary, you can save all 5 settings options and load the one suitable for each specific case.
Not reallylumpics.ru
How to use MSI Afterburner
 Sometimes, especially in situations where new games are released, users personal computers are faced with the fact that their video card is not powerful enough to run the game without any lag. But hurry to buy new video card not worth it. Because there is such a wonderful program as MSI Afterburner.
- Program settings
- Cooling settings
- Overclocking the video adapter
- Profiles and interface
What can MSI Afterburner do?
- Overclocking a video card
- Current status monitoring
- Capture video from your computer screen
- Screenshots (saving them in a separate folder)
What does it mean to overclock? Overclocking a video card means increasing its performance by changing the standard settings of the video card. However, attention! It is worth considering here that all actions are carried out at your own peril and risk - the manufacturer does not guarantee the repair of the device, just as it does not guarantee it proper work when changing default settings. The video card can simply burn out, in the literal sense of the word, if the available cooling is not enough.
But slight overclocking of the video card in the presence of normal cooling does not pose any danger. However, do not forget to monitor the temperature of the video adapter. Fortunately, the program that will be discussed in this article has such an opportunity. Moreover, it is possible to monitor the temperature of the graphics core directly during the game. The program itself can be found on the official MSI website. And to the question of what to do to overclock a video card when MSI help Afterburner, how to use this program and the features of its settings, as well as several others useful functions is discussed in this article.
MSI Afterburner, instructions for setting up and overclocking a video card
The program only supports video cards from NVIDIA and AMD manufacturers. If you have a video card from other manufacturers, then, unfortunately, you won’t be able to use all its functionality.
First you need to install the program. You can find it on the official MSI website. During installation you are prompted to select a language. Then a new window appears, with a choice of components of the program to be installed - select all the items with check marks. And click next. Here MSI Afterburner will prompt you to select the path to your installation. Select a directory and install. Enable MSI Afterburner by clicking on the shortcut located on the desktop. After launch, a window appears with many sliders, settings and various sensors monitoring.
Program settings
By clicking on the button with the image of a gear, the program settings panel is called up. By default, the main settings tab is displayed there. In this menu, if your computer has several video cards, check the “Synchronize settings of identical GPUs” checkbox. Next, check the “Unlock voltage monitoring” checkbox. This will allow you to adjust the voltage using the Core Voltage slider. In the main properties, so that the program retains its settings after a system reboot, you can check the “Run with Windows” checkbox. In this case, after the system boots, the program will immediately start working in background.
Cooling settings
Cooler settings allow you to adjust the fan speed, thereby influencing the cooling of the video card during overclocking. First you need to activate the “software user mode” by checking the box. Now on the window with the graph you can directly drag the nodes with the mouse, adjusting the fan speed at the desired temperature. At temperatures around 80 degrees and above, the fan speed should be set to 100%. After this, the video card can be tested in game mode or with a third-party program. If after some time of playing the program does not show a temperature of 90 degrees or more, then you can overclock the video card. At high temperatures (more than 90 degrees) this will be dangerous.
Overclocking the video adapter
If everything is normal with the temperature, then you can proceed to overclocking the video card itself. To do this, there are several sliders on the middle panel of MSI Aftrburner.
- Core Voltage - voltage
- Core Clock – video card frequency
- Memory Clock – memory frequency
There are also sliders such as Power Limit and Temp.Limit, but if they refuse to work, then most likely they are not supported by your video card. At the help of three The above sliders are what overclock the video card. You should overclock the video card gradually, gradually moving the sliders to the right and periodically testing the video card under load.
Video adapter status monitoring
 The monitoring tab is responsible for displaying readings about temperature, CPU load, core frequency and memory load directly on the monitor screen. To display monitoring on the monitor screen, check the “Show in Overlay Screen Display” checkbox. Now data will be displayed even during the game. The ATS setting is responsible for the keys that call up monitoring on the screen, including the ability to change the style of data display. Recording video and capturing screenshots The next section of the menu is setting up screenshot capture. Responsible for screenshot settings, allows you to select a folder for storing screenshots, and also assign hotkey.
Next is the video capture menu. In the same way, as in the previous case, you can assign a hotkey to control recording, configure what format to record video in, recording quality, frame rate, etc. Having configured the hotkey, just press it, for example, during computer game to start recording the image in separate file.
Profiles and interface
There are two tabs left - profiles and interface. The first menu allows you to save settings as separate profiles, which can always be loaded later. And the “Interface” menu is intended for settings such as language, the format in which temperatures will be displayed, and the appearance of the program.
comp.guru
How to properly configure MSI Afterburner

MSI Afterburner - multifunctional program to overclock a video card. However, when incorrect settings, it may not work at full capacity and damage the device. How to configure MSI Afterburner correctly?
Download MSI Afterburner
Setting up MSI Afterburner
Checking the video card model
MSI Afterburner only works with AMD video cards and NVIDIA. First of all, you need to determine whether your video card is supported by the program. To do this, go to “Device Manager” and in the “Video Adapters” tab look at the model name.

basic settings
Open “Settings” by clicking the corresponding icon in the main program window.

By default, the "Basic" tab opens. If your computer has two video cards, then check the “Synchronize settings of identical GPUs” checkbox.
Be sure to check the “Unlock voltage monitoring” checkbox. This will give you the option to use the Core Voltage slider, which adjusts the voltage.

Also, you need to check the “Run with Windows” box. This option is necessary to start new settings along with the operating system. The program itself will work in the background.

Cooler setup
Cooler settings are available only in desktop computers; they allow you to change the fan speed depending on the operation of the video card. In the main window of the “Cooler” tab we can see a graph in which everything is clearly shown. You can change the fan parameters by dragging the squares.

Monitoring setup
Once you have started changing the graphics card settings, the changes should be tested to avoid malfunction. This is done using any powerful game with high requirements for the video card. Text will be displayed on the screen, from which you can see what is happening with the card on this moment.

In order to configure the monitor mode, you need to add required parameters, and check the “Show in Overlay Screen Display” checkbox. Each parameter is added one by one.
Setting up ATS
In the OED tab, you can set hotkeys for working with the monitor and set additional text display settings, if desired.
If such a tab is missing, it means the program was installed incorrectly. Included with MSI Afterburner RivaTuner program. They are closely interrelated, so you need to reinstall MSI Afterburner without unchecking the installation box additional program.
Setting up screenshot capture
In order to take advantage of this additional function, you need to assign a key to take a picture. Then select the format and folder to save the images.

Video Capture
In addition to images, the program allows you to record videos. Just as in the previous case, you need to assign a hotkey to start the process.

By default, set optimal settings. If you wish, you can experiment.
Profiles
MSI Afterburner allows you to save multiple settings profiles. In the main window, save, for example, to profile 1. To do this, click on the “Unlock” icon, then “Save” and select “1”.

Go to the settings, to the “Profiles” tab. Here we can configure a key combination to call up certain settings. And in the “3D” field, select our profile “1”.

Interface setup
For user convenience, the program has several skin options. To configure them, go to the “Interface” tab. Select the appropriate option, which is immediately displayed at the bottom of the window.

In the same section we can change the interface language, time format and measurement temperature.
As you can see, setting up MSI Afterburner is not at all difficult and anyone can do it. But trying to overclock a video card without special knowledge is highly undesirable. This may cause it to break.
We are glad that we were able to help you solve the problem.
Poll: did this article help you?
Not reallylumpics.ru
Using the latest Afterburner to boost the 3D performance of MSI GAMING laptops
Posted on October 23, 2015
Warning: All actions aimed at overclocking the system are not covered by the warranty, so use all the tips below with full understanding and caution. Overclocking using Afterburner is possible on systems with GTX800M and GTX900M series graphics cards. Users cannot use this tool to work with graphic solutions AMD or UMA graphics. Moreover, due to restrictions GPU drivers, overclocking some laptops may not be feasible.
Some advanced users probably know that in addition to excellent graphics hardware, MSI gaming solutions are equipped with the best software for GPU overclocking, whose name is Afterburner. This application has been bundled with MSI graphics cards for many years. Afterburner is very good tool to overclock the clock speed of the GPU core and video memory. For some configurations, Afterburner even allows you to raise the core voltage and increase the maximum power factor. Moreover, this great tool for detailed monitoring of GPU parameters and status. The application offers the user more than 20 parameters for real-time control.

Afterburner v4.1.0 for GTX900M series of mobile video cards
Afterburner works great on mobile platforms with some caveats for certain GPUs.
On most MSI gaming laptops (with GTX900M and GTX800M graphics cards), the application runs quite stable. Suitable version Afterburner for overclocking GTX980M, GTX970M, GTX865M and GTX950M mobile graphics cards is v4.1.0.
In this article we will try to overclock the GE62 with a processor Intel Core i7 4710HQ and GTX965M video card. Original base frequency GPU – 924 MHz; during gameplay it can rise to 950 MHz.
Using GPU-Z we get detailed information about GPU. The GTX965M has GDDR5 video memory with a frequency of 5000 MHz, which is obtained thanks to a 4x multiplier of the base frequency of 1250 MHz. However, if DDR3 is installed, the multiplier will only be 2x. pay attention to lower limit indicators in the “GPU Сlock” column. This is the standard GPU base frequency at which the core runs in currently. When we change the GPU frequency, the number in this field will change to the one we set.

How to increase the frequency of the GPU and video memory
Afterburner will hardly raise any questions even in the hands of a novice overclocker. Just follow the steps we describe in this article and you will succeed.
When you launch Afterburner, the window illustrated below will open. For overclocking here, you will have access to only two parameters – GPU frequency and video memory frequency. These restrictions are due to the fact that mobile video cards changes to the core supply voltage, power factor limit, and fan speed are locked for the user. Therefore, we can only be content with these two parameters.
The GPU clock speed can be raised to a maximum of 135 MHz, while the memory frequency can be overclocked to 1000 MHz and above. But it should be remembered that when you approach the maximum capabilities of the system, it begins to work unstable. Moreover, it becomes unsafe. Here, just as an example, we slightly raised both figures by 120 MHz. Don't forget to click the “Apply” button to confirm your changes.

Next, we need to look at real-world performance and make sure the system works with the new settings. To do this, we used 3D Mark 11 - the easiest way to observe the difference in performance before and after overclocking.
In 5 minutes of testing with standard settings, we got P7103 points.

Before we run the 3D Mark 11 performance test again, we'll tell you one trick that will allow you to save overclocking parameters. First you need to change your desired overclocking settings. In our case we raised clock frequency GPU and memory at 120 MHz and applied the changes. Next you select Profile 1 and press Save button to save settings in this slot. As you can see, the user has 4 slots for saving parameters. In the future, everything you need to fast switching graphics card in one or another overclocking mode, this is to select one of the saved profiles.

Now let's look at the results. When the GPU and video memory frequencies were raised to 120 MHz, the system remained stable, and the 3D Mark 11 performance test showed P7728 points. In the DirectX11 3D test in P-mode, the performance increase was more than 8%.

Real change in games
Let's launch some heavyweight and see the real, applied nature of the changes. Our choice fell on the most popular action movie with tons of modernized weapons - “Call of Duty: Advanced Warfare”, which was recognized as one of best games in the “FPS Games of 2014” ranking. With standard video card settings, we see a frame rate of 43.4 FPS, which is quite enough for combat scenes.

Now we launch Afterburner and raise the GPU and video memory frequency to 120 MHz. Next, we return back to the game and watch FPS on the same scene. As you can see, the frame rate has increased to 50.1 FPS, which is 15% higher compared to standard settings.
Thus, we are convinced that overclocking produces positive results, increasing system performance. If you consider yourself an advanced, competent user, you can use Afterburner not only to easily adjust the system to your current needs, but also to monitor the GPU, video memory and FPS in real time and save screenshots directly during the game.

Conclusion
Depending on the configuration and model of the gaming laptop, the overclocking range of its parameters may vary. However, Afterburner does an excellent job of boosting GPU and VRAM clock rates to over 100 MHz on most gaming laptops, including laptops MSI Gaming. If we compare the overclocking process between laptops various manufacturers, then on MSI laptops it runs easier and more stable thanks to a muscular, competent cooling system.
Either way, Afterburner is a simple way to increase 3D graphics performance by 8 to 15%. Given the overall stability of the system, this is a really good indicator for both gamers and advanced users who prefer powerful gaming laptops.
Now enough with the numbers! Time for GPU overclocking and cool gaming settings!

ru.msi.com
Msi afterburner - how to use
If you have an idea to overclock your video card, then you cannot do without the MSI Afterburner program. This convenient utility, which allows you to increase card performance by 15-20 percent and control the progress of optimization. Before you start installing MSI Afterburner and overclocking your card, there are a few things you should know about the dangers of this process. The whole point is that high performance A video card requires a very good cooling system, otherwise you will simply ruin the components. It is better to overclock the middle and old generation video cards that are installed on your desktop computer. It is not recommended to overclock laptops, as the percentage of breakdowns from overclocking is high. Keep in mind that you can increase performance quite a bit, don't try to push the video card to the extreme. If you understand the full responsibility this process, then start your acquaintance with MSI Afterburner in this article.
Download and MSI installation Afterburner
- You can download the utility from the link http://www.softportal.com

The installation process is quite simple. You need to follow these steps:
- Agree with license agreement.
- Select the program installation directory.
- Please note that the program itself consists of two blocks - this is MSI Afterburner itself and the RivaTuner utility, which allows you to capture videos and screenshots, as well as show FPS and other parameters during the game to monitor the state of your system.
- Decide whether you need a desktop shortcut by selecting the option.
MSI Afterburner is divided into two utilities. One of them bears its native name, and the other is called RivaTuner. Install them both. RivaTuner will help you look at FPS and monitor the state of your computer during the game.


