Setting up msi afterburner for games. How to use MSI Afterburner and keep your video card in good shape. Simple Rules for Voltage Control
The main purpose of the program MSI Afterburner- This is overclocking the video card. With its help you can overclock graphics chip and video card memory, thus increasing its performance. But, in addition, this program can be used to monitor various parameters while running full-screen games.
In this article we will look at MSI Afterburner from a monitoring point of view. Here you will learn how to enable in-game monitoring and use MSI Afterburner.
Step No. 1. Download MSI Afterburner and install it on your computer.
To begin with you will need yourself MSI program Afterburner. Download it from the official website () and install it on your computer. Process MSI installations Afterburner is straightforward and no different from installing any other program. Just launch installation file and click on the “Next” button.
On one of the screens, the installer will ask you to select which programs to install. Here the checkboxes for both MSI Afterburner and RivaTuner should be selected Statistics Server. Since to enable monitoring in games we will need both of these programs.

After the installation of MSI Afterburner is completed, the RivaTuner Statistics Server installer window will appear.

In this installer, we also click on the “Next” button until this program it won't install either.
Step No. 2. Launch MSI Afterburner and go to settings.
After the installation is complete, launch the MSI Afterburner program. The appearance of this program may differ depending on what version you have. Therefore, do not be surprised if your MSI Afterburner does not look like the screenshot below.

In order to enable monitoring in games you need to go to MSI settings Afterburner. To do this, click on the button with the image of a gear.
Step No. 3. Turn on monitoring required parameters.
In the MSI Afterburner settings window, open the “Monitoring” tab. All settings related to monitoring in games are concentrated here.

On the “Monitoring” tab there is a list of parameters that can be monitored directly during the game.

In this list, you need to select the parameters that you need and enable the “Show in OED” option for them. To do this, you need to select one of the parameters with the mouse and check the box next to this option.

After enabling the “Show in OED” option, you can select the monitoring method this parameter. In the drop-down list you can select “Text”, “Graph” or “Combo”.

As a result, next to the parameter for which you have enabled monitoring, there should be an inscription “in the OED”.

If the “Show in OED” option is inactive and cannot be clicked, this means that this parameter is disabled. To enable the ability to monitor this parameter, check the box on the left side of the list.

Once the monitoring of all the necessary parameters is enabled, save the settings of the MSI Afterburner program by clicking on the “OK” button.
Step No. 4. Launch the game that requires monitoring.
Once the MSI Afterburner program is configured, you can proceed directly to monitoring. To do this, without closing MSI Afterburner, launch the game you need.

If everything was done correctly, then in the left top corner monitoring will appear on the screen with the parameters you need.
Sometimes, especially in situations where new games are released, users personal computers are faced with the fact that their video card is not powerful enough to run the game without any lag. But hurry to buy new video card not worth it. Because there is such a wonderful program as MSI Afterburner.
What can MSI Afterburner do?
- Overclocking a video card
- Current status monitoring
- Capture video from your computer screen
- Screenshots (saving them in a separate folder)
What does it mean to overclock? Overclock your video card means increasing its performance by changing the standard settings of the video card. However, attention! It is worth considering here that all actions are carried out at your own peril and risk - the manufacturer does not guarantee the repair of the device, just as it does not guarantee it proper work when changing default settings. The video card can simply burn out, in the literal sense of the word, if the available cooling is not enough.
But slight overclocking of the video card in the presence of normal cooling does not pose any danger. However, do not forget to monitor the temperature of the video adapter. Fortunately, the program that will be discussed in this article has such an opportunity. Moreover, it is possible to display temperature monitoring graphics core, right during the game. The program itself can be found on the official MSI website. And to the question of what to do to overclock a video card when MSI Help Afterburner, how to use this program and the features of its settings, as well as several others useful functions is discussed in this article.
MSI Afterburner, instructions for setting up and overclocking a video card
 The program only supports video cards from NVIDIA and AMD manufacturers. If you have a video card from other manufacturers, then, unfortunately, you won’t be able to use all its functionality.
First you need to install the program. You can find it on the official MSI website. During installation you are prompted to select a language. Then a new window appears, with a choice of components of the program to be installed - select all the items with check marks. And click next. Here MSI Afterburner will prompt you to select the path to your installation. Select a directory and install. Enable MSI Afterburner by clicking on the shortcut located on the desktop. After launch, a window appears with many sliders, settings and various sensors monitoring.
Program settings
By clicking on the button with the image of a gear, the program settings panel is called up. By default it is set there main settings tab. In this menu, if your computer has several video cards, check the “Synchronize settings of identical GPUs” checkbox. Next, check the “Unlock voltage monitoring” checkbox. This will allow you to adjust the voltage using the Core Voltage slider. In the main properties, so that the program retains its settings after a system reboot, you can check the “Run with Windows” checkbox. In this case, after the system boots, the program will immediately start working in the background.
Cooling settings
Cooler settings allow you to adjust the fan speed, thereby influencing the cooling of the video card during overclocking. First you need to activate the “software user mode” by checking the box. Now on the window with the graph you can directly drag the nodes with the mouse, adjusting the fan speed at the desired temperature. At temperatures around 80 degrees and above, the fan speed should be set to 100%. After this, the video card can be tested in game mode or third party program. If after some time of playing the program does not show a temperature of 90 degrees or more, then you can overclock the video card. At high temperatures (more than 90 degrees) this will be dangerous.
Overclocking the video adapter
If everything is normal with the temperature, then you can proceed to overclocking the video card itself. To do this, on the middle panel of MSI Aftrburner there are several sliders.
- Core Voltage - voltage
- Core Clock – video card frequency
- Memory Clock – memory frequency
There are also sliders such as Power Limit and Temp.Limit, but if they refuse to work, then most likely they are not supported by your video card. At help of three The above sliders are what overclock the video card. You should overclock the video card gradually, gradually moving the sliders to the right and periodically testing the video card under load.
Video adapter status monitoring
 The monitoring tab is responsible for displaying readings about temperature, CPU load, core frequency and memory load directly on the monitor screen. To display monitoring on the monitor screen, check the “Show in Overlay Screen Display” checkbox. Now data will be displayed even during the game. The ATS setting is responsible for the keys that call up monitoring on the screen, including the ability to change the style of data display. Recording video and capturing screenshots The next section of the menu is setting up screenshot capture. Responsible for screenshot settings, allows you to select a folder for storing screenshots, and also assign hotkey.
Next is the video capture menu. In the same way, as in the previous case, you can assign a hotkey to control recording, configure what format to record video in, recording quality, frame rate, etc. Having configured the hotkey, just press it, for example, during computer game to start recording the image to a separate file.
Profiles and interface
There are two tabs left - profiles and interface. The first menu allows you to save settings as separate profiles, which can always be loaded later. And the “Interface” menu is intended for settings such as language, format in which temperatures will be displayed, appearance programs.
Posted on January 11, 2016
Want to monitor your system's performance while gaming? What's the best way to see what your equipment can do? Does it fully reveal itself or is something preventing it?
You've probably seen game reviews with system performance information right on your computer screen while you're playing and wondered: How did they do it?
This information, presented in the upper left corner of the screen, is called OSD or OSD menu and is one of the most frequently used functions in the MSI Afterburner application. It allows you to monitor the performance of your video card and other hardware during the game, and thus gives you important information about what can be improved to increase productivity. Want to know how to get this information on your screen? Just follow our directions below!
First, you need to get the latest version of MSI Afterburner and Rivatuner Statistics Server. Both programs are included in the MSI Afterburner installer. ()
1. Launch MSI Afterburner
2. Click “ Settings"(Settings) 
3. Click “ Monitoring”(Monitoring) and go to “ Active hardware monitoring graphs”(Monitoring active equipment) and select the information you are interested in to display in the OSD menu (for example, we use “GPU usage”)

b. To display the information you are interested in on the screen, select the “ Show in On-Screen Display”(Show in OSD menu). 
c. In a collumn " Properties"" (Properties) you will see the inscription " in OSD"(on the menu). Select other information to display on the screen in the same way. You can change the order of information displayed on the screen by dragging the desired menu items up or down the list.
d. Text shown in “ Override group name”(Group Name Change) to be displayed in the OSD menu can be changed as you wish. (Here we changed the name “GPU usage” to “GPU load”)
e. Don't forget to click OK to save your changes and exit to MSI Afterburner. 
Now when you launch the game you will see an OSD menu!
But that is not all! You can also customize the appearance of the menu. You can easily customize the OSD menu using the RivaTuner Statistics Server utility, which is automatically installed with Afterburner.
1. Click on the “ icon Riva Tuner Statistics Server”

2. In the menu that opens, you will see settings that you can change. Here are some of the most interesting options to change:
a. On-Screen Display shadow (OSD Shadow Setting): When this option is enabled, the text will have a dark outline to improve its visibility.
b. On-Screen Display palette (Change OSD Color): Here you can change the OSD text color. You can also change the color of the shadow.
c. On-Screen Display zoom (OSD Enlargement): Here you can change the OSD text size.
d. Position of OSD(Changing OSD Position): Drag the OSD text to any position on the screen. 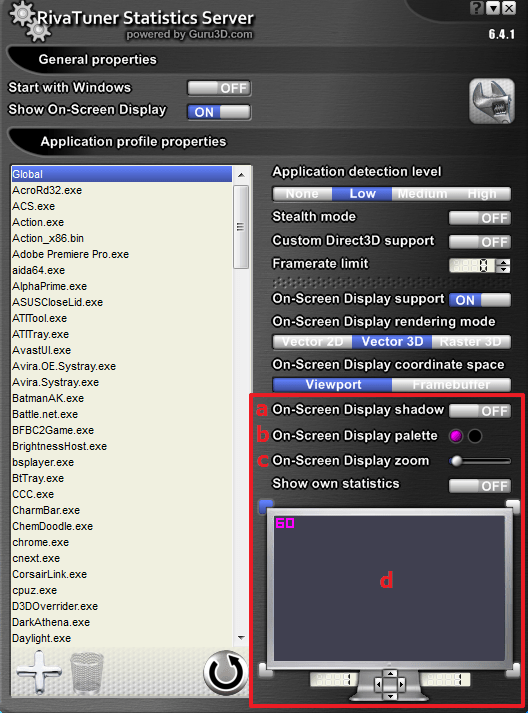
3. After you are done with the OSD settings, launch the game and observe the result. The MSI Afterburner app is very convenient tool any gamer, and not just overclockers. You can use MSI Afterburner to configure optimal performance in games! The application is constantly updated and guarantees excellent stability and compatibility with your equipment. Since new versions are released regularly, make sure you use latest version application, which is available for download at the following link:
— multifunctional program to control the video card. She works with graphic cards from AMD and NVIDIA, allows you to overclock, enable data monitoring functions in games and more. In this publication, we will consider the question “how to configure MSI Afterburner” for proper operation video cards.
Setting up the program
Important! For full-fledged work programs, do not uncheck the boxes from RivaTuner Statistics Server. Install with MSI Afterburner.
The main settings of MSI Afterburner are opened by clicking on the gear. When you first start, there are 7 tabs available in the menu:
- Basic and Monitoring.

- Capture Screenshots and Videos.

- Profiles and Interface.

To begin with, in the “Basic” tab set:
- “Synchronize settings of identical GPUs” if your PC has two graphics cards.

- “Unlock Voltage Monitoring” to access the use of the Core Voltage slider.

- “Run with Windows”, to integrate some functions and the ability to run with the operating system.

Click OK and restart the program.
Working with a cooler
In the program you can change the rotation speed of the coolers, which depends on the heating temperature of the video card. Unfortunately, this function Available only for desktop PCs. Open the “Cooler” tab in the properties. You can change parameters by dragging points on the graph. 
Setting FPS in the game
To set up the monitoring mode, in the “Monitoring” tab, click to select the “frame rate” values and click “Show in Overlay Screen Display”.  In addition, you can output other parameters in a similar way. In the game, the necessary monitoring data will be displayed on the screen.
Working with OED
In this tab you can set hotkeys and set additional settings displaying text on the screen in computer games. 
When you click the “Advanced” button, a new window with settings appears. 
Saving game screenshots
In the “screenshot capture” tab, you can configure the key that will be used to save. In the “Capture screenshots” line, click the mouse pointer and press a key or key combination. In the future, pressing the specified keys will save a fingerprint of the image from the screen. You can also select the folder in which the screenshots will be saved.
Sometimes, after installing some games, it turns out that the video card’s power is not enough. This is very frustrating for users, because they will either have to abandon the application or buy a new video adapter. In fact, there is another solution to the problem.
MSI Afterburner is designed to overclock your video card to full capacity. In addition to the main function, it also performs additional ones. For example, monitoring the system, capturing video and taking screenshots.
Before starting to work with the program, users need to be aware that if they do it incorrectly, the video card can become damaged. Therefore, it is necessary to strictly follow the instructions. Undesirable and auto mode acceleration
MSI Afterburner supports video cards NVIDIA And AMD. If you have a different manufacturer, you will not be able to use the tool. You can see the name of your card at the bottom of the program.

Launching and setting up the program
We launch MSI Afterburner through the shortcut that was created on the desktop. We need to ask initial settings, without which many actions in the program will not be available.
Check all the boxes that are visible in the screenshot. If your computer has two video cards, then add a checkmark to the field “Synchronize settings of identical GPUs”. Then click "OK".

You will see a notification on the screen that the program needs to be restarted. Click "Yes". There is no need to do anything else, the program will be reloaded automatically.

Core Voltage slider
By default, the Core Voltage slider is always locked. However, after we have set the basic settings (Tick in the voltage unlock field), it should start moving. If, after restarting the program, it is still not active, then this function is not supported by your video card model.
Core Clock and Memory Clock slider
The Core Clock slider adjusts the frequency of the video card. In order to start acceleration, you need to move it to the right. It is necessary to move the regulator little by little, no more than 50 MHz. During the overclocking process, it is important to prevent the device from overheating. If the temperature rises above 90 degrees Celsius, the video adapter may break down.

Next, we test our video card with a third-party program. For example, VideoTester. If everything is in order, you can repeat the procedure and move the regulator another 20-25 units. We do this until we see image defects on the screen. It is important here to identify the upper limit of the values. When it is determined, we reduce the frequency of units by 20 to eliminate defects.
We do the same with Memory Clock.

To test the changes we have made, we can play some game with high requirements for the video card. In order to monitor the adapter's performance during the process, we configure the monitoring mode.
Monitoring
Let's go to "Settings-Monitoring". Select the required indicator from the list, for example. Check the box below "Show in Overlay Screen Display".


Cooler setup
I want to say right away that this function is not available on all computers. If you decide to overclock the video card in new laptop or netbook models, then you simply won’t see the cooler tab there.

For those who have this section, put a tick opposite "Enable software user mode". The information will be displayed in the form of a graph. Where the temperature of the video card is displayed below, and in the left column the speed of the cooler, which can be changed manually by moving the squares. Although this is not recommended.

Saving settings
At the final stage of overclocking the video card, we must save the settings made. To do this, click the icon "Save" and select one of 5 profiles. You also need to use the button "Windows", to launch new settings when the system starts.

Now let's go to the section "Profiles" and select there in the line “ 3D" your profile.

If necessary, you can save all 5 settings and load the one suitable for each specific case.


