How many GB should a bootable flash drive be? How to make a bootable USB flash drive in UltraISO: step-by-step instructions. Adding the necessary program images
I recently wrote an article on how to create a multiboot flash drive. I think there is no point in writing about this a second time, just follow the link and you will see effective method, believe me.
Now I’ll tell you how to make a multiboot drive with several systems and completely different programs, most likely the article will turn out to be long, but this doesn’t matter, because everything effective options will be in one place.
How to create a multiboot flash drive using WinToHDD
An interesting program in which, in addition to creating bootable flash drives There are also functions for copying the system and installing a new one. So that users understand how to use it, I will try to describe everything in simple and understandable language.
Before the process you should move important files from the drive to another location, for example, to a hard drive.
You can download WinToHDD from here. Launch the utility and click on the “Multi-Installation USB” section.
A window will open where you need to select the flash drive from the drop-down menu. A message about formatting the flash drive will pop up, be sure to transfer important data. Next, select the system and boot partitions, although there is only one flash drive, so they will be the same. Click on the “Next” button.

The writing of files related to the bootloader to the flash drive begins, an important operation in which it is better not to touch anything, but just wait.

What do you think needs to be done now? I hope you have already prepared operating system images. They need to be moved to a USB drive. That's it, we made a multiboot flash drive.

What to do with a flash drive made in WinToHDD
We created a bootable USB flash drive with multiple operating systems, which is very exciting. You should now boot from it. This can be done through the BIOS or Boot Menu, whatever is convenient for you.
The download manager appears, where you select one of the presented items - 64 bit system or 32-bit.

The WinToHDD utility window will appear with the name of the system image. Let's start a new installation and select from the list the right system. Now click Next.
Next, we are asked to select or create the following partitions - boot and system. Here you should be more experienced user and don't mess anything up. If necessary, convert partitions to MBR or GPT.

If your BIOS is not UEFI, but the Legacy boot type, then you should convert the partitions to MBR and also format them to NTFS.
If you use BIOS UEFI, then convert the partition to GPT. All this is done on the command line.
Once you have specified the required partitions, you can click “Next” and wait for the system to install. You can experiment on a PC with this program if these instructions seemed a little complicated to you, but we managed to create a multiboot flash drive.
Creating a multiboot flash drive using Easy2Boot
First, you need to download several files; we will need them during our work:
RMPrepUSB– download from here: http://www.rmprepusb.com/documents/rmprepusb-beta-versions
Easy2Boot– download from here: http://www.easy2boot.com/download/
We launch the RMPrepUSB utility and look at the interface. Lots of functions and nothing is clear. It follows from this that the method will be a little complicated for novice users, but you should not give up this option. Don't forget to connect the flash drive.

Let's first look at those interface items that will be useful to us.
- We mark the option “Do not ask questions” - that is, no notifications with requests will appear;
- In the “Size” fields - enter MAX, “Volume Label” - enter any;
- IN boot sector select the first option related to Windows;
- In the File system section, check the “NTFS” and “Boot as HDD” items. You can also choose FAT32, but the option is slower and only supports a maximum of 4 GB file sizes.
- In the fifth section you need to select the path to Easy2Boot. Attention! There is no need to unpack the archive; we leave it as is.
- Press the button "Prepare disk". You should have a drive inserted and displayed in the very top field; if there are several disks there, then make no mistake and select the desired flash drive.
- After completing the operation of preparing the flash drive (it was formatting), you need to click "Install Grub4Dos". If a warning window appears, select “NO”.
It is advisable not to close the utility, because it will be useful to us later. When we open the flash drive, we will see several folders there. There is an “ISO” folder, and in it there are supposed folders for operating systems and some utilities.

What do we do next? You need to take the necessary images and transfer them to the WINDOWS directory, you can also move them to the appropriate folders antivirus utilities, programs for creating backups, working with disks, as well as checking for RAM errors.
Images do not have to be thrown only at WINDOWS folder. You can throw them at the root or ISO folder. When loading from a flash drive, they will still be displayed.
Here you copied necessary files to the drive, you need to return to the main RMPrepUSB window. Open the “Drive” tab and click on the option "Make All Files on Drive Contiguous", or press Ctrl+F2.


Create a multiboot flash drive using WinInstall4Grub4DOS
From this link you can download the WinInstall4Grub4DOS tool. Unzip it and run the file. A welcome window will appear, where we click on the “Next” button.

It's very good if you are prepared necessary images. You can select them by clicking on the “Select folder” button; the OS images must be located in some folder, the name must not have Russian letters.
Having specified the path to the system images, click “Next”.


After the next click on the “Next” button, you will see operations for copying, driver integration, and other things. The process can be lengthy and we are even offered to go have tea, thanks for that.

To add data to system images, the FiraDisk script will run. In the window that appears, click OK.


Now let's see what's in the folder with all the images. Copies of them appeared there with the note “FiraDisk”.

Let's go to the WinInstall4Grub4DOS utility and select the “Save files” option. In Explorer, create additional folder and name it, for example, “Utilities”, since that’s where they will be written. You need to create it in the folder where the folder with the images is located.
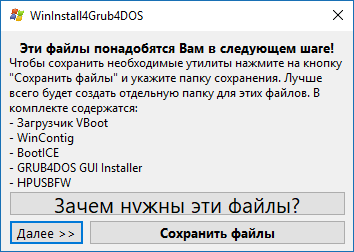
If you are interested in what these utilities are, then click on the “Why are these files needed?” button.
Finally, we connect the flash drive to the PC, run HPUSBFW, located in the folder with the utilities, as administrator. A window will appear with a choice of flash drive, file system, preferably NTFS, and a checkmark quick formatting. Start the formatting process. When finished, close the window.

In the utilities folder we find the archive with the GRUB4DOS_GUI tool. Let's run this file.
Move the checkbox to the “Disk” position and select the flash drive next to it. If nothing happens, then run the utility with elevated privileges. Click “Install”.

A command line will open, press the “Enter” button.

In the utilities folder, copy the MENU.LST and GRLDR files to the USB flash drive. If they are not there, then download them from the Internet, they are easy to find. Here's the link so you don't have to search.
Let's create a folder on the flash drive with some name and move the images there with the FiraDisk annotation. We haven't been able to create a multiboot flash drive yet because there are a couple of steps that need to be completed. Go!

Using the Wincontig program
One more thing. It is necessary to defragment the copied images. This can be done using WinContig, located in the utilities folder. Launch it and select images using the “Add files” button.

Click on the “Action” section and select “Defragmentation”. We are waiting for the process to complete.
The status should not be fragmented, this means something is wrong with the files, or you need to take a larger flash drive.

In the WinInstall4Grud4DOS window, click “Next”, so we will find ourselves in the section where we will do something.

In the “Menu generator for Grub4DOS” field, you need to indicate the path to the disk where you have Windows images. detailed instructions written in a file that opens by clicking the “What to do?” button.
After that, click “Make”.

After waiting a little, we will see the code that needs to be copied, for which there is a corresponding button.

Open the file menu.lst and copy it there this code. Let's save. You should do this for each image.

We created a multi bootable media with multiple operating systems. This process turned out to be long and hardly anyone will use it, but for general development will do.
When booting from a flash drive, the GRUB4DOS bootloader will appear, with a black background and a list of operating systems. You can work on the design of the bootloader using ZXBFM__2.1b, but this is optional.

RESULTS
So, friends. I have created such a voluminous article for you. Now you know how to create a multiboot flash drive that has not only operating systems, but also various kinds of utilities. Some methods turned out to be simple, while others were complex or took a long time to implement. In any case, they are all effective if done correctly. Beginners may have problems because pitfalls there's a lot here. If you have a problem, be sure to write in the comments, I will try to help.
Today, more and more laptop and PC manufacturers refuse to integrate optical drive. This can be explained by the fact that CD and DVD media have lost their relevance. They have been replaced by smaller media such as memory cards and USB flash drives. In addition, it is simply impossible to integrate a drive into a thin ultrabook case. This trend has led to some inconveniences, for example when installing operating system. Creation bootable flash drive Windows 7 becomes simply necessary.
How to create a bootable USB flash drive
What is necessary:
- Flash drive
- UltraISO program
- DVD image with Operating System
The storage capacity must be at least 4 gigabytes. This is how much a standard one weighs copy of Windows 7. Larger storage capacity can be used.
If you have everything you need, we proceed to the actual creation.
First, insert the flash drive into any free USB port. Make sure there is nothing on it that you need, as all information will be erased from it.
If you are recording an image from a laptop, check the battery charge and, if necessary, connect to a charger.
If the computer turns off during recording, there is a high probability that the flash drive will turn into a useless piece of plastic.
Step-by-step instruction:
1. Launch UltraISO program. This must be done as a computer administrator, otherwise the program will not be able to start the recording process. Click the right button. mouse on the program shortcut and select “run as administrator”.
2. After the program starts, open your ISO image file in it. In the left top corner program, click on the file->open button or press the CTRL+O button combination.

3. Select the file with the Windows 7 image in the window that opens and click “open”.

4. The selected disk image will open in the program and you will be able to see all the files that it consists of.

5. Then, go to top menu programs to the “Boot” item. In the drop-down list of actions, click “Record” image of Hard disk."

6. Another window will pop up where you will need to select recording options. First you need to specify which device the image will be written to. Opposite the “Disc Drive” option in the drop-down menu, select the flash drive that you prepared.

7. Opposite the “Recording method” parameter, select the “USB-HDD+” mode. Next to “Hide boot partition” put “no”. After this, you can safely press the “Record” button. The remaining parameters do not need to be touched.

8. After this, the process of writing the selected image to removable media. This usually takes 10 to 15 minutes.
You can check the status of the process by looking at the event log at the top of the window and at the progress bar. Above it will be indicated the percentage of the recording completed, as well as how much time has passed and remains.
Do not close the program or turn off the computer during this time. If this happens, you risk ruining the flash drive.

9. Once the recording is complete, you will see a message in the event log stating that everything is ready and the recording was successful.

From a USB drive, installing Windows 7 is faster than from regular disk. This is explained by USB speed 2.0 is much higher than the optical drive.
10. The creation of a bootable USB flash drive has come to an end. All that remains is to check its functionality.
To do this, insert it into the USB port of the computer or laptop on which the installation will take place. Turn it on and go to BIOS. To do this, hold down the DEL or F2 key. After the transition, check your download priorities. In boot priority (First Boot Device) should be your flash drive. Save the settings by pressing the F10 key and restart the computer. If the installation process starts, it means you did everything correctly.
When purchasing licensed software, the buyer receives it on a DVD. Therefore, to install it on a PC that does not have an optical drive, you need to create a bootable flash drive. Our step-by-step instruction will help you with this.
Since almost no one uses CDs and DVDs these days, it is only logical that Windows image For further installation, it is best to save it to a USB drive. This approach is indeed much more convenient, because the flash drive itself is much smaller and is very convenient to store in your pocket. Therefore, we will analyze all the most efficient methods for creating bootable media for further installation of Windows.
For reference: creating bootable media means that an operating system image is written to it. From this very drive, the OS is subsequently installed on the computer. Previously, when reinstalling the system, we inserted a disk into the computer and installed it from it. Now you can use a regular USB drive for this.
To do this, you can use a proprietary software Microsoft, the already installed operating system or other programs. In any case, the creation process is not difficult at all. Even a novice user can cope with it.
All the methods described below assume that you already have the downloaded version on your computer. ISO image operating system, which you will write to a flash drive. So, if you haven't downloaded the OS yet, do so. You must also have suitable removable media. Its volume should be sufficient to accommodate the image you downloaded. At the same time, some files may still be stored on the drive; it is not necessary to delete them. All the same, during the recording process, all information will be irretrievably erased.
Method 1: Use UltraISO
There is a detailed description of this program on our website, so we will not describe how to use it. There is also a link where you can download it. To create a bootable USB flash drive using Ultra ISO, do the following:

If any problems arise during recording, errors appear, most likely the problem is in a damaged image. But if you downloaded the program from the official website, no difficulties should arise.
Method 2: Rufus
Another very convenient program, which allows you to create bootable media very quickly. To use it, follow these steps:

It is worth saying that Rufus has other settings and recording options, but they can be left as they are originally. If you wish, you can check the box "Check for bad blocks" and indicate the number of passes. Thanks to this after recording installation flash drive will be checked for damaged parts. If any are detected, the system will automatically correct them.
If you understand what MBR and GPT are, you can also indicate this feature of the future image under the inscription "Partition scheme and type system interface» . But doing all this is completely optional.
Method 3: Windows USB/DVD Download Tool
After Windows release 7 Microsoft developers decided to create special remedy, which allows you to make a bootable USB flash drive with an image of this operating system. This is how a program called . Over time, management decided that this utility could well provide recording for other operating systems. Today, this utility allows you to record Windows 7, Vista and XP. Therefore, for those who want to make media with Linux or another system other than Windows, this tool is not suitable.
To use it, follow these steps:

Method 4: Windows Installation Media Creation Tool
Also Microsoft specialists have created a special tool that allows you to install on your computer or create a bootable USB flash drive with Windows 7, 8 and 10. Windows Installation Media Creation Tool most convenient for those who decide to record an image of one of these systems. To use the program, do the following:

In the same tool, but for Windows 10, this process will look slightly different. First, check the box next to the inscription "Create installation media for another computer". Click "Further".
But then everything is exactly the same as in Windows Installation Media Creation Tool for version 8.1. As for the seventh version, the process there is no different from that shown above for 8.1.
Method 5: UNetbootin
This tool is intended for those who need to create a bootable Linux flash drive from under Windows. To use it, do this:

Method 6: Universal USB Installer
Universal USB Installer allows you to burn images of Windows, Linux and other operating systems to drives. But it is best to use this tool for Ubuntu and other similar operating systems. To use this program, do the following:

Bootable flash drive with operating image Windows systems, can be created using the UltraISO program. Why is it necessary to have such a bootable USB flash drive with an operating system image recorded on it?
Unexpected problems may occur when using the Windows operating system. The operating system may begin to work, at best, with malfunctions, and in the worst case, it will stop loading altogether. From such possible problems No one is insured; it is impossible to predict this in advance.
Sometimes problems with the operating system can be fixed using the Windows operating system recovery function. To do this, you will need to run, if, of course, this feature is functioning at the moment.
If such a recovery cannot be started regular means Windows operating system, then you can try to restore the system using a disk with an image of the operating system recorded on it, or use a bootable USB flash drive for this.
In most cases, serious problems can only be solved by reinstalling the operating system, if you have not done your data in advance. Therefore, it is always necessary to have a disk with an image of the Windows operating system. This disk can be used for new installation operating system, to restore the operating system, or reinstall it.
Advantages of a flash drive over a DVD drive
Typically, a distribution package with an operating system is recorded on an optical DVD disc. But storing an image with an operating system on such a disk is problematic due to the fact that optical disk DVD is subject to mechanical damage. Just one scratch can cause an optical disc to fail.
The way out of this situation is to use a bootable USB flash drive with an image of the Windows operating system recorded on it. Installing the Windows operating system with USB flash The drive is no different from the process of installing an operating system from a DVD.
A flash drive with an operating system recorded on it is more protected from mechanical damage than a DVD disc. In addition, it has significantly less physical size, and can be more easily moved without fear of mechanical damage.
You can create a bootable USB flash drive using the UltraISO program, which is designed to work with disk images.
UltraISO is a paid program, but it has trial period free use. you can use free version UltraISO programs with an image file size limit of 300 MB. You can find a solution to this problem on the Internet, where you can also find portable versions of the UltraISO program.
How to create a bootable USB flash drive in UltraISO
Now you will learn how to create a bootable USB flash drive onto which an image of the Windows 8 operating system will be written. In exactly the same way, you can use the UltraISO program to write an image of the Windows 7 operating system to a USB flash drive.
In order to create a bootable USB flash drive in UltraISO, you need to open the UltraISO program as an administrator. After opening the program window, click on the “Open” button on top panel in the UltraISO program window.
Then, in the Explorer window that opens, you need to select an image of the Windows operating system to subsequently write it to a flash drive.
In the "Open" window ISO file"You should select the operating system image file, and then click on the "Open" button. In this example, I chose to create a bootable USB flash drive with an image of the Windows 8 Pro operating system.

In the UltraISO program window, on the right side of the window, an image of the Windows 8 Pro operating system appeared.

Now you can insert the USB flash drive into the appropriate slot on your computer, if it was not inserted there before.
A flash drive that is designed to record an image of the operating system Windows 7, Windows 8, or Windows 10 must be at least 4 GB in size and formatted in file system FAT32. You can also format a flash drive immediately before recording an image of the Windows operating system using the UltraISO program.
Attention! If there is data on this flash drive that you do not want to lose, then you will need to copy it to a safe place. In progress USB formatting flash drive, all data located on a flash drive that has been formatted will be deleted.

After opening the “Write Disk Image” window, you will need to check that you have selected the correct disk to create a bootable USB flash drive. You will need to make sure that the flash drive disk is under the correct letter of the alphabet.
You can check the “Check” option to check for errors after recording to ensure that the system image was recorded without errors.
In the “Recording method” item, you need to select “USB-HDD+”, and then proceed to format the flash drive or record an image of the Windows operating system.
If the USB flash drive has already been formatted before the process of creating a bootable flash drive, then you will need to click on the “Burn” button.
If the flash drive has not been formatted in advance, then you should click on the “Format” button. Now let's look at the formatting process USB drive in the UltraISO program.

In the “Format” window, you need to select the file system - FAT32, and then click on the “Start” button.

In the warning window, you must click on the “OK” button. After formatting, all data that was previously on the flash drive will be destroyed.

After formatting is completed, a window will open in which you will be informed that this operation was successfully completed. In this window, click on the “OK” button, and then close the “Format” window.
Now you will need to click on the “Burn” button in the “Write Disk Image” window to write an image of the operating system to begin creating a bootable flash drive.
A “Hint” window will open, warning you that all information is on USB drive will be erased. In this window, click on the “Yes” button.

After this, the process of writing the operating system image to the flash drive begins. A bootable USB flash drive is created for the Windows operating system.

The speed of creating a bootable USB flash drive depends on USB reading flash drive and the power of your computer. After some time, the image of the Windows operating system will be written to the USB flash drive.
In the “Write Disk Image” window you will see a message - “Writing complete!” A bootable USB flash drive for Windows 8 has been created.

Now you can close the UltraISO program, it has already done its job.
After this, you should open Explorer and make sure that the image of the Windows 8 operating system was written to the flash drive.

If you open the flash drive, you will see a recorded image of the Windows 8 Pro operating system there.

The process of capturing an image of the Windows 7 operating system is exactly the same, and it is no different from recording an image of the Windows 8 operating system.
To install the Windows operating system, you will need to enable BIOS priority loading the operating system from a USB flash drive.
Conclusions of the article
The UltraISO program will allow you to burn Windows to a USB flash drive to install the operating system on your computer. It is necessary to have a bootable USB flash drive, because no one is immune from sudden failures of the operating system or equipment. Therefore, the operating system image is needed so that you can use it if unforeseen circumstances arise.
Creating a bootable USB flash drive in UltraISO (video)
Rufus is an excellent utility for creating a bootable USB flash drive. Free, easy to use and versatile. With its help, you can record an image of Windows XP, 7, 8 or 10. And most importantly: recording is approximately 2 times faster than, for example, . Therefore, in this article we will look at how to use the Rufus program.
To begin with, it is worth noting some features of Rufus:
- Works on all versions of the OS: from Windows XP SP2 to the new “ten”.
- Writes USB flash drives for PCs/laptops with both old BIOS and new BIOS UEFI.
- Creates USB drives for Windows recovery or password.
- Works on PCs and laptops without an installed OS.
- No program installation required.
Main advantages of Rufus:
- contains only one menu screen (thanks to this, the likelihood of clicking the wrong thing is reduced to zero);
- can find problem sectors on USB drives, as well as format and restore flash drives.
The only negative is that due to its simplicity, Rufus cannot create multiboot flash drives. Although the program is simply not intended for this.
How to make a bootable USB flash drive for Windows 7?
Everything is done extremely simply, so there will be no problems. Even if you decide to create a bootable USB flash drive for the first time.


