Installing an additional hard drive. Installing a new hard drive
Having seen “Not enough space” on the multi-colored monitor, and tired of deleting your favorite movies, games and endless programs, have you decided to expand the memory of your computer? First, listen to how we did it. The goal is clear: how to install a hard drive on a computer. We will also install external, portable ones. The task is simple, clear, go ahead!
Installing a new disk
How to install a new hard drive on a computer?
To get started, let’s print out the packaging and remove it. Using scissors or a knife, remove the data keeper from the packaging box. We inspected what was removed and checked for chips, scratches, and damage. Now we disconnect the PC from the outlet, remove the side covers from it by unscrewing the four bolts screwed into the back wall. We saw a lot of dust! We will remove it using cotton swabs, a soft brush, and at the end of the process, a vacuum cleaner.
Now we remove the hard drive from the special basket; to do this, we unscrew two bolts from each side. (Suddenly you have a boltless mount, like, with such a mount it is even easier to install, remove the clamps, pull out the strips and remove them. During installation with this connection, we tighten the “screw” until it clicks.) Next, turn off the power and the SATA cable, remove the old one away from computer, and we also connect the new one with two cords. Place it in the same basket on the system unit and secure it with bolts.
We knew that the power supply of our old “screw” was of the SATA type, on earlier models the IDE type was used, take this into account when choosing special jumpers. We carried out all the work with the utmost care! Before putting the information source into the computer, we made sure that the cables did not interfere. Side panels can be installed.
A complete replacement of the drive also entails the complete eradication of all viruses! By receiving a new custodian in your computer, as a result, we increase its performance by 5-10%. New media are faster, so it is better to install operating systems on them, but you can connect the old one at any time, this will be discussed in the next section.
Installing an additional disk
The first option had one significant drawback - by completely replacing the disk with a new one, we get all our terabytes in our hands, away from the PC. Therefore, we will explain to you how to install a second, additional hard drive on your computer.
This option has significant advantages:
- there is no reason to reinstall the operating system;
- the new keeper can be formatted, split, saving all documents;
- The memory of your drives will increase in total, and will not change one for the other.
So, we have removed the sides. We have a screwdriver in our hands, but we won’t unscrew it, take it out, much less disconnect anything from the old one, before installing the hard drive on the PC. We just find the SATA power cable from the power supply and connect it. Using the SATA cable purchased earlier, we connect the motherboard to another connector.
Now, carefully, as described in the last section, we install the new one below the old one, it is important that the distance between the storage media is one or more cells, this will provide better ventilation and reduce heating. We screw it in four places. Next, pay attention to how the wires are located. We make sure that they are all inside, where we can use plastic ties. That's enough, feel free to close the computer, plug it in, and launch the operating system.
Our task is to format and split the new one in a way that suits us. As a rule, these are 2-3 sections. You can choose two equally, but if there are three sections, then choose one fifty, the rest twenty and thirty percent, respectively. Choose the option yourself, we will make two equal. We do everything as carefully as possible, it is possible to return information to a formatted hard drive, but you will either have to search through a bunch of sites, or look for a good specialist, pay money and probably disconnect the drive in order to take it to a specialist.
Therefore, we tell you how to do this in Russian! Attention! Click Start -> My Computer (right-click) -> Manage. On the left we select “Disk Management”, and on the right we find squares with a new letter (we remember what the ones that were called were), right-click and in the window that appears, determine what size we want, insert the desired letter (F-Z) of the English alphabet, and format it, NTFS system, check the “Fast” box, it’s really faster. We did this 2 times, we set the size in half, thereby breaking it, now it is more convenient for our carriers to work with a PC. Work is done.
What should I do to simply connect without a screwdriver and wasting time? This will be discussed in the final section. Although this gadget is more expensive, it deserves attention.
Connecting an external drive to the computer
We will briefly tell you how to install a hard drive on a computer when it is external. We rather connect it, which is quite simple. There are two connection types: USB 3.0 (faster) and USB 2.0 (slower). The first connects directly to the motherboard, into the corresponding connector, believe me, it’s hard to make a mistake there, but the second connector has been familiar to us for a long time, we connect both a web camera and phones there when we upload photos. Although external media in stores is much more expensive, this is a huge portable “Flech” that will always come in handy around the house!
Now you know where to start and your favorite videos and photos can be safely stored on your computer for long-term memory.
When the first computers appeared, all programs, games and other files took up virtually no disk space. Now things are completely different, and it is often necessary to install additional storage media. Therefore, every user should know how to connect a second hard drive to a computer. In fact, this is not difficult to do, you just need to follow simple instructions.
First, the device must be purchased in a store. Please note that the hard drive has several connection interfaces. After purchasing the purchase, you can begin installing the device.
Preparing for installation
- How many hard drives are already connected to the motherboard? Most often, a computer has only one hard drive, so installing a second drive is not difficult. In most cases, the HDD is located directly under the DVD-ROM, so finding it will not be difficult;
- Is there additional space to install a second hard drive? If it is not possible to install a second or third disk, then you will have to purchase a USB drive;
- What type of cable is used to connect the hard drive to the computer? If the purchased device does not have the same interface as on a PC, it will be difficult to install it.
Please note that you will need a 3.5-inch hard drive. There is no need to buy small disks designed for laptops.
Physical disk connection
If the system unit has not yet been disassembled, disassemble it. Now it is recommended to get rid of static electricity. This is done by any means known to you. If you wish, you can purchase a special grounding bracelet in the store.

After some minor manipulations, the hard drive will be secured in the case; now all that remains is to connect the hard drive. Before plugging in the power cable and cable, it should be noted that the procedure is slightly different for the IDE and SATA interfaces.
IDE interface
When connecting a drive with an IDE interface, it is recommended to pay attention to such a nuance as setting the operating mode:
- Master (main).
- Slave (subordinate).
If you are installing an additional hard drive, then you must enable Slave mode. To do this, you need to use a jumper (jumper), which is installed in the second place. The first row includes Master mode. It is important to note that on modern computers, the jumper can be completely removed. The system will automatically determine which hard master is.

At the next step, you need to connect the second or third hard drive to the mother. To do this, the IDE interface is connected to a cable (wide, thin wire). The second end of the cable is connected to the IDE 1 Secondary socket (the main drive is connected to the zero socket).

The final connection step is power supply. To do this, a white chip with four wires is connected to the corresponding connector. The wires come directly from the power supply (a box with wires and a fan).
SATA interface
Unlike IDE, a SATA drive has two L-shaped connectors. One is for the power connection, and the second is for the data cable. It should be noted that such a hard drive does not have a jumper.

The data cable is connected to a narrow connector. The other end is connected to a special connector. Most often, the motherboard has 4 such ports, but there are exceptions and there are only 2 ports. One of the slots may be occupied by a DVD drive.
There are cases when a drive with a SATA interface was purchased, but no such connectors were found on the motherboard. In this case, it is recommended to additionally purchase a SATA controller that is installed in a PCI slot.
The next step is to connect the power. An L-shaped wide cable is connected to the corresponding connector. If the drive has an additional power connector (IDE interface), it is enough to use one of the connectors. This completes the physical connection of the hard drive.
BIOS setup
When all manipulations with the hard drive are completed, you should turn on the computer and then enter the BIOS. It is important to note that launching the BIOS on each computer is carried out differently. To do this you need to use the key:
- Delete;

After entering the BIOS, you need to proceed to configuration settings. It is important to assign booting from the drive on which the operating system is installed. If the priority is set incorrectly, the system simply will not boot.
If one of the disks does not appear in the BIOS, it means that the hard drive was connected incorrectly or the cable was damaged. It is recommended to inspect all wires and reconnect (don't forget to turn off the computer).
Once the BIOS setup is completed, you can boot into the operating system. After this, all that remains is to assign a letter to the drive.
Final stage
Since connecting the hard drive to the computer is not enough, you need to make the final setup directly from Windows. On some computers, this procedure is carried out automatically. To check this, you should open “My Computer”, and then see if a new disk has appeared.
If nothing happens, you need to launch the control panel. Then select “Administration”. Once a new window opens, you will need to select “Computer Management”. In the left column, you need to find the “Disk Management” tab (on some computers “Disk Manager”).

- At the bottom of the window, select disk 1 (if more than 2 hard drives are connected, select the disk with the highest number). This will be the new hard drive;
- You must assign a letter to the logical volume. To do this, right-click on the disk and then select “Assign letter”;
- As soon as the disk is assigned a new letter, it must be formatted. The procedure can take a long time, it all depends on the size of the hard drive. When formatting, it is important to select the NTFS file system.
When the formatting process is complete, a new disk will appear in the My Computer root directory. If for some reason you cannot connect the HDD using the built-in manager, it is recommended to use third-party programs.
An excellent tool for working with hard drives is Partition Manager. In addition, such a utility allows you to split the disk into several logical volumes.
Conclusion
Connecting a hard drive takes no more than 15 minutes. If you follow the instructions, there shouldn't be any difficulties. Modern computers do not require additional BIOS settings, of course, if the disks are not installed in a completely new computer. Also, do not forget that how big the connected hard drive can be depends on the operating system.
Video review: connecting a hard drive
We discuss the issues of choosing hard drives. The main differences between hard drives, their operating parameters were discussed, and recommendations were given for choosing hard drives for certain tasks. In today's article we would like to dwell on the issues of putting a hard drive into operation.
A previous analysis of the modern hard drive market showed that there are practically no players left in it. The key players remain Seagate and Western Digital; Toshiba, which received the business after purchasing the bankrupt Fujitsu division, is playing the role of a catching up independent manufacturer. A comparison of various hard drives showed that competing models may differ in operating noise and performance, but this difference is so low that it can be neglected. When choosing a universal hard drive, we recommend paying attention to the release date, which is indicated on the label, as well as its cost. The newer the hard drive, the better, since there is less chance that you will end up with a Thai drowned man or a disk with outdated, problematic firmware. There are already too many firmwares in the computer and often, not many people can take the time to update the firmware of the hard drives. At the same time, it is often hard drives that cause various lags and freezing of the operating system, which must be taken into account by all computer users, especially laptops.
Some may disagree and begin to argue that hard drives are reliable. Unfortunately, using the latest generation of hard drives under different brands, we cannot confirm this - problems occur in all manufacturers, with approximately equal frequency. This is understandable, a hard drive is a mechanical nanotechnological device in which small parts are in constant motion - this leads to the impossibility of eliminating the risk of defective products entering the market. For such users, we recommend purchasing a hard drive from the manufacturer that is closest to the “soul” and instills confidence.
For other rational users, we recommend taking a closer look not at the brand, but at the store where you purchase it. Hard drive manufacturers in our country have virtually no dealership warranty service centers, so if the device fails, you will have to go to the store where you purchased it. Often, regional "sharashkin's offices" strike a pose. Such offices can be immediately identified by the terms of the warranty for the product sold. If instead of a two, three, five year warranty on a hard drive they offer you 6 months or one year, then you will not get any warranty from them. Fortunately, there are fewer and fewer such offices, since such network giants as Yulmart, Citylink, and CSN are opening their representative offices in almost all regions, which reduces the cost of products while simultaneously increasing the quality of warranty service. Often the faulty hard drive is replaced with a new one or the money paid is returned.
The picture is clickable --
Few users know how to handle a newly purchased hard drive. The most experienced in this regard should be considered users who began their acquaintance with the computer from the days of the MS-DOS operating system, when each operation was “felt” through the command line. Today everything has been simplified to the point of disgrace. As soon as you insert a CD with the Windows 7 operating system into the drive, it will detect new hard drives, offer to create partitions on it and itself will format it to create the most popular file system - NTFS. But many users consider this not sufficient, since it does not allow at least a preliminary assessment of the quality and reliability of the purchased hard drive. Therefore, the following specific advice is given.
Firstly, the purchased hard drive must be carefully inspected in the delivery department for any dents, scratches, as well as signs of previous mounting in the system unit. In the latter case, as a rule, the paint flies off the screw holes. Often hard drives are shipped in anti-static sealed bags, if the package is marked as the hard drive and it is sealed - you are still responsible for any defects on the hard drive itself, so don't be lazy - print it out and inspect the device. This is due to the fact that modern hard drives are quite sensitive to mechanical influences and there are frequent cases of spindle jamming or head block displacement due to falls or impacts, which can happen in any store - people work everywhere.

The picture is clickable --
As soon as you bring the hard drive home, install it in the system unit in accordance with all the rules. It should not be cramped; it is advisable that there should be one free slot at the top and bottom, and that it is secured to the body with all four screws or latches. The rubber gaskets used to reduce the level of transmitted vibration should not interfere with reliable fixation of the device. In this case, it does not matter how you install the hard drive - upside down or with the controller unit - the hard drive will still work, the main thing is that it is securely fixed. Next, connect all the cables and make sure that the voltage along the 5 volt line of your power supply is not too high or low. An underestimation will lead to constant “stop starts” of the hard drive, and an overestimation will lead to operation at elevated temperatures.

The picture is clickable --
Well, the third key point - are you going to additionally check the reliability of the selected hard drive? If not, you can start working, but periodically backing up the contents of your new device will protect you from catastrophic information loss. Many users want to immediately determine the endurance of their hard drive, even before they upload their valuable data onto it. Typically, these device runs take a long time and can only be recommended for users who actually have one.
To begin with, it is recommended to enable the S.M.A.R.T check. devices at the BIOS level. Then independently evaluate the value of the new device through special programs. It makes sense to take a screenshot of the S.M.A.R.T values. before testing begins, so that comparison can be made after it.

The picture is clickable --
The next step is to start testing the linear read speed of the entire disk. Typically this is a package from Everest Ultimate, AIDA or HD Tune. After evaluating the data obtained, compare them with the data of other hard drives in this class. If +/- 10%, then this is quite normal. A higher difference should make you think, and if there is a difference of more than 50%, you should study in more detail the reason for the poor performance of the new device and check its performance on another computer. In case of problems, replace it under warranty. Similarly, estimate the access time to data on magnetic disks.
Then the surface of the magnetic disks is tested. As a rule, the MHDD or Victoria program is chosen for these purposes. The first program and the second, up to version 3.5, work exclusively within the DOS operating system, which becomes unacceptable for many users. The Victoria 4.3 program runs in Windows 7, but requires running as a computer administrator. After starting the program in random search mode, leave it for a day. The hard drive begins to crackle and crackle all day and all night. Then it is recommended to repeat the test for a similar period, but in Butterfly mode.
Almost the last test is to launch the IOMeter program. After setting small block sizes, setting up random search, read-write ratios, you start the process. It is also recommended to test for about 24 hours. It makes no sense to compare the obtained data with other hard drives, so simply evaluate the performance of the drive and look at the S.M.A.R.T table. If everything is fine, then your disk is reliable and will fail in the next 24 hours - no one can guarantee you more, but peace of mind is still worth a lot.
People often ask the question on the Internet: “I bought a new hard drive and connected it. Why can't I see the new disk in the system? The fact is that after physically installing the hard drive into a computer or laptop, it is necessary to programmatically initialize and mark it. So, how to set up a connected new hard drive in Windows 7? Nothing could be simpler.
Update 2016: Despite the fact that the illustrations were taken a long time ago from Windows 7, these instructions are also suitable for Windows 10 and 8.
Step 1. Right-click on the system shortcut "Computer" and select "Manage":
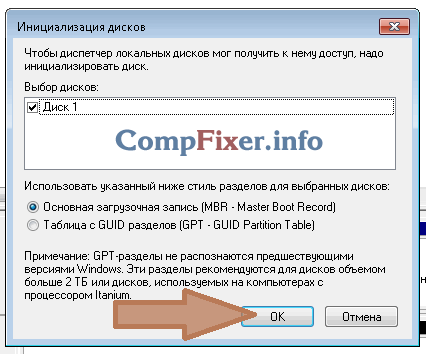
Step 2. In the window that opens on the left, select “ Disk management". After this, a dialog box should open on the right side “ Initializing the disk". Click “OK” in it:

_____________________________
Attention! If you click on " Disk management" dialog box does not open, right-click on the left side of the disk image in the area that says "No data" or " Not initialized" and select " Initialize disk". (See 2 pictures below.)


The task is to call the same window “ Initializing the disk". In it you must make sure that the checkbox next to “Disk n” is checked and click OK.
Step 3. Right-click on the right side of the new disk image and select " Create a simple volume»:

Step 4. Click "Next":

Step 5. Select the partition size. By default, the maximum partition size is set. Those. the partition will occupy the entire hard drive. If you want the new disk to have several partitions, then at this point select the size of the first partition. For example "10240". Then the new partition (aka “partition”) will occupy 10 GB of disk space.
If to create the first partition on a new hard drive you did not select all the available space (which was the default), then after the created partition there will be unallocated space on the disk. To create additional partitions in the unallocated area, repeat these instructions with steps 3 .
After selecting the partition size, click “Next”:

Step 6. Select a drive letter. Click "Next":

Step 6. In most cases, the file system type should be left “NTFS”. Select the volume label, such as "Games" or "Archive" and click "Next":

Step 7 Click "Finish" to exit the Disk Initialization Wizard:

After this, you will see that the disk has begun to format:

Wait until the caption “Good ...” appears on the right side of the disk image instead of the word “Format”:

Now you can open “Computer” and check if a new section with the desired letter has appeared.
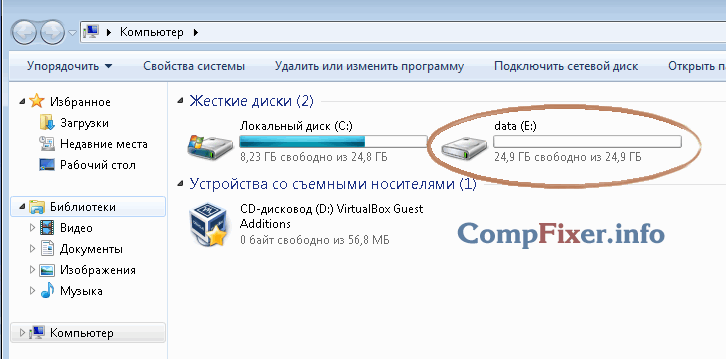
The marking is done. You can use the drive!
Articles in the same category
I’ll share with you how I solved a problem related to my hardware. I worked and worked... and there wasn’t enough space. Have you thought about how to install a hard drive on your Acer AX3910 computer? There are not enough connectors for it.
I’ve been using this computer for several years now and I’ll tell you honestly, it’s never let me down, it works super reliably, quickly, and the most important thing I like about it is its noiselessness. Works like a laptop. It's on the table and you can't even hear it.
Installing a second hard drive on an Acer AX3910 computer.
Before this model, I used the same desktop computers, of the same brand, only less powerful and with a smaller hard drive. As they were used, the need for a faster processor and a larger hard drive arose. I have been using this model for more than two years and have no plans to change yet. Except that there wasn't enough space on the hard drive.
Computer settings:
For additional storage space, I have been using an external hard drive “WD Elements” for a year now. The brand is not known to me, it is made in Thailand. 
This HDD has a USB3 connector, the data transfer speed is very high that I didn’t even need to increase the built-in hard drive.
And I wouldn’t worry if at one point he didn’t start working slowly. The time it takes to load files into my programs from this external drive has increased dramatically. And energy-intensive programs - Adobe Premier Pro, Adobe Muse. The brake became concrete.
And there was concern. When checking the disk, Windows declares a system error on the disk, but cannot fix it. And “my whole life” is on it! Archival photos, work over many, many months. It became creepy to even think, if suddenly... I don’t even want to say this word! I handle it very carefully, blowing off the dust.
How to install a second hard drive
What to do? I decide to urgently install an additional 1 TB hard drive, leaving the original drive of the same manufacturer under the system, without reinstalling the system or changing anything. Bought for 3820 rubles. And knowing that there is no free space for it in this compact case, I decide to install it instead of a CD/ROM, and use an external CD/ROM, connected via a USB connector. It's not needed that often these days. And on the motherboard, there are only two SATA connectors for disks.
I disassemble the case, it's easy

unscrew the CD/ROM 

Connecting a second hard drive
How to install a second hard drive programmatically. I connect the connectors to it from the CD/ROM and assemble it. I just swap the connectors of the native HDD and CD/ROM. This is done so that the new HDD does not act as the root disk. If you don't reset the connector, the computer simply won't boot the system. Tried it in setup Switching the drives didn't work, so I had to re-wire the wires. This is done quickly and is not difficult. 
Next, connect all the wires, turn it on and press on the keyboard Del. This is necessary in order to get out setup and just in case, set the boot priority from our native hard drive. 

 Exit, saving the settings.
Windows will boot, but when you open Explorer, you will not find the new disk. To do this, we will make the following assumptions:
We go out to Control Panel-Administrative Tools-Computer Management-Disk Management
.
Point the mouse at this disk 
and right-click to call up a pop-up menu in which we create a simple volume.
The Create a Simple Volume Wizard window will appear, which will guide you through setting up this disk. 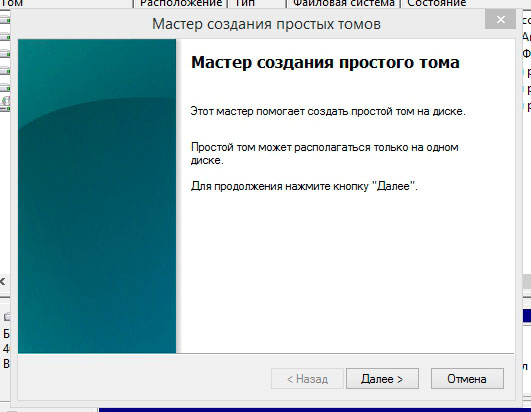
During the creation process, we assign a drive letter, you can come up with a name for it. Let's format it. And a second hard drive appears on our computer. This operation is simple and intuitive. 
Thus, the computer gained new storage, essentially tripling its memory capacity. All that remains is to add RAM up to 16 GB. And you can still use it for two years.


