Program for testing usb flash drive. How to check the writing and reading speed of a USB flash drive
Sooner or later, most users encounter a situation where the flash drive is displayed incorrectly (here you can try formatting first) or the information on it suddenly disappears. But do not despair - it is likely that you yourself will be able to revive the device and successfully restore the photos and documents stored on it or “bring to life” the file system.
Thanks to our recommendations, you can save not only on the services of a specialist, but also on special programs - we will consider exclusively free software for repairing flash drives. However, it is also worth keeping in mind that different utilities are designed for devices from different manufacturers.
If you don't know the model of your USB drive
do the following:
Go to the Start menu and in the “Run” line write mmc devmgmt.msc, then press Enter. In the Universal Serial Bus Controllers section, find your “USB Mass Storage Device”, select it and right-click. Open Properties, then go to the Details tab and in the dropdown select Device Instance Code (or Hardware Codes). Write down or remember the PID and VID.
Then go to the FlashBoot.ru website and enter the VID and PID data in the special field. After this, you will receive information about your device and the utilities that are best suited to repair it.
Recovering a Transcend flash drive
To restore devices of this brand, the official Transcend RecoveRx utility is best suited. With its help, you can conduct an in-depth search for already deleted files, which you can later also recover: photos, documents, audio and video files.
By the way, RecoveRx supports all types of storage devices, including memory cards, MP3 players and external hard drives. This program works extremely simply - you just need to specify the type of files or select all.
The second method is online recovery of flash drives from the JetFlash Transcend series. To use it, you must download JetFlash Online Recovery (you must have an active Internet connection). Once launched, the tool will automatically restore all your data.
Silicon Power flash drive recovery
If you have a Silicon Power flash drive, you are in luck - the manufacturer cooperates with Recuva. The File Recovery tool provides a clear interface that will allow you to quickly scan your device and mark those that are subject to reincarnation. You can read more about the operating features of this program.
Kingston flash drive recovery
If you have lost files on media from this company, a flash drive recovery utility can also help you. If you have problems with the operation of the device, then most likely you will have to format it, and do this not with a Windows tool, but with the official Kingston Format Utility. Just launch it, select your device and click “Format”.
Recovering a SanDisk flash drive
USB drives from SanDisk have a five-year warranty, so if you suddenly encounter problems, feel free to go to the store or contact the manufacturer (e-mail.
And again return the ability to use it for writing and reading.
In this case, you will have to sacrifice data, which may not be recovered later.
But the alternative to using these applications is both non-working and lack of information.
Diagnosis of the problem
The main signs that a flash drive requires repair are:
- Issuing messages about USB media copy protection or about an unidentified device;
- The drive cannot be detected by any computer;
- Absence from the list of disks;
- Inability to read (and, of course, write) information;
- Negative results when attempting to restore or format.
Sometimes the problem may be a USB connector or a lack of drivers on a particular computer. But when problems occur on every device, most likely the problem is with the drive.
Utilities for flash drives
You can try to restore the functionality of the USB drive using system utilities.
But when the problem is serious, the best option is to restore it through a program specifically designed for repairs.
Some manufacturers produce their own applications that are best suited for repairing these particular brands.
Although with their help you can restore a USB drive of any brand.
Advice: Special programs are designed for repair, not restoration. It is not recommended to extract information using them.
JetFlash Online Recovery
To restore non-functioning Transcend drives, the manufacturing company has created a special utility that can be found and downloaded for free on its official website.

Adata
The manufacturer Adata also has a freely available program for restoring USB media on its official website.
In some cases, the application manages to save part of the data, even if the USB drive has been formatted.
Unlike most such programs, recovery can be performed not only on video, audio and photo files, but also on Word documents, e-books and spreadsheets.

Universal programs
In addition to specialized software that mainly repairs drives of its own brand, there are several applications that can restore the working condition of most devices.
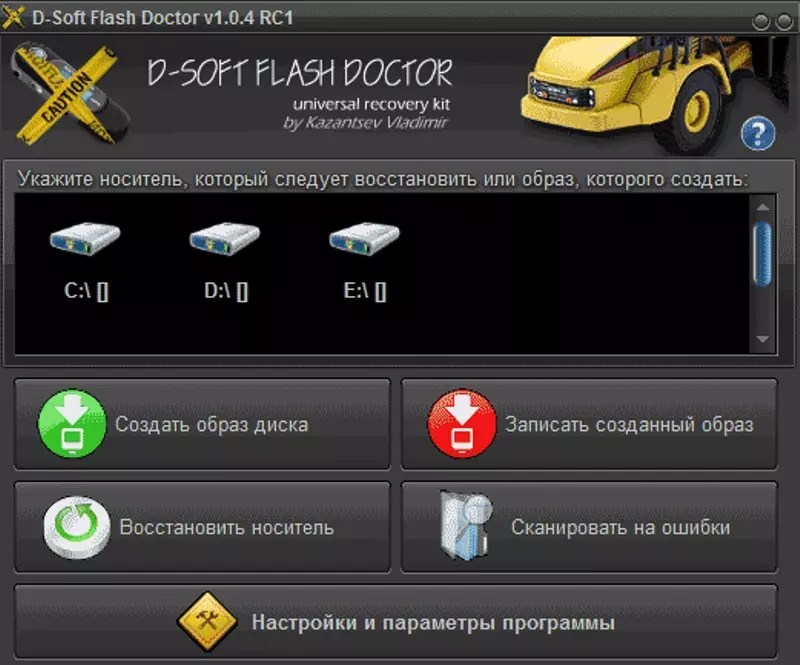
One of them is the D-Soft Flash Doctor program, which provides the following benefits:
- Menu and documentation in Russian;
- Lack of localization for individual brands;
- Creating a flash disk image for further work not on the drive, but on its virtual copy.
The following programs, not so well known, but also free and quite effective, are:
- ChipEasy, which can not only easily restore a flash drive, but also recognize the manufacturer if its name is not written on the case or has been erased over time;
- Flash Drive Information Extractor is a utility that can provide the maximum amount of data about a flash drive along with its recovery;
- CheckUDisk – for all its ease of use, it is a very fast working and detailed information application.
Anyone who has lost data at least once in their life due to damage to a removable storage device knows how important systematic diagnostics of such media is.
A flash drive (memory card), like any other electronic device, wears out over time. As a result, errors may occur that we would never have known about if we had not carried out regular diagnostics. Diagnostic actions are designed to alert the user of an impending failure.
In this article we will provide a detailed description of a free program for checking flash drives and other removable storage media for errors.
Description of Check Flash
Check Flash is a free utility for testing and formatting removable storage devices. Using this application, you can diagnose errors, determine the extent of corruption, or run a read/write performance test.
The application interface is very simple and functional at the same time, which makes it easy to use even for novice users.

On the right side of the window we have a preview of the Drive map, a report that is compiled after the checks are completed (Log) and legends (Legend) explaining the meaning of individual blocks.
Check Flash allows you to perform read and/or write tests. Depending on the type of access to the flash drive you select, we can activate additional functions, such as the Read stability test. Each of the listed options allows you to study not only the state of the media, but also find out its parameters.
Check Flash Guide
The main program window is divided into separate sections, which include:
Access type— selecting the type of access to removable memory media (flash drive, card)
- Use temporary file - means that a temporary file will be used for testing. This is the most secure access method and provides basic functionality that allows you to quickly check a flash drive or check the read and/or write speed.
- As logical drive - removable media is treated as a logical drive. Partition-level access allows for several additional tests and is less secure.
- As physical device - the media is treated as a physical disk, which allows all available tests to be carried out and is the most dangerous access method.
ATTENTION! Using the “As physical device” option can only be recommended in extreme cases.
Drive— choosing a storage device
Action type— choice of action
- Read stability test - conducts a thorough test of the flash drive along with checking CRC errors. The option is available when using the access type “logical/physical drive”
- Write and read test - allows you to perform a series of reading and writing tests, while specifying parameters (maximum data read/write speed). In addition, in this test we can determine the size of the data sample with which the test will be carried out (Small pattern - 2, Full pattern - 18).
- Low level initialization - the ability to edit information about partitions on the specified media.
- Save image - creates a backup copy/image of the selected media or partition (writing to a file).
- Load image - reproduces a media image from a backup copy.
- Full erase - erasing a flash drive. It completely deletes data, after which it is almost impossible to recover data from such media.
length test— determines the length of the test
- One full pass - the length of the test is determined for one full move.
- Burn it - the test runs until the user stops the operation.
- Manual - the duration is determined by the user (the number of cycles is indicated).
- Until first error found - the test will be executed until the first error is detected on the media.
Information— detailed information about the test.
It displays information about the progress of the diagnostic process, the number of cycles completed, the time until the operation is completed, the read and write speed, the number of passes remaining and, most importantly, the number of errors detected.
How to check a flash drive for errors
Connect the flash drive to your computer. Run the Check Flash program. If the flash drive was not detected in the Drive section, click on the “Refresh” icon. Select the Action type and set the test duration (test completion condition). After setting all the parameters, click the “Start!” button.
We can constantly monitor the progress of the diagnostic process on the right side of the window, on the Drive map tab. After testing is completed, we will receive a report (Log tab).
The rapidly increasing popularity of solid-state drives has generated a huge amount of low-quality goods, fakes and outright garbage. So, having bought another cheap flash drive, you risk losing important data that was recorded on it. To prevent such a situation, you need to be able to diagnose the device, so in this article we will figure out how to check a flash drive for functionality.
To prevent problems in the operation of a flash drive, it is necessary to diagnose it.
In the most general case, the “coolness” of a USB drive is usually measured by its volume; this approach reflects one facet of the truth, but it cannot be called complete. In addition to the actual volume, which, by the way, in reality may turn out to be far from what was declared, a flash drive has other parameters that we will learn to distinguish and measure each. These are read speed, write speed, bad sectors and many types of different errors.
In this article we will look at several specialized programs, but first of all we will try to use the built-in functionality of Windows. It will not help us find all the answers to our questions, but it is quite capable of checking the disk for errors and correcting them. Let's get started.
Using Windows functionality
Under this heading we will figure out how to check a flash drive for bad sectors using the capabilities of Windows. First of all, we insert our device into the slot of a computer or laptop and go to “My Computer” to see what letter it is identified under, let’s say it’s the letter “H”, remember this point, the letter will be useful to us. Below I will indicate the command where this letter will appear; you will need to replace it with your own.
What will our actions be? We need to give a command to the system so that it checks our USB for damaged sectors and, if possible, restores them. We can do this directly from the “Run” window, or by first entering the command line.
We will use the chkdsk command, which stands for Check Disk.
First way. We press the key combination “Win + R”, we get into the “Run” window, enter the command “chkdsk H: / F / R” there. The letter “F” is responsible for file system damage, and “R” is for sectors.
Second way. In the same way, go to “Run”, just enter the “cmd” command, it will take us to the command line. It is recommended to use this method, then we can track the report and understand what is happening with our sectors and file system. We enter the same command into the command line and wait for the result.

In principle, this is all that Windows is capable of; we will continue to use specialized programs.

Check Flash
The first program for checking a flash drive is Check Flash. Not the most user-friendly program; at first, some functions may not be obvious to an inexperienced user, but with the instructions provided, everything should become clear.
So obviously we need to download the program. The archive is already on our desktop, let’s unpack it. The utility is portable and does not require installation.
First of all, we copy all the necessary files to another medium, because in the end we will need to format the flash drive.
After launching Check Flash, we will see a window divided into sectors with various settings; the screenshots below will indicate exactly how to set these settings to check one of the drive parameters.
To begin, select our device in the “Device” column; after verification, all the necessary information will appear in the corresponding field. After setting all radio switches to the same state as in the screenshots, you need to press the “Start!” button. and confirm your decision. The large field on the right will tell us the state of the memory cells; you can determine the color value on the “Legend” tab. How to check the actual capacity of a flash drive? Let's get started, the first check will address this issue:

Checking the flash drive for read and write speed:

Flash drive test for memory cells with errors:

After all the tests, go to the “Log” tab and observe the report. If there are too many different errors, it is not recommended to store important data on such a medium; there is a high probability of losing it. While running, Check Disk created various files on our drive; to get rid of them, just format the flash drive using a regular explorer.
The next program for testing a flash drive is Flash Memory Toolkit. A very powerful product. The license costs a lot, but absolutely all functions are available in the trial version, for us it’s a lifesaver. The functionality of the program is wide, but its main features are: recovery of lost data and secure deletion (we will consider further). The topic of the article is testing a flash drive, so we will also touch on the relevant sections, naturally.
So, we, of course, downloaded the application, installed it and launched it, we see the program window:

We won’t rush, we’ll go over all the important elements of the interface. First of all, we add our flash drive for processing (line in the upper left corner). Next to this line there are buttons for formatting and screenshot, nothing fancy. Next, just below on the left we see a tab bar, these are the main functions of the program, and we will use them.
- The first tab “Info” provides us with all the primary information on our media: capacity, free space, file system, name, etc.
- The second tab “Error Scan” speaks for itself; it tests the flash drive for read or write errors. It's a good idea to do this check immediately after purchasing a solid-state drive.

- The third tab is disk cleanup, but a special kind of cleanup. After such formatting, it is impossible to restore the data; you are working with the file system itself, a function that is indispensable in terms of data security and confidentiality.
- “File Recovery” is why you can download this program. There are not many analogues to this tab in terms of functionality in RuNet. In essence, we have a complete recovery of lost data, naturally, data that was deleted in the usual way, which was erased as a result of an error or algorithm failure. We select the desired type of files that we are going to search for, and wait. The program will offer a list of all files of the selected type, but we, in turn, need to select specific files to restore. A preview is provided for images, a very convenient and useful function; almost all the most popular file extensions are supported. An important point - save all recoverable files to any other medium other than the one with which all manipulations are performed.
- Backup/restore - regular backup, we won’t stop here.
- Low-level Benchmark - low-level test of drive speed, similar to the function of the previous program.
- File Benchmark is a modified speed measurement function tied to the size of the file being moved.
We have looked at all the functions of this program, it’s time to draw conclusions.
Conclusion
In this article, we figured out how to check a memory card for functionality. As it turned out, there are quite a few ways, and we considered only a small part of the existing ones. Programs for diagnosing and restoring flash drives are a dime a dozen, we just have to choose for ourselves the one that will meet all our requirements.
How to check the authenticity of a Chinese flash drive? How to check if a memory card is fake or not?
Very often I had to deal with flash drives and memory cards with a fake size. Very often sellers of Chinese sites sell fake flash drives and memory cards. The product description says 16 GB, 32 GB or more, and when I try to write to a flash drive files are often inaccessible.
I personally got such a flash drive for my DVR. After recording 40 minutes of the trip, the dash cam began recording video lasting 3 seconds, and then tried to record again. It's all about the memory card.
And our Chinese friends do it very simply. Write the file table to a memory card or flash drive “in a circle”. Because of this, the computer displays the size of the flash drive, for example, 32 GB, but the real volume is only 4 GB.
Therefore, do not rush to confirm your order on aliexpress.com or other sites. At first check the flash drive with the h2testw utility.
The same applies to write and read speeds. Very often sellers deliberately overestimate the class of memory cards.
How to test a flash drive or memory card with h2testw.
Myself The flash memory testing process can be divided into 2 stages:
1.
Filling the entire free space of the tested disk with information (files, the size and number of files is selected by the H2testw program itself depending on the free space of the disk being tested), while the actual writing speed is measured.
2.
Reading the recorded information from the disk under test, while measuring the actual reading speed and the reliability of the information, i.e. We check with the information that was previously offered for recording.
This test allows you to determine:
Real speed of reading/writing information of the tested flash memory.
-The true volume of the storage medium being checked.
Choosing a language "English"
Button "Select target" select the desired drive.

Select an item "All available space"(we test all available memory)
And press the button "Write+Verify" and wait for the process to complete.

Attention: The read/write speed in the test will only be real if you use a high-speed USB port and test the memory card without an adapter. If an adapter is necessary, it is best to use a quality card reader.

As you can see from the screenshot, testing of the drive was successful
But there is another option:
The media is likely to be defective.
1.8 GByte OK (3954734 sectors)
5.8 GByte DATA LOST (12240850 sectors)
Details:2.9 GByte overwritten (6240208 sectors)
0 KByte slightly changed (2.8 GByte corrupted (6000642 sectors)
8 KByte aliased memory (16 sectors)
First error at offset: 0?0000000000003830
Expected: 0?358d089906064530
Found: 0?158d089906064530
H2testw version 1.3
Writing speed: 1.58 MByte/s
Reading speed: 5.56 MByte/s
H2testw v1.4
And in this case, we tested memory with an announced volume of 8GB, but only 2 GB (1.8 GByte OK) is available for normal use, the rest 6GB (5.8 GByte DATA LOST) not possible to use. Average speed for this storage medium = 1.58 MByte/s, average read speed = 5.56 MByte/s


