Why doesn't virtual router work? Virtual Router Plus: Cannot start Virtual Router Plus
Virtual Router Plus- a program that allows you to configure Wi-Fi distribution from a laptop. Works with everyone operating systems Windows family. It is also compatible with the anniversary OS. To create a wireless access point, just launch the program and click “Run” virtual router plus". But often users encounter the error: “virtual router plus cannot be started.” I will write what to do in this case and how to fix the problem as part of this article.
Reason for error
Virtual Router Plus - program with simple interface, which automates the creation and connection to an access point. The received error indicates problems in the software or hardware of the laptop:
- There is no Wi-Fi adapter.
- Wi-Fi is turned off or on.
- The drivers for the wireless adapter are not installed.
- The adapter or driver does not support startup virtual Wi-Fi networks.
- The virtual adapter is not enabled.

Elimination
Now let's check what caused the error.
Checking Internet access
Make sure your laptop is connected to the Internet via Wi-Fi or LAN cable. If the Internet Access icon does not appear in the tray:

Advice! If you are using wireless communication as an Internet connection, check out the information on .
Checking the virtual network adapter
Right-click on Start and select “Device Manager”:

If there is no such device in the Device Manager or there is not even a mention of the Wi-Fi (Wireless adapter), proceed to the next step.
No adapter in Device Manager
If you are sure that your PC/laptop has a Wi-Fi adapter, you need to install/update the appropriate drivers. Download software, you can visit the website of your device manufacturer. The installer can be launched using the executable .exe file or through the device manager by selecting “Update driver”. 
Don't forget to restart your operating system.
If you have any questions after reading the article, leave comments or use the form.
Today we will talk about such a thing as virtual router. If you are interested in this topic, then you are most likely a user who does not want or cannot purchase a real router. So, the idea of a virtual router is to turn your laptop or computer with a Wi-Fi module using software into a device capable of performing the tasks of a real router.
Okay, so how do you create a virtual router for Windows? As we mentioned above, implement this task Special software will help you, which will allow your Wi-Fi module to act as a router. That is, it can be argued that you can literally download a virtual router.
How to set up a virtual router?
So, to set up a virtual router, you will need exactly three things: a laptop or computer, Wi-Fi module and, in fact, the application itself, which will help you create the specified functionality.
In this article we will look at setting up a virtual router program using an example Virtual Router Plus. This utility is one of the most popular among users who need such functionality, and it is also absolutely free.
To produce setting up Virtual Router Plus, you will need to download it first. After downloading this program to your computer, place its executive file anywhere on your computer, since it does not have of great importance. For example, you can place it on your desktop.
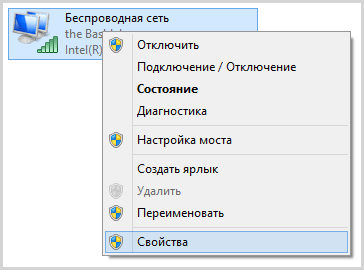
Your next step will be to expand your Internet sharing. To do this, you need to right-click on the Internet connection icon in the Start notification area and select “Network and Sharing Center.”
Click on "Change adapter settings". Now find the network connection that you want to start distributing through the virtual Wi-Fi router for your computer. Right-click and go to “Properties”.
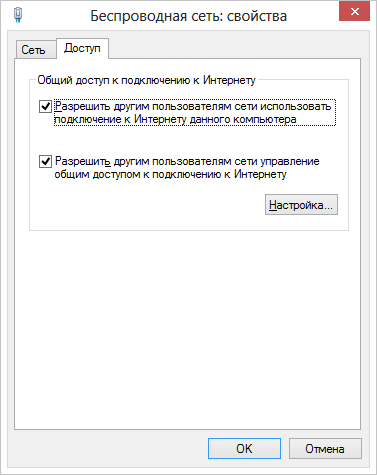
Go to the “Access” tab and check the box next to the option that will allow other users to use this network connection. Then click on the drop-down menu and select “Wireless Network Connection”. Confirm all changes in the settings.
Having sorted out the settings, let's go back to the downloaded program that will allow you to create a virtual Wi-Fi router. Run the previously downloaded Virtual Router Plus file. A window will appear in front of you in which you will need to specify the network name, password and connections.
Enter any name you need in the SSID line. In the password line you need to specify the password accordingly. In the network connection line, select the connection for which you opened general access in your network connection settings.
As soon as you finish displaying everything necessary settings in the Virtual Router Plus window, you just have to click on the “Start...” button. By clicking on the button, the distribution of Internet connection via your Wi-Fi module will start. You will see a corresponding message in the Notification Area.
Outcome and possible problems
That's basically all you needed to do to create a virtual router. If you want to stop sharing your Internet connection via the Wi-Fi module, you just need to click on Virtual program Router Plus on the “Stop...” button.
However, with a virtual router, things may not always go so smoothly. Sometimes, even after doing all of the above, you will still not be able to create a wireless access point to the network. This may happen for several reasons. For example, your antivirus may easily block your network connection. Try deactivating your antivirus and follow the steps again.
If you are convinced that nothing prevents you from creating a virtual router on Windows, but you still cannot create a connection, then there is one more thing - the Wi-Fi module in your laptop or personal computer. There may be something wrong with the Wi-Fi drivers. In the worst case scenario, your Wi-Fi module may fail.
Found a typo? Select the text and press Ctrl + Enter
Today we’ll talk about how to distribute the Internet via Wi-Fi from a laptop or from a computer that has the appropriate wireless adapter. Why might this be needed? For example, you purchased a tablet or phone and would like to access the Internet from it at home without purchasing a router. In this case, you can distribute Wi-Fi from a laptop that is connected to the network either wired or wirelessly. Let's look at how to do this. At the same time, we’ll look at three ways to turn a laptop into a router. Methods for distributing Wi-Fi from a laptop are considered for Windows 7, Windows 8, they are also suitable for Windows 10. If you prefer non-standard ones, or do not like to install additional programs- you can immediately go to the method in which the implementation of Wi-Fi distribution will be organized using the Windows command line.
Update 2015. Since the writing of the manual, certain nuances have appeared regarding Virtual Router Plus and Virtual Router Manager, about which it was decided to add information. In addition, another program for distributing Wi-Fi from a laptop has been added to the instructions, with extremely positive reviews, described additional method without using programs for Windows 7, and also described at the end of the manual typical problems and errors that users encounter when trying to distribute the Internet in such ways.
Simple Wi-Fi distribution from a laptop connected via a wired connection in Virtual Router
Many who were interested in distributing the Internet via Wi-Fi from a laptop have heard about such a program as Virtual Router Plus or simply Virtual Router. Initially, this section was written about the first of them, but I had to make a number of corrections and clarifications, which I recommend that you read and then decide which of the two you would prefer to use.
Virtual Router Plus- a free program that is made from a simple Virtual Router (we took the software from open source and made changes) and is not much different from the original. On the official website it was initially clean, but in Lately delivers unwanted software to your computer that is not easy to uninstall. On my own this option Virtual router is nice and simple, but you should be careful when installing and downloading. On currently(beginning of 2015) you can download Virtual Router Plus in Russian and without unnecessary things from the site http://virtualrouter-plus.en.softonic.com/.

The method of distributing the Internet using Virtual Router Plus is very simple and straightforward. Disadvantage this method turning a laptop into a point Wi-Fi access is that for it to work, the laptop must be connected to the Internet not via Wi-Fi, but either by wire or with via USB modem
After installation (previously the program was ZIP archive, now this is a full-fledged installer) and launch the program, you will see a simple window in which you will need to enter only a few parameters:
- Network name SSID - enter a name wireless network, which will be distributed.
- Password - Wi-Fi password consisting of at least 8 characters (WPA encryption is used).
- General connection - in this field you should select the connection through which your laptop is connected to the Internet.
After entering all the settings, click the “Start Virtual Router Plus” button. The program will minimize to the Windows tray, and a message will appear indicating that the launch was successful. After that, you can connect to the Internet using your laptop as a router, for example from an Android tablet.
If your laptop is connected not by wire, but also via Wi-Fi, then the program will also start, but you will not be able to connect to the virtual router - it will fail when obtaining an IP address. In all other cases, Virtual Router Plus is excellent free solution for this purpose. Further in the article there is a video about how the program works.
Virtual Router is a virtual router program with an open source code, which underlies the product described above. But, at the same time, when downloading from the official website http://virtualrouter.codeplex.com/ you do not risk installing the wrong thing for yourself (at least for today).

MyPublicWiFi program
I wrote about free program for distributing the Internet from laptop MyPublicWiFi in another article (), where she collected positive reviews: Many of the users who were unable to launch a virtual router on a laptop using other utilities succeeded with this program. (The program works on Windows 7, 8 and Windows 10). Additional benefit this software - the absence of installation of any additional unwanted elements on the computer.
After installing the application, the computer will need to be restarted, and it will run as Administrator. After launch, you will see the main window of the program, in which you should set the network name SSID, a password for the connection, consisting of at least 8 characters, and also note which Internet connection should be distributed via Wi-Fi. After this, all that remains is to click “Set up and Start Hotspot” to launch the access point on the laptop.

Also, on other tabs of the program, you can view who is connected to the network or set restrictions on the use of traffic-intensive services.
You can download MyPublicWiFi for free from the official website http://www.mypublicwifi.com/publicwifi/en/index.html
Video: how to distribute Wi-Fi from a laptop
Internet distribution via Wi-Fi using Connectify Hotspot
The Connectify program, designed for distributing Wi-Fi from a laptop or computer, often works correctly on those computers with Windows 10, 8 and Windows 7 where other methods of distributing the Internet do not work, and it does this for the most different types connections, including PPPoE, 3G/LTE modems, etc. Available as free version programs and paid options Connectify Hotspot Pro and Max with advanced features (Mode wired router, repeater and others).

Among other things, the program can track device traffic, block ads, automatic start distributions when logging into Windows and more. More details about the program, its functions and where to download it in a separate article.
How to distribute the Internet via Wi-Fi using the Windows command line
Well, the penultimate method in which we will organize distribution via Wi-Fi without using additional free or paid programs. So, a method for geeks. Tested on Windows 8 and Windows 7 (for Windows 7 there is a variation of the same method, but without the command line, which is described below), it is not known whether it will work on Windows XP.
Press Win + R and enter ncpa.cpl, press Enter.

When the list opens network connections, click right click wireless mouse and select Properties
Switch to the “Access” tab, check the box next to “Allow other network users to use the Internet connection” of this computer", then - "Ok".
Run Command Prompt as Administrator. In Windows 8, press Win + X and select “Command Prompt (Administrator)”, and in Windows 7, find Command Prompt in the Start menu, right-click and select “Run as Administrator”.

Run the command netsh wlan show drivers and see what is being said about hosted network support. If it is supported, then you can continue. If not, then most likely you do not have the original driver to a Wi-Fi adapter (install from the manufacturer’s website), or a really very old device.

The first command that we need to enter to make a router out of a laptop is as follows (you can change the SSID to your network name, and also set your password, in the example below the password is ParolNaWiFi):
Netsh wlan set hostednetwork mode=allow ssid=site key=ParolNaWiFi

After entering the command, you should see confirmation that all operations have been completed: wireless access allowed SSID name changed, the wireless network key is also changed. Enter the following command
Netsh wlan start hostednetwork

After this input, you should see a message stating that “The hosted network has started.” And the last command that you may need and which will be useful in order to find out the status of your wireless network, the number of connected clients or the Wi-Fi channel:
netsh wlan show hostednetwork
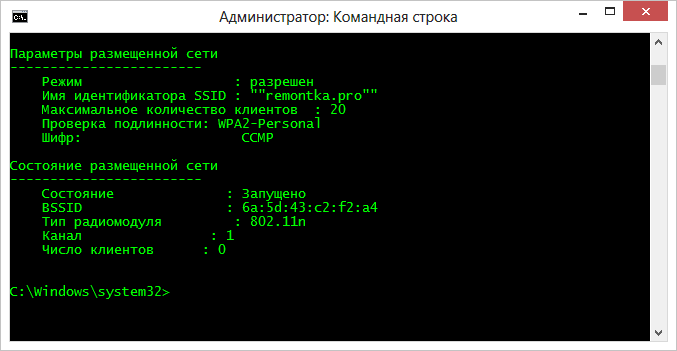
Ready. Now you can connect via Wi-Fi to your laptop, enter given password and use the Internet. To stop distribution, use the command
Netsh wlan stop hostednetwork
Unfortunately, when using this method Internet distribution via Wi-Fi stops after each laptop reboot. One solution is to create bat file with all the commands in order (one command per line) and either add it to startup or run it yourself when necessary.
Using a computer-to-computer network (Ad-hoc) to distribute the Internet via Wi-Fi from a laptop in Windows 7 without programs
In Windows 7, the method described above can be implemented without resorting to command line, and quite simple. To do this, go to the Network and Sharing Center (you can through the control panel or by clicking on the connection icon in the notification area), and then click “Set up a new connection or network.”

Select the “Set up a wireless computer-to-computer network” option and click “Next.”

On next step You will need to set the network name SSID, security type and security key (Wi-Fi password). To avoid having to configure Wi-Fi distribution again each time, check the “Save settings for this network” option. After clicking the "Next" button, the network will be configured, Wi-Fi will turn off if it was connected, and instead begin waiting for other devices to connect to this laptop(that is, from now on you can find the created network and connect to it).

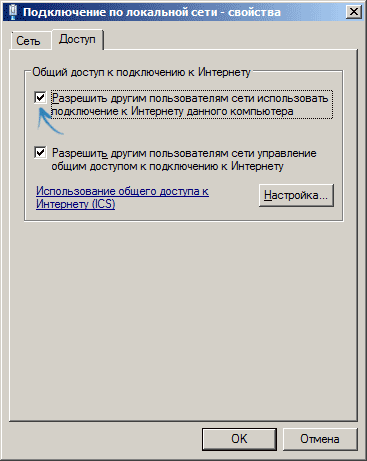
In order for the Internet to be available when you connect, you will need to share Internet access. To do this, go to the Network and Sharing Center again, and then select “Change adapter settings” in the menu on the left.
Select your Internet connection (important: you must select exactly the connection that directly serves to access the Internet), right-click on it, click “Properties”. After that, on the “Access” tab, enable the checkbox “Allow other network users to use this computer’s Internet connection” - that’s all, now you can connect to Wi-Fi on your laptop and use the Internet.
Note: in my tests, for some reason, only another laptop with Windows 7 saw the created access point, although according to reviews, many phones and tablets work.
Typical problems when distributing Wi-Fi from a laptop
In this section, I will briefly describe the errors and problems that users encounter, judging by the comments, as well as the most probable ways their solutions:
- The program writes that the virtual router or virtual Wi-Fi router, or you receive a message that this type network is not supported - update drivers for Wi-Fi adapter laptop, and not through Windows, but from the official website of the manufacturer of your device.
- The tablet or phone connects to the created access point, but without access to the Internet - check that you are distributing exactly the connection through which the laptop has access to the Internet. Also common cause The problem is that general access to the Internet is blocked by an antivirus or firewall (firewall) by default - check this option.
It seems that I have forgotten nothing of the most important and frequently encountered problems.
I'll finish with this this manual. I hope you find it useful. There are other ways to distribute Wi-Fi from a laptop or computer and other programs designed for these purposes, but I think the methods described will be sufficient.
Today almost everything modern computers, laptops or mobile devices are equipped with Internet access. However, they are far from willing to bother setting up connections, since this causes some difficulties. Even fewer users understand the question of how, for example, to distribute Wi-Fi from their terminal. To simplify such actions, use unique application called Switch Virtual Router (by the way, a Russian development). You will have to delve into the settings in any case, but this will take much less time and effort than doing similar things in the operating system with hardware equipment.
Switch Virtual Router: what is this program?
You can understand what kind of utility this is quite simply by translating its name from English into Russian. In fact, this is a real one that allows you, through built-in tools, to turn your terminal into a distribution device, to which others can subsequently connect computer systems or users of mobile gadgets.
On this moment You can download the version of Switch Virtual Router in Russian (in this form the program is released initially), and the distribution kit for release 3.3 will “weigh” something like 720 KB.
Basic operating modes
The application itself does not have many features (by by and large, they are not needed here). However, the Switch Virtual Router program offers two main operating modes:
- two user terminals are connected through one access point in point-to-point mode (only information and data exchange is possible);
- the virtual router is configured as a point to which many users connect and provides shared Internet access.
There is one more interesting point. One of the “tricks” of the program is that if you disable the application, the created point, as if nothing had happened, will still work in an active state. The same applies to putting the distribution terminal into hibernation mode after disconnecting all previously connected devices. Undoubtedly, it is very convenient.
Please note: the application does not support legacy XP and Vista systems and can only function correctly in versions 7 and higher, regardless of architecture.
How to use Switch Virtual Router: preliminary setup
Installation of the application is carried out using the appropriate “Wizard”, in which you just need to follow the instructions.

On at this stage There should be no problems or difficulties. After installation is complete, launch the application. The first thing you should do is go to the settings menu. Opens them special button with an image of a gear in the lower right corner of the program window.

On the tab general parameters you need to set the router name to English language(it will be applied to both the name of the access point and the name of the network), password (preferably at least eight characters) and its confirmation, then save the changes. Also, if you wish, you can check the box opposite the launch of WiFi (Switch Virtual Router - respectively) when the system starts.
Activate device sharing
Now you need to enable virtual device sharing. To do this, in the main window you need to click on the line for changing network adapter parameters or go to this section from the Network and Sharing Center in the standard “Control Panel”.

On the menu available connections another one appeared wireless connection(until the access point is configured, it will display a cross on a red background). By right-clicking on it, use the properties line in the drop-down menu and go to the access tab. Here we will use both present permissions (except for installing telephone connection, if it is present in the list) and select the type of connection to home network. Then we simply save the changes.
First connection start
Now all that remains to be done in the Switch Virtual Router program is just a little. There is a start button in the main window.

Click it and wait until the connection is established. If everything is fine, the corresponding icon will appear in the tray, and in the network connection settings a previously used name like “ wireless connection“such and such number” will change to the one that was assigned to the virtual router at the initial stage.
Setting up distribution if the connection is not activated for other devices
In the tray, use the connections icon and select the adapter you are using from the list (Ethernet, Wi-Fi, ADSL, 3G, etc.).

Again, in the properties we set general access if in the original version something was done incorrectly or a different adapter was activated.
Possible access problems
As for the problems with virtual device, almost everyone who has used it notes that the Switch Virtual Router program does not always determine IP addresses for connected devices or even the main terminal correctly, although it uses automatic mode for this.
If such a problem occurs, and a notification appears in the system tray requiring you to check and fix the connection, you can try to enter the relevant data manually. The subnet mask remains in standard form(255.255.255.0), and the combination for the IP address is 192.168.137.1.
In some cases, the Switch Virtual Router program may be blocked by an antivirus or firewall. To begin with, you should disable it for a while and check the application for functionality. In the second case, the program must be added to the firewall exclusion list. If in the list of installed Switch programs Virtual Router is not displayed or add an application to it in a standard way not possible, location must be specified executable file programs manually.
Pros and cons of the program
All that remains is to express all the pros and cons. According to reviews from users and specialists, the program has only one drawback - periodically arising problems with automatic detection IP addresses of connected users.
On the other hand, the undoubted advantages of the application include the following:
- free distribution of the utility;
- small size;
- low consumption of system resources;
- no need to run additional services;
- the ability to switch the distributing terminal to hibernation mode after completing a connection session with other devices;
- full control of parameters, monitoring network connections and information about connected terminals.
Instead of a total
As you can see, there is nothing particularly complicated in setting up the program and additional parameters network adapters there is no. All this will take a maximum of a couple of minutes after the first start of the application. Of course, problems with the created connection may also arise, but this issue can be resolved quite easily.
But here’s the main thing: the user of the same laptop with a built-in Wi-Fi adapter or the owner of a computer with wired connection or an external USB controller does not need to be purchased optional equipment, which can sometimes be quite expensive. The program will turn the desired terminal into a virtual router without any problems.
Virtual Router Plus is a program that allows you to configure Wi-Fi distribution from a laptop. Works with all operating systems of the Windows family. It is also compatible with the anniversary OS. To create a wireless access point, just launch the program and click “Launch virtual router plus”. But often users encounter the error: “virtual router plus cannot be started.” I will write what to do in this case and how to fix the problem as part of this article.
Reason for error
Virtual Router Plus is a program with a simple interface that automates the creation and connection to an access point. The received error indicates problems in the software or hardware of the laptop:
- There is no Wi-Fi adapter.
- Wi-Fi is turned off or airplane mode is on.
- The drivers for the wireless adapter are not installed.
- The adapter or driver does not support running a virtual Wi-Fi network.
- The virtual adapter is not enabled.
Elimination
Now let's check what caused the error.
Checking Internet access
Make sure your laptop is connected to the Internet via Wi-Fi or LAN cable. If the Internet Access icon does not appear in the tray:
Advice! If you use wireless as your Internet connection, read the information on setting up Wi-Fi on Windows 10.
Checking the virtual network adapter
Right-click on Start and select “Device Manager”:
If there is no such device in the Device Manager or there is not even a mention of the Wi-Fi (Wireless adapter), proceed to the next step.
No adapter in Device Manager
If you are sure that your PC/laptop has a Wi-Fi adapter, you need to install/update the appropriate drivers. You can download the software on the website of your device manufacturer. The installer can be launched using the executable .exe file or through the device manager by selecting “Update driver”.
Don't forget to restart your operating system.
If you have any questions after reading the article, leave comments or use the form


