Move the application to the android memory card. Android Step by Step: Transferring applications, or how to free up memory. How to transfer applications to a memory card using Adoptable storage
Almost all phones and tablets released in 2018 have a large amount of built-in memory, which can be expanded using microSD cards 32 GB or more (in mid-class and flagship models). But among owners of older and inexpensive devices with internal storage of 4 GB or less, the issue of shortage free space It’s especially acute on a smartphone. In this article, we will look in detail at all the ways to transfer applications to an SD memory card in Android.
The instructions are intended for both beginners and experienced users, so it talks about transferring applications not only regular means, but also with the help special programs, requiring root rights.
You can also free up space in the internal memory by deleting system applications.
How to transfer applications to a memory card using accessible means
Starting from the very earlier versions Android, the system had a function to transfer most installed applications to an SD card. Instead, in Android 6.0 Marshmallow, it became possible to use a memory card as an internal drive (this method is also described in the article).
Let's look at the function as an example Samsung phone under Android control 5.0:
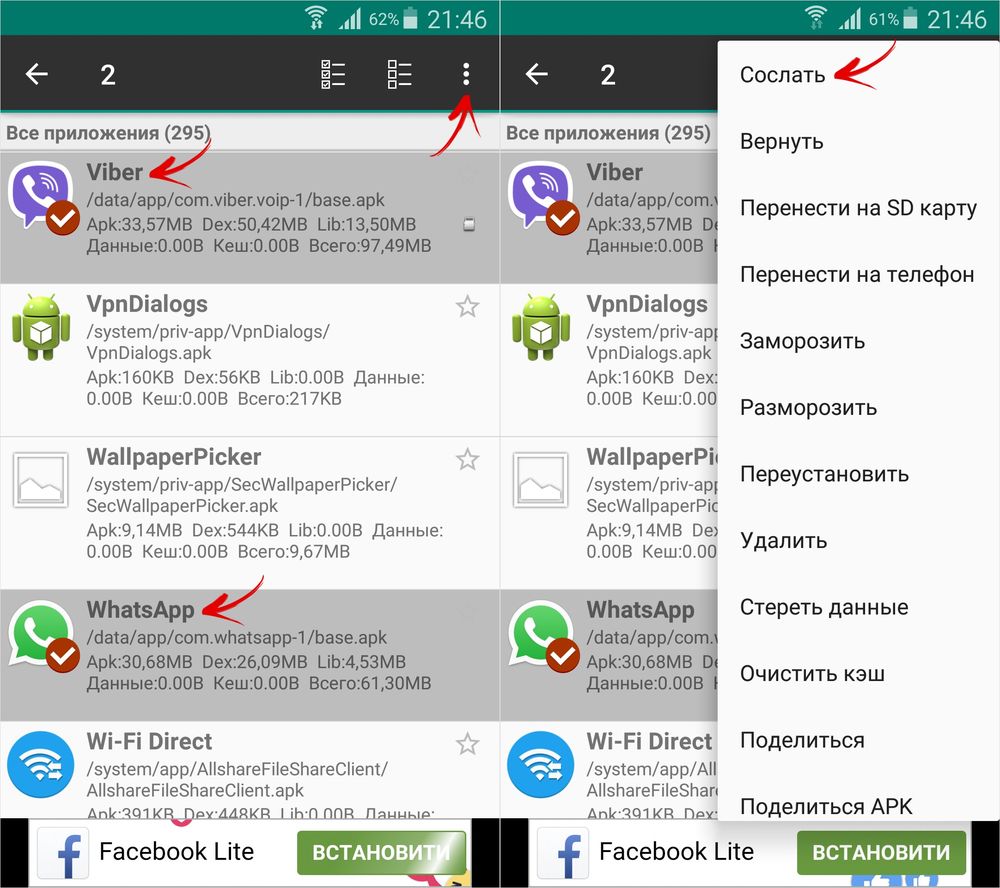
Go to Settings and select Apps. Depending on the manufacturer and firmware, the item may be called “Application Manager”, “All Applications”.

Select the downloaded game or program. If the application can be moved, the “Move to SD card” button will be active. Click on it.

If the button does not work, the developer has prohibited installation of the application on the memory card and it will not be possible to move it using standard means.
AppMgr III (App 2 SD) for transferring applications
In order not to open the settings of each game or program and not see whether they can be transferred or not, use the AppMgr III (App 2 SD) utility - in it, the moved applications are collected in a separate tab.

Hold your finger on app cards to mark them. Select the ones you need and click on the folder icon at the top. In the new window, click on the red arrow, which will take you to the application details page. To go to the settings of the next selected program or game, press the Back button.

AppMgr III will also tell you which applications should not be installed during external memory so that all their functions work correctly.
Using an SD card as internal memory
This feature was introduced in Android 6.0 and works in Android 7 Nougat, Android 8 Oreo and Android 9 Pie. It allows you to use a memory card as a built-in storage device. Since SD replaces internal storage, it makes sense for the flash card to be larger than the internal memory. And for applications to work quickly, the SD card must have high speed records.
Data formatted as internal storage, memory cards will not be read if you install SD in another smartphone or tablet. To use the card in a new device, you will have to format it as portable storage.
After connecting, a message will appear in the notification shade that it has been detected. new map memory. Just click “Configure”, select “Internal memory” in the window that opens and follow further instructions. Don't forget to transfer files from the SD card to another storage device, as they will be deleted during the formatting process.

Detailed instructions for setting up the card:
1. Go to “Settings” → “Storage” (may be called “Storage and USB drives” or “Memory”).
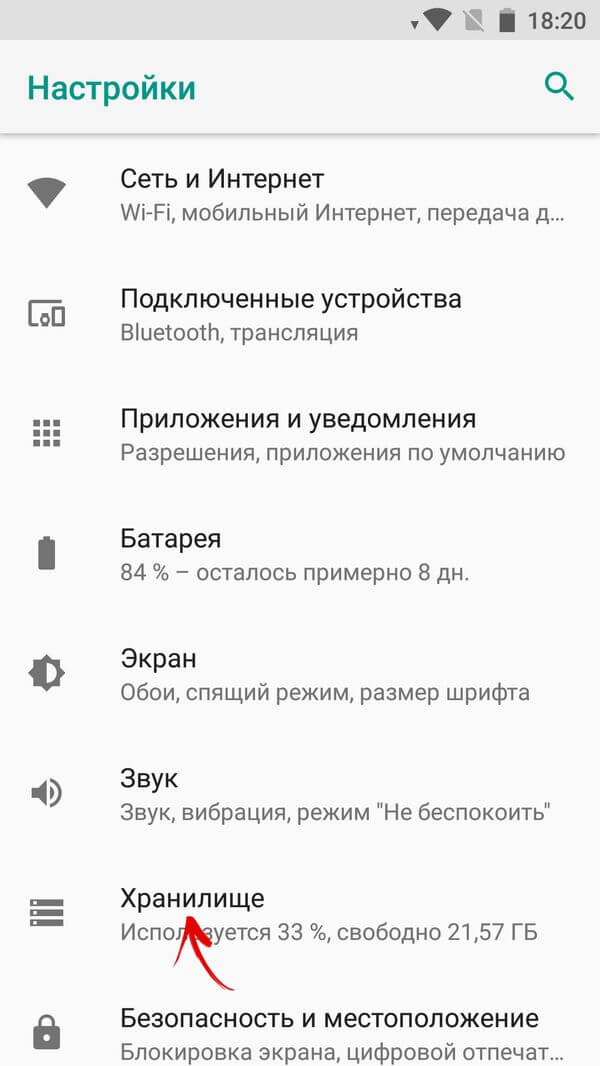
2. Click on "SD Card".

3. On the right top corner open the menu, select “Settings” (in some firmware “Memory”).
4. Click Internal Storage.

5. A warning will appear on the screen that all data saved on the SD card will be deleted during the formatting process. Therefore, copy them first, and then click “Clean and Format”.

6. If your smartphone uses low-class SD (for example, microSD Class 6), a message will appear on the screen that the memory card is slow.

7. Before completing the formatting process, you will be prompted to transfer some files and applications to the SD card. Select the option you want, click Next and then Transfer.

8. Finally, click “Done” and manually restart your phone.

Now open “Settings” → “Applications” → “Application details” (if this item is not there, go to next action) and select installed program or a game.
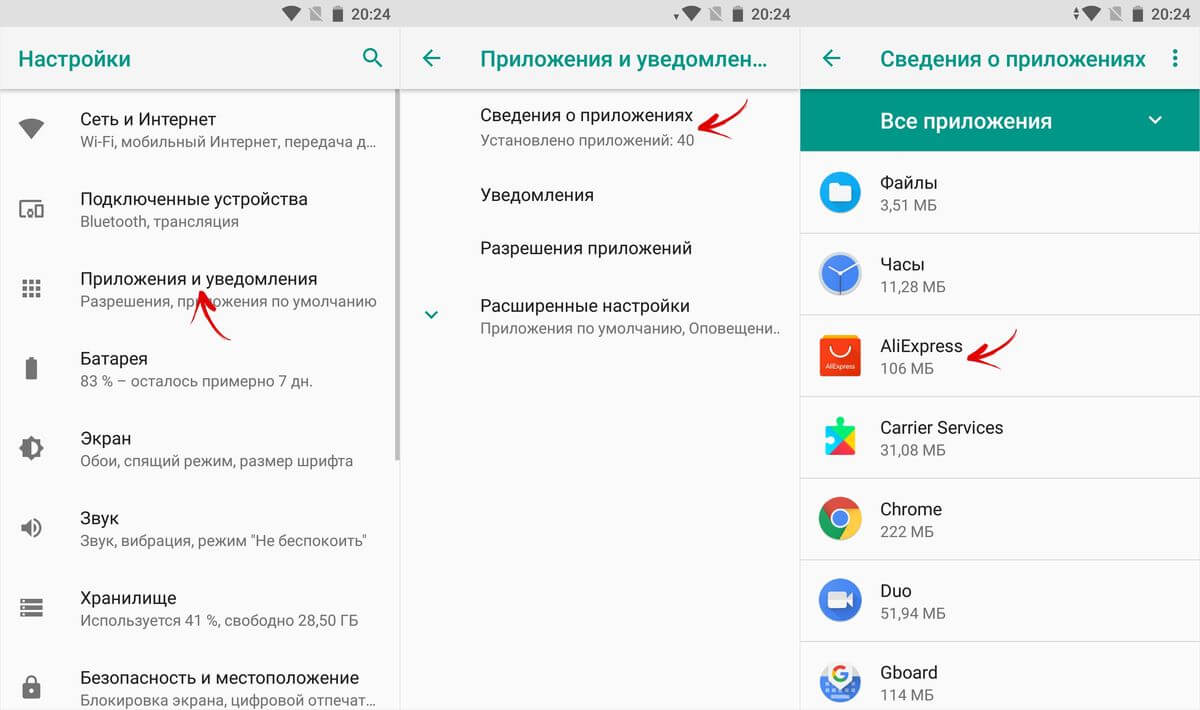
Click "Storage" (may be called "Memory"), then click on the "Change" button and select the SD card.
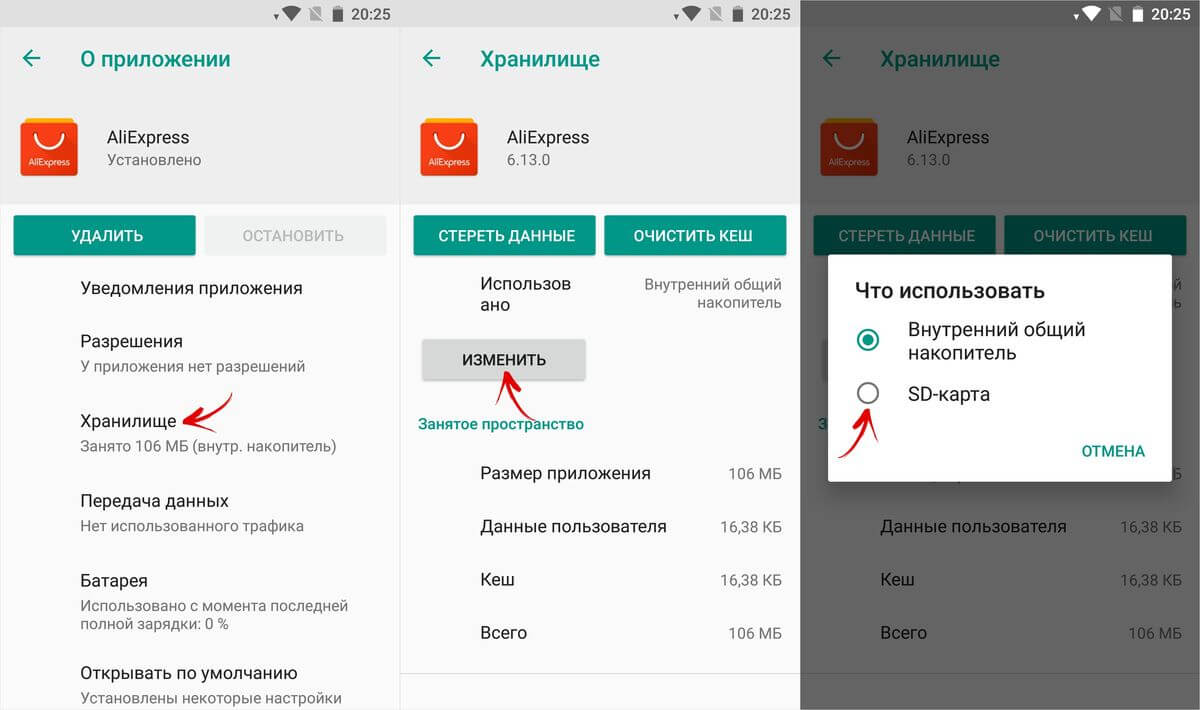
In the window that appears, click “Move” and wait for the transfer to complete.

Formatting a memory card as an internal drive using ADB
If your smartphone has Android 6, 7, 8 or 9 installed, and in the settings menu there is no function for formatting the SD card as internal storage, the manufacturer did not add such an option to the firmware. But users can format the memory card themselves using the utility.
To do this, activate on Android, connect your mobile device to your PC and launch ADB from command line either from Windows PowerShell, if one of the latest builds Windows 10. Enter next command and press Enter (in Windows PowerShell, add ./ before the command).
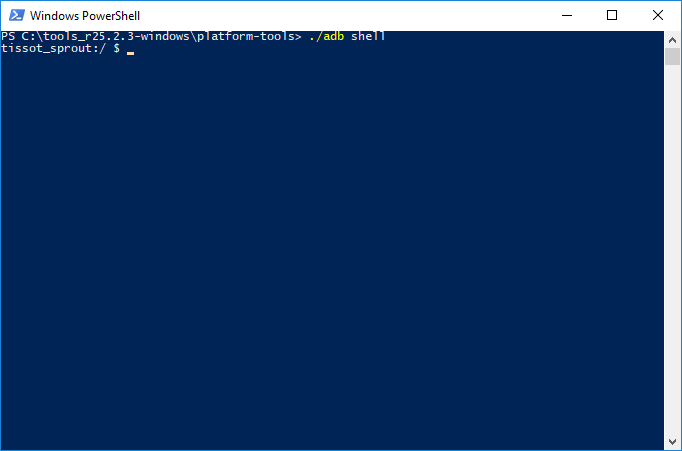
The console will launch and the “$” sign will appear in it. Type the command and click Enter:

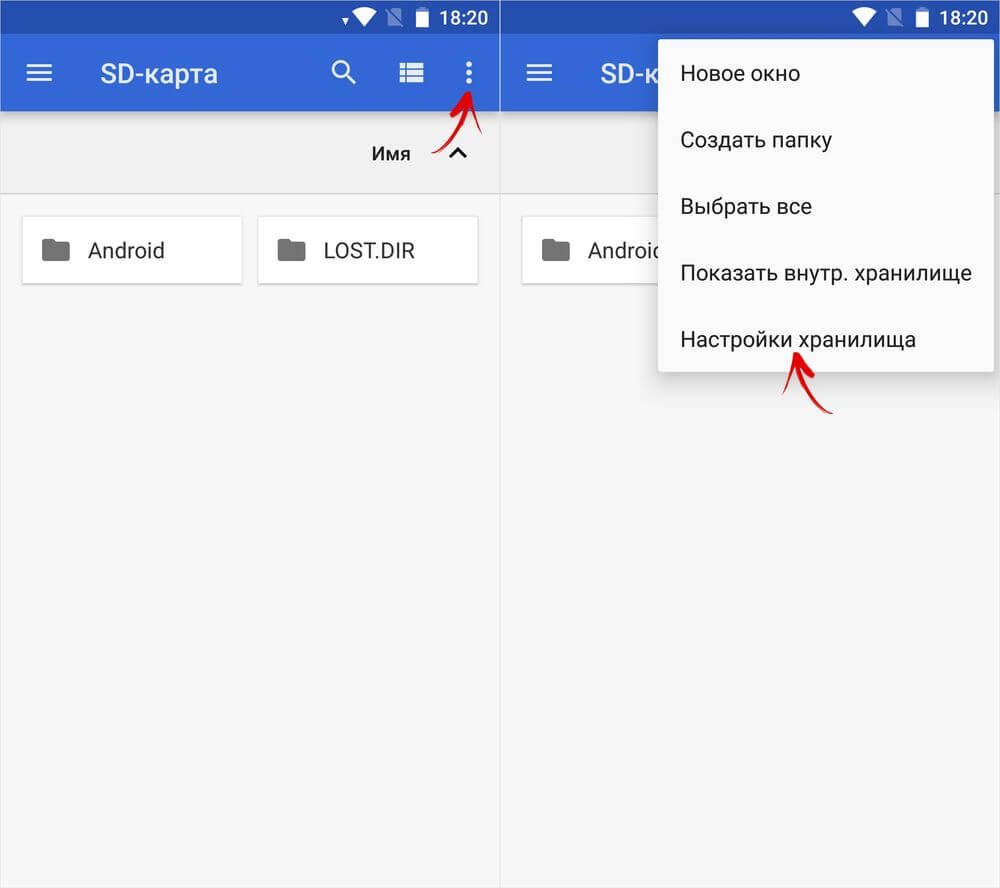
The line below will display the view's SD card ID disk:NNN,NN. Replace NNN,NN to the value of the received identifier and run the command:

Wait for the command to complete. Then go to Settings → Storage and select SD card. Expand the list of options by clicking on the three dots at the top and click “Transfer Data.”

Select "Transfer" and wait for the process to complete. Finally, click “Done.”

How to move multiple apps to SD card in Android 8 Oreo and 9 Pie
To avoid performing the same steps to transfer applications separately, use the AppMgr III (App 2 SD) program, which was described at the beginning of the article. Only on Android 8 Oreo and Android 9 Pie you will have to give AppMgr III a couple of permissions.
Launch the application. A notification will appear that the program needs access to your usage history. Click Allow, select AppMgr III from the list of applications, activate the switch and return to the program. You can also configure access to your usage history by going to “Settings” → “Applications and notifications” → “Advanced settings” → “ Special access» → “Access to usage history”.

Select the games and programs that you want to move to the flash card and click on the image of the folder with the arrow inside. In the "Move to Map" window, click on the red button below.

A message will pop up saying that AppMgr III needs permission to edit. system settings. Click on the switch and you will be taken to settings. Activate the toggle switch and return to the application. The options for this permission are located under Settings → Apps & notifications → Advanced settings → Special access → Change system settings.

You will then be prompted to allow AppMgr III to automatically perform actions without manual confirmation for each application. Click "YES", go to the " Special abilities", select "AppMgr III", switch the toggle switch to the "ON" position and confirm by clicking "OK". Then return to the program.


Application transfer will begin immediately. Just wait for it to complete.

At the end it will show that the applications have been moved to the memory card.
Transfer games to SD card in Android
Most user memory occupies cache installed games. To move it, we will use the FolderMount program, which can mount directories from internal memory to external memory. It requires .
Download FolderMount from Google Play, run and provide Superuser rights.

In the “List of Pairs” tab at the top, click on “+”.

Come up with and enter the name of the folder pair in the first line.

Click on the second one, which will open the built-in file manager. The game cache is located in the “Android/obb” directory, and the application cache in “Android/data”. Go to the folder you want to mount and click on the checkmark.
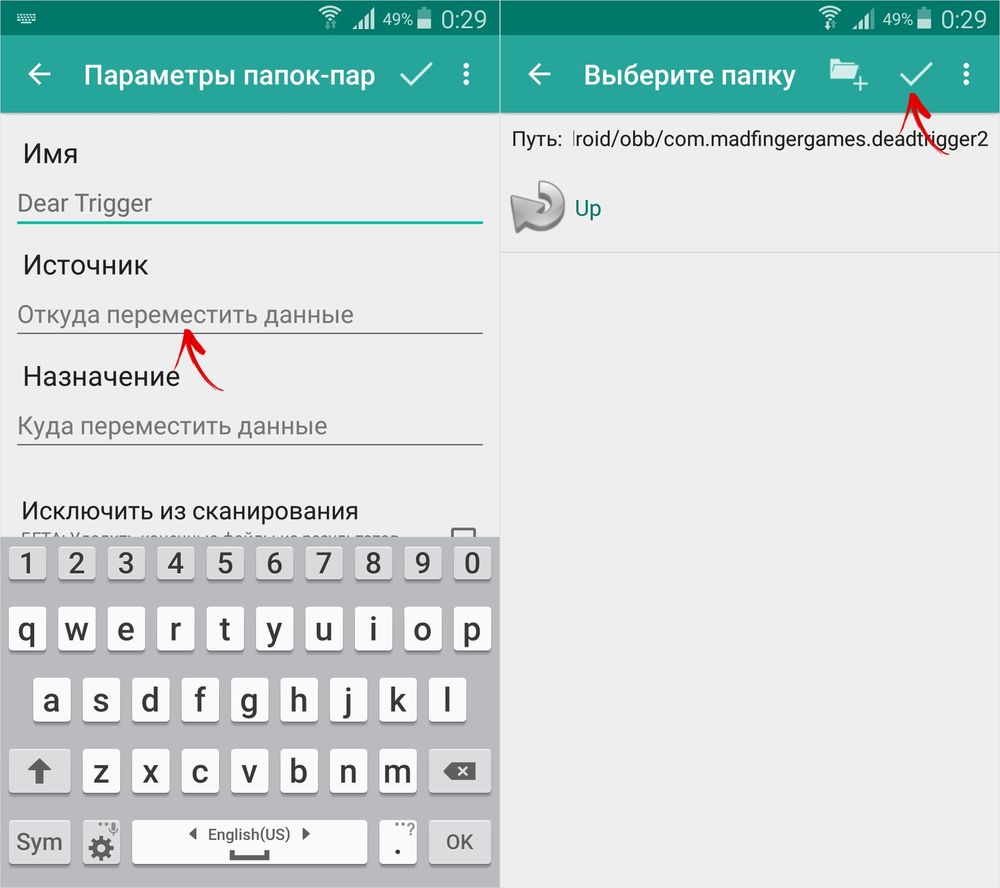
The screen will ask if you want to create the destination folder automatically. Click "YES" if you agree. In this case, FolderMount will copy the path from the internal storage and create the same on the external drive. Click "NO" if you want to manually set the mount end point and select the folder where to move the files.

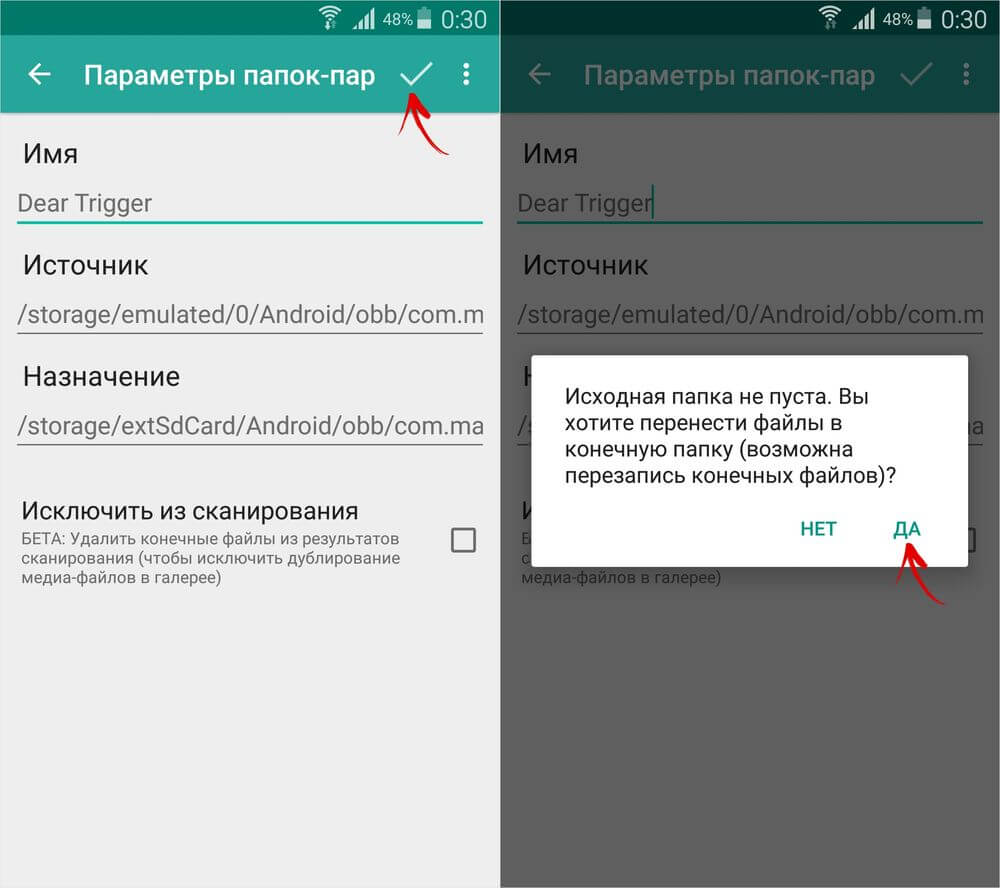
To start copying, click on the checkmark and confirm the transfer by selecting “YES” in the next window.
The process will be displayed in the notification panel.

Once copying is complete, switch the toggle switch in the “List of Pairs” tab to mount.

At the bottom there is a button with a pin image, clicking on which will mount all directories at once.

To move files back from the destination folder to the source folder, first unmount the pairs: to do this, turn off the toggle switch or click on the crossed out pin, then hold your finger on the pair and click on the trash can icon.
How to move apps using Link2SD
Link2SD is a program that can mount application data onto a memory card. In order for it to work, mobile device necessary and create on SD additional section on ext3/ext4 file system. Partitioning a memory card into sections is done in one of the following ways.
(!) Before you create new section, copy all the files located on the SD, as they will be deleted after partitioning the memory card.
Memory card partitioning on Android via TWRP
If installed on your smartphone, partition the SD card through it. To do this, click “Advanced”.

Select "Partition SD card".

Check "Micro SD card" and click "OK".

Select file system ext-partition to be created and specify its size. For example, 2048 MB - this memory will become available for transferring applications and the volume of the SD card will be reduced by that amount. Leave the Swap partition size (paging file) equal to 0.
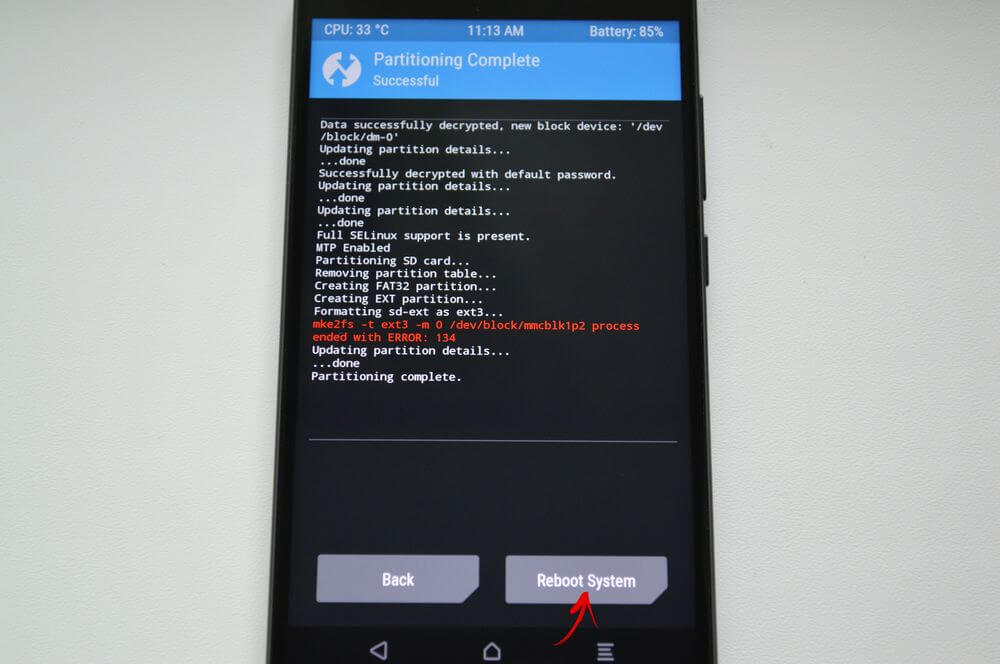
Drag the slider to begin SD marking.

At the end, click “Reboot System” and “Do Not Install” if you do not want to download official application TWRP.

The device will reboot. If you go to “Settings” → “Memory” (or “Storage” in latest versions Android), you will see that the SD size has decreased. The second section “sees” only Link2SD, App 2 SD and similar applications.
Create a hidden partition on SD using AParted
The second way to split a memory card into 2 partitions if you have Superuser rights, but no TWRP:
Go to “Settings” → “Memory”, click “Disconnect memory card” and confirm the action.

Launch AParted and grant root access.

There are 2 bars in the Create tab: the top one will display the new partition, and the bottom one shows the current SD size and its file system.

Click "ADD" to create the first partition. It will be new size Memory cards where you can save photos, music, videos and other files. Leave the checkbox next to “Format”, the fat32 file system and select the size with the slider. To set it more precisely, click on the number next to MB, enter the desired value and click OK.


Click “ADD” again and create a second hidden partition to which games and applications will be transferred. Pull the slider all the way, leave “Format” checked and select the ext file system.

Click “APPLY” and select “OK” in the warning window that appears.

The SD partitioning process will start.

When completed, the second line will display 2 sections.

Now connect the memory card through “Settings” if this did not happen automatically. The new SD size should be displayed there.
Working with Link2SD
Open Link2SD and grant the program Superuser rights.

A window will immediately appear asking you to select a file system. hidden section SD cards. Check suitable version ext and click OK. If the window does not appear, expand the menu on the left and click “Recreate mount script.”


Then click "Restart device" to mount the second partition of the memory card. The device will reboot.

After Android launcher go to Link2SD, click on the 3 dots in the top right corner and select "Multiple".

Check required applications and reopen the menu. Click "Send".

There is also a "Move to SD card" feature that moves apps standard method Android, inaccessible to users without Link2SD.

If you need to move one game or program, find it in the list, click on it and select “Send” or “Move to SD card”.


With the development of technology, content is becoming more and more voluminous, which leads to a constant lack of free space on our devices. Fortunately, many smartphones have a special slot for a memory card, with which you can significantly increase the amount of free memory on your phone. Some users refuse to purchase SD cards and hope that the internal memory of the device is enough for them. They often make mistakes and still purchase microSD, which is perhaps difficult to do without. As a result, there is a need to move all the data accumulated over months (and possibly years) to a memory card. This is exactly what will be discussed further. In this article, we will take a closer look at how to transfer applications from internal memory to an SD memory card in Android. Let's figure it out. Go.
Let's look at popular utilities
The ability to transfer applications, unfortunately, is not available on all versions of the Android operating system. Therefore, only owners of Android above 2.2 Froyo (inclusive) and below 4.4 KitKat can perform this operation. Also, this cannot be done with every application. It is necessary that the developers provide such an opportunity, otherwise you will not succeed.
Now let's move on directly to how this is done. The first thing you need to do is open “Settings” and go to “Applications”. Select the utility or game you would like to move. If the program is installed in the main memory, you can move it by clicking the “Move to SD card” button. In this way, one by one, transfer each available program.
![]()
You must click the corresponding button in the application properties
If there are a lot of applications on your smartphone, this method can be tedious, because you will have to open each utility in turn and add it separately. So, this process can take you the whole day. Fortunately, there are more comfortable ways to solve this problem.
For example, use special utility, which is called FolderMount. With its help, it will be possible to move even those programs that are not available for transfer in the standard way.

For correct operation applications do not forget about root rights
To install and use FolderMount, you must be rooted. Then download and install this utility on your smartphone. Next, you will need to grant the program root rights upon its request. Through the "Application Analyzer" you can see a list of all games and programs that are available for transfer. FolderMount will then prompt you to create a folder on the SD card that matches the internal memory folder. Agree to this action to begin the data movement process. All this may take some time. Depends on the size of the folder being moved. When FolderMount completes the operation, tap on the pin icon located next to the folder. As soon as she becomes Green colour, you can close FolderMount, as this indicates that the partition has been mounted.

Continue to follow the instructions
The application cache is a very important component and often takes up even more free space than the program itself. Luckily, the cache can also be moved to a memory card using FolderMount. After launching the application, tap on the “+” icon located at the top right. In the input field, write the name of the game or program whose cache you want to transfer. Then select the cache folder, which you will find along the path “SD/Andoid/obb/utility name”. Next, in the “Destination” section, select the folder on the SD card where the cache will be moved. After filling out all the items, tap on the pin icon, as in the previous case, and wait until it turns green.

Usually the cache size is quite large, so you will need to wait
The undoubted advantage of this utility is that it is available for all versions of Android. In some cases you may need full version FolderMount. However, do not rush to get upset, it costs only one dollar. Agree, this is very little money for a comfortable and complete expansion of the memory of your phone.
In addition to FolderMount, there are other programs that allow you to transfer games and utilities from internal memory to microSD. One such program is Link2SD. A very easy to use, convenient utility that also copes with the task well.

The application displays information on the size of programs in the list and card of each of them
Another great one software- AppMgrIII (App 2 SD). It is also free and perfectly solves the problem of data transfer. In addition, using AppMgr you can clear the cache and delete junk files from a smartphone. In AppMgrIII, all programs on your smartphone are divided into groups:
- On Phone. Those that are stored in the internal memory and can be transferred to microSD.
- On SD Card. Those that are already stored in external memory.
- Phone Only. Here are those applications that cannot be moved.

First of all, pay attention to the “Movable” tab (On Phone, Movable) and the cache size
If you want to immediately install games on a memory card, then, unfortunately, this will not work. In any case, the game will be installed on the main memory, and from there it will have to be transferred to the SD card. This function is only available through the Move2SDEnabler utility.
These are the ways to move games and applications from the main memory of a smartphone to external memory. As you can see, this is done quite simply and quickly. Working with microSD is much more convenient and enjoyable, so feel free to copy all your data there. Write in the comments whether this article helped you understand the issue and share your experience of carrying out similar operations with other users.
Every Android OS user sooner or later faces a problem when the internal memory of the phone is not enough, and there is no place to save all the applications from Google Play or photos! Moreover, the user often finds out about this only when there really is more, and he has to think about what to delete in order to free up several tens of MB for the next application or photo.
In fact, all programs, games, photos can be stored on a removable SD card (2, 4, 16 GB and others) to save space in the device’s main memory. The Android system is designed in such a way that all downloads are saved in the smartphone’s memory by default, which is why it gets clogged up quickly.
Install (transfer) applications to the SD memory card
To transfer applications, you must have an Android operating system of at least version 2.2 installed. It was installed by default in devices purchased back in 2010-2011. The ability to transfer also depends on the application developer. Some companies simply forget to build into their programs a function for transferring programs and games, while others do it on purpose!
Transferring applications to an SD card in Android 2.2 and higher
And so, to install an application on an Android SD card, you must first download it and then move it to the card. To do this you need to do the following::
- Go to the settings of the Android operating system.
- Next, go to the “Applications” tab.
- To view the list of programs on the SD card and phone, click on the “SD card” item. It will be here full list applications that can be transferred to removable card from the internal memory of your device. Moreover, under the product name the occupied space in megabytes or gigabytes will be displayed.
- Select the application you want to transfer to the SD card and click on it once.
- A tab will open with complete information about the product. There will also be a tab “Move to SD card”. Click it and wait for the process to complete. The transfer time directly depends on the characteristics of your smartphone and the weight of the application itself.
It is also worth paying attention to the fact that the program will not be completely transferred to removable media, because some system files still remain in the internal memory of your mobile phone.
Transferring Apps to SD Card in Android 4.4 KitKat
In the operating room Android system 4.4.2 KitKat and higher, there are some restrictions on transferring applications to the SD card. As Google explains, these are precautionary measures. But, as a rule, the phone’s system memory is not enough, and you don’t want to delete programs, so users still need some way to install the application on the Android SD card. How to enter in this case?
There is a solution, and several different options!
- First you need to check whether the app you want transfers to the card or not. Many developers have learned to bypass this protection and immediately released updates so that users can special problems transfer data from phone to flash drive.
- If you have a phone Sony brands, then you don’t have to worry about the built-in Android protection 4.4.2. For many models, specialized algorithms were built in to allow applications to be transferred to the card and back without any problems.
- Perhaps the methods listed above did not help you, but you still shouldn’t despair! Was developed special utility and added to the Google Play service. Its functionality allows you to transfer programs and games to the device’s SD card. Read the description below.
Special programs for Android
The developers came up with special applications, which in automatic mode solve this problem for many novice users.
Here are the most convenient and quite popular:
SDFix Software: KitKat Writable MicroSD
SDFix: KitKat Writable MicroSD is free on Google Play. On this moment has about 1-5 million downloads. The only condition is that you have full root rights.
To install it correctly, follow the instructions:
- Open the Google Play service and enter the name of the program.
- Download the app on your smartphone and open it.
- A tab with product information will appear. Click Continue.
- As soon as the program asks for root rights, agree.
- Your phone will reboot, after which you can easily transfer programs and games to the SD card in the standard way!
App 2 SD program
 A simply colossal number of programs have been developed for Android that allow you to work with applications, display complete statistics about each of them, delete unused ones, clear the cache and much more. One of the most convenient utilities in this category it is AppMgr III (App 2 SD). Allows you to transfer programs with cache(by the way, here are the instructions), view full statistics, remove several programs at once and much more!
This article will tell you how to transfer apps to the card Android memory. I can say with confidence that this question asks a large number of users of Android devices. And most often these are device users internal volume whose memory is 4–8 gigabytes. To help them, there are many ways to transfer programs to SD.
Using standard tools
As mentioned above, in devices with a small amount of memory, approximately 1 GB is occupied by the Android system itself, about 2 gigabytes are allocated for multimedia files, and only 1 GB is allocated for installing programs, which is, of course, very little today. Now there are games on Google Play that are more than two gigabytes in size, and no matter how powerful your device is: it may happen that you will not be able to install them due to the small amount of space allocated for the software. Therefore, I will tell you how you can save applications to an Android memory card.
This option does not require any intervention third party programs, but is performed using standard means of the system itself. The fact is that it can only partially solve the problem on some devices.
In this case, when transferring applications to an SD card, in practice we get a transfer to memory for multimedia, that is, to the second half of the same device, but not to the flash drive itself.
This can often be seen on gadgets of Chinese origin.
Execution order
Note: Not all programs can be moved, but only those whose developers have provided this possibility.
Also, not absolutely everything is moved to SD; however, some files remain in their original location, and large files are moved to SD.
We use AppMgr III
I also want to tell you how to transfer applications to a memory card automatically on Android. To do this, I would like to recommend a software called AppMgr III, which is available for free on Google Play. It has a very simple interface that is immediately understandable to everyone. This product only slightly complements the standard transfer functionality, and when installing a new game, for example, it will warn you that it can be installed on SD: you just have to agree or not.
How to use AppMgr III
After launching this program, your device will immediately display Android applications that can be moved to the memory card. To perform this task, click on the icon with the name and confirm the action.
You can also select the “On the SD card” tab, where you will see the programs that have already been moved, or the “In the phone” tab to display programs that cannot be transferred to the Android memory card.
How to get ROOT rights: Video
Using FolderMount
There is also another option for transferring applications to an Android memory card: it requires ROOT rights, but is very effective. With this method, it is not the application itself that is transferred to the Android SD card, but its cache and the largest files. The procedure works with absolutely all games, since they most often have a cache. I would like to note that you can move cache applications not only to an Android memory card, but to any drive connected to it, to a USB flash drive or HDD hard drive.
So, in order to transfer the application cache on Android, for example, to a memory card, follow these steps:
After this, the application cache will be physically moved to the memory card, and the device itself will “think” that that folder is located along the path Android/data or Android/obb.
This is the entire manual on how to transfer applications to a memory card on Android. We hope you can handle this without difficulty.
Transferring applications to a memory card in Android: Video
Team V-ANDROIDE 06.10.2016 22:12
Hello. I highly recommend not opening root rights well, because it is fraught with consequences. Often, phones start to glitch terribly and then you simply won’t have any problems. It gets to the point where you have to reflash the phone. So, think again before you open full access. Believe my experience, it is better not to open Root. Personally, I have a Samsung S4 and I don’t even try to open root rights, because I know what it can mean. Regarding your question, I don’t remember all the models anymore, how the root opens. But, I know that on Samsung the developers (manufacturer) closed root rights completely, and in order to open root you need to install a new custom firmware with already open rights. This applies to phone and tablet models released in 2013 and newer models. Most likely, you will not be able to open the root without a computer.
Team V-ANDROIDE 06.10.2016 22:12
Hello. I can not know. Maybe the flash drive is formatted to some kind of file system that the phone does not support. Maybe there is not enough space on the memory card. There might be some kind of glitch. The application may not be able to be migrated. Most likely there is some kind of system glitch. Try formatting the memory card at a low level using a PC (this will require HDD program low level format), then again format the memory card on the PC to the FAT32 file system. Then you insert it into the phone and format it again in the phone using Android. To transfer applications, try using Clean program Master. You can download the program for free on the Play Market.
Team V-ANDROIDE 10/19/2016 20:08
Hello. I know - opening root rights gives Free access all applications, including malicious ones, to system files and records. Here is one of installed applications or the virus may simply damage records, change the system configuration, steal personal data and transfer it to the owner, and so on. In addition, many phones begin to glitch terribly due to open root rights. Honestly, I don't see the point in opening them. Phones and tablets work just fine. Route does absolutely nothing, it only makes it worse, because because of it everything starts to glitch and there are serious risks of picking up a virus or malware that will simply disable your device. Return everything to its original state and DO NOT OPEN Root at all. Forget that this is even possible. Believe my experience, you should not open the root.
Vova Stadnitsky 12/22/2015 19:28
I don’t have the function of moving to an SD card at all, you can only move to system memory and into the phone's memory. I tried various programs, but they were moved to the system and phone memory. That is, we are not talking about sd at all, as if sd is not installed, although all the files that were there are played. Help me solve the problem, please
Team V-ANDROIDE 12/30/2015 15:53
Hello. Apparently, your device simply does not support such functions. In general, the most best app- This Clean Master. But, you need to buy it in order to use the program fully. IN paid version There is also transfer of files to an SD card. Other methods are described in the article. If you can’t do it, then I can’t tell you other ways, since I don’t know myself.
Timur 01/19/2016 07:26
A small number of phones have a bug in the firmware; there is no possibility of transferring to an SD card. (Example: Lenovo A850) in this phone factory firmware with a jamb that simply blocks the possibility of transfer.
Solution to the problem: we say goodbye to the warranty on the phone and flash a new firmware. (Please note, with some phones, flashing the firmware can become a quiet horror, because it causes difficulties because there are a large number of subtleties that may not be described on the forums. As a result, you can just kill your phone with your attempts to reflash)
Gutts 20.03.2016 13:57
I installed root rights on the Lenovo A526, checked it with a checker, the root was installed, but I still can’t move applications. The app manager writes that the device supposedly does not support this function. I also tried to swap the memory, but it stops seeing the flash drive altogether. what to do?
Madya 09.24.2016 14:16
Hello, help me please! I installed root rights through recovery, and then I saw that the applications on the SD card were erased. I think ok, I'll install it again. In the end, I downloaded them, installed them, wanted to transfer them to the SD card, but it says “could not move the application.” I don’t know what to do. I tried absolutely everything, all applications, but nothing helps. I don’t want to remove root rights, perhaps you know what the problem is?
Hello. Who did you try to switch places? For transfer root applications no need to open. To transfer applications to a memory card, just install Clean app Master. This application has a lot of useful functions, among which the most useful feature– clearing memory of garbage, as well as transferring applications to a memory card. It's quite simple. Open the application, go to the “Tools” section (there is a corresponding button at the bottom center). ;Next go to the “Application Manager” section, and then open the “Move” tab. After this, check the boxes of the applications that you want to transfer to the SD card and confirm the operation. Next, I think you’ll figure it out, it’s all very simple.
Many owners modern gadgets They are trying with all their might to expand the memory in their device. Unfortunately, 4-8 GB of internal memory is not enough for users to comfortable work. An SD card allows you to expand these boundaries. You can transfer music, video or text documents. But what can you do with games? How to move applications to a memory card? Now there are many ways to help you do this.
Standard means
As we have already found out, built-in memory plays an important role in using the device. Typically, about 1 gigabyte is allocated for operating system, 2 GB - under multimedia files. So what remains? Only 1 gigabyte is allocated for various applications. Of course, by modern standards this is very little. Nowadays there are Android applications that take up more than 2 GB. It doesn't matter how powerful you are mobile phone, because without memory you will not be able to install normal applications. It is because of this that many users are looking for a way out of this situation. Let's look at how to use standard means you can move applications to the memory card of Samsung, Asus and others famous brands. Unfortunately, the owners Chinese phones this method will not work.

The point is that in Chinese models developers separate internal memory For general use and memory for multimedia. When transferring, the files will simply move to the second half.
For more expensive models The developers have provided the ability to transfer applications to an external drive. This method does not require any third party utilities. If your phone supports this feature, then you can easily move necessary programs. How to move applications to an Android memory card?
First, let's go to the settings of your device.
Go to the “Applications” item.
In the list, find the application that needs to be moved and click on it.
In the new window, click on the “Move to USB drive” button.

Unfortunately, not all programs can be moved. If the developers have provided such an option, then you will move the application in a few minutes. You also need to remember that not all files are moved to the SD card. Only large files are transferred, while others that are responsible for launching the application remain on the internal memory.
Additional software
How to move an application to a Lenovo memory card? This can be done automatically using additional programs. The most common is App Mgr III. This utility is available to everyone. It's free and you can download it from Google Play. The program is quite simple, anyone can understand the functionality. When installing new program it will warn you that you can install the game on the SD card. Agree with it and wait for the game to install.
Using the App Mgr III program
How can I move applications to a memory card using additional software? If the game or program is already installed on the device, then you should follow the instructions to transfer the utility.

1. Open required application and select “Moveable” from the top. This will show you all the games that can be moved to the SD card. You can also view games and programs that have already been moved by selecting “On SD card”, and utilities that cannot be transferred.
3. Confirm the selected actions and wait for the set goal to be achieved.
Using FolderMount
FolderMount is a special program that performs its functions perfectly. It will help you move the application. Using this program, the Android memory card will be used as the main memory, since it allows you to move almost all files to external storage. Unfortunately, FolderMount has a significant drawback: it requires ROOT rights. If you get superuser rights, then this utility will help you a lot. It transfers not only game files, but also their cache. It's great for gaming. You can also transfer applications not only to an SD card, but also to any other external storage device.

FolderMount operation
Transferring files using this utility is quite simple, but some users may encounter certain problems. How to move applications to a memory card?
Download the program from Google Play and install it.
Click on the button in the form of a plus sign, which is located in the upper right corner.
In the new window, first select “Name” and write the name of the game you want to move.
After this, select “Destination” where you want to move the game.
Confirm the action by clicking on the checkmark in the upper right corner. We wait for the application to move to the memory card. Then you can move on to other games.
Conclusion
How to move applications to a memory card? As you may have noticed, there is nothing complicated about this. If using standard tools you were unable to move the game or program, then you should install additional software. Of course, these programs will not be able to transfer all applications to the SD card, but this way you will still free up memory. The most effective utility is FolderMount, but it requires ROOT rights. When you get superuser rights, you take a risk, but it greatly expands the functionality of the phone as a whole and gives you many new features.


