How to open headphones. Quick and easy repair of broken headphones at home: instructions and tips
Are your favorite headphones out of order? If you have a little free time and a desire to save money on buying a new headset, you can repair the headphones yourself. Moreover, the breakdown is often not serious enough to immediately go to the store.
As a rule, if you have the slightest idea about working with a soldering iron, solder, wire cutters and glue, then everything should work out.
If you still have the instructions for your headphones, read them before starting work. It may indicate the sequence of actions in case of a malfunction similar to yours.
- cable break;
- plug malfunction;
- problems with the microphone;
- speaker failure;
- breakdowns associated with the volume control;
- malfunction of headphone arms;
- problems with the microphone mounts (boom).
Broken wires
This is probably the most common headphone failure. To repair them, we will need the following tools:
- soldering iron with solder;
- sharp knife and wire cutters;
- heat-resistant glue and tubes;
- high strength threads.
First you need to determine exactly where the cable broke. After all, it often happens that the top rubber ball does not have any visual evidence of rupture. To search, you may have to connect the headphones to your phone or computer, and then carefully bend the wire until sound appears.
Having determined the place where the cable broke, cut it at a distance of two to three centimeters on each side of the likely problem point. Now you need to remove the insulating layer and “tin” the wires.
Use any of the available fluxes to prepare the cable surface for soldering. Place it on a wooden board, press it down with a heated soldering iron and make movements like when cleaning a wire from varnish, for example.
After tinning, put heat-resistant tubes on the electrical cable and solder, paying attention to the colors of the wires. Now, to improve the connection, fold them in a Z shape and secure with threads.
If desired, you can decorate the cable using heat-resistant glue. It must be applied carefully with a soldering iron. This will prevent the threads from unwinding and will make the junction area aesthetically attractive.
 Problems with the plug may be due to careless use of equipment
 Plug faults
In most cases, you will have to first disassemble the plug and then reassemble it. Its problems can be divided into two groups: mechanical and non-mechanical, associated with a cable break directly at the bend near the plug.
The disassembly process is similar for almost all headphones and will involve carefully cutting the plastic along the part in order to get to the wires.
If the last link of the plug breaks and it remains in the sound supply device, remove the remaining part of the part with tweezers or an awl and go to the store for a new plug, because it is no longer possible to repair it.
When turning the first link of the part around its body, you will notice that the sound becomes as if it was coming from under water, and the volume has decreased. You can repair the plug if you solder the contacts between the link and the petal so that they do not move relative to each other.
If the cable breaks at the base of the part, you will need to cut this wire 2-3 cm above the point of breakage and solder it back, taking into account color scheme electrical cords included in the plug. If it is difficult to determine exactly which wire to solder where, use an ammeter to measure the resistance between the cords.
Microphone problems
As a rule, electret capsule microphones with amplifiers are installed in headsets. This means that during repairs you need to carefully monitor the polarity; you cannot clean their holes mechanically and prevent long-term temperature increases. The latter means that you need to solder quickly, but at the same time very carefully.
To ensure the highest quality soldering process, use organic flux. And check whether the microphone is working without special devices you can if you replace it with another one or connect it to another device that probably works.
Otherwise you will need an oscilloscope that is active and in working order. acoustic system or good knowledge electrophysics to independently assemble an inverting amplifier circuit.
Speaker failure
The speaker winding burns out if the power supplied to it is exceeded. The severity of the breakdown is determined using an ammeter or multimeter. The resistance of the windings of working speakers will be almost the same (plus or minus about 10%) and varies in the range of 16–100 ohms.
 Wheezing in headphones is usually caused by problems with the membrane or winding
 If the speaker produces sound, but wheezing is mixed in with it, this indicates a problem with the winding or membrane. The winding becomes unstuck from the membrane due to a strong impact, displacement of the magnet, or exceeding the maximum permissible power. It happens that the coil moves away from the membrane due to mechanical damage.
For repairs you will need superglue, a toothpick (sharp match) and accuracy. Be careful, because after gluing it takes time for the parts to take the correct position.
Problems with the volume control
The main reason for the failure of the volume control is accumulation large quantity dust on the resistive layer, which leads to bad contact with a slider that is activated by a regulator. The malfunction is indicated by a crackling sound or a complete loss of signal in the headset.
To eliminate damage, you need to apply graphite lubricant or technical petroleum jelly to the surface of the resistive layer.
Repairing volume control adjustment (video)
Malfunctions of the headphone arms or microphone boom
A broken headphone arm is fairly easy to repair using a thin piece of metal, small screws, epoxy glue and a drill.
In the case of repairing a microphone boom, you need to understand that it is difficult to recreate the full functionality, but fixing it in a stationary position will not be difficult. You will need a wire with a diameter of 0.7–0.8 mm, a drill and heat-resistant glue. Please note that when gluing, you can wet your hands with water, and then you will be able to give new part the required form.
Since the store sells great amount headphones from various manufacturers, you may encounter breakdowns not described above. The main thing is not to panic, but to think about what you can do with your own hands in this situation.
Many people who regularly use MP3 players and mobile phones, to listen to music through headphones, you probably found yourself in a situation where the music suddenly stopped playing in one of the headphones or both. What could be the problem? 90%, this is a break in one of the wires of the headphone wire. Very often, a break occurs near the plug, that is, in the place where the wire is often bent during operation. There is something on this topic, but I decided to add something on my own.
Photo - in-ear headphones
were purchased from me quality headphones- liners that were mercilessly exploited) over the past 2 - 3 years. About 2 months ago, the sound disappeared from one of the headphones.

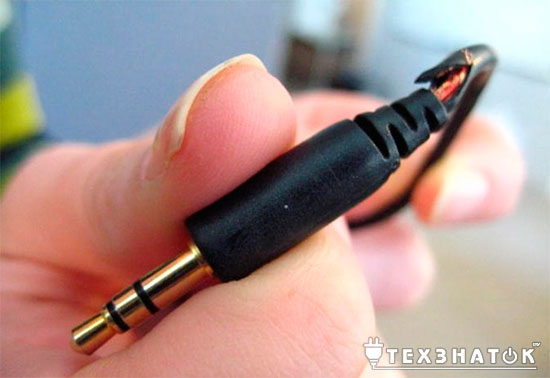
Plastic plug
You can determine the location of the break by turning on the player and bending the headphone wire, slowly moving from the plug to the headphones, as soon as sound appears, then there is a break in this place. Thus, the location of the damage on the wire was determined, and it turned out, as in the most common case, near the plug.

Metal headphone plug
Plug Jack 3.5 You can buy it at any radio store, there is a choice for every taste, both in a plastic case, cheap, and in an all-metal case, more expensive.

The following figure shows the pinout of the plug Jack 3.5 :

It is advisable only if the headphones are of high quality, with relatively thick veins. There is no point in repairing cheap headphones with thin wiring; they will not last long after repair. You can determine the cross-section of the veins by feeling the wires with your fingers. If the wire bends easily and is very soft, most likely there are thin wires, and most of the wire is occupied by plastic insulation. There are 3 or 4 wires in the wire, one or two of them connected together, this is the minus or common wire, and one wire for the left and right channels. Sometimes, if there are pets in the house, in particular cats, which, as you know, love to test all the wires, the wires can be bitten. In this case, the part of the wire that was damaged is bitten off with a small margin, stripped and tested with a multimeter in audio testing mode. If the wire goes further and the length allows, we connect it by soldering and splice the wires. The junction of the wires is insulated with pieces of electrical tape or adhesive tape, and then a piece of heat shrink is put on this place.

Heat shrinkage most often shrinks by 2 times its diameter after heating. In order to seat it, you need to warm it up with a lighter, or if available soldering iron, you can use it. If the break was near the earphone, you can open its case with a knife, cut the wire, ring, make sure that the break has been repaired, and solder again. After soldering, the earphone can be easily assembled using a second of glue.

Also, by setting the multimeter to the 200 Ohm resistance measurement mode, you can ring the headphones through the plug. That is, we call the resistance of the wires, together with the soldered headphone speakers, when we touch the plug contacts with the multimeter probes. The test resistance on the multimeter screen can vary from 8 to 30 or more ohms. This means that the channel is working and there will be sound in the headphone. If there is one on the multimeter screen, then there is a break in the wire. When assembling the earphone, you must remember to tie the cable in a knot; this knot will prevent the wire from being pulled out from the earphone when pulled. The following figure shows the connection diagram:

This picture shows the connection of the wires to the plug and speakers. The speaker itself, as everyone knows, consists of a permanent magnet and a membrane with a speaker coil glued to it. The ends of the coil are soldered to the contacts on the speaker. Let me remind you that the coil is tested with a multimeter in ohmmeter mode, this means that when we touch the probes of the multimeter to the plug contacts, we measure its resistance, or in other words, we make sure that the plug-wire-earphone circuit is closed, and from the headphones when connected to the player there will be sound. In the same way, if you have a multimeter, but no signal source (player or phone), you can check any headphones for functionality. The author of the instructions is AKV.
It is known that the breakage of the plug at the end of the wire is the most common malfunction of headphones.
Due to frequent kinks, strong jerks and other mechanical loads, thin wires break or tear. In this case, as a rule, one ear stops working or, as in my case, both at once.
Sometimes the common wire breaks, in which case the sound is distorted beyond recognition: high and mid frequencies almost completely disappear. This happens because the right and left amplifiers of the phone/player are turned on in antiphase and their output signals almost completely cancel each other out.
It also happens that the stereo effect simply disappears.
Often there is no sound in the ears, but the microphone works as if nothing had happened. However, if the microphone wire breaks, the control buttons on the headset cord stop working along with the microphone.
Most often, the cause of any described malfunction is a broken wire in the immediate vicinity of the plug. 
Sometimes damage to the wire is visible to the naked eye, but most often it is hidden under the insulation.
How to fix headphones at home if the wire comes off the plug
Now I will tell you how to fix vacuum earbud headphones with your own hands if the wire has come off the plug.
I will show the repair process using headphones as an example. Monster Beats by dr Dre, which I got with HTC phone Sensation XE. They served faithfully for almost 4 years until the plug finally broke.
The plug in these headphones is a regular mini-jack (3.5 mm) with four contacts - right ear, left ear, microphone and general. By the way, what’s interesting is that this headset has buttons so that you can rewind songs forward and backward, but there are no buttons for them special contacts on the connector. All the buttons somehow miraculously use the same microphone contact.
In short, now I’ll try to repair these headphones at home, and if something goes wrong, screw it! - I'll go buy new ones. Moreover, the choice today is simply huge. And especially since I’m far from an audiophile and any kind will suit me, as long as they’re comfortable.
Initially, the headphones looked like this: 
Headphones with a microphone and control buttons, so the plug has 4 contacts and 5 wires inside. The headset connector is, of course, non-separable. 
As I already said, this method Repair is only suitable if the problem is in the connector - one earphone, right or left ear, microphone does not work, buttons are not pressed, the sound disappears if you move the wire at the plug, etc. and so on.
So, if you are firmly convinced that the headphone plug really needs to be replaced, move on.
How to fix headphones if one ear (or both) is not working
In order for us to get the highest quality and super-creative plug that no one else has, we will need:
- Two .38 caliber shells. Suitable for Makarov pistol or similar. For example, I took brass sleeves for trauma (AKBS 9mm P.A.)
- Drill with drill bits (3, 3.5, 7 and 9.5mm)
- Hacksaw for metal
- Epoxy adhesive
- Syringe for 5 cubes
- Small vise
- Sandpaper
- Soldering iron with a sharp tip (solder, flux and an aspirin tablet are welcome)
- A small board, approximately 30x30 mm and about 20 mm thick
We will make an L-shaped plug, because... it is better than straight (more reliable and more compact). So, let's go.
Step 1
To begin with, we’ll make a little equipment to make it easier to work with the sleeves, so that you can safely clamp them in a vice without denting or scratching them. We take our piece of wood and drill a hole in it with a 9.5 mm drill, then make a cut with a hacksaw.
You should get something like this: 
Step 2
Now we can process our sleeves without fear of spoiling their chic appearance: 
Step 3
Since I had spent cartridges, there were dents on the primers from the firing pin. But we need everything to be beautiful, so we knock out both capsules using an awl, a hammer and straight hands: 
Then we straighten one of them with light blows from the inside using something suitable (I took the shank from a broken drill of a suitable diameter).
To make it even more beautiful, you can sand it a little more with sandpaper: 
Then we press the beautiful and even capsule into its original place: 
If your cartridges are brand new, unfired, then knock out only the primer from one of them (you can throw it away immediately, it won’t be needed). We do not touch the second sleeve for now.
Step 4
Then we clamp the sleeve without primer in a vice and drill out the bottom from the inside with a 7 mm drill. You need to drill in such a way as to make the bottom of the sleeve as thin as possible. Those. the drill should come almost close to the hole from under the capsule (I left about 0.5 mm of margin).
Then carefully cut off the bottom to make a puck like this: 
Step 5
Now we take our sleeve with a primer and shorten it to 13 mm: 
We carefully process the edges with sandpaper to obtain an even cut that is strictly perpendicular to the axis of the sleeve.
As a result, the two halves should fit perfectly into each other: 
Step 6
Now is the time to deal with the old plug and wires.
To begin with, very carefully, using a sharp knife, unscrew the old connector to remove all excess and leave only the plug itself with four contacts and soldered wires: 

We remember, or better yet write down, where which wire was soldered. My HTC headphones (with microphone) had the following pinout: 
Step 7
We unsolder the old wires from the connector, strip the cable, tin the ends and shrink a piece of heat shrink (diameter 2.5 mm, length 21 mm).
To service wires in varnish insulation, it would be nice to take an aspirin tablet, but I didn’t have one, so I made do with regular rosin. If you work with aspirin, then know that the vapors of this nasty thing are terribly poisonous. You have been warned. 

Step 8
Drill a hole of suitable diameter in the wall of the sleeve. In my case, a 3 mm hole turned out to be ideal: 
Step 9
We thread the cable through the hole and solder the headphone and microphone wires (in strict accordance with the pinout!): 
Step 10
 Well final stage: Using a syringe, measure out 0.5 ml of hardener and 5 ml of epoxy resin. Mix the ingredients together thoroughly.
Then, to expel all air bubbles, heat the mixture in a water bath to 80 degrees.
We fill our sleeve with the resulting composition to the brim, put everything in its place and, with the help of ingenuity and improvised devices, fix it all for at least 12 hours (or better yet for a day): 
Last step
When everything hardens, we take the structure out into the light of day and receive aesthetic pleasure from the work done.
What could be more enjoyable than fixing your broken phone headphones yourself? 


Eh, if I also had headphones in the form of cartridges, it would be a fairy tale :) 
If this is too difficult for you and you would like something simpler and faster, then we present to your attention the restoration of a headphone plug using an old ballpoint pen and epoxy resin.
Well, now you know exactly what to do if the headphones in the jack break. And if your arms and legs grow from different places, then everything will work out much better, than me!
IN Everyday life modern man Headphones are an indispensable attribute that allows you to enjoy listening to your favorite music and audiobooks anywhere and at any time. Unfortunately, this gadget does not last forever and is prone to breakdowns. In such a situation, you have to think whether you can repair the headphones yourself, or whether it is better to buy new ones. It is recommended not to rush to throw away old ones, since broken ones, in most cases, can be repaired at home. This article will discuss how to repair headphones yourself.
Headphones are enough simple device, so all the faults can be listed literally on your fingers. Common reasons The reasons why the headphones stopped working include the following:
- plug breakage;
- The headphone cord is faulty;
- The volume control is faulty.
Plug failure
If your headphones break, the first thing you should pay attention to is the connection point between the plug and the cable. Often the cause of the breakdown lies precisely in this place. Due to frequent bending, the cable cores break, so the signal does not pass into one “ear” of the gadget or into both at once. The microphone may also not work.
The breakdown is quite easy to detect. When the gadget is turned on, you need to try bending the cable at the site of the supposed breakdown in different sides. If a sound appears or a crackling sound is heard, this means that one of the wire strands is broken. What to do if a problem spot is found on the cable?
To repair headphones, do the following.
- Cut the plug from the cable.
- To repair the plug will be used inside of old with a slight modification. To remove this part, you need to cut the plastic shell using a utility knife, as shown in the picture below.

- After cutting the plastic, remove the insides of the plug. You will see contacts to which several thin wires of different colors are soldered. In the same way, you can disassemble iPhone headphones.

- Remember or sketch on paper which contact and color the wire was connected to. The pictures below show standard circuits wiring cable cores. The color of the conductors may vary depending on different models, V in this case, green is the left channel, red is the right, and copper (without isolation) is common.


- If you need to repair headphones with a microphone, which are connected with one plug (usually there are 2 plugs on the cable), then the wiring diagram will be as in the figure below.

- Next, you need to free the internal cable cores from the external (general) insulation.

- Headphones cannot be repaired without a soldering iron. This is explained by the fact that it is necessary to connect common wires and tin the tips of all conductors using flux and solder. Since the conductors are covered with insulation (varnish), the tinning process will be a little difficult. To make it easier, it is recommended to use a lighter to lightly ignite the ends of the wires. You can also clean the ends from the varnish layer using a regular knife.

- To continue repairing headphones with your own hands, for example, Defender headphones, you need to find ballpoint pen, from which you only need one part, namely the bottom. It will serve as a housing for the plug.

- Prepare a small piece of heat shrink tubing to protect the wire from sharp bends.

- At the next stage, you will need to put the tip of the handle and heat shrink on the cable, and then solder the tinned ends of the wires to the plug part.
- We solder the contacts, strictly following the wiring diagram (using our sketch).

- After you have soldered all the conductors, you need to check whether the headphones are working or not. To do this you can use a multimeter and call all contacts. If there is no device, then simply plug the plug into the phone socket and turn on music playback on it. Make sure that both channels of the headset work separately by turning the balance control in the equalizer.
- If the test result is positive, wear heat shrink tube to the soldering place and using a lighter or a hair dryer, make sure it fits snugly to the plug.

- To continue, prepare a small amount of epoxy resin.

- Add a few drops of resin to the tip of the pen and slide it onto the soldered plug. At this point, the headset repair is considered complete.

The procedure for replacing the plug is the same for all types of headsets, for example, such as: Beats By Dr headphones, Sennheiser HD 215, Razer Kraken Pro, as well as for Steelseries Siberia v2 headphones, Audio-technica ATH-ES7 and headphones Defender.
Headphone cord is faulty
How to repair headphones if the headset cord is faulty? You can try to find fracture site internal wires of the cable, probing and bending all its sections while the gadget is running. If you hear a cracking sound or a sound during the test, mark this place with a marker. Next, at the break point, the cable is cut and stripped. After which the ends of the thin conductors must be soldered, observing color, and insulated.
If the break point is not found, then the entire cord will need to be replaced.. The following example will show the repair of vacuum headphones.

Replacing the cord in large headphones
Large gadgets such as Philips headphones or Sven headphones for a computer, they differ from plug-in ones only in the size of the speaker (membranes in small gadgets). Difficulties may arise when trying to get to the speaker in order to solder the wire contacts.
U different manufacturers The methods for opening them vary. These may be latches that are difficult to detect or hidden screws hidden under soft “pads” - ear pads. For example, the question often arises of how to disassemble Sennheiser headphones HD203?
This is done simply.

When repairing Steelseries Siberia headphones, the ear pads hold adhesive based. You can remove them by carefully prying them up with a screwdriver, after which you can find the fasteners. Some models use latches instead of screws, which can be broken if pressed hard. If they break, you will have to glue the cups of the gadget together, after which they will become inseparable.

In the Razer Kraken headphones, the ear pads are not glued and can be easily removed.

After disconnecting them, the fasteners can be found under the glued paper.

In the Audio-Technica M30 or ES7 headset, they are also placed on the rim of the gadget’s cup. Philips headphones are no exception.
By the way, the Audio-Technica ES7 headphones have hinges for rotating the cups. Therefore, if you disassemble it while repairing a gadget, you must be careful.

The Philips SHD 8600 headset is devoid of all the disadvantages associated with replacing the plug and cable, since it is a representative wireless devices.
Volume control problems
How to fix headphones if you have problems with the volume control in the form of loss of sound or crackling? In this case, you can use graphite lubricant to apply it to the resistive layer to restore contact. After this, the headset should function without problems.

If after lubrication the headset continues to work poorly, then the regulator needs to be replaced with a new one.
Thus, in most cases, before you run out and buy a new headset, you can repair it yourself. To do this, you will need a soldering iron with a thin tip and skills in handling it.
Autumn has come, dear readers, Apple is releasing new products. This means that specialists iFixit It's time to blow off the dust from the instruments that has managed to settle on them since the day of the natural Retina display from MacBook Pro. The most interesting is yet to come, but let's say, headphones EarPods on sale immediately after the presentation and are ready to be the first to go under the knife.
EarPods Model Number - MD827:

The new remote, with three buttons and a microphone (left), looks different from the previous generation headphone remote. The wires at the top and bottom are much better protected from kinks.

Looking at the following photo, you will say that Apple removed the microphone hole in the remote control housing - and you will be wrong! The point is that the holes in general did not have. The round grid was purely informative - so that you knew where to speak. It is now replaced by a microphone icon. Are we saving on matches, Joni?

To open the remote control, it is best to use a mediator. A surprisingly useful thing when dismantling equipment.

The remote control consists of five components: two plastic covers on the top and bottom, an elastic band with buttons, a flexible board, and an oblong metal plate. Here we see the top cover in the right hand, while everything else is still assembled form held in the left:

Remote control, rear view. Just in the plate (it is needed to give rigidity) there is a hole for the microphone There is.

In addition to the microphone, another microcircuit was found on the flexible board. Pretentious Chipworks believe that this is either analog-to-digital converter, or some kind of volume control device.

Remote control board (top - dime, 10-cent coin):
Red - microphone 2F17 045;
Orange - TI25ASGVI 079.
Compared to the new remote control, the old one is just a toy. By the way, it is much less protected from moisture.


Now that you're done with the remote control, it's time to pick up a scalpel and move directly to the headphones. EarPods glued together, there are no latches. If you open the house (read below for why it’s better not to do this), then you will need fresh glue for reassembly.

...Modestly. Like most in-ear ("eardrop") headphones, a single EarPod contains a membrane, a voice coil, and a magnet. 
The membrane - which is very important - is for the first time made of paper, not plastic. iFixit write that this will have a positive effect on low and mid frequencies. Frame? From the inside, it no longer seems somehow super unusual...

So, once again: magnet (left), membrane and voice coil (right). And then they are the same, but upside down. On the outside of the acoustic design (around the magnet), a fine mesh is laid directly over the symmetrical holes.
This is an important component because to maintain required quality sound acoustic design must be rigid and, moreover, open, so as not to interfere with the passage of air behind the vibrating membrane.

There was no mesh in the old headphones. From top to bottom: previous generation headphones, headphones from first iPod and EarPods.

iFixit puts durability at the forefront, and the EarPods are very good in this regard. But before us acoustic device, which, being disassembled and reassembled again, even with very great diligence, will never sound the same again. Therefore, there will be no rating for “ease of repair.” Bye it won’t, because iFixit is still just warming up. Very soon an iPhone 5 will land on their desk, then they will iPod touch and nano, and then, you see, and iPad mini.

Clickable. [


