Atol driver usb com. Atol does not create two com ports. Setting up the CCT driver produced by Atol and transferring data to the OFD via USB. Disabling a digital signature directly through the registry
Note: This article was written for ATOL cash register systems that comply with Federal Law-54 (Online cash register). If you have a cash register old model, then in steps 3 and 6 you will have one COM port, skip steps 11-13.
1. Install the ATOL driver as an administrator. Follow the installer's recommendations:


2. Connect the device via USB cable to your PC.
3. Open “Device Manager”, KKT ATOL should be displayed as “ Unknown device", or as shown in the figure (when connecting the ATOL KKT via USB cable, two devices should be displayed):

4. Click right click mouse on each device and select “update driver”.

5. Select “Search for drivers on this computer”:

6. Install drivers from the following folder: C:\Program Files\ATOL\Drivers8\USB_Drivers. At correct installation Device drivers will have an ATOL mark:


7. Now open the “KKM Driver” (you can find it by searching on your computer) and click “Setting Properties”:

8. Now select the “Search for equipment” item:

9. In the “search parameters”, indicate the model of your cash register and click “search”. The driver must find the device, indicate its operating speed and COM port:

10. Next, in the “communication parameters” we indicate the same values that the driver gave us in previous paragraph(in the search for equipment), and also indicate the model of your device and click “test connection”. If everything is configured correctly, your device will be displayed in the “Result” line:

12. Now launch “Driver Management” as an administrator. The KKM field contains arbitrary information that defines the KKM. In the COM port field, enter the port number for exchange with the OFD (This is the second of the ports that is displayed in your “device manager”, not used in “ KKM driver) Check the “Autorun” box and click the “Run” button:

13. Check the logs that the port is configured correctly. There should be a record in the logs that the port was detected correctly:


14. Now install the Subtotal application, following the installer’s instructions:


Since the drivers used to work with cash registers when connected via USB do not have digital signature, their installation will be impossible, because Windows default prohibits the installation of such drivers. In order to still be able to use them, this check must be disabled.
Disabling driver signature verification in Windows 7
Method 1.
This method requires the editor snap-in to be installed on your computer. group policy. If you are using Windows 7 Home Basic, Home Premium or Starter, you will have to install this snap-in separately.
Open the Run dialog by pressing the Win+R key combination, type gpedit.msc in it and click OK:
The Local Group Policy Editor window will open:

In the window, go to the section “User Configuration” → “Administrative Templates” → “System” → Driver Installation”

Open the option “Digital signature of device drivers” and in the left top corner switch to “Disabled”. Click OK and restart the computer.

After this, the system will never check the signature of installed drivers. However, in order to avoid possible problems with the system due to the installation of drivers obtained from unreliable sources, it is recommended to use method No. 2 to disable digital signature verification once.
While the system is booting, press F8 and we get to the menu for selecting boot options. Here we select “ Disabling mandatory driver signature verification"and press Enter. This action will boot Windows 7 into special regime
Without checking driver signatures, you can install any drivers. After a restart, the protection will be turned on again, while the installed drivers will work, but new drivers without the necessary digital signature will not be installed.
Disabling driver signature verification in Windows 8 and 8.1 You can disable signature verification from the Windows 8 boot options menu. To access it, you need to restart your computer by executing command line

(by pressing the Win+R combination): Then select the option Extra options


(Advanced Startup) Click the button

Restart The computer will reboot again and a menu for selecting boot options will appear in front of you. We are interested in the item Disable mandatory check driver signature enforcement

, select it by pressing the F7 or 7 key on your keyboard.
Another way to install drivers without a digital signature.
In Windows 8 and Windows Server 2012 there is a so-called " test mode work" ( TestMode), in which it is possible to install any (including unsigned drivers).
What are the dangers of operating the system in “test mode”? Technically, you are working with the same full-fledged OS, but there are a few nuances. Firstly, this configuration is not formally supported by Microsoft. Secondly, by switching the system to debug mode, you significantly reduce its security and the stability of the OS, so there is a risk of various errors and its infection increases significantly.
All new and modernized machines produced by ATOL can transfer fiscal data to the OFD via a USB cable when the cash register is connected to a computer. The service is used for this Ethernet over USB. The required service is installed together with the Retail Equipment Driver, and requires selecting a communication channel between the cash register and a PC via a USB port.
To set up this method of transmitting fiscal data, you will have to work hard. The first thing you need is a user with administrator rights (only under such a user can you configure anything). The second thing you need is luck and patience. But the method has been tested by our employees.
Attention: data transfer using Ethernet over USB is not recommended by ATOL staff, since ATOL still cannot get the go-ahead for digital signatures for its USB drivers from the Windows service. Bureaucracy, what to take from it. Hooray, since driver version 8.15 there are no problems with the digital signature of drivers.
If for some reason you cannot install the service according to the instructions, you will have to use “crutches”. Download them from the links at the bottom of the page. If you already had ATOL drivers installed before installing the service, you will need to completely remove them.
Attention No. 2: the Ethernet over USB service for cash registers manufactured by ATOL only works starting with firmware 2.x.x.x. Beg firmware for your device from ATOL employees or ATOL ASC.
Switching the communication channel between the cash register and PC via USB
By default, most ATOL fiscal registrars operate via the COM port (with the exception of ATOL 30F and ATOL 11F. To switch to the USB exchange channel, you need to do the following:
- Turn off the cash register (if enabled).
- Press and hold the check scroll button.
- Without releasing the button, turn on the cash register.
- Wait for the fifth beep.
- The cash register will print out the service mode items on the receipt.
- Press the receipt scroll button twice (there should be two beeps).
- A receipt with the parameters of the communication channel will be printed.
- Press the receipt scroll button three times (three beeps).
- "USB Enabled" will print and return to service mode.
- Press the receipt scroll button once, the cash register will go into operating mode.
Disabling digital signature verification in new versions of Windows
On this moment the most simple solution is to remove the old DTO and install new version 8.15.
Attention No. 3: only for older versions of drivers (versions up to 8.14 inclusive)! For operating systems Windows Vista and higher. You can do this in several ways:
Via command line (suitable for all versions of Windows):

Using the Local Group Policy Editor (the most effective method for older versions of Windows):
- In the "Start" menu, launch "Run" (or press the Win + R keys).
- In the window that appears, type gpedit.msc.

- Click "OK" and the Local Group Policy Editor window will open.
- Sequentially select: “User Configuration” - “Administrative Templates” - “System” - “Driver Installation”.
- Right-click on "Digital Signature of Device Drivers".
- Select "Edit" from the context menu.

- A window will open in which you can select two modes: either disable digital signature verification, or leave digital signature verification enabled, but allow the installation of unsigned drivers.

- After selection desired mode Click "Apply" and "OK". Close the windows.
- Reboot your computer and forget about installation headaches unsigned drivers before next update operating system.
From the special system boot options (for Windows 10):

After using any of the methods to disable digital signature verification, you need to restart your computer.
Installing the ATOL commercial equipment driver

Installing Ethernet over USB service for ATOL equipment
- Install drivers commercial equipment ().
- Install " run this program as administrator", for file EthOverUSB.exe.

- Run with administrator rights" Driver management".

- Go to the section " EthernetOverUSB Service".
- Check the path in the service. It should be like this: C:\Program Files\ATOL\EthOverUsb\EthOverUsb.exe.
All new and modernized machines produced by ATOL can transfer fiscal data to the OFD via a USB cable when the cash register is connected to a computer. For this purpose, the Ethernet over USB service is used.
To set up this method of transmitting fiscal data, you will have to work hard. The first thing you need is a user with administrator rights (only under such a user can you configure anything). The second thing you need is luck and patience. But the method has been tested by our employees.
Attention: data transfer using Ethernet over USB is not recommended by ATOL staff, since ATOL still cannot get the go-ahead for digital signatures for its USB drivers from the Windows service. Bureaucracy, what to take from it.
If for some reason you cannot install the service according to the instructions, you will have to use “crutches”. Download them from the links at the bottom of the page. If you already had ATOL drivers installed before installing the service, you will need to completely remove them.
Let's help those who help!
Attention No. 2: the Ethernet over USB service for cash registers manufactured by ATOL only works starting with firmware 2.x.x.x. Beg firmware for your device from ATOL employees.
Setting up data transfer using a USB cable is not difficult; it requires:
- Disable driver digital signature verification in Windows (for OS higher Windows Vista). Through the command line (run the command line as administrator), in two ways:
1. Or run the command: bcdedit.exe /set nointegritychecks ON
2. Either sequentially: bcdedit.exe -set loadoptions DDISABLE_INTEGRITY_CHECKS And bcdedit.exe -set TESTSIGNING ON
After entering each command, press Enter, the executed command should be marked as "Operation completed successfully".
Possible problems
Everything was done exactly according to the instructions, but the service does not start - try using a “crutch”. If the crutch does not help, then you will have to connect the cash register to the Internet in another way.
Only one COM port is displayed in the device manager - remove the device driver, disconnect the cash register from the computer and reconnect it.
Links
- “crutch” EoU from ATOL employees;
Instructions inside. "Crutch" will not require starting the service from "Driver Management".
Related posts:
Disable the warning: “This host currently has no management network redundancy”
Sharing a local network with using VLAN on Mikrotik
*Important! Setting up this scheme only works under Windows.
Installing a USB driver for the ATOL printer
Download, unpack the archive and proceed to installation.
We connect the printer via USB. Go to Windows Device Manager. In the " COM ports and LPT" two devices will be displayed: "Device with serial interface USB (COM#).
* If you have one device displayed in Device Manager, you need to remove it along with the drivers and update the hardware configuration again.
* If you see in Device Manager, in addition to these two ports, it is also simply " Serial COM port", then it is better to disable it (right-click and select disable).
Right-click on one of these devices and select “Update drivers...”. Next, select to search for drivers manually on this computer.

Then “Select a driver from the list of already installed drivers.”

Click the “Install from disk...” button.

In the window that appears, click the “Browse...” button. Specify the path to the folder with the drivers downloaded earlier. Select a file "ATOL_uUSB.inf"

After successful installation, the device will be named “ATOL USB Device (COM#). For the second device, repeat the driver installation step by step.
If the device icon has Exclamation point, you need to right-click on the device and select “Delete”. In the window that appears, check the “Remove driver programs for this device” checkbox. For the second device, the removal operation must be repeated. Then repeat the installation procedure again (for two devices)
Setting up and running the EoU service
1. Download the EoU service to your PC (cash register) (the file can be downloaded at the end of the article)
2. Go to the EoU folder and open the settings.ini file via text editor(for example Notepad). The file must indicate COM number-port that will be used for communication with the OFD, for example, for communication on port 4 the settings will look like this:
*This must be one of the two COM port numbers that we have defined in Device Manager.
3. Create a shortcut to the file EthOverUsb.exe from the EoU/ folder
4. Go to the shortcut properties and in the object field at the end of the line add a space and “-e”, as shown below:

Turn on the printer and try to run the file. If the setup is successful, the command line window will open and information about data exchange with the OFD will appear in it.

If “U2E_TLV_RX_REQUEST_VERSION” is repeated in the command line window, you should restart the printer or change the COM port number. If this does not help, you should remove the driver and repeat the installation steps from the beginning of this article.
You can uninstall the driver in Device Manager by right-clicking on the device. Select “delete” in the context menu. In the window that appears, check the box.

After removing the printer ports, press the “F5” key and return to the first installation step.
Settings automatic start services.
1. Open the folder Windows startup, to do this, go to the Start menu - System Tools (Windows) - Run and in address bar enter shell:startup and click OK

2. To automatically start the service, you need to place the shortcut we created earlier in the Windows Startup folder that opens.
*In order for the service to be launched with a minimized window, you should change the window properties in the shortcut properties.
connecting Atol 30F via USB
- The initial state:
- Windows Server 2008-64
- Atol-30F only with USB, test FN inserted (clean, not registered)
- Atol driver KKT 8.14
We connect the USB cable, turn it on, 2 new ones appear in the system unidentified devices and USB\VID_2912&PID_0005&REV_0200&MI_00 and USB\VID_2912&PID_0005&REV_0200&MI_02 .
We go to the manufacturer’s website, but in the download center the driver simply cannot be found under the names USB or VCOM. Since Atol switched to an NXP (Phillips) processor, you can try looking for drivers on www.nxp.com (we are not looking for easy ways). But this is a bummer. The answer turned out to be - read Atol's instructions. After installing the Athol DTO8 commercial equipment drivers, you need to find the drivers in the folder (for me) and pull up the drivers for unidentified devices from there. 2 ATOL type devices will appear USB device(COM9).
You can view the serial number and other useful information like this: hold the CL button (there is only one), turn it on.... after the first signal, release it.
Setting up an exchange channel WiFi,USB or BT: hold the CHL button (there is only one), turn it on.... after the fourth signal, release it. Next, select desired number through the same button (by the number of clicks on the button).
Diagnostics of connection with OFD: hold the CHL button, turn it on.... after the sixth signal, release it.
You can also run from the cash register driver (for example 8.14.2.0 exactly): Mode - Select; (checkbox - Device is on;) Password 30; Entrance; Report - 43 Status of communication with OFD, “Diagnostics of the condition with OFD” is printed.
Note: it’s not very clear why, but Atol in the manual suggests installing 2 drivers DTO8 and DTO9.
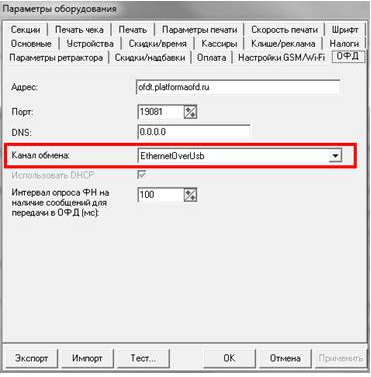
We use DTO8 - Setting up properties - Equipment Parameters - OFD (tab) - select Ethernet over USB, reboot the cash register, run the test with the OFD... As a result, it prints: EoU app not found. I saw such a program in catalogs C:\Program Files (x86)\ATOL. In fact, look in the Atol menu - Trade Equipment Drivers - the "Manage Drivers" program, run it as Administrator, because There you need to configure a service with autostart, see the service tab EthernetOverUsb, there we enter the serial number of the cash register and the COM port number (the number only has a number). Attention, there are 2 COM ports for a reason: one is used to control the cash register (commands are given to it), and through the second it (the cash register) goes online and sends checks to the OFD. Therefore, be careful.
So on Windows Server 2008-64 it turns out to be a bummer, the following manifestations occur: when starting the service from the Driver Management program, a window constantly appears that the program will be closed. Manually through the "Control Panel" - "Services" the service seems to start, but does not work. Let's leave this question for later. (In fact, after a month everything suddenly worked OK, unfortunately I couldn’t trace the reason).
On Windows 7-64 (driver 8.12) everything started, for example, right away! In the “Driver Management” settings I have this: “ATOL 30F” “COM10”. The DF itself is controlled via COM9.
We check from the Atol KKT driver: via USB (VCOM) everything works OK.
I would also like it to USB number the virtual COM port did not change after equipment restarts. But at first glance Windows-Server system 2008-64 correctly remembers each connection of a new Atol kkt via USB and hangs it on a separate VCOM port.
Connect Atol 30F via WiFi
- The initial state:
- Windows Server 2008-64
- Atol 30F (with WiFi module inside) with FN, non-fiscalized
I’ll say right away that you cannot use a USB channel and a WiFi channel at the same time to control the cash register.
We inserted a WiFi module (inexpensive item). We first configured the settings for our WiFi network via USB.
Hold the CHL button, turn on..., after the fourth signal we switch the exchange channel to WiFi, “WiFi Station is on” is printed. Then, after the next turn on, Atol 30F prints after 1 minute: WiFi CONNECTED TO ACCESS POINT IP ADDRESS xxx.xxx.xxx.xxx (mine is 192.168.1.51).
In the Atol KKT driver (8.14.0), select "Property settings" - port: TCP/IP client - (the IP address and port field becomes editable) - specify the KKT IP (default port 5555), then click "Test connection" , result "ATOL 30F, No. 00106106230501, version: 3.0.1245 RU, NEFIC.".
Do we now need the EthernetOverUSB Driver Management program? It’s strange because we are working over a WiFi channel, but it turns out that EthernetOverUSB must be correctly configured and running (hanging as a service). Otherwise, the connection test with the OFD returns:
- communication channel: EoU
- USB device: connected
- EoU app: not found
- diagnostic completed with error
By the way, the EthernetOverUSB Driver Management program also glitches, be prepared.
The question remains how to make the IP address of the cash register static. Since after turning on my IP it’s 192.168.1.51, then 192.168.1.29,... I couldn’t find such a setting in the KKT driver (8.14.0).
It looks like you need to configure the IP address in the router (bind the IP address to the cash register statically).
Atol 30F and 1s 8.3 Bukh 3.0
- The initial state:
- Windows Server 2008-64
- 1C 8.3 Enterprise Accounting, edition 3.0 (3.0.49.28)
- Atol 30F with WiFi with FN, non-fiscalized
We are setting up a new CCP in 1C Bukh 3.0: Administration - Connected equipment - And here Be careful CCP with data transmission.
You can lose a lot of time setting up Atol 30F in the section Fiscal registrars(like Atol FPrint 30, don't do this - it's a completely different device).
So we go to the cash register with data transfer, configure the port to “TCP/IP client”, IP address (it’s clear which one), port 5555. We have Atol 30F configured for the WiFi channel.
- We check how the check is printed (to the IP address of the cash register in local network):
- "Bank and cash desk" - "Fiscal device management" - open a shift.
- “Sales” - “Retail sales (receipts)” - “Create” - ... - “Accept payment” - select your cash register and voila, a receipt is printed (even with the names of the goods).
- “Bank and cash desk” - “Fiscal device management” - close the shift, ok - the closing of the shift is printed.
You can check that checks are sent via the Internet to the OFD from the cash register driver (for example, 8.14.2.0 exactly): Mode - Reports without cancellation; (checkbox - Device is on;) Password 30; Entrance; Report - 42 Current state of calculations, the “Report on the current state of settlements” is printed, where see “Untransmitted FD XXX” (if everything is good it should be 0).
Installing drivers for Windows 10-64:
After installing the driver (for example, I have KKT_8_14_02_02_Full.exe), two COM ports appear in the system, so they need to reinstall the drivers from the folder " C:\Program Files (x86)\ATOL\Drivers8\USB_Drivers".
3869.96 RUR
Product code: 44248
Manufacturer: Atol
2D barcode scanner ATOL SB 2108 USB (black), article number 44248
Payment methods: cash or bank transfer
Model: 2D barcode scanner ATOL SB 2108 USB (black), article number 44248
ATOL SB2108 is one of the most affordable 2D scanners on the market. Combines reliability, high quality And maximum performance. It is equipped with photo scanning technology that allows you to quickly and accurately recognize linear, two-dimensional and PDF417 codes.
Reads in a second
2D scanner ATOL SB2108 equipped with photo scanning technology that allows you to instantly recognize linear, two-dimensional and PDF417 codes. Easily deals with damaged and low-quality barcodes, reads barcodes from screens mobile phones, plastic cards, coupons, leaflets, documents.
Scanner ATOL SB2108 can read alcohol brands in PDF417 format and is ideal for working in the EGAIS system. Damaged labels are sometimes found among alcohol products: thanks to a high-quality imager, the scanner can easily recognize even damaged barcodes and you will not have to write off or return the goods to the supplier.
With an eye on the future
In 2018, the Government of the Russian Federation will launch a program of mandatory labeling of goods for ten items: products of animal origin (VETIS “Mercury”), leather shoes, outerwear, eau de toilette and perfumes, tires, wheel disks and a number of other products. In 2020, all medicinal products will also be labeled with the Datamatrix code. In total, about 50 items of goods will be included in the list of mandatory labeling. Scanner SB2108 will help you comply with legislation at minimal cost.
Indispensable for loyalty programs
Modern boutiques, supermarkets, restaurants increase the loyalty of their customers with the help of mobile applications. To receive a discount, customers are sent a barcode, which is read at the checkout by a 2D scanner. ATOL SB2108 efficiently reads 2D barcodes from screens mobile devices. Attract clients high level service with scanner ATOL SB2108!
Specifications
- Model ATOL SB2108
- Processor 32 Bit
- Form factor: manual
- Reading indicators Blue LED, vibration, sound
- Resolution 640 (horizontal) x 480 (vertical)
- Scanning angle 45° (horizontal); 30° (vertical)
- Scanning speed 30 frames/sec.
- Scan depth
- 5 mil (Code 39) 90 120 mm
- 13 mil (UPC/EAN) 30 305 mm
- 20 mil (Code 39) 30 450 mm
- PDF417 (10 mil) 50 225 mm
- Datamatrix (10 mil) 52 240 mm
- Barcodes Aztec, BPO, Codabar, Codablock, Code 11, Code 39, Code 93, Code 128/EAN128, DataMatrix, EAN.UCC Composite, GS1, Interleaved 2 of 5, Matrix 2 of 5, MaxiCode, MicroPDF417, MSI Code , PDF417, Planet, Plessey Code, Postnet, QR code, RSS, Standard 2 of 5, Telepen, TLC 39, UPC/EAN
- Power supply DC+5V±5%
- Power consumption 60 mA (operating mode); 40 mA (standby); 300 mA (scan)
- USB interfaces (HID, COM)
- Backlight White LED 630+10 nm
- Operating temperature 0℃ 50℃
- Storage temperature -20℃ 60℃
- Humidity 5% - 95%
- Shock resistance Repeated drops from 1.2 m
- IP IP42
- Dimensions, mm 170 × 100 × 75
- Weight, g 150 (without cable)
- Black color
- Equipment Scanner ATOL SB2108, USB cable, instructions


