Wi-Fi router Zyxel Keenetic Extra II - Reviews
At first glance, there are no fundamental differences from older models. Still the same blue-white box, and inside - classic set: in addition to the router, the user receives a power supply, a half-meter patch cord and instructions.
The design is laconic and discreet. A black and white plastic rectangle will fit perfectly into the interior of both home and office. The materials are chosen perfectly - the top pimpled lid does not collect fingerprints at all. And in general, the assembly leaves a pleasant impression: nothing creaks and there are no gaps.


All the necessary indicators are located on the top cover. In addition to the connection status, indicators let you know about the status USB port. On the back of the device there are four LAN port and one WAN port.
The case is equipped with four extended antennas capable of operating on the MIMO 2×2 principle - this allows the router to better cope with signal transmission in multi-room spaces. The form factor allows you to install the gadget not only on a flat horizontal surface, but also to hang it on the wall. There are loops at the bottom especially for this purpose.
Works on any frequency
When developing Extra II, the manufacturer focused on functionality. Hidden inside the router is an inexpensive but reliable MediaTek MT7628 SoC chip with a single core operating at 580 MHz. There are 16 MB of flash memory and 128 MB random access memory. At first glance, it may seem that such a filling is not able to cope with high speed connection, but NAT and VPN software accelerators come to the “help” of the chip.

Four antennas allow you to divide the network into two segments: some of the connected devices will be able to operate at frequencies in the 2.5 GHz range (within 300 Mbit/s), and more modern gadgets, equipped with an 802.11ac module, - in the 5 GHz range (up to 867 Mbit/s). In these ranges, the device supports up to 16 non-overlapping channels, so the gadget’s capabilities allow you to set up a third or even fourth network, especially for guests, so that access to local resources is denied and only the Internet can be used.
The existing WAN port is capable of supporting speeds of up to 100 Mbit/s and this is quite enough for comfortable online viewing of movies in high quality.
Step-by-step setup interface
All control of the router occurs through the NDMS 2.08 operating system and through the web interface. Initial setup extremely simple - the installation wizard already has in its “memory” step by step guides according to the most popular settings methods. So the user can only choose a convenient guide. The rest of the settings algorithms can be found on the website - the manufacturer even provided many of them with screenshots.

IN latest versions firmware, a schedule has appeared - for example, you can configure the operating time of interfaces or limit the access of certain devices by time.
There are also modes for using the router as a signal amplifier or adapter (in this case, up to five devices can be connected to Keenetic Extra II). For each mode you use, the settings are saved so they can be reused later.

Additional functionality can be added to the router as components. Among the already available components are network filters Yandex.DNS and SkyDNS, protecting the network from unnecessary sites.
Keenetic Extra II is one of the most affordable routers in the ZyXEL line; its price at the start of sales does not exceed only 4,000 rubles. Nevertheless, the device demonstrates more than good performance. A user who purchases this model for home will certainly enjoy the ease of all settings and the ability to solve any network problem. The main emphasis is on working in the 5 Hz range, so the router is able to provide an uninterrupted Internet signal even on the most demanding devices.
In order to get to the router’s web interface, you need to open your Internet browser and type 192.168.1.1, User Name in the address bar admin (Username), Password – 1234 (provided that the router has factory settings and its IP has not changed).
Changing the factory password
For security reasons, it is recommended to change the factory password. Default: Login admin, password 1234. In the router interface, you need to go to the “ System", Further password. In field "New Password" enter New Password. It must be repeated in the next field. Next, save the settings by pressing the button “ Apply».
Setting up Wi-Fi on the router
WiFi.
- In the window that appears in the field Network name (SSID) enter the name of your network (any)
- In field Network protection select WPA2-PSK
- In field Network key enter your password to access the network (any)
- In field Channel: select Auto
- After filling in all fields, click the button Apply.

Setting up an Internet connection

NAT when automatically obtaining an IP address (DHCP)
- Select a section at the bottom of the page Internet
- In the window that appears, click on Broadband connection (ISP)
- In field Configuring IP settings select Automatic
- In field MTU size enter 1400
- After filling out these fields, click the button Apply.

Setting up PPTP (VPN) when automatically obtaining a local IP address
At the top of the page, select the tab Authorization.
- In field Type (protocol used) select PPTP
- In field Connect via select Broadband connection (ISP)
- In field Server address enter pptp.freedom
- In field Username enter your login to access the network from the subscriber registration card
- In field Password enter your password to access the network from the subscriber registration card
- In field Authentication algorithm select CHAP. After filling in all fields, click the button Apply.

Setting up a PPPoE connection (Rostelecom, Dom.ru)
InternetAuthorization»
- Type (protocol): PPPoE
- Username : Your login according to the contract
- Password: Your password according to the agreement
- Configuring IP parameters: Automatic
- Service Name, Hub Name, Description- may not be filled in
- In field Authentication method select Auto
- Save the settings with the button "Apply."


Setting up an L2TP connection (Beeline)
In the router interface, you need to select the tab on the left “ Internet", in the list that opens, select " Authorization»
- Internet Access Protocol: L2TP
- Description: connection name
- Server address: server name or address (specified in the contract)
- Username : Your login according to the contract
- Password: Your password according to the agreement
- Authentication method: Auto
- Save the settings with the button "Apply."


Before we start setting up the router, let's check the local network connection settings. For this:
Windows 7
1. Click on " Start", "Control Panel".
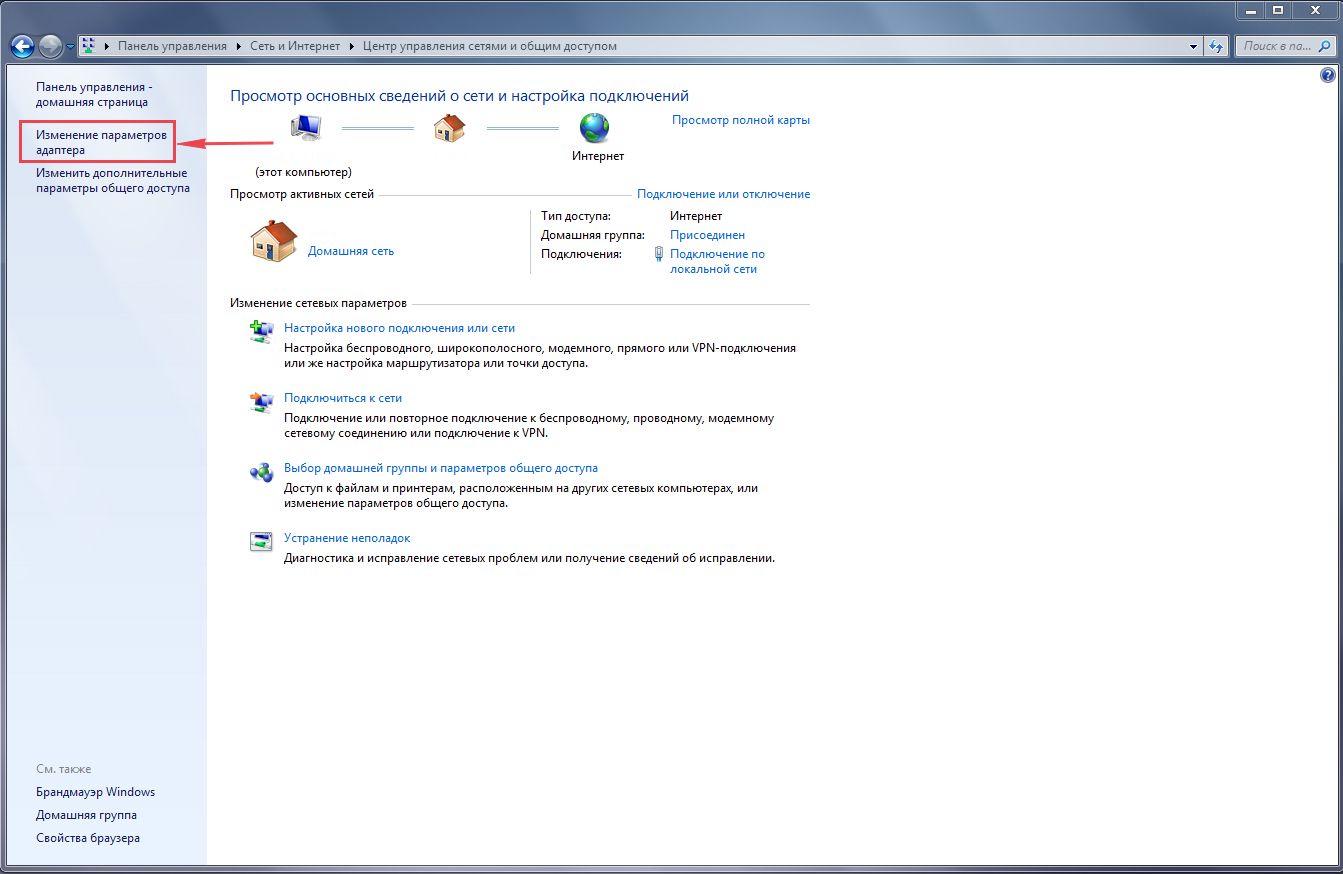
2. Click on " View network status and tasks".

3. Click on " Change adapter settings".
4. LAN connectionProperty".
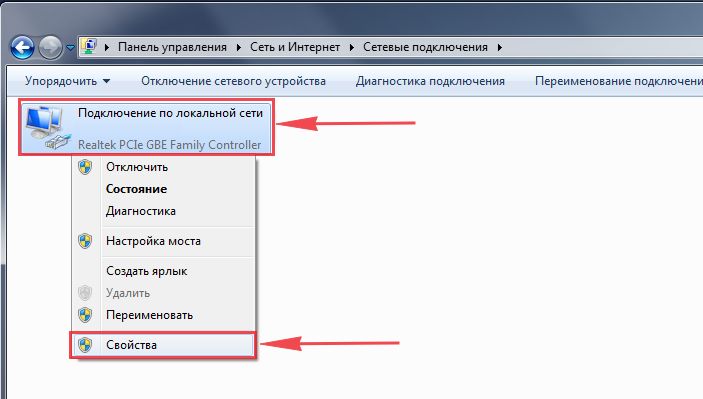
5. From the list select " Internet Protocol Version 4 (TCP/IPv4)" and press " Property".

6. " and "", then press the " button Ok".

Windows 10
1. Click on " Start", "Options".

2. Click on " Network and Internet".

3. Select " Ethernet" and click on " Configuring adapter settings".

4. In the window that opens we see " Ethernet". Click on it right click mouse, select " Property".

5. From the list select " IP version 4 (TCP/IPv4)" and press " Property".

6. In the window that opens, you need to check the box " Obtain an IP address automatically" And " Obtain DNS server address automatically", then press the button " Ok".

Connecting the ZYXEL Keenetic Extra II router to a computer
The next step is to connect the router ZYXEL Keenetic Extra II to your laptop or Personal computer(PC). To do this, you need to connect the cable that your provider provided to you to the “INTERNET” port of the router (this is the cable that goes to your apartment, house, office, etc. from outside), and the cable that came with router, connect one end to the “HOME NETWORK” port of the router, and connect the other end to your laptop or PC. And yes, don't forget to connect the power cable.

Authorization of the ZYXEL Keenetic Extra II router
So, we connected the router, now you need to use any browser (be it Google Chrome, Mozilla Firefox, Internet Explorer, etc.) get into its web interface. To do this, open the browser and address bar enter the router address: my.keenetic.net or 192.168.1.1 and press the button " Enter" on your keyboard.
Afterwards, the router offers us a quick setup, select the interface language - “Russian” and click Web Configurator.

After this, the router can display a window for setting a password on the web interface. Here, according to your wishes, you can set a password or not. If you set a password, write it down somewhere.

ZYXEL routers also work in various modes, it would be a good idea to check whether the mode is selected. Click on the shortcut in the bottom menu " System" and go to the tab " Mode". If you are setting up the Internet by entering a login and password, leave the mode " Internet Center - main mode".

Setting up the ZYXEL Keenetic Extra II router
Now you need to configure the router. First of all, let's secure the wireless network by setting a password for wi-fi. Then you will need to find out what type of connection is used to access the Internet, is it PPTP, L2TP or PPPOE. You can find out by calling your provider (this is the organization with which you entered into an agreement to provide Internet services). So, let's start setting up the router.
Setting a password for wi-fi
The ZYXEL Keenetic Extra II router is dual-band, which means that the router supports 2 operating frequencies for wireless connections, 2.4 GHz and 5 GHz. 5 GHz allows you to achieve higher bandwidth, but has a shorter range than 2.4 GHz, 2.4 GHz is more susceptible to interference. 5 GHz is not supported by all devices. Therefore, which frequency to choose is up to you. You can select both, and depending on the circumstances, change the wireless connection on your devices.
I bring to your attention Video instructions for setting a password for wi-fi on a router ZYXEL Keenetic Extra II
Let's also take a written and illustrative look at setting up a Wi-Fi password on a router ZYXEL Keenetic Extra II in two frequencies.
1.
On the Web interface, click on the shortcut " Wi-Fi network
"go to network settings" 2.4 GHz access point".
2.
Enable hotspot", then in the field " Network name (SSID)"come up with and indicate your name wireless network, given name In the future it will light up when you connect to the network. I advise you to indicate the frequency used in the name of the network, for example: “imya seti 2.4”.
3.
"Network protection" - WPA2-PSK.
4.
Network key
5.
"Channel width" - "20 MHz".
6.
Click " Apply".

7.
Click the tab " 5 GHz access point".
8.
Check to see if the checkbox next to " Enable hotspot", then in the field " Network name (SSID)“come up with and indicate the name of your wireless network. I advise you to indicate the frequency used in the name of the network, for example: “imya seti 5”.
9.
"Network protection" - WPA2-PSK.
10.
Now you need to set a password for the wireless network. In field " Network key"We come up with and enter a password.
11.
"Channel width" - "20/40/80 MHz".
12.
Click " Apply".

Setting up PPTP
PPTP on the router ZYXEL Keenetic Extra II using the ZYXEL router as an example Keenetic Omni II.
PPTP on the router ZYXEL Keenetic Extra II.
1.
Internet".
2.
Select the tab " PPPoE/VPN"press" Add connection".

3.
Turn on" And "".
4.
IN " DescriptionType (protocol)"choose" PPTP", "Connect via"choose" Broadband connection (ISP)".
5.
Username"), password (in line " PasswordServer address
6.
"Configuring IP settings" - "Automatic".
7.
Apply".

Setting up PPTP with a static IP address
PPTP with static IP address on the router ZYXEL Keenetic Extra II
1.
Click on the shortcut in the bottom menu " Internet".
2.
Select the tab " PPPoE/VPN"press" Add connection".
3.
In the window that appears, check the checkboxes opposite " Turn on" And " Use to access the Internet".
4.
IN " Description"enter any words in Latin letters, for example "Host", " Type (protocol)"choose" PPTP", "Connect via"choose" Broadband connection (ISP)".
5.
Below you are asked to indicate your user name (in the line " Username"), password (in line " Password"). You will also need to specify the server IP address (in the line " Server address").
6.
Manual" against " Configuring IP settings".
7.
Specify IP addresses and DNS.
All this data is usually specified in the contract with the provider. If for some reason you could not find them, you need to call hotline Your provider and find out how you can get them.
7.
After you have entered all the necessary data, press the button " Apply".

L2TP setup
I bring to your attention Video instructions for setting up the connection type L2TP on the router ZYXEL Keenetic Extra II using the example of the ZYXEL Keenetic Omni II router.
Let's also take a written and illustrative look at the connection setup L2TP on the router ZYXEL Keenetic Extra II.
1.
Click on the shortcut in the bottom menu " Internet".
2.
Select the tab " PPPoE/VPN"press" Add connection".
3.
In the window that appears, check the checkboxes opposite " Turn on" And " Use to access the Internet".
4.
IN " Description"enter any words in Latin letters, for example "Host", " Type (protocol)"choose" L2TP", "Connect via"choose" Broadband connection (ISP)".
5.
Below you are asked to indicate your user name (in the line " Username"), password (in line " Password"). You will also need to specify the server IP address (in the line " Server address"). All of the above data is provided to you by the provider (the organization that provided you with the Internet).
All this data is usually specified in the contract with the provider. If for some reason you could not find them, you need to call your provider's hotline and find out how you can get them.
6.
"Configuring IP settings" - "Automatic".
7.
After you have entered all the necessary data, press the button " Apply".

Setting up L2TP with a static IP address
Let's look at setting up the connection L2TP with static IP address on the router ZYXEL Keenetic Extra II. Typically a static IP address is provided legal entities, or how additional service to the basic tariff for individuals.
1.
Click on the shortcut in the bottom menu " Internet".
2.
Select the tab " PPPoE/VPN"press" Add connection".
3.
In the window that appears, check the checkboxes opposite " Turn on" And " Use to access the Internet".
4.
IN " Description"enter any words in Latin letters, for example "Host", " Type (protocol)"choose" L2TP", "Connect via"choose" Broadband connection (ISP)".
5.
Below you are asked to indicate your user name (in the line " Username"), password (in line " Password"). You will also need to specify the server IP address (in the line " Server address").
6.
Since the connection uses static ip address, select " Manual" against " Configuring IP settings".
7.
Specify IP addresses and DNS.
All of the above data is provided to you by the provider (the organization that provided you with the Internet).
All this data is usually specified in the contract with the provider. If for some reason you could not find them, you need to call your provider's hotline and find out how you can get them.
7.
After you have entered all the necessary data, press the button " Apply".

Setting up PPPOE
I bring to your attention Video instructions for setting up the connection type PPPOE on the router ZYXEL Keenetic Extra II using the example of the ZYXEL Keenetic Omni II router.
Let's also take a written and illustrative look at the connection setup PPPOE on the router ZYXEL Keenetic Extra II.
1.
Click on the shortcut in the bottom menu " Internet".
2.
Select the tab " PPPoE/VPN"press" Add connection".
3.
In the window that appears, check the checkboxes opposite " Turn on" And " Use to access the Internet".
4.
IN " Description"enter any words in Latin letters, for example "Host", " Type (protocol)"choose" PPPOE", "Connect via"choose" Broadband connection (ISP)".
5.
Below you are asked to indicate your user name (in the line " Username"), password (in line " Password"). All of the above data is provided to you by the provider (the organization that provided you with the Internet).
All this data is usually specified in the contract with the provider. If for some reason you could not find them, you need to call your provider's hotline and find out how you can get them.
6.
"Configuring IP settings" - "Automatic".
7.
After you have entered all the necessary data, press the button " Apply".

Setting up PPPOE with a static IP address
Let's look at setting up the connection PPPOE with static IP address on the router ZYXEL Keenetic Extra II. Typically, a static IP address is provided to legal entities, or as an additional service to the basic tariff to individuals.
1.
Click on the shortcut in the bottom menu " Internet".
2.
Select the tab " PPPoE/VPN"press" Add connection".
3.
In the window that appears, check the checkboxes opposite " Turn on" And " Use to access the Internet".
4.
IN " Description"enter any words in Latin letters, for example "Host", " Type (protocol)"choose" PPPOE", "Connect via"choose" Broadband connection (ISP)".
5.
Below you are asked to indicate your user name (in the line " Username"), password (in line " Password").
6.
Since the connection uses a static IP address, select " Manual" against " Configuring IP settings".
7.
Specify IP addresses and DNS.
All of the above data is provided to you by the provider (the organization that provided you with the Internet).
All this data is usually specified in the contract with the provider. If for some reason you could not find them, you need to call your provider's hotline and find out how you can get them.
7.
After you have entered all the necessary data, press the button " Apply".

Updating firmware and components
I bring to your attention Video instructions for updating the firmware on the router Keenetic Air using the Keenetic Omni II router as an example.
Connecting a computer to wi-fi
After connecting and setting up the router, you need to connect the computer to a wireless network (wi-fi), let's consider connecting to wi-fi in two operating systems, these are Windows 7 and Windows 10:
Windows 7
Video instruction
1.

2. Sultan

3.
Check the box next to " Connect automatically" and press
"Connection".

4. Specify " Security keyOK".

5.

Windows 10
Video instruction
1. In the lower right corner of the desktop, find the wireless network (wi-fi) icon and click on it with the left mouse button.

2. A window pops up with a list of available wireless networks. Select a wireless network, in my case it is the network " Sultanova"(You select the network whose name was given at ).

3.
Check the box next to " Connect automatically" and press
"Connect".

4. Specify " Security key"This is the wireless network password that you specified when . After you have specified the key, click " Further".

5. We wait perhaps a couple of seconds and you are connected to your wireless network.

Refers to ZyXEL company. Among the most technologically advanced products of this manufacturer are: Keenetic router Extra. What are the main features of its configuration? What do users say about their experience using the router in practice?
Device characteristics
What should you say before considering the features of setting up the device and studying the reviews that characterize it? ZyXEL Keenetic Extra is a very common device, and therefore opinions on its use can be found on many thematic online portals. Therefore, you can be confident in the reliability of the data obtained. So, now let's look at the main characteristics of the device.
The device about which we're talking about, equipped with:
Processor with a frequency of 600 MHz;
128 MB RAM module;
Flash memory of 16 MB;
3 antennas;
5 Ethernet ports supporting data transfer at a speed of 1 Gbit/s;
USB ports;
Hardware modules that allow you to connect to 3G and 4G networks if you use a USB modem;
Ports for connecting to lines operating in the ADSL2 standard;
Telephony support modules.

The router can function as an access point, signal amplifier, and adapter. Key performance indicators of the device:
Data transmission via wireless network at a speed of 300 Mbit/s;
Providing stream routing using the PPPoE standard at a speed of 950 Mbit/s, in the PPTP format at a speed of 500 Mbit/s;
Read data from USB drives at a speed of 17 MB/sec.
Basic functions of ensuring the functioning of a wireless network:
Application modern algorithms WPA-PSK protection;
Guest network support in Wi-Fi format;
Providing access control using MAC addresses;
Support quick setup WPS;
Support Wi-Fi technology Multimedia.
The device is compatible with big amount types of software - in particular, with mobile applications For iOS platforms and Android. The device can operate at temperatures up to 40 degrees and humidity up to 95%. The device can be controlled via a web interface, command line via TELNET, as well as from external network. If necessary, you can use the option to backup and restore settings. Another notable device control option is software update its functions. The device also supports logging of system processes.
As the reviews presented on thematic portals can attest, ZyXEL Keenetic Extra, in terms of characteristics, is one of the most functional devices in its segment. Let us now consider the features of setting the required parameters of the router hardware modules to ensure its correct operation.
Setting up the router: connection
Keenetic Extra, like almost any other device, is carried out by correctly connecting the corresponding device to the communication infrastructure that is installed in the user’s apartment or office. Despite the fact that the main task of the router owner is to configure wireless Internet, the initial parameters of the device will need to be set via a wired connection to the device in question.
But before this, you need to bring the router into a functional state by connecting to it an antenna, a power supply, and also a wire that connects to network card PC. In addition, you need to connect the wire leading from the provider to the router. As a rule, no special problems in order to bring the ZyXEL Keenetic Extra router into a functional state - user reviews may indicate this.
After the device is brought into working condition- turn on the power and wait for indicators to appear on the router case indicating that the device is working and receiving a signal from the provider’s network. If everything is fine with the connection, you can configure the ZyXEL Keenetic Extra router using the tools operating system.
Network settings in the operating system
First of all, you need to enter the “Control Panel” of Windows, then go to the option “ Network connections" In it you need to find the item responsible for connections with local network. You need to right-click on it and select “Properties”. In the window that opens, you need to select the option responsible for setting up the TCP/IP protocol, then click on the “Properties” button.

In turn, in the loaded menu you need to set the settings by which the IP address, as well as the DNS server address, should be obtained automatically. Now you can proceed directly to setting up the router.
Basic router settings
First of all, it makes sense to reset current settings if the ZyXEL Keenetic Extra Wi-Fi router has already been used somewhere before, since the options are within the scope of network infrastructure may be very different from those under which the router operated previously. In order to reset the device settings, you need to press Reset button located in the recess of the router case and hold for about 30 seconds. In this case, the router must be plugged in. Then you need to wait until the device reboots.

Then you need to re-enable software Windows. IN in this case in order to configure the ZyXEL Keenetic Extra router, we mainly only need a browser. Almost any will do, including standard Internet Explorer. You need to open a browser and enter the address 192.168.1.1. In the page that opens, you must enter the network administrator login - admin, and the password - 1234. It is possible that the combination of username and password, if the router was used previously, will be different. If this is the case, and the settings have not been reset, you will need to find out them from the previous administrator. But when you reset the initial settings, the default login and password are set - exactly the ones listed above. If everything is in order with the login data for the router control panel - the user will log in to the appropriate interface.
If the router WiFi ZYXEL Keenetic Extra was purchased in Russia, then the menu in the control panel of the device is most likely in Russian. If this is the case, then as soon as the start window of the panel opens, after entering your login and password, select the “Internet” option. Then you need to click on the “Authorization” tab. After this, you need to enter the correct data in the fields present in the settings that open.
Setting up a network connection: PPPoE protocol
Typical for many providers is a scheme in which Internet access is provided via the PPPoE protocol. If this is the case, then you need to select the appropriate option in the router settings. You also need to check the box next to the option responsible for activating the IP address for the WAN. But in some cases it is not necessary to set it - you need to clarify this moment at the provider. Afterwards you need to specify a username and password to access the network. You should also find them out from the provider or look at the contract for the supply of communication services, if you have one at hand. The next item in the network connection settings interface is MTU. As a rule, no changes are required to it. But, again, some providers recommend setting certain values in the appropriate option. Therefore, it makes sense to clarify this point by contacting the support service of your Internet access service provider.
Connection setup: PPTP protocol
Another popular mechanism for organizing network access is the use of the PPTP protocol. If this is the case, then you need to be in the “Internet” interface within the control panel WiFi router ZyXEL Keenetic Extra, select the “Authorization” option. In the window that opens, you need to select the appropriate protocol. After this, you must enter the address of the provider's server. As a rule, it is also fixed in the contract for the supply of Internet access services. If this document is missing - you need to clarify the relevant data with the provider’s support service. Similarly, indicate the login and password for access to the network, which are reflected in the contract or provided by the communication service provider.

Connection setup: NAT protocol
Another scheme for connecting to the network is using the NAT infrastructure. As experts note, this mechanism is one of the simplest in terms of implementation. correct settings connecting the router in question to the network. In order to set the required NAT options, you need to enter the “Internet” interface of the router control panel, then select the “Connection” option. Then you need to make sure that opposite the item where the settings for IP parameters are recorded, the “Automatic” option is activated. However, the use of this scheme is possible if the network infrastructure used by the provider allows it.
In many cases, the NAT interface functions provided that the necessary settings are entered into manual mode. If this is the case, then the user will need to specify the parameters, as well as the IP addresses, which are fixed in the agreement with the communication service provider. To do this, you need to return to the “Connection” item located in the “Internet” menu, then select the “Manual” option opposite the field in which the settings for the IP parameters are recorded. Then you will need to enter parameters such as IP address, network mask, configure DNS addresses 1, as well as DNS 2.
These are the main network parameters ZyXEL router Keenetic Extra. Setting up the actual wireless connection to the Internet is the user’s next task. Let us consider the features of its solution in more detail.
Setting up a wireless connection
In order to configure WiFi in the router in question, you must again go to the router control panel through the browser. After loading the main interface, you must select the “Wi-Fi Network” option, then the “Connection” menu item. After this, you need to check on the page that opens whether the checkbox next to the option responsible for activation is checked wireless access. Then - indicate the name of the Wi-FI network in the SSID field - whatever the owner of the router prefers. It will subsequently appear in the list wireless connections V network interfaces operating system. After this, you need to click on the “Accept” button and thus fix the settings.
After this, you need to return to the “Wi-Fi Network” option, and then select the “Security” menu item. Here you will need to record a Wi-Fi password. In addition, you must activate efficient algorithms data encryption. In the “Authentication” option, you must select WPA2-PSK. In the security type settings, it makes sense to set the mixed encryption protocol - TKIP/AES. The format to be set for network key- ASCII.
After necessary settings entered, you need to click on the “Accept” button. Then you need to save the changes in the router settings, after which it will reboot - this procedure takes about 1-2 minutes. Afterwards, the device can be disconnected from the PC and used as a wireless device.
So, we have studied how to set up a Wi-Fi connection on a device such as the ZyXEL Keenetic Extra router - user reviews may indicate that this procedure can be carried out quite quickly. As a rule, there are no particular difficulties in solving the corresponding problem, provided that the owner of the router has the information necessary to configure the device.
Let's now consider what users say about their experience of using WiFi ZyXEL Keenetic Extra in practice. Reviews of the corresponding device can be found on large quantities thematic online portals.
Excellent catching, no glitches, etc. I measured the speed via wifi - 82 megabits download and upload above 70! Internet fiber 100 Mbit.
Minuses
Didn't find it
Review
I was looking for a router for a store - several departments, the total area seems to be more than 200 sqm. The walls are brick. Internal - sibit and brick. Worth in grocery store on the refrigerator - on the right in office space through a thick wall it catches all stripes! On the left is a hardware store - there is also fishing there in all lanes! Only my brother has one at the very end of the construction store, and through a metal display case, if the door is open - 1-2, and if it is closed - it’s already bad, but the room is like a bunker. I had to run a wire there to a network of computers, since I was initially counting on wired connection. And in a grocery store, the online checkout works great. So it exceeded my expectations! Why did I choose Zyxel? Because this company has been producing modems for a very long time... I took Zyxel to my cousin’s apartment - it works great and works for a couple of years without interruptions. I also read the reviews - more positive. For office use, mikrotik is offered everywhere - it costs several times more. TP Link was offered - refused, it was painfully buggy. And so in my Khrushchev apartment, the ancient D-Link receives very weakly in the edges. But dir 620 has been working for more than 5 years.


