Self-assembly of a system unit in pictures or how to assemble a computer at home. The main stages of assembling a computer. Protection of the insides of the electrical panel from repair and finishing work
Arranging a comfortable living space, a comfortable office room, a sales area or a warehouse depends on the correct choice of furniture units. All types of furniture can be divided into cabinet, modular, project, upholstered products and structures made according to individual projects. Factory models are popular among consumers due to their affordability. However, in most cases, after purchasing ready-made cabinet units, furniture assembly is necessary, unless installation of the products by specialists is provided.
Typically, prefabricated furniture purchased in a showroom, store, or market, or ordered from a factory, is delivered to consumers in disassembled form. If the installation of furniture is not specified in the contract, the craftsmen will not assemble it, so the owner needs to do the entire amount of work with his own hands. On the one hand, if you have a drawing, components, and tools, installation is not difficult. But high-quality assembly requires the presence of certain skills and a minimal understanding of the technology of assembly and installation of cabinet furniture. Main stages of the technological process:
- unpack furniture parts, fasteners and accessories supplied in the kit. It is imperative to check that the units comply with the declared quantity, quality and color;
- You should check the availability of instructions, diagrams, detailed drawings according to which the furniture is assembled. If some elements are missing, you can purchase additional fasteners or contact the manufacturer;
- it is required to select and prepare fasteners, mounting fittings, connecting elements, drills, electrical and mechanical tools, hardware and other consumables;
- checking that the holes for fixing the fasteners correspond to the attached drawing. The assembly diagram must contain clear instructions for installation of furniture structures;
- if you have no assembly experience, it is recommended to first mount something small, for example, a furniture box, and then proceed with the installation of large furniture, as shown in the picture;
- furniture assembly is carried out in the following order: installation of shelf holders, hinges, strips, ties, connection of frame elements, installation of doors, gluing mirrors, installation of handles, legs;
- complete design with shelves, drawers, decorative fittings. It is convenient if during assembly you can position the model using adjustable legs;
- built-in furniture is fixed to the wall, and a sliding system is first installed under the sliding wardrobe. Stationary furniture is completely assembled and then installed in the chosen location;
- adjustment of facades - use a screwdriver to loosen or strengthen the bolts of furniture hinges. It is necessary to ensure that there is no gap between the doors;
- checking the plane of the kitchen countertop, clearly hanging the upper sections of the upper cabinets, installing household appliances.
The furniture assembly lesson contains general information about installation technology. The assembly of metal furniture, seating areas, sofas, beds, tables with add-ons, radius compartments is carried out taking into account certain nuances. Simple structures can be assembled independently, without using professional equipment, but if you do not have the skills or the necessary tools, and the project is quite complex, it is better to use the services of the manufacturer - professional furniture makers will assemble the product quickly and efficiently.
When assembling furniture with your own hands, you must not overtighten the fasteners, use low-quality consumables, and when using screwdrivers, you must monitor the precise movement of the bit so that the tool does not damage the panels at high speeds. It is better to remove the protective film from the parts after completing assembly.

Unpacking and studying the instructions
Nuances of assembling various designs
When it comes to assembling furniture, you need to take into account that it will not be possible to connect elements of different products in the same way - the installation of furniture structures requires special fasteners, fittings and a set of tools. There are certain nuances in the assembly process itself - you need to know them in order to work quickly, accurately and accurately. Floor installation of a bed is significantly different from the assembly of wall cabinets; the connection of upholstered furniture parts and the installation of a built-in compartment are carried out completely differently. Some nuances and recommendations for assembling various furniture:
- A chest of drawers is an example of simple prefabricated furniture with a minimum number of fasteners. You need to install drawer guides on the side panels. Pour a little glue into the blind holes in the sidewalls and ends of the stiffener flanges, insert the dowels and easily hammer them in, connecting the elements, and then attach the confirmations. The top cover is fixed with dowels and minifixes - a pin in the cover, an eccentric in the sidewall, then the confirmations are screwed in until they stop. The next stage is to nail the back wall, having previously checked the diagonal, assemble the drawers, install guides on them, screw the handles into the prepared holes;
- standard sleeping bed. After checking the presence of all structural parts, the base is assembled - the transverse and longitudinal beams of the frame are connected with euroscrews (confirmations) or self-tapping screws. A cross beam is fixed in the center, the lamellas are installed in specially prepared grooves. The side walls of the frame are secured with dowels and plugs. The remaining elements of the bed are fixed with bolts, the legs are screwed in, if there are any, and the mattress is placed in the base box. The double model is assembled according to the same principle;
- bed with lifting mechanism. Standard model consists of a frame (base), a lifting mechanism, a mattress and internal drawers. You will need a screwdriver with a full set of attachments, a screwdriver, a wrench, euro screws with countersunk heads and an internal hexagon, a tape measure and a level. Assembly diagram: connecting three drawers and headboard parts with brackets, corners or ties with screws. In the upper part of the drawers, shelves, corners, a lifting mechanism are mounted - a gas shock absorber (cylinder upwards) is secured with nuts with a stopper, handles and a limiter for the mattress are installed;
- Stationary cabinets are the easiest furniture to assemble. Sequence of actions: connecting the shelves with the side panels using confirmations and screwdrivers, installing the back wall made of fiberboard, for which furniture nails or a furniture stapler with staples are used. After assembling the box, check the same level of diagonals and compliance with the right angle between the elements. The next step is hanging, adjusting the facades, then all that remains is to install the shelves. If the model has drawers or roll-out shelves, guides for them are installed first;
- sliding body - a stationary sliding wardrobe with a plinth begins to be assembled by screwing the plinth to the bottom with minifixes and dowels, and then driving in support nails. The body is also assembled on minifixes and duplicate dowels; it is important to check the correspondence of opposite holes. Next, fix the back wall (nails, staples, installation in a groove), check the diagonal and angle. After this, you need to install shelf supports, guides for drawers, install shelves and a bar. If the cabinet is without a base and trim in the lower rear part, the plinth is dismantled;
- sliding door system – used for all coupe models. Built-in products do not have side walls and are often made without a roof or bottom. Installation consists of attaching shelves to the walls of the room and installing a sliding system. First, install stoppers and limiters, secure the upper guide rail, there is no need to screw the lower one. The door panel is inserted into both guides into the far grooves, the second leaf into the near grooves, and adjustments are made. After this, you can fix the bottom rail and glue the sealing brushes;
- elements of a kitchen set - complex installation, required full set tools, various fasteners, special fittings. Assembly begins with the preparation of the lower sections - the bottom is connected to the side walls with euroscrews, the planks are installed under the tabletop, the back wall made of fiberboard is secured (stapler, nails in increments of up to 10 mm), and the legs are fixed with self-tapping screws. This is followed by installation of hinges in the mounting slots, hanging of hinged facades, and adjustment. Drawers are assembled using the same principle. After screeding the “bottoms,” the tabletop is installed, checking the horizontal level with a building level.
The upper cabinets of the kitchen set are assembled in the same way as the “bottom” ones; the products do not have drawers, but a more complex installation is required. The upper sections are hung on a mounting strip, anchor bolts, powerful hinges or butterfly dowels on plasterboard at an optimal height of 550-600 mm from the tabletop. An important nuance in the kitchen is that a gap of 2-3 mm is left between the top of the door and the countertop, the mounting rail is installed 30-40 mm below the roof of the hanging sections, the installation of a corner kitchen begins with the installation of a radius or straight corner cabinet.

You can use a power tool in your work, which simplifies the attachment of a particular part to the body

Panels should be coated before assembly, not after, to avoid smudges.

When making cabinet furniture, pay attention to the fact that laminated chipboard may crumble during insertion of fasteners

Select fasteners after you have decided on the main material
Scheme and drawings
In order to independently assemble any furniture structure, the craftsman needs a drawing on which the technological process of installing the assembly unit is “outlined” in detail and clearly. The presence of schematic images simplifies the task. It is worth noting that the manufacturer is not responsible if customers damage wood chips, mirrors, or plastic parts during the assembly process, so the work must be done carefully, use mechanical equipment, and carefully study the attached diagram and instructions. What useful information does the drawing contain:
- instructions for assembling the unit (kit). Typically, the manufacturer indicates that the order complete with parts, fastening, connecting, mounting, and decorative fittings must be checked upon receipt of the goods;
- the assembly of Italian furniture or a regular set from a furniture supermarket begins in the same way - with studying the specification, which indicates the number of parts, their name, size, code;
- the specification of the fittings is indicated in a separate table, Supplies, fasteners. For ease of use of the drawing and assembly diagram, the name and size of the fittings are given - screw, bolt, clamp, confirmat, clamp;
- The craftsman needs text instructions to correctly assemble the product - the specification and assembly order are indicated for each unit, and the design details and fittings are marked on the drawing - a template for drilling holes.
The diagram on how to hang a mirror deserves special attention. There are several options for installing mirror panels. To choose suitable way installation, you need to take into account the weight of the mirror and the strength of the base plate. Technology for hanging a mirror:
- use double-sided tape - place glued strips of tape on the surface of an MDF or chipboard, “try on” the mirror, remove protective film and fix the glass. The work is carried out with the part in a horizontal position so that the glue on the mounting tape sets. You can hang the mirror vertically, increasing the consumption of adhesive tape;
- acrylic glue - necessary to hang the mirror without damaging the amalgam. The sealant can be applied dotted or in separate strips, distributing the adhesive over the surface indented from the edge of the mirror. It is recommended to glue the slab to the mirror part in a horizontal position. Equipment for work – glue gun, glue dries in 24 hours;
- colorless construction silicone is quite suitable for securely hanging a mirror on a cabinet door. To firmly glue the parts, it is not necessary to apply silicone to the entire back surface of the mirror; it is enough to distribute the substance in thin transverse stripes, attach the mirror glass, fix the decorative frame to the glued mirror.
As an alternative, you can use fastening hardware made according to the principle of clamping tabs. But the disadvantage of this method is the presence of visible parts of the mounting hardware. To avoid drilling mirrors and glass parts, accessories such as a clamp are widely used. Exists big choice products according to construction, design, material of manufacture - the gluer can be made of plastic, have a transparent structure, round or rectangular shape. A clamp is a universal device that acts as a mirror holder or glass shelf holder. Installation option - fixation with a self-tapping screw or drilling under the clamp.
An example of a diagram for assembling a children's wardrobe according to the manufacturer's drawing: place the right side on a table for assembling furniture, install the rod holder, guides, hinge counters, rods. Place the bottom on the dowels, secure the left side panel using eccentric fasteners. Insert the back wall into the groove, secure the connecting beam, and secure the left side panel. Next, the box is assembled according to the diagram - the rods are screwed in, the sides of the box are mounted, the unit is secured with eccentrics, and the bottom is secured with euroscrews - confirmats.
After hammering in the thrust bearings, the children's closet is placed in vertical position on the table for assembling furniture, mount the door hinges on self-tapping screws (the size is indicated in the drawing). The final stage of assembly is the installation of doors, rods, handles, then a drawer and shelves are inserted into the cabinet. Using such a simple and understandable diagram, which is attached in the drawing to the furniture structure, you can assemble any cabinet unit - a table, a chair, a wardrobe, a bed.


Required tools and fasteners
To properly assemble a furniture structure, you must have a full set of tools, connecting fittings, and decorative accessories at hand. Furniture fasteners are supplied complete with products, but there are situations when not all fittings are available, then you can choose some fasteners yourself. Manufacturing and assembling furniture - two different technological processes. In the first case, sawing, grinding, milling, and gluing equipment is required; in the second, the client assembles the product with his own hands, using a set of tools and components. Types of connecting fittings:
- confirmat (aka Euroscrew, screw tie) - inexpensive, reliable, durable furniture connection, does not require precise drilling for additives mounting hole. Used for assembling wooden products and furniture from chipboard;
- metal and plastic furniture corners are the simplest devices for connecting parts. The products are durable, reliable, and easy to install. The scope of application of the fastening is upholstered furniture, cabinet models;
- minifix eccentric design is a common type of connection of elements, the tie of which is performed at a right angle. The mounting option is a corner minifix, designed for complex structures. Withstands many assembly/disassembly cycles;
- Rafix – an eccentric type fastening connection, the fixation of which is carried out in two mounting holes. The design of the rafix, a photo of which is presented below, is an eccentric, a plastic body, a rod, a liner (not in all products);
- self-tapping screws are devices for intersectional fastening of parts, which are convenient to use in places where shelves are mounted, or furniture hinges canopy. Self-tapping screws do not have such high reliability as Euroscrews and minifixes, but they are inexpensive;
- countersunk screw - a simple fastener, usually not supplied with furniture. The area of use of a countersunk screw is the installation of shelves, back walls made of fiberboard, handles, hinges, guide runners for drawers.

A furniture corner is used to fasten perpendicular structures

Using a countersunk screw

Tenon permanent connection
The list of tools required for assembly must be selected depending on the type of furniture structure. Thus, to connect soft products, a wrench and a screwdriver for fastening hardware are used, and when installing parts of a kitchen set, connecting and mounting fittings are required for hanging upper cabinets (anchor bolts, metal hinges). Furniture units supplied ready-made are accompanied by a drawing, assembly diagram, and prepackaged fastening components. The drilling for connecting fittings is carried out by the manufacturer, so the master’s task is to assemble the furniture with his own hands according to the drawing, which indicates where the holes are drilled.
Currently, for the production of cabinet furniture, the demand for which is steadily growing, the same type of materials is used, so assembly requires standard set tools. We are talking only about connecting finished (processed, glued, drilled) parts.
List of tools for furniture assembly:
- A screwdriver is a tool that is easy to use and maintain, with which the master performs almost all operations - tightens self-tapping screws, minifix rods, screws, clamps, dowels. Screwdriver with battery used for assembling all types of furniture - compartments, dressing rooms, hallways, kitchen and bathroom sets, beds, sofas, coffee tables;
- bits for magnetic holders. Types of bits – Phillips, asterisks, hexagons. To use a screwdriver, the consumable fasteners are fixed in a magnetic holder. Cross bits are suitable for self-tapping screws with cross splines, installation of eccentric couplers. Star bits are necessary for installing built-in household appliances, hex bits are necessary for installing confirmat couplers;
- a stationery knife, a level, a tape measure - a list of tools without which assembling and repairing furniture is impossible. Using a level, they control the position of facades, countertops, doors in the horizontal and vertical plane, all measurements are made with a tape measure - if the parts have drilling for self-tapping screws or cutting with a milling cutter for minifixes, you need to check the accuracy of the holes;
- hammer drill, drill, jigsaw - a professional tool that may be needed for inserting a sink, making holes for communication systems, and installing the upper sections of kitchen units. Which tool to choose depends on the design of the furniture, installation features, and the need to disguise communication systems (bathroom, kitchen).
A set of hexagons, a clamp, drills and bits, as well as a screwdriver for adjusting hinges, a hammer, and pliers may be required for a craftsman to assemble furniture with his own hands according to drawings and assembly diagrams. A pencil will not interfere with your work - before you start assembling the furniture, you need to check the alignment of the holes according to the attached diagram. If they are located inaccurately or incorrectly (this sometimes happens), you will have to fix the fasteners yourself in a strictly defined place, using drilling jigs. Such devices are templates with which you can accurately make holes for drills, euroscrews, and dowels. Furniture production and assembly will be more accurate if you use overhead jigs - they are suitable for making holes on flat parts made of chipboard and MDF.
In addition to common mounting and connecting fittings, furniture structures use supports, tenon permanent connections (rods, fixation on dowels for seating with glue), ties for fixing tabletops, intersectional ties, transformation mechanisms and support rollers (upholstered furniture). All parts must be available, otherwise the furniture assembly at home will not be completed correctly.
An important point - handles, hinges, shelf supports, canopies, legs, sliding systems, railings, moldings, that is, finishing fittings and parts of internal filling systems, are installed by the manufacturer of furniture structures. But if the model is large in size, the parts can only be connected at the installation site. In this case, professional furniture assembly is preferable to self-assembly.


Screwdriver

Pliers

Tool level

Hexagon

Screwdriver
Common mistakes
Every private furniture maker has own secrets How to quickly and accurately assemble furniture. Some professionals use a table to assemble furniture, while other craftsmen can mount a large tall cabinet on the floor and install the finished structure, measuring the diagonal of the room and the product.
Difficulties may arise with inserting sinks into kitchen countertops, making radius curves, for which you need to use special equipment, hanging mirrors with glue, tape, or adhesive.
To become a professional assembler, the future master must be able to draw up a project, calculate the consumption of materials, perform detailing and cutting of chipboard, MDF boards, use equipment, tools and have some design skills. Then the finished product will be distinguished by its impeccable quality, durability, and long service life. Frequent mistakes that novice craftsmen make when assembling furniture:
- start work without first checking the availability of the mounting kit, basic structural elements, and without studying the manufacturer’s instructions;
- Universal prefabricated furniture begins to be assembled by connecting large parts - you need to decompose all the elements into units (drawers, cabinets, tables), and try to assemble a small structure;
- they don’t pay attention to the specifications in the instructions - in vain, at first glance the parts are similar, but there are left and right elements, fronts of upper and lower cabinets, and other assembly nuances;
- ignore the need to assemble the product on a hard, clean surface. You need a sufficient amount to work free space, you can use a device for assembling furniture;
- panels made of MDF material can be damaged by using an electric tool (drill, screwdriver) - use screwdrivers until you acquire the necessary assembly skills;
- do not change the diagonal of cabinets (compartments, bedside tables, chests of drawers) before installing the back wall made of fiberboard - this leads to distortion of the part and the entire structure;
- do not take into account the assembly order specified by the manufacturer in the instructions. The result is low quality assembly, dismantling and re-installation of the product;
- they do not check the holes for fixing the fasteners, do not measure the distance between them to ensure compliance with the drawing - as a result, they have to cover the defects with plugs.
There are craftsmen from whom you can hear that they violate assembly technology in order to quickly complete the work - for example, “I hang the top of the kitchen unit before installing the lower cabinets.” Technically, this is not true - the assembly of a complex kitchen structure begins with the installation of the lower corner cabinet (often a sink), then install the remaining floor units, connect them together with self-tapping screws or intersection ties, cut in the sink, install the countertop, and only then proceed to install the upper tier of the kitchen headset There are many such subtleties in the process, and to do the job accurately, watch the video on assembling furniture.
When the master has assembled a furniture structure using simple equipment, fasteners, tools and accessories, he must make adjustments, check that there are no visible technological gaps, and that the doors are diagonal. Distributing and assembling furniture is not an easy task, but after acquiring the appropriate skills, everyone will be able to gain valuable experience in assembling furniture units of various designs. To make furniture assembly easier, the video below will help you understand the process.
This activity can be used as a business option in several steps - ordering factory furniture, delivery to the consumer in your car, installation at the installation site. Presenting photos of assembled furniture will expand your customer base if the furniture assembler is interested.
Video
In the first part detailed manual on assembling a computer with your own hands, we will talk about installing a processor on the motherboard, installing its cooling system and installing RAM.
Introduction
IN last years The computer industry is experiencing a real boom in demand in the mobile PC segment. Smartphones, laptops, ultrabooks, all-in-one PCs and, of course, tablets that have flooded the market are increasingly displacing classic desktop computers from our lives. This trend is evidenced by various reports from various analytical agencies.
But ten years ago everything was completely different. Sales of system units and components for them were the main source of income for many computer companies, and low-power and expensive laptops were practically not regarded by users as an alternative to a stationary home PC.
It was this time that can be called the heyday of “self-assembly,” when the vast majority of system units sold were assembled not at company-owned plants or factories, but in small pavilions of computer markets, by the hands of self-taught sellers. The users themselves did not lag behind them. The most creative and experienced of them preferred to independently assemble the future PC itself at home. And we must admit that this approach had many advantages. Individual components tended to cost less than the complete computer. Moreover, you could choose a suitable hardware manufacturer, eliminating the possibility of low-quality equipment appearing on your desktop, made by nameless handicraft Chinese companies (it was called “noname”).
To date self-assembly system unit less and less practiced by users. And this is not surprising. As we have already noted, on the one hand, the desktop PC market is now experiencing a decline due to the rapidly increasing popularity of mobile computers. On the other hand, huge competition and the development of IT technologies have made it possible to saturate the market with inexpensive computer devices, making “self-assembly” impractical for the sake of saving money.
And yet there are still many enthusiasts who prefer not only to independently create the configuration and select components for their future electronic machine, but also to assemble it all with their own hands. This is especially true for high-performance computers of medium and top level. After all, it is this approach that allows you to choose the right balance between installed devices and their cost, without worrying about what, for example, powerful processor, they will install you a weak video card with a large amount of video memory, which simply will not be used. Also in this case, there are always ample opportunities for subsequent modernization of the system unit, implementation of modding and operational implementation minor repairs.
Thus, despite the fact that assembling a PC with your own hands is gradually fading into the background, this issue still remains relevant. Therefore, we decided to prepare material, or rather even a manual, for novice users, which will tell you in detail how to assemble a system unit yourself at home.
Before assembly
Before starting assembly, let's get acquainted with the components that will make up our future computer. Here it is worth mentioning right away that we in no way encourage you to assemble a PC of the same configuration and from the same parts that will be involved in this material. All the equipment used to demonstrate the assembly is purely the personal preference of one person and has nothing to do with advertising of certain brands and manufacturers.
So, in our case, solutions from Intel, which include a motherboard based on the Z77 chipset with an LGA 1155 socket and quad-core processor Core i5 family. To cool the processor, a tower fan with low level noise.
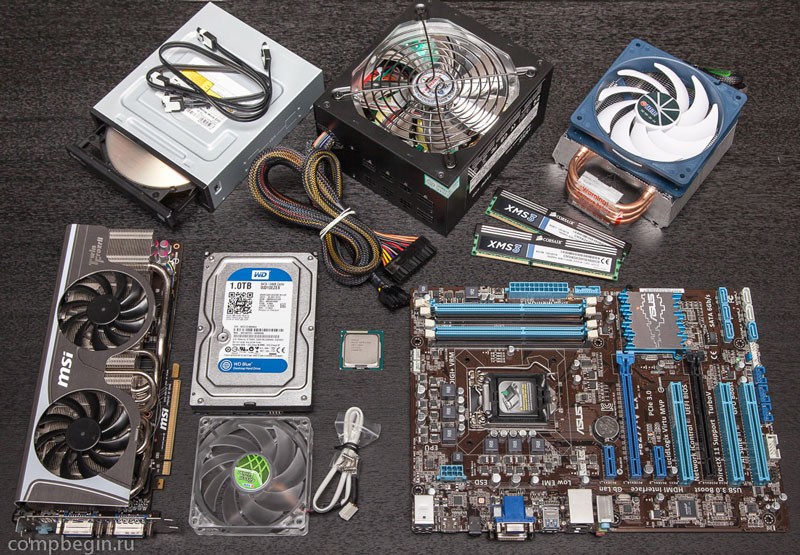
The remaining participants in our assembly were: a pair of 4 GB DDR3 RAM modules, GeForce video card GTX 580, a 1 TB hard drive and an additional internal fan for airflow, a DVD-RW optical drive, a medium-sized ATX case and a 700 W power supply.
In order to assemble all this into a single whole, we need only one tool - a medium-sized Phillips screwdriver, preferably with a magnetic tip. And of course a pair of straight hands.
Everything is ready to begin assembly and now it’s time to remember one important detail - static electricity, which in some situations tends to accumulate on our body. All computer parts, with the exception of the power supply, are low-voltage equipment and can easily burn out even from the shortest discharge high voltage. But banal combing of hair or rubbing against woolen items can lead to the accumulation of a static charge of several thousand volts. So imagine what could happen if you cut it on some computer part?
To avoid unfortunate consequences, be sure to touch any metal object, such as a heating pipe or refrigerator, before handling components. If your body was electrified, then in this case, the accumulated charge will instantly discharge. Also, during assembly, it is better not to wear things that can contribute to the accumulation of static electricity.
It is advisable to carry out the assembly itself on a surface that does not conduct electricity (wood, plastic). If the work table is covered with a cloth tablecloth, then it is better to remove it for a while, since many fabrics tend to accumulate static electricity.
Processor Installation
At the first stage of assembly, we will install the processor and RAM into the motherboard, and also mount the CPU cooling system. Of course, you can first screw the motherboard into the case, and only then do the above steps. But here it is important to know that some processor fans have mounts, some of which are placed with reverse side"motherboard", which may make it impossible to install it when the board is already inserted into the case.
Finding the processor socket on the motherboard is very easy. It has a rectangular shape with sides measuring more than 4 cm, so it is quite difficult not to notice it.

One of the main design differences Intel and AMD processors is the fact that in the first, contact pads are used to connect to the connector on the motherboard, and in the second, contact legs are used.

Accordingly, motherboards also have different sockets, which for Intel microprocessors are equipped with soft spring-loaded legs, and for AMD, with many tiny holes. Let us remember that in our case we are dealing with an Intel processor and an LGA socket.
Before installing the processor, you must open the connector by pressing the metal lever and pulling it to the side.

Once released from the mount, move the elevator lever up, after which the clamping frame will open.

To prevent incorrect installation of the processor in the socket, manufacturers make auxiliary docking cutouts in the design of their cases. Intel has semicircular recesses on the case, while AMD has beveled corners.

After opening the socket, we take the processor and install it into the socket without any effort or pressing, so that the mating cutouts align.

Now we close the clamping frame by inserting the protrusion located on it with a recess under the limiter, and return the metal elevator lever to its original place, thereby pressing the processor to the contacts located in the connector.
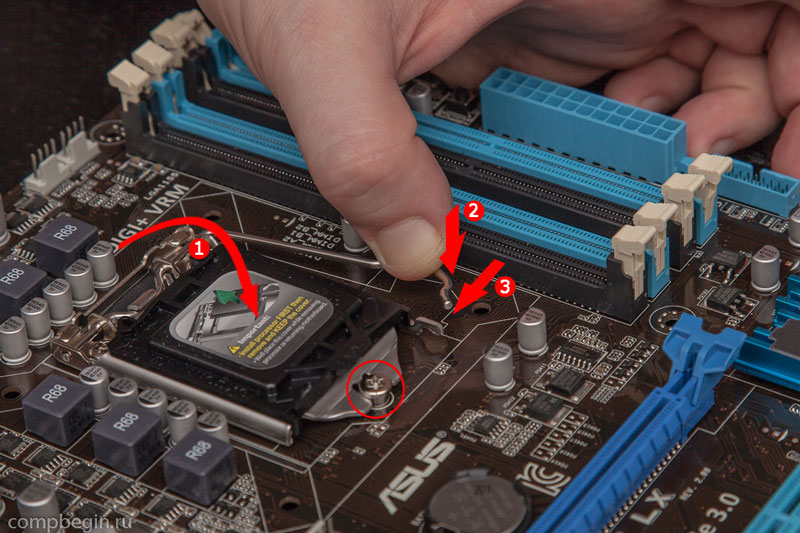
At this point, the black protective cap on the pressure frame should fly off, after which it can be thrown away. At this point, the installation of the processor can be considered complete, so let’s move on to installing the cooling system.
Installing a CPU Cooling System
Today there are a large number of different cooling systems on the market that use various ways attachment to the system board. Of course, it’s difficult to talk about all the nuances within the framework of one material, but this is not necessary, because, as a rule, many coolers with unusual mounting systems are equipped with detailed instructions on their installation.
We will look at the two most common methods of installing fans, which are used with certain nuances in the vast majority of cooling systems.
To install the cooler in the motherboard next to the processor socket, there are four holes.

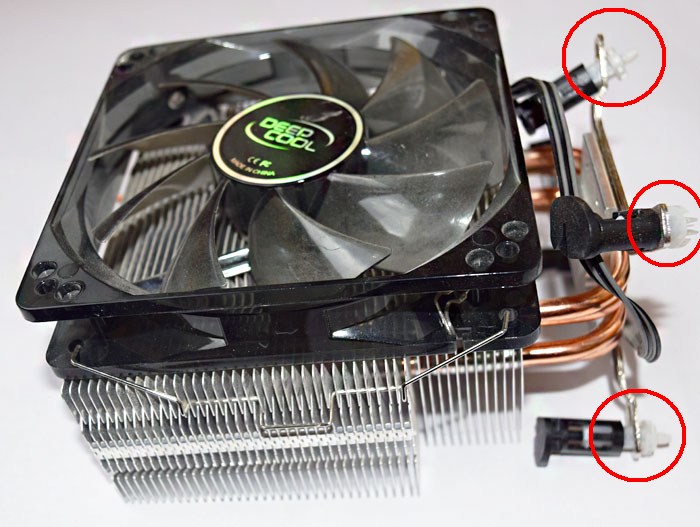
In most cases, the cooler mount for modern Intel processors contains four legs, which are inserted into these very holes and secured there by pressing on them from above. To avoid distortions, it is better to fasten them crosswise.

Standard fan for processorsIntel
For dismantling fans, with this kind fastenings, you need to turn the head of the leg counterclockwise 90 degrees, and then pull it up. After removal, rotate all legs to their original position.
Motherboards with sockets for AMD processors are equipped with a special frame for installing the cooling device, to which the standard cooler is attached with two screws. So everything is simple here.

Let's move on to our case. We did not use the original Intel fan, replacing it with a more advanced tower cooler with low noise levels. Its installation on the motherboard is somewhat different from the standard procedures described above. Here, to increase the stability of the cooler, a special frame is used to mount it, located under the processor socket, to which it is subsequently screwed. It is with its placement that we will begin.
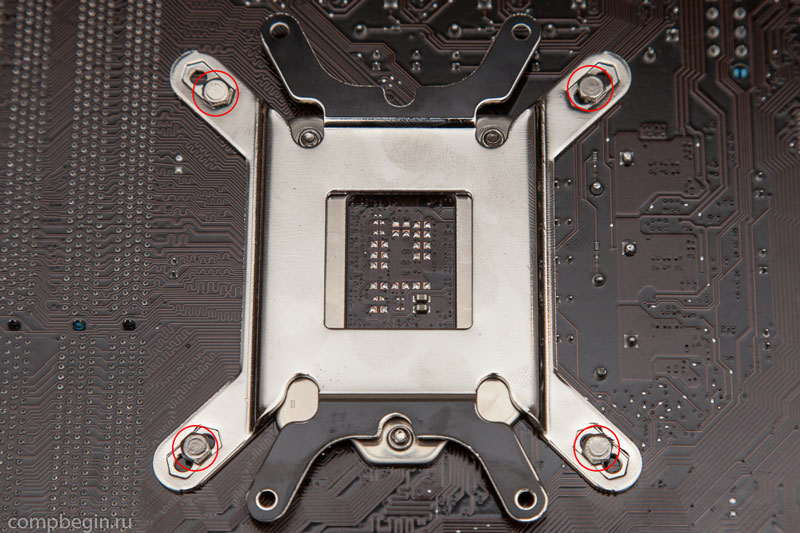
Attach the frame from the back side motherboard in such a way as to align all four holes on both parts. Then we insert the screws included in the kit and fasten the nuts onto them on the other side of the board, to which the frame will be attached, pressing the base of the radiator into the processor cover.

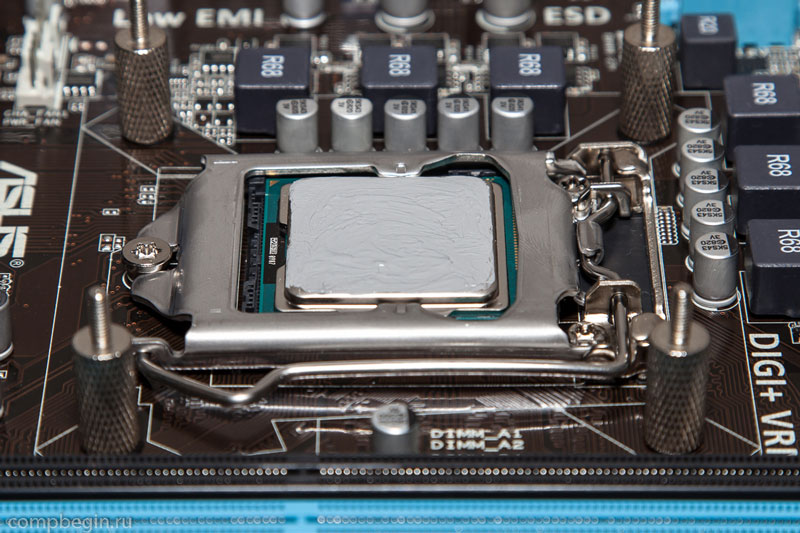
Cooling of the processor occurs due to the heat exchange process between its cover and the base of the cooler. Ideally, the lid and base should be completely adjacent to each other, which would ensure maximum heat dissipation efficiency. But in practice this is very difficult to achieve, since their surfaces have roughness. Therefore, in order to increase the contact area, liquid thermal paste is used to fill microvoids, thereby improving heat transfer between the surfaces of devices.
As a rule, in many solutions, including inexpensive and standard coolers, thermal paste is applied to the radiator of the cooling system at the factory. So all you have to do is properly secure the fan to the motherboard. But in our case, you will have to apply the thermal paste yourself, since the tube with it is included separately.
You should know that thermal paste should be applied in a very thin layer. principle than more topics better, it’s not suitable here, as it will only harm normal heat transfer. For application, you can use any available means, as long as your imagination is enough. We used a regular cotton swab, first moistening its ends a little so that the cotton would not peel off.
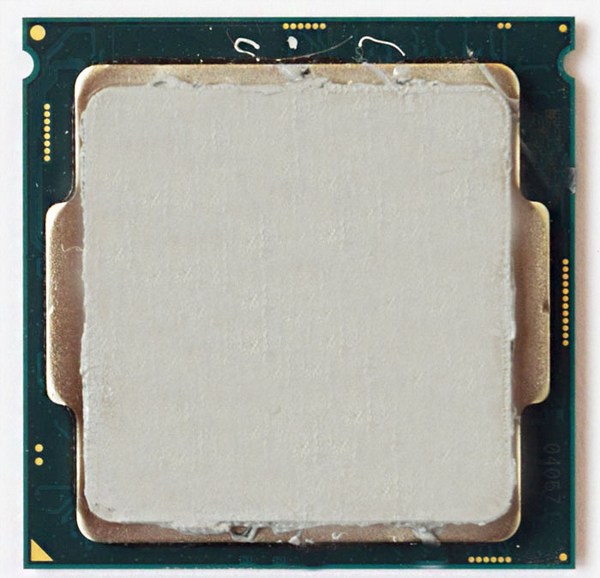
Squeeze out a small amount of thermal paste from a tube onto the processor cover.

Then spread it evenly over the entire area.
Now, everything is ready to install the cooling system. We take the radiator and remove the protective film from its base.

We install the radiator on the processor and secure it using a special clamping frame and nuts that are screwed onto the screws we prepared earlier. To avoid distortions of the radiator, tighten the nuts crosswise.

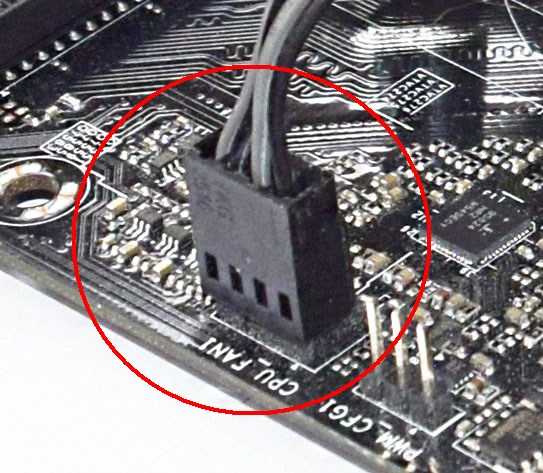
Now all that remains is to connect the fan to the control connector on the motherboard, and then put it on the radiator, after which the installation of the cooling system can be considered complete.
The connector on the motherboard for the processor cooler is always located next to the processor socket, has four contacts and the name CPU_FAN.

It should be taken into account that the cooler itself may often have a three-pin connector, which in any case will be compatible with the one located on the motherboard. The presence of the fourth pin is not mandatory, since it is responsible for an additional function that makes it possible to use various automatic fan speed control modes, depending on the processor temperature, using the motherboard BIOS.
Regardless of which connector you have on the cooler, to avoid incorrect connections, auxiliary notches are always placed on it, so it is almost impossible to make a mistake when connecting the fan to the motherboard.
Our first stage of assembly is completed by installing RAM. This is very simple procedure, as you will soon see for yourself. Slots for installing memory are not at all difficult to find, since they have an elongated shape, are always located next to the processor socket and are painted in pairs in different colors. By the way, they have appeared more than once in many previous photographs.

In our case, we have four connectors in black and blue colors, which makes it possible, if desired, to install four memory sticks respectively. IN general case, different motherboard models may contain 2 ( budget models), 4 (standard) or 6 (legacy models) RAM slots. As you can see, in any case their number is even. The fact is that memory modules are usually installed in pairs to turn on dual channel mode, which allows you to double the process of data exchange between the RAM and the central processor. That is, if you want to have 8 GB of RAM, then you should buy two 4 GB sticks. Of course, you can install a single 8 GB memory chip instead, but in this case the computer's performance will be reduced.
It’s not for nothing that the manufacturer paints the RAM slots in pairs in different colors. These are the so-called “banks”, each of which has its own color. To use the dual-channel mode, you need to install a couple of memory chips in one bank, and not at random. For example, in our situation, we fill either both black slots or blue ones.
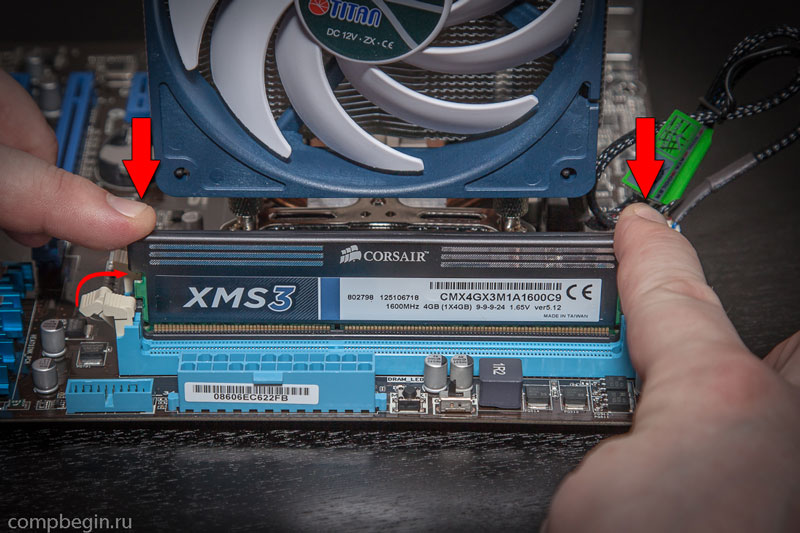
Before installing the modules, move the white locking levers located on the sides of the selected connectors to the sides. Next, using light pressure, carefully insert the memory stick into the slot.

In this case, it is necessary to align the notch on the memory module with the jumper in the connector on the motherboard.
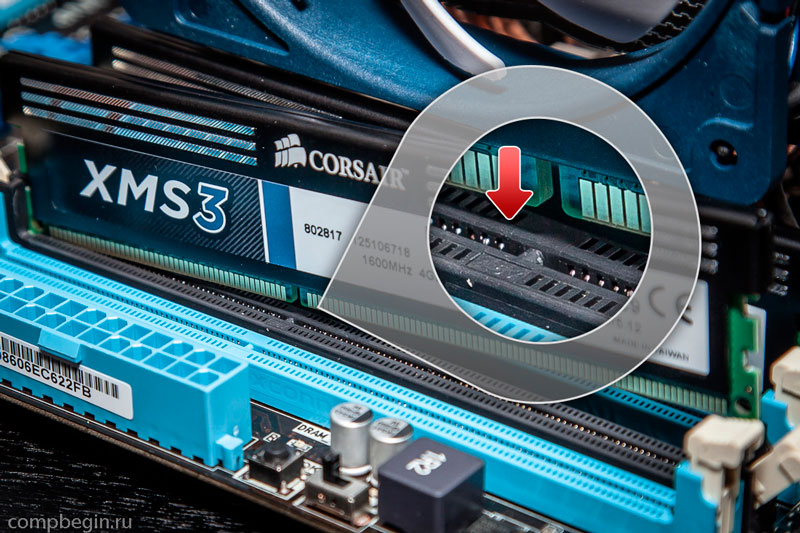
After making sure that the bar is inserted into the slot, fix it by pressing from above on the corners of the memory until a characteristic click is heard. The side clamps should return to their original position.
We do the same with all the other planks.
This is the first and the most important stage assembly can be considered complete.

Don’t be surprised, but after installing all the components described above, you can start the system for the first time and check its functionality. After all, most modern processors have a built-in graphics core, and motherboards have integrated connectors for connecting a monitor. Having temporarily connected the power supply to the processor and motherboard, it is not difficult to turn on the assembled system by closing the corresponding contacts on the “motherboard” with any metal object, for example, a screwdriver. Only experienced users should perform this trick. Well, if this is your first assembly, then go straight to the second stage.
Hello friends! If you are a computer enthusiast, then learn on your ownAssembling a computer will not be difficult for you.
When I wrote this article, I immediately showed it to a person who had never assembled personal computer. He read it carefully and began asking me questions, from which I realized that the publication urgently needed to be supplemented with many little details, only then would it become understandable to beginners. As a result, I almost completely rewrote the article several times and only now am I offering it for your consideration.
In my last publication, I explained to you, but today we will independently assemble a classic PC.It is best to assemble a computer on a table so that you can see everything and be as comfortable as possible. Let's start withapplying thermal paste to the processor and installing it into the motherboard socket, then we assemble CPU cooler and connect it, after that we insert the RAM modules into special connectors on the motherboard, then mount the power supply into the case and tighten the wires, secure the SSD, HDD in the system unit, and only after that install the motherboard in the case...
First, we need to buy thermal paste and apply a thin layer to the processor. It is inexpensive and is usually sold together with a special hard card, with the help of which it is literally smeared over the surface. Why do you need thermal paste? During operation, the processor heats up very much and, with the help of thermal paste, effectively removes heat from itself to the cooling radiator.

Installing the processor into the motherboard
Now let's install processor in, in my case i5 6400 and Asrock z170m pro4s. Install the processor into the socket very carefully and carefully so as not to damage it. This especially applies to AMD processors, since unlike Intel processors, which have contact pads, first there are so-called “legs”, bending which the processor will stop working. So, we open the socket on the motherboard using the side latch and look at the keys that show us how to insert the processor correctly.


We take the processor in our hands and see that it has corresponding recesses and a triangle in the corner, thanks to which it will be difficult to make a mistake during the installation process.

With a gentle movement of your hand, simply place the processor in the socket,

We make sure that it does not hang out there and close the side latch.

CPU cooler
Further, I prefer to equip the motherboard in full and install RAM on it immediately, outside the case, because personally, with my big hands doing this in a tight space (inside the case) is problematic.
So, we look at the motherboard and see special connectors for mounting the cooler, and that’s where we’ll install it.


This is done simply, take the cooler, put the special legs into the holes and snap them into place.
After installation everything will look like this.


Don’t forget to also connect the cooler’s power to a special connector on the motherboard called CPU FAN.

RAM
power unit
Now that the motherboard is fully charged, we proceed to installation in the case. Many people advise installing the motherboard into the case first, but I prefer and recommend that you start with the power supply, because if you follow my advice, you can stretch all the necessary wires properly and avoid damage to the motherboard, since the unit is usually very large and takes up a lot of space . One awkward move and you can easily damage the microcircuits - goodbye motherboard. In my case, the GMC Forge case and the Aerocool KCAS 600W power supply.
Installing the block is a very simple process. We install, stretch the wires as desired and screw the screws into special holes on the back of the case.


I would like to note that the power supply is always installed so that the fan is directed downwards when the unit is mounted at the bottom. The inside of the case has its own microclimate and its own temperature, so it will be better if the power supply draws in cool air from the outside rather than warm air from the inside.
SSD and HDD
Now before installing the motherboard for the same reason as with the power supply. We insert solid state drive and the hard drive into the appropriate baskets, if there are any; if they are not, then we simply screw them to the case. I will have a Patriot Spark 128gb and a Seagate Barracuda 7200 1000gb working hard on my system.


Motherboard
Let's move on to installing the motherboard into the case. The mother itself has special holes for fastening; depending on the model, the number of these holes may vary. We insert the motherboard into the case in accordance with these fasteners and tighten it with the screws that are included with the case.


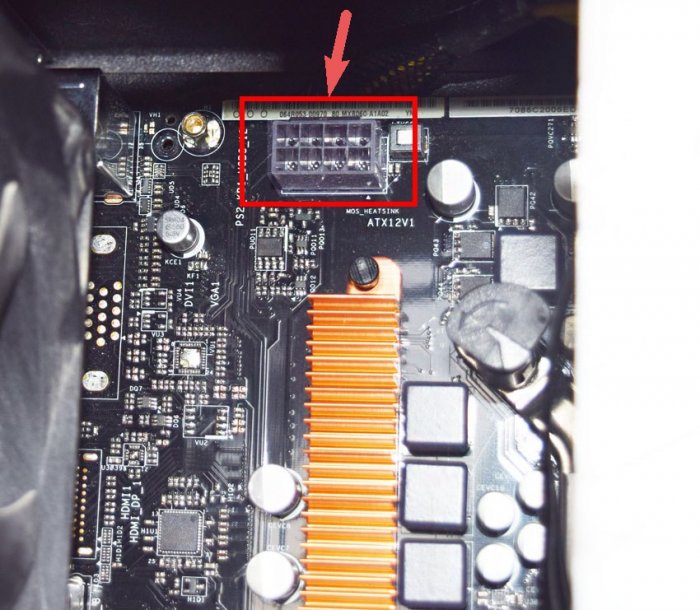
CPU power
And finally, all we have to do is connect all this stuff together. Let's start with powering the processor. The power connector can be 4pin or 8pin and is usually located directly next to the processor. We find the corresponding cable at the power supply and connect it.

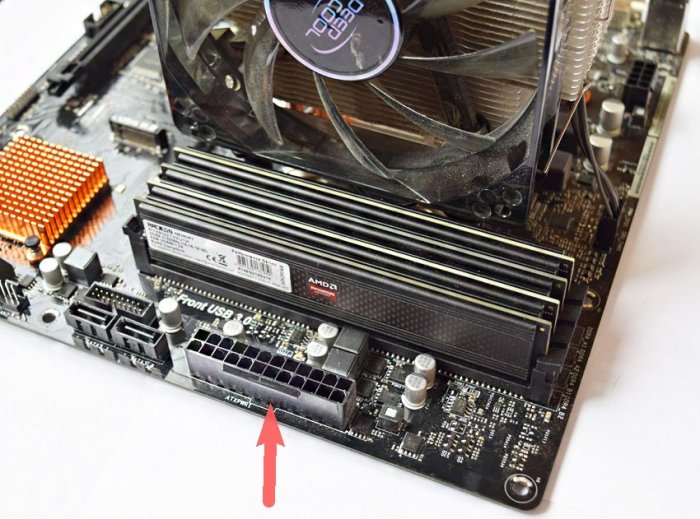
Motherboard power

Case cooler
Let's move on to connecting case coolers for injection/exhaust. They are connected to the corresponding connectors on the motherboard with the name CHA FUN or SYS FAN or similar.


Now let's connect our drives using SATA interface cables to the corresponding slots on the motherboard.
Don't forget to connect extra food to our storage devices. In my case, this can be done from the back of the case.

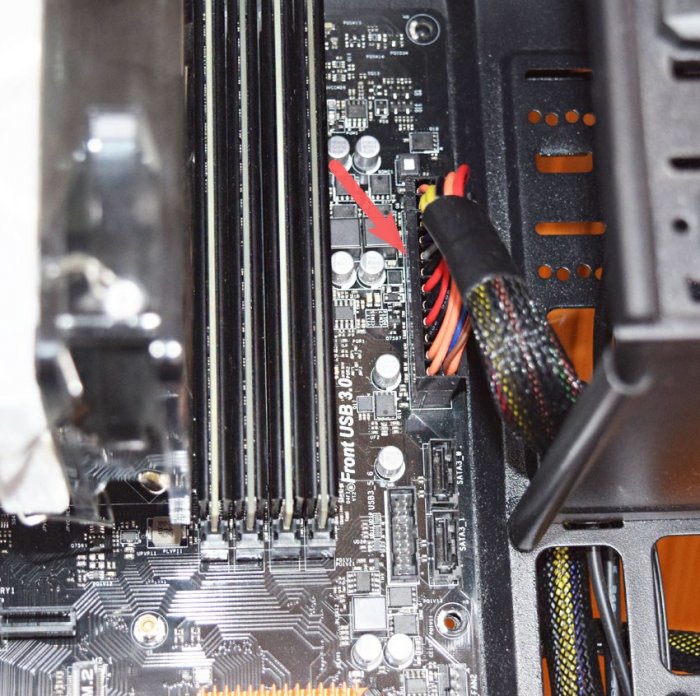
Connecting Front Panel Cables to the Motherboard
And finally, I decided to leave the most difficult thing, which causes some problems for most users, namely connecting the power to the front panel. All connectors are located at the bottom of the motherboard. Let's start with the audio outputs. Take the wire with the name AUDIO and connect it to the connector with the same name.
Do you want to build a computer for games or for Photoshop? Are you looking for instructions with photos on how to assemble a computer with your own hands? You've come to the right place.
The article continues the story about assembling a computer at home. Let us remind you that we are assembling a computer for a photographer, which easily turns into a powerful gaming computer by simple addition video cards. The selection of components for the photo and gaming computer being assembled, as well as methods for protecting electronic components from static electricity, was described.
Before you begin the computer assembly process, make sure you have a Phillips screwdriver - this is the only tool you will need. Make sure you have all the components needed to build your PC. Make sure you provide antistatic protection for sensitive electronic components. All this was discussed in detail in the previous article. If everything is in order, let's get started.
Computer assembly sequence. Step-by-step instruction
It is convenient to start assembling a computer by installing the processor (Core i5 6500) into the socket on the motherboard (H110M PRO-VD). To do this, remove the motherboard from the antistatic bag, holding it by the ends, and place it on a cotton fabric (calico, satin) folded in several layers. Several layers will gently hold the board, it will not slip and scratch the table. In addition, cotton does not accumulate static electricity. Raise the processor pressure plate lever (press down slightly and move it to the side), and fold back the processor pressure plate. There is a plastic plug on the pressure plate. We don’t touch her, she will go away on her own. Next, take the processor out of the box and remove it from the blister. We hold the processor exclusively by the ends, without touching the contact pads. We combine the triangular key on the processor and on the board. Also on the processor on the opposite side of the key there are 2 notches on the sides; they should also go around the corresponding protrusions on the board socket. Having aligned the key and the notches, we simply place the processor with the contacts down on the socket without any effort. If the key and the notches are aligned correctly, the processor will lie flat, without distortion. Next, simply lower the pressure plate onto the processor and secure it with a lever. At this moment, the plastic plug on the plate should bounce off on its own. We put it aside, it is no longer needed. The entire processor is installed on the motherboard.
 MSI h110m pro-vd processor installation
 The box with the processor also contains a fan, the so-called box cooler. Take it out of the box. Be careful not to lubricate the thermal paste that is applied to the heatsink where it touches the processor. The paste is needed to smooth out micro-irregularities, to ensure a tighter contact between the radiator and the processor body, so that heat is better dissipated. Every time you install or dismantle the cooler, you need to apply new paste. So if for any reason you want to remove an already installed cooler, do not forget to buy additional thermal paste in a tube. Installing a boxed cooler is generally simple: you need to rotate the fan around its axis so that the power connector reaches the mating part on the motherboard. Align the 4 holes on the board with the clips on the fan. Press down on the clips and they will snap into place. The clips must be fixed one at a time in the following sequence: first, opposite ones along one diagonal, then along the other. Having snapped the clips, we connect the fan power connector with the mating part on the motherboard (marking on the cpufan board).
Next, install 2 RAM sticks on the motherboard (Kingston HyperX FURY Black Series 16 GB). The planks are very easy to install. You need to move the levers on the sides of the memory connectors on the motherboard to the sides. Install the strip into the connector, aligning the only notch on the strip with the protrusion in the connector, and gently press down. The bar will sink down, and the side arms will rise and snap into place.
 CPU cooler and memory sticks on MSI h110m pro-vd board
 It's time to install our motherboard into the system case. We take our case (AEROCOOL MC3), remove the side covers, and put them aside. We put the body in horizontal position. You need to install the missing support bushings on the motherboard mounting panel. Four pieces, which are present on all board sizes, are already installed. We look at how many mounting holes there are on the board; under each hole you need to install a support sleeve. The support bushings are in a bag with screws that come with the body. The same bag contains a hex adapter for a Phillips screwdriver. The adapter is needed to tighten the threaded connection between the bushing and the panel. At first I didn’t notice this adapter and tightened the bushings with pliers, but you do everything as expected when using the adapter.
When all the support bushings are installed, you can mount the motherboard connector socket on the rear wall of the system unit. The panel comes complete with motherboard. There are special recesses in the system unit case, so this socket seems to snap into place.
Now you can screw the motherboard itself onto the support bushings. For this we take the screws from the same package included with the case. When tightening the screws, the board must be pressed against the back panel, since it rests and springs with special tendrils.
 Mounting the MSI h110m pro-vd motherboard in the system case
 For those who want to build a powerful gaming computer and bought extra gaming video card type GeForce GTX 10 series, it's time to install it on the motherboard connector pci boards express and attach the socket to the rear wall of the system unit.
Turn the body over to a vertical position. Now we will install an optical DVD drive (DVD-RW LG GH24NSD0). In the following pictures, the devices are conventionally shown with connected wires. There is no need to do this yet. Installation of wires is a separate operation. On the front panel of the system unit case, you need to remove one of the three removable panels for external 5.25-inch devices. This will be the most top panel. To remove it, you need to bend one of the side clamps from the inside and press on the panel from the outside. The panel will fall inside, after which it can be removed. We insert our optical drive from the outside into the resulting hole in the case, aligning the drive with the front panel of the system unit. We fix the drive in the basket for external devices. On one side of the basket there are clips for quick fixation; there you just need to bend the lever. On the other hand, there are no such clamps, so we screw in 2 screws from the kit.
 Optical drive in the basket for external devices
 Now it's the turn of SSD (OCZ Trion 150 TRN150-25SAT3-240G) and HDD (1 TB WD Caviar Blue) drives. Solid State Drive put it in the basket for internal devices, 2.5-inch compartment. On one side, we insert the pins of the basket into the disk mounting holes, and on the other, we fix the disk with two screws from the kit to the system unit case. For hard drive On one side we screw in screws with a narrow pin head, they will slide along the guide. We insert the pin heads into the guides and insert the disk into the basket for internal devices, 3.5-inch compartment. On the opposite side, fix the disk with three screws from the system unit case kit.
 SSD and HDD drives in the basket for internal devices
 Now comes the power supply (Aerocool KCAS 600W). We take it out of the box and install it on the bottom of the case, with the fan down, to the side vent. The system unit is on high legs, so there is room for air to enter. The power cord connector will face the outside and the wiring harness will face the inside of the chassis. We fasten the 4 screws from the kit on the rear wall.
 Power supply at the bottom of the system unit
 Now that all the components are in place, you need to connect them with electrical cables. All devices must be connected by interface cables to the motherboard. Plus, each device needs to be connected to a power cable from the power supply. In the pictures, all power cables have a black polymer braid. Almost all connectors are keyed, so it is impossible to mix them up unless you use excessive force. Plus, the board has signatures for each connector part. You should immediately try to lay the cables through channels and through technological holes in the system unit case, so that all that remains is to secure them later.
Let's connect the signal wires to the motherboard:
- 3 SATA3 cables from three devices: DVD drive, HDD drive, SSD drive. On one side of the cable the connector is connected to the device, on the other side of the cable the connector is connected to the motherboard. For the HDD drive, there is no need to connect the connector on the motherboard side yet. We will connect it after installing Windows on the SSD disk, this will be discussed later;
- Wires from the front panel of the system unit: blue USB3 connector, audio panel connector, USB2 connector. The buttons and lights on the front panel of the system unit come to the motherboard in the form of single contacts with markings. To install them, you need to check the diagram included with the motherboard. We also connect the front panel fan connector (marked on the sysfan board).
Let's connect the power wires to all devices. We take the wires from the power supply:
- CPU power connector;
- Motherboard power connector;
- Additional front panel fan power supply. Molex connector mounted in parallel signal wires, increasing the cross-section of the power wire;
- 3 SATA power connectors for each device: DVD drive, HDD drive, SSD drive.
- Those who installed a video card need to check whether it has an additional power connector (for powerful video cards). If so, then it needs to be connected.
The connection of connectors on the msi h110m pro-vd board is shown in the picture. In this and other pictures, the wires are conventionally shown held together with plastic clamps. There is no need to install clamps yet - this is done at the last stage, when everything is already working.
 MSI h110m pro-vd connector connection
 After connecting the wires inside the system unit, you can connect the power cord, plug it into a power outlet, connect the keyboard, mouse, monitor, and then . If during setup you need to correct something, do not forget to remove the plug from the socket, including the one at the monitor.
After setting up the BIOS and installing the OS, if everything works, you need to use plastic clamps to secure the wires in the system unit case so that they do not dangle when moving the computer. If you are like in in this case If you use an integrated video card, you need to install a plug on the hole in the first PCI expansion slot (on the back wall, where the discrete video card panel usually comes out). The plug is included with the system unit case. You should end up with something like this:
 Fully assembled system unit. View from the motherboard
  Securing cables to the system board panel
 All that remains is to screw on the side covers of the system unit and you can use the computer.
In this configuration, everything came together and worked the first time for me. I solved my problem: camera developer raw Photoshop I began to move and process the raw image from the photo matrix (RAW format).
3DNews has a large and diverse audience. The resource is visited by both seasoned enthusiasts who have assembled more than one PC, and readers who are just beginning to delve into all the intricacies of computer technology. The test laboratory elegantly overclocks them to serious frequencies to study the durability of drives, in modern games and on the purchase of unusual iron abroad, but at the same time does not forget about inexperienced users. This is how the “” section appeared, which offers various configurations of system units. After reading the comments and personal communication with the readers of the site, it became clear to me that it was time to tell in detail and show beginners how to assemble the components proposed in the article into a single whole. This is exactly what this material is dedicated to.
⇡ Selection and compatibility of components
Sometimes deciding on the set of components that will make up your PC is more difficult than assembling the system unit yourself at home. You can find it on sale great amount processors, motherboards and video cards. You can argue for a long time about which brand is preferable, as well as debate about whose graphics are faster, the main thing is that when the final configuration is selected, all the hardware is fully compatible with each other. By the way, these are the systems I propose in “”. If you follow this rule, assembling a system unit is not much different from playing with a construction set in which all the parts fit together. The dimensions of components, parameters of mounting holes and connectors - all elements of a computer are strictly regulated, and therefore, for example, it cannot be that DDR3 RAM suddenly works on a motherboard with DIMM slots intended for installing exclusively DDR4 modules. You simply won't be able to install them into the appropriate slots.
For the full functioning of the system unit, you must purchase the following devices: motherboard, central processor, cooler, RAM, hard drive or solid-state drive, video card (if the CPU or motherboard does not have a built-in graphics core), power supply and case. Additional components include an optical drive, as well as various discrete devices: network and sound cards, additional cooling.

The motherboard is the basis of any computer. It depends on it which processors will be used, how many RAM modules, video cards and drives can be installed. The dimensions of the motherboard also play an important role when choosing a case. At the moment, among motherboards, the most popular form factor solutions are E-ATX (305 × 330 mm), ATX (305 × 244, 305 × 225 or 305 × 199 mm), mATX (244 × 244, 244 × 225 or 191 × 188 mm) and mini-ITX (170 × 170 mm), although the standard sizes themselves similar devices there are many more. The form factor is always specified in technical specifications buildings.
The “housing” itself for components is also divided into types depending on size and shape. As a rule, the larger the computer case, the more powerful hardware we can install in it, while ensuring high-quality cooling all system components. The dependence, however, is nonlinear - practice shows that it is quite possible to assemble a powerful gaming PC in compact cases with a volume of 7-10 liters. You just have to first select all the components more carefully.
Among PC cases, the most popular are four types of models: Midi-Tower (examples - and ), Full Tower (), Mini-Tower () and Slim Desktop (). Naturally, the more compact the device, the fewer seats it has for installing discrete video cards, drives and case fans. For example, the Node 202 with a volume of 10 liters can only install 2.5-inch hard disks and SSD. A conscientious manufacturer indicates all these features in the technical characteristics of the device.
When choosing components, pay attention to other limitations that any computer case has:
- maximum height of the processor cooler;
- maximum video card length;
- maximum length of the power supply.
Before purchasing equipment, be sure to make sure that all devices are compatible with each other, do not conflict and fit exactly into the computer case. The simplest logical chain, which will not allow you to purchase components that do not match each other, looks like this:
- We decide on the model of the central processor.
- Select a motherboard with a suitable CPU socket.
- We study the list of compatible motherboard equipment on the official website and select a set of RAM.
- We select drives that are compatible with the motherboard.
- We select a video card, power supply, processor cooling and a case that will accommodate all the components.
Again, the given sequence is by no means an axiom. Since assembling a PC is always a creative process, the sequence of choosing hardware may change. For example, you liked a certain case and want to build your dream system only in it. Or you already have some components on hand and need to buy the rest.

If the system unit will use a maintenance-free water cooling system for the processor or video card, then you will additionally need to find out the sizes of the supported radiators, as well as the locations in which they can be installed. Obviously, the mounting locations for the SVO coincide with the mounting locations for the fans. Single-section radiators are usually installed on the rear wall, two-section and three-section - on the top and/or front.

To write this material, based on the above sequence of component selection, I used the following set of devices:
- CPU AMD Ryzen 7 1700, socket AM4, 3.0 (3.7) GHz;
- maternal MSI board X370 GAMING PRO CARBON, socket AM4, X370 chipset;
- RAM Kingston HyperX Fury (HX426C16FR2K4/32), 4 × 8 GB, DDR4-2666;
- solid state drive;
- video card;
- power unit Cooler Master MasterWatt, 500 W;
- Cooler Master MasterBox 5 MSI Edition case;
- CPU cooling Cooler Master MasterLiquid 120.
As you can see, the most common form factors are used in preparing this material - ATX for the motherboard and Midi-Tower for the case. Similar options are offered in the “Computer of the Month” - because this size is the most universal and is the most popular. True, I can’t say that the assembly process in Mini-Tower and Slim Desktop cases is fundamentally different. It’s just that the requirements for selecting hardware that is compatible with each other are noticeably higher.
Additionally, I would like to note that when selecting devices, all modern trends were taken into account. The main drive is the Kingston HyperX Predator model with an interface PCI Express. And the choice in favor of the Cooler Master MasterBox 5 MSI Edition was made due to the possibility of installing a power supply at the bottom of the chassis, as well as the presence of a mount for drives on the barrier wall. Plus, maintenance-free systems are very popular liquid cooling. Cooler Master MasterLiquid 120 — bright representative single-section “water pipes”, which are ready for work out of the box. The remaining components are selected in such a way that the end result is a productive system unit for work and entertainment. The optical drive was not used. In my opinion, in 2017 there is no need for it, and the Cooler Master MasterBox 5 MSI Edition (as well as many other new cases of a similar format) does not have seats for installing devices in 5.25-inch bays.

To assemble the system unit, you will definitely need two Phillips screwdrivers with different slot diameters, nylon ties and wire cutters. Perhaps pliers will come in handy - in cheap cases, the threads are cut by eye, as well as double-sided adhesive tape, degreasing liquid and cotton swabs. In order to avoid scratching the case and damaging the motherboard, I place all components on a rubber mat. An antistatic bracelet or gloves will also be useful for beginners, but, to be honest, more to give confidence in own strength. Since assembling a PC also includes connecting small connectors to the motherboard, you definitely can’t do without good lighting or a flashlight on hand.
⇡ Step No. 1. Installing the processor and RAM
The motherboard user manual always contains a description of the installation of all main components and connectors. Beginners, keep this book with you. The sequence of steps for assembling the system unit may vary depending on the type of components. For example, sometimes it is better to install a processor cooler right away, and sometimes it is better to install it second to last or last. Even before fixing the motherboard in the case, you should install the central processor and RAM in the appropriate slots.

You are probably aware that the design of AMD and Intel processors is noticeably different from each other. Thus, on AMD chips, protruding contacts, called “legs” by hardware, are located directly on the PCB substrate. But Intel chips do not have such elements - for these CPUs the contacts are placed directly in the motherboard socket.
AMD chips are installed very simply: lift the lever, place the processor on a plastic substrate, lower the lever.

As for Intel solutions for LGA115X platforms, a similar technique is used here: together with the lever, we raise the clamping frame, install the processor, lower the lever and the clamping frame.

In case of Intel platforms LGA2011 and LGA2011-v3, to raise the clamping frame, you will need to release two levers from the locking slots.
|
|
|


Please note that all central processors and motherboards are equipped with pointers and so-called foolproof protection. In principle, you will not be able to install the chip into the socket in any other way, so NEVER use force when assembling the computer. All elements in the system unit are equipped with protection against incorrect connection. Apart from the CPU, you won't be able to connect power supply cables, case connectors, fans, discrete devices, drives, or RAM in any other way. More precisely, you can, but this will require maximum effort. I think it’s not worth talking about the consequences of incorrect installation of PC components.

After the central processor into the DIMM slots, usually located with right side from the CPU, I install RAM. MSI X370 GAMING PRO CARBON supports DDR4 RAM, printed circuit board Four ports are wired at once. Some motherboards may have only two of them (most often these are either the cheapest devices, or mini-ITX form factor solutions, or), in models for the LGA2011 and LGA2011-v3 platforms there are eight. Typically, all DIMM slots are marked on the PCB.
Most modern AMD and Intel processors have dual-channel RAM controllers. That's why motherboards use either two or four DIMM slots. Therefore, it is considered optimal to install either two or four RAM modules. In the first case, RAM is installed through one connector. Some motherboards have special signs. For example, in the MSI X370 GAMING PRO CARBON, modules are installed in the DIMMA2 and DIMMB2 slots - in this case, the RAM will operate in dual-channel mode. In other motherboards there are inscriptions like , - in such cases, to ensure dual-channel mode, the modules must be installed in the DDR4_A1/DDR4_B1, DIMM_A1/DIMM_B1 and DDR4_1/DDR4_2 slots, respectively.

"Fool proof" for RAM
I have already said that it will not be possible to insert RAM incorrectly, since the design of the DIMM connectors uses a jumper. It is also used to prevent the user from “squeezing” modules of a different standard into a motherboard that supports DDR4.
RAM cards are secured using latches located at the edges of the DIMM slots. Some motherboards only have these latches on one side of the connectors. This is done so that the user can easily change RAM modules without, for example, removing the video card.

After installing the CPU and RAM, you can immediately install a CPU cooler, but only if the design uses a small heatsink. The use of an oversized cooling system will complicate the installation of the motherboard, as well as the subsequent connection of wires. The photo above shows examples of installing boxed coolers—the so-called coolers that are sold together with processors. Coolers for the AMD AM3+ and FM2+ platforms are mounted using plastic “ears” - a special metal bracket with eyes clings to them. Box cooling for Ryzen chips is installed differently; here you will have to work with a screwdriver: first remove the plastic mount, and then screw the radiator to the backplate. The cooler for Intel processors is attached using plastic clips: install the heatsink on the CPU and press the latch until you hear a characteristic click. In general, in the case of installing box cooling systems, even beginners should not have any problems.
Thermal paste is already applied to the base of some coolers - its use significantly increases the efficiency of heat removal from the CPU. In any case, thermal paste is always included with the processor cooler. For example, Cooler Master MasterLiquid 120 came with a small tube, which should nevertheless be enough for 3-4 times. Please be sure to remove the protective film before installing the cooling system, if any, on the base of the device. The process of applying thermal paste is described in point number five.
But the installation of other coolers is done individually, since each manufacturer uses a mounting kit own development. Therefore, immediately remove the instructions from the CO packaging. Most devices are equipped with universal mounting mechanisms that fit both AMD and Intel processors. True, the mating part of the mount, which must be pre-fixed on the board, is different for different platforms. The list of supported equipment, as well as the dimensions of the cooler, are always indicated in the technical specifications. And yet there are quite a few models on sale that are compatible with only one specific platform.

Once again: if the device is large or, as in my case, a maintenance-free liquid cooling system is used, then at the first stage it is enough to attach the back plate and frames to the board, which will hold the cooler’s radiator. We will install the radiator itself next to last, after all the cables are connected to the motherboard. Yes, in cases of the Cooler Master MasterBox 5 MSI Edition level, the barrier wall has a window for access to the cooler's backplate, but it is not always convenient to use.

If we talk about air processor coolers, tower type coolers are considered the most popular. Depending on the platform used and specific model The CO radiator can be installed in two positions. In the first case, the cooler fan will blow air through the rear wall of the case, in the second case, through the top. Correct option installation is determined by the shape of the housing used. So, in the case of models in Full-, Midi- and Mini-Tower formats, it is better to use the first option. It is important that the used CO does not overlap the expansion slots, and also does not rest against the cooling elements of the motherboard power subsystem. For example, the MSI X370 GAMING PRO CARBON does not conflict with even the largest tower coolers. A wide processor cooler can also prevent the installation of RAM modules with high cooling radiators. Therefore, it is better to use compact RAM kits, such as Kingston HyperX Fury for example, or make 100% sure that CPU cooling and memory will not conflict with each other.
Our assembly uses a maintenance-free liquid cooling system Cooler Master MasterLiquid 120, so its installation will be done penultimately (step No. 5).

The cooler and case fans are connected to the motherboard using 3- and 4-pin connectors. The MSI X370 GAMING PRO CARBON has six such elements soldered at once, which is very convenient. The number of such ports is not regulated in any way, but at least two connectors on the board must be present: for connecting the CPU cooler fan and for the system (case) impeller. All connectors are marked accordingly: CPU_FAN, SYS_FAN (or CHA_FAN). Sometimes the 4-pin connector intended for the processor cooler is highlighted in a different color (usually white). You can also find the PUMP_FAN connector in mid- and high-price boards. It is designed to connect the rotor of a water cooling pump, but at the same time it is suitable for any other fans. It’s just that a greater current is transmitted through this port.
The three-pin connector does not allow you to adjust the speed of the fan connected to it. But the 4-pin port has such an opportunity, and modern motherboards are able to regulate the rotation speed of the “turntables” both with pulse-width modulation (fans with four contacts) and without it (fans with three contacts).
If there is a shortage of connectors for connecting case fans, all kinds of adapters will help. This can be a regular splitter that allows you to connect several impellers to one 3- or 4-pin port at once. Or a cable connected to a MOLEX or SATA connector. There are also devices such as, although their popularity has never been high. However, they are initially equipped with simple (most often three-position) controllers that control the fan speed by lowering the voltage from 12 to 7 or 5 V.
In the case of our PC, there is no need for additional adapters and splitters, since only two CBO fans and one case impeller need to be connected to the motherboard.
⇡ Step No. 2. Installing the motherboard and connecting case connectors
Now that the CPU and RAM are connected to the motherboard, it's time to start working on the case.

For a long time now, in tower cases, the power supply has been installed primarily at the bottom. This was done both for aesthetic reasons (it’s more convenient and easier to lay wires) and for the sake of increasing the cooling efficiency, primarily of the PSU itself. However, there are case models on sale with other options for installing the power supply.

Mounting spaces for installing a power supply, 2.5- and 3.5-inch drives
The design of the Cooler Master MasterBox 5 MSI Edition includes a small basket with a slide that can accommodate two 3.5-inch hard drives. More compact 2.5-inch drives are mounted on a barrier wall.

Installing the motherboard begins with fixing the I/O panel plug in a specially designated rectangular hole. You won't have any difficulties. The plug is always included with the motherboard.

Mounting accessories are always supplied with the housing. Along with the Cooler Master MasterBox 5 MSI Edition, I found three types of screws, as well as plastic clips for installing additional fans. Other cases may have more mounting options. On some models, the stand screws required to install the motherboard are already screwed into the corresponding threaded holes on the barrier wall. In the case of Cooler Master MasterBox 5 MSI Edition, you will have to do this procedure yourself.

So, the case supports the installation of motherboards of mini-ITX, mATX, ATX and even E-ATX form factors. There are symbols on the wall (a similar note is used in many models). Since the assembly uses an ATX form factor board, you need to screw all eight stand-up screws into the threaded holes marked with the letter “A”. However, not all motherboards belonging to this standard size meet the length and width parameters of 305 × 244 mm. For example, the MSI X370 GAMING PRO CARBON is narrower by 19 mm, so it cannot be mounted in the case on the right edge. Consequently, when connecting wires from the power supply or installing memory modules in DIMM slots, the textolite will bend. Install these elements more carefully in such cases.

After the motherboard is secured, I personally immediately connect the controls and connectors on the front panel of the case. The front wall of the Cooler Master MasterBox 5 MSI Edition has two USB port 3.0 A-type, two 3.5 mm mini-jacks for headphones and microphone, as well as system power and forced reboot keys. Difficulties can arise only when connecting controls - this is a bundle of wires with connectors Power LED- and Power LED+ (transmit information to the computer status indicator), Power SW (responsible for the operation of the power key), HDD LED- and HDD LED+ (transmits information to the drive activity indicator ), as well as Reset SW (responsible for the operation of the forced reboot button). Some elements may not be on the “face” of the case, since not all devices are equipped, for example, with a Reset key or LED indicators. However, in all cases these connectors are connected in a specific sequence, as shown in the table below. It’s just that motherboard manufacturers use their own designations for essentially the same pad: JFP1 in MSI motherboards; PANEL in ASUS; PANEL1 in ASRock and F_PANEL in GIGABYTE.
| Power LED+ | Power LED- | Power SW | Power SW |
| HDD LED+ | HDD LED- | Reset SW | Reset SW |
In addition, among the internal connectors on the motherboard there may be contact pads for connecting USB 3.1 and USB 2.0 ports, RGB strips, a TPM module, FP audio and a speaker.


