The price list template is beautiful. Creating a price list in Microsoft Excel
In this post, we invite you to check out a selection of 64 effective, well-designed pricing pages. We hope they will be a great source of ideas for you. Watch, get inspired and bookmark!
1.Flat
Flat allows visitors to purchase any number of licenses, at any time and for any period, using a simple price filter slider.
2.

ViewFlux did a very good job of distributing the white space on their pricing page. The clean layout allows visitors to focus on the features of each plan.
3.

Readymag lets users know right away that they can save up to 20% on annual plans. When switching between the monthly and annual billing tabs, the animation does a great job of highlighting the price difference.
4.

Marvel also relies on the benefits of an annual subscription, but compared to the previous example, their page is easier to read due to the well-distributed white space.
5.

Dunked also offers customers savings of up to 30% when signing up for an annual plan - this is signaled by a small switch located under the tariff plans.
6.

Stripe emphasize the simplicity and transparency of their tariff plans both in the title and in the descriptions. The main tariff stands out against the background of other structural elements of the page.
7.

Key Feature of this price list is that the user can cancel or change his tariff at any time.
8. Klets

Most optimal tariff Klets price list is framed; in addition, the company offers a two-week free-trial subscription for it.
9. Base

Base uses huge fonts to draw visitors' attention to their pricing plans. At the bottom there is a compelling call to action encouraging you to fill out the lead form.
10. Symo

Symo highlights the benefits of the central plan by highlighting it with a blue box that says “ The best choice"(Best choice).
11.
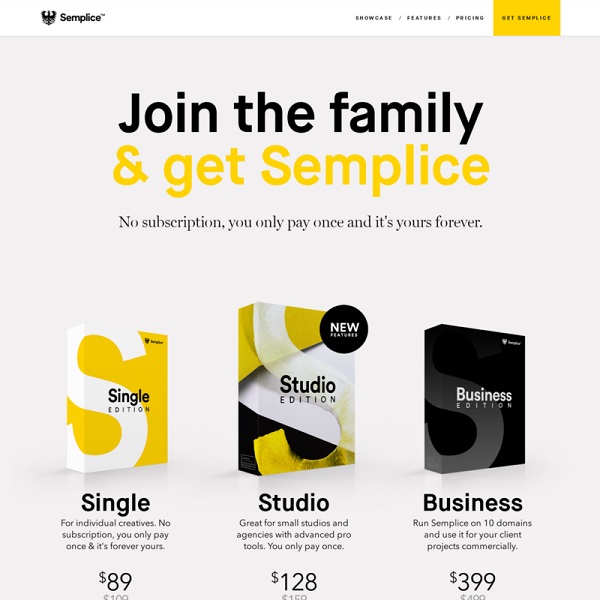
Semplice offers users to purchase any version of their product in one payment, without any subscription.
12. Carto
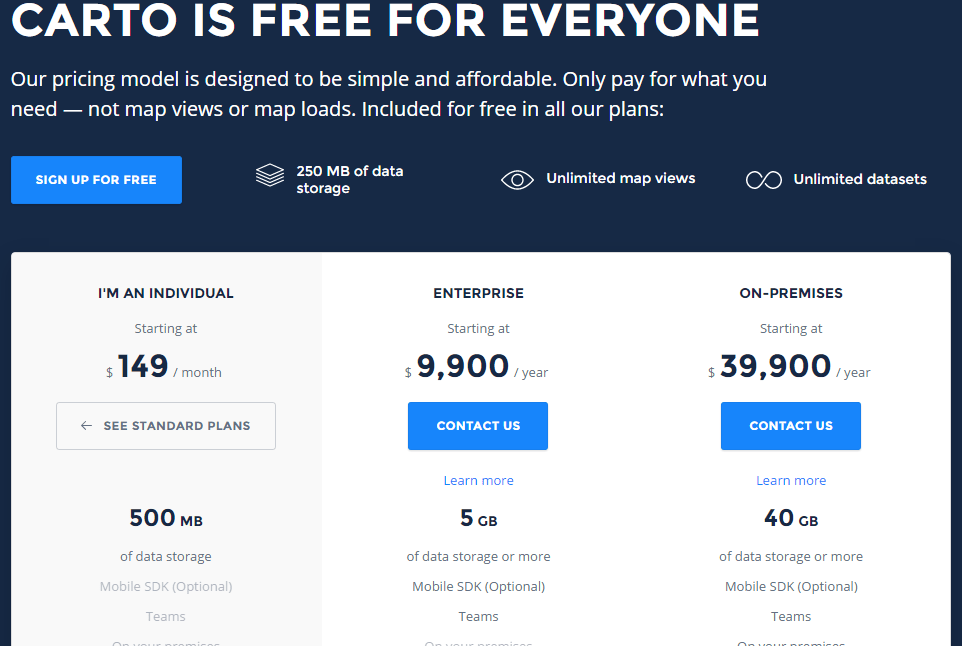
Carto's pricing model is simple and affordable. The individual plan is highlighted in gray, and its price contrasts strongly with the other two offers.
13.

Prevue provides its customers with a free subscription to each of the tariffs presented.
14.

Themes Kingdom not only points users to the most popular plan, but also guarantees them a refund within the first 14 days.
15.

Webflow also guarantees subscribers a refund within 30 days. The price list includes 4 tariff plans - from free account for beginners to the most expensive plan for large teams.
16.

This page will serve as an excellent example of how to design a price list for online stores promoting perfumes or cosmetic products.
17. Flow

Flow allows page visitors to adjust their tariff plan parameters using a convenient vertical slider. If you subscribe, the entire team receives 15 days free use.
18.

Shoplo offers a 15-day free-trial subscription to all customers. Competently structured page tariff plans makes it easy to distinguish the main benefits of each offer.
19. Lingo

Lingo includes high-quality icons on its price list, and also informs page visitors about a 30-day free subscription for the professional and team plans.
20.

Mailchimp's flexible system of tariff plans is designed for both entry-level email marketing and large email campaigns for large businesses. The designers very successfully expressed the difference between tariffs in symbolic images with animals.
21.

Clean layout and large font highlights to Squarespace visitors the cost of their two main plans.
22. Asana

Asana offers users two basic tariff: Free subscription for teams of less than 15 people, which does not contrast with the general background of the page, and a premium plan - with a bright color.
23.

Onfleet leads a simple and transparent pricing policy and allow visitors to select the required tariff using a horizontal slider.
24.
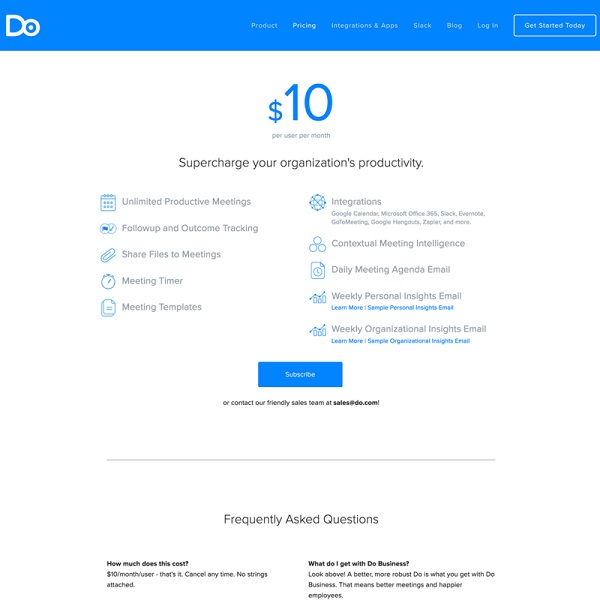
On their pricing page, Do simply lists a single subscription price and lists its benefits.
25. Vend

Vend provides its customers with several attractive pricing plans, highlighting the most popular ones with color.
26.

Marque combines very interesting colors in its price list and perfectly explains to visitors the purpose of each tariff plan.
27.

Moneybird's pricing page is an exemplary example of a minimalist approach to design.
28. Coach

Absolutely all functions of the Coach service are free. You only pay when you use Coach to sell content.
29.
The absence of any secondary design elements on this page speaks to its inherent minimalism. Segment's clean layout makes it easy to highlight the most popular plan.
30. Clio

Clio uses one pricing plan and one CTA button in their price list. To subscribe, the user only needs to leave an email.
31. Wake
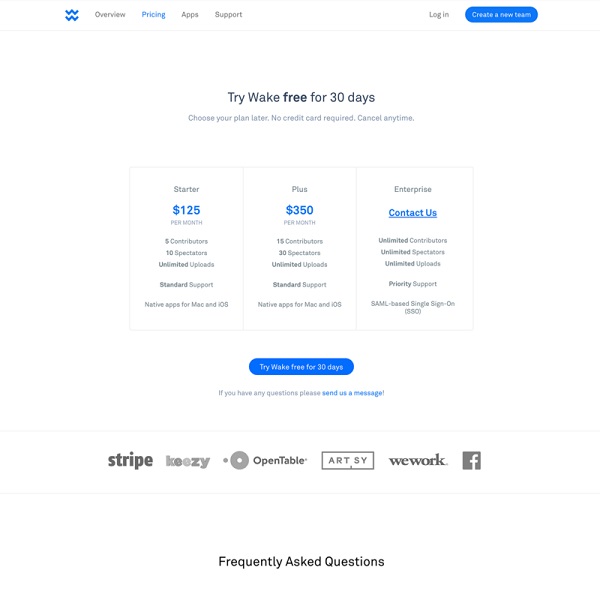
Wake encourage potential clients take advantage of the 30-day free subscription, placing names on the price page famous brands who have already collaborated with them.
32. Ionic

Ionic provides flexible plans for developers, startups, and enterprises. When purchasing an annual subscription, the user saves 10% on payments.
33.

Webydo makes it very clear to visitors which plan is the most popular and also highlights the 20% discount on annual subscriptions.
34.

Unlike previous services, Mention expressed the benefit of an annual subscription not in money, but in months. The increase in the cost of tariff plans here is expressed in saturation of blue color, which is used in their design.
35.

Avocode's basic plans are available for two weeks free use. The entire emphasis here is on the annual subscription, and the monthly payment is relegated to the background.
36.

The catchy inscription “100% Happiness Guarantee” intrigues visitors and helps dispel their doubts before choosing a suitable Weebly plan.
37.

Timely offer customers a limited free plan and a paid but very affordable subscription with a 30-day trial period.
38.

The most popular Dropbox Business plan is highlighted in blue. You can sign up for a monthly free trial subscription or purchase it immediately.
39.

Atomic perfectly emphasizes the uniqueness of each tariff due to the correctly selected color. The most popular plan is marked “Recommended”.
40.

As social proof Shopify shows visitors to its pricing page the number of startups that have already signed up for a two-week free account.
41.

All 4 Format plans are available for free use for two weeks. The red CTA button contrasts favorably with other elements on the page.
42.

Apiary has displayed its prices in a table with detailed descriptions, which allows you to easily see all the features of the tariffs.
43.

Treehouse demonstrate the difference in their tariff plans in the size of the structural blocks that describe their advantages. Due to the contrast of colors, the emphasis is placed on a more expensive account.
44.
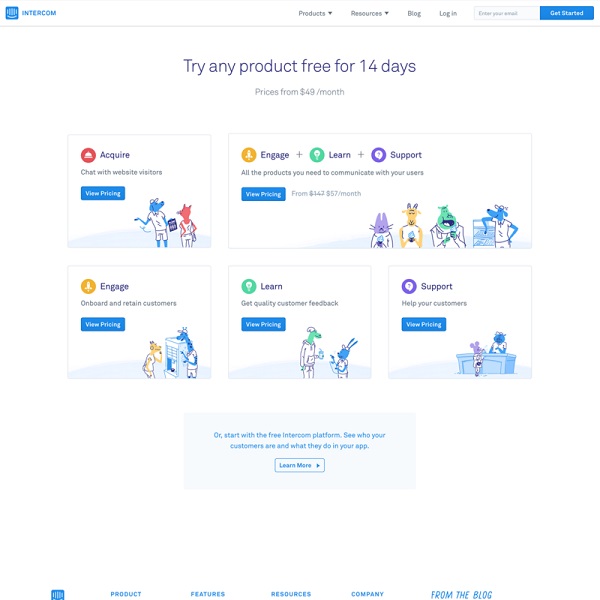
Intercom made good use of hand-drawn characters to communicate their value proposition.
45.
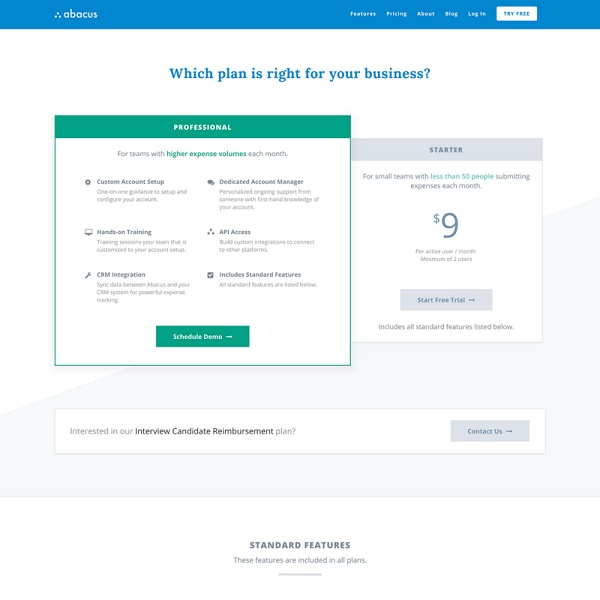
Abacus starts their price list with a leading question, and then highlights the block in color and format with a more professional rate for large teams.
46.
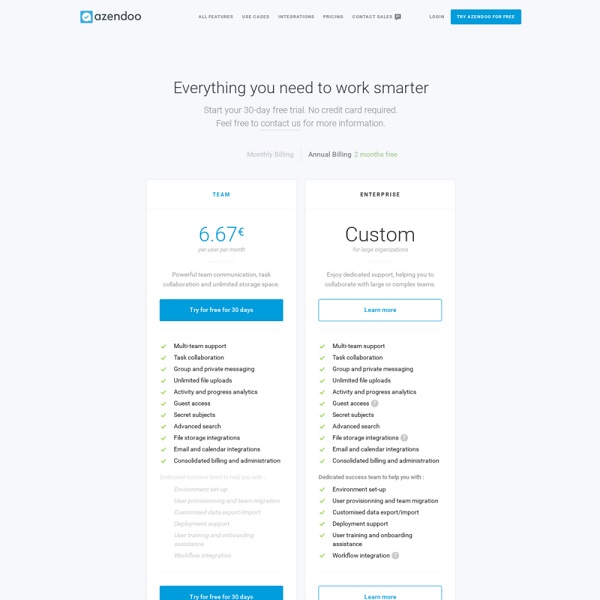
Azendoo takes a minimalist approach when designing its pricing page. You can use the cheaper team tariff here for free.
47.

Positionly offers visitors the option to recommend a plan using a simple drop-down menu.
48.

That Clean Life focuses customers' attention on its standard tariff, designed for individual use.
49.

GoSquared allows subscribers to use its platform free for 14 days. The medium plan stands out because it provides customers with the most favorable terms.
50.

Presumi explains to users the purpose of each tariff not only through text descriptions, but also due to small drawings.
51.

SendGrid distributes the two cheapest tariffs for additional plans so that each client can find suitable conditions for themselves.
52.

The InVision price list includes five simple plans, designed for any audience. For the most expensive tariff, you can sign up for a free-trial subscription.
53.

And again we see that animation in the design of tariff plans changes their perception in better side. For more detailed comparison price offers the visitor only needs to press one button.
54. Podio
Podio offers favorable rates for entrepreneurs of any level and shades the most popular plan with a dark fill.
55. Quip

Quip displays its flat rate price in a separate white block that contrasts with the background of the page and attracts attention.
RedPen is quick to tell users that the only difference among all their plans is the number of projects that can be carried out simultaneously.
59.

Help Scout activated various colors to highlight each of the tariffs, and also highlighted general features all price offers.
60. Mode

With simple lettering and blue Fill Mode very clearly separates the paid part of its price list from the free part.
Robin also uses a horizontal slider to filter their pricing plans. When you select the required price conditions, the red indicator switches between price offers.
63.

Mapbox lists a lot of features in their plan descriptions, but at the top of the page they list the benefits that all of their plans have in common.
64.

Litmus shows how to distribute correctly in the price list empty space. Using this table, anyone can start using the service within 1 minute.
For almost any trade organization, an important element of activity is the preparation of a price list of the goods or services provided. It can be created using various software solutions. But, as surprising as it may seem to some people, one of the simplest and convenient ways is to create a price list using a regular spreadsheet Microsoft processor Excel. Let's figure out how you can perform this procedure in this program.
A price list is a table that indicates the name of the goods (services) provided by the enterprise, their a brief description of(in some cases), and necessarily – cost. The most advanced copies also contain images of products. Previously, traditionally, we more often used another synonymous name - price list. Considering that Microsoft Excel- this is the most powerful table processor, compiling such tables should not cause problems for him. Moreover, with its help you can create a price list for very high level in an extremely short time frame.
Method 1: simple price list
First of all, let's look at an example of compiling a simple price list without pictures and additional data. It will consist of only two columns: the name of the product and its cost.
- We give a name to the future price list. The name must contain the name of the organization or point of sale, for the product range of which it is compiled.
The name should stand out and catch the eye. The design can be done in the form of a picture or a bright inscription. Since we have the simplest price list, we will choose the second option. Start in the leftmost cell of the second row Excel sheet write the name of the document we are working with. We do this in uppercase, that is, in capital letters.
As we can see, the name is still “raw” and not centered, since, in fact, there is nothing to place in the center relative to anything. The “body” of the price list is not ready yet. Therefore, we will return to finalizing the design of the name a little later.
- After the name, we skip one more line and in next line sheet we indicate the names of the columns of the price list. Let's call the first column "Name of product", and the second – "Cost, rub.". If necessary, expand the cell boundaries if the column names extend beyond them.
- At the next stage, we fill out the price list with the actual information. That is, in the appropriate columns we write down the names of the goods that the organization sells and their cost.
- Also, if the product names go beyond the boundaries of the cells, then we expand them, and if the names are too long, then we format the cell with the ability to wrap by words. To do this, select a sheet element or group of elements in which we are going to carry out word wrapping. Click right click mouse, thereby calling the context menu. Select a position in it "Cell Format...".
- The formatting window opens. Let's go to the tab "Alignment". Then check the box in the block "Display" near the parameter "Wordwise". Click on the button "OK" at the bottom of the window.
- As you can see, after this, product names in the future price list are transferred according to words if they do not fit into the space allocated for of this element leaf.
- Now, in order for the buyer to better navigate the rows, we can create borders for our table. To do this, select the entire range of the table and go to the tab "Home". In the toolbox on the ribbon "Font" There is a button responsible for drawing boundaries. Click on the triangle icon to the right of it. A list opens all sorts of options borders. Select an item "All Borders".
- As you can see, after this the price list received boundaries and is easier to navigate.
- Now we need to add the background and font color of the document. There are no strict restrictions in this procedure, but there are certain unwritten rules. For example, the colors of the font and background should contrast with each other as much as possible so that the letters do not blend into the background. When designing the background and text, it is not advisable to use colors that are close in spectrum and it is unacceptable to use the same colors. In the latter case, the letters will completely merge with the background and become unreadable. It is also recommended to avoid using aggressive colors that hurt the eyes.
So, let's press left button mouse and select the entire table range. In this case, you can capture one empty row below and above the table. Next, go to the tab "Home". In the toolbox "Font" there is an icon on the ribbon "Fill". Click on the triangle located to the right of it. A list of available colors opens. We choose the color that we consider more appropriate for the price list.
- As you can see, the color has been selected. Now you can change the font if you wish. To do this, select the table range again, but this time without a name. In the same tab "Home" in the tools group "Font" there is a button "Text color". Click on the triangle to the right of it. Like last time, a list opens with a choice of colors, only this time for the font. We choose a color according to our preferences and the unspoken rules discussed above.
- Again, select all the contents of the table. In the tab "Home" in the toolbox "Alignment" click on the button "Align to Center".
- Now we need to deal with the column names. We select the sheet elements that contain them. In the tab "Home" in the block "Font" on the ribbon click on the icon "Bold" in the form of a letter "AND". You can also type the hotkey combination instead Ctrl+B.
- Now we should return to the name of the price list. First of all, let's place it in the center. Select all sheet elements that are in the same line as the title, up to the end of the table. Right-click on the selection. In the context menu, select the item "Cell Format...".
- The cell format window, already familiar to us, opens. Moving to the tab "Alignment". In the settings block "Alignment" open the field "Horizontally". Select an item from the list "At the center of the selection". After this, to save installed settings, click on the button "OK" at the bottom of the window.
- As you can see, now the name of the price list is placed in the center of the table. But we still need to work on it. You should slightly increase the font size and change the color. Select the cells that contain the name. In the tab "Home" in the block "Font" click on the triangle to the right of the icon "Font size". Select from the list right size font. It should be larger than in other elements of the sheet.
- After this, you can also make the font color of the name different from the font color of other elements. We do it the same way we changed it this parameter for the contents of the table, that is, using the tool "Font Color" on the tape.


At this point we can assume that the simplest price list is ready for printing. But, despite the fact that the document is quite simple, it cannot be said that it looks clumsy or awkward. Therefore, its design will not scare away customers or clients. But, of course, if desired appearance can be improved almost indefinitely.

Method 2: creating a price list with permanent pictures
In a more complex price list, next to the names of the goods there are pictures depicting them. This allows the buyer to get a more complete understanding of the product. Let's see how this can be brought to life.
- First of all, we should already have pre-prepared photographs of the goods stored on the computer’s hard drive or on removable media connected to a PC. It is advisable that they are all located in one place, and not scattered across different directories. In the latter case, the problem will become more complicated, and the time to solve it will be significantly increased. Therefore, it is recommended to organize.
- Also, unlike the previous table, the price list can be a little more complicated. If in the previous method the name of the product type and model were located in one cell, now let's divide them into two separate columns.
- Next, we need to choose which column the product photos will be in. For this purpose, you can add a column to the left of the table, but it will be more rational if the column with images is located between the columns with the name of the model and the cost of the product. To add a new column to horizontal panel coordinates, left-click on the sector in which the column address is located "Price". After this, the entire column should be highlighted. Then go to the tab "Home" and click on the button "Insert", which is located in the tool block "Cells" on the tape.
- As you can see, after this to the left of the column "Price" a new one will be added empty column. We give it a name, for example "Product Image".
- After that, go to the tab "Insert". Click on the icon "Drawing", which is located on the ribbon in the toolbox "Illustrations".
- The insert picture window opens. We go to the directory where our pre-selected product photos are located. Select the image that corresponds to the first product name. Click on the button "Insert" at the bottom of the window.
- After this, the photograph is inserted onto the sheet in its natural size. Naturally, we need to reduce it to fit it into a cell of an acceptable size. To do this, we alternately stand on different edges of the image. The cursor changes to a double-headed arrow. Hold down the left mouse button and drag the cursor to the center of the picture. We perform a similar procedure with each edge until the drawing takes on acceptable dimensions.
- Now we need to edit the cell sizes, because currently the height of the cells is too small to properly fit the image. The width, in general, satisfies us. Let's make the elements of the sheet square so that their height is equal to the width. To do this you need to know the width.
To do this, place the cursor on the right border of the column "Product Image" on the horizontal coordinates bar. After this, hold down the left mouse button. As you can see, the width parameters are displayed. First, the width is indicated in certain conventional units. We do not pay attention to this value, since this unit for width and height does not coincide. We look and remember the number of pixels indicated in brackets. This value is universal for both width and height.
- Now you should set the same size for the height of the cells as it was specified for the width. To do this, select with the cursor on the vertical coordinate panel with the left mouse button held down those rows of the table that should be expanded.
- After this, on the same vertical coordinate panel we stand on lower limit any of the selected lines. In this case, the cursor should transform into the same bidirectional arrow that we saw on the horizontal coordinates panel. Hold down the left mouse button and drag the arrow down. Drag until the height reaches the same size in pixels as the width. After reaching this value, immediately release the mouse button.
- As you can see, after this the height of all selected lines increased, despite the fact that we dragged the border of only one of them. Now all the cells in the column "Product Image" have a square shape.
- Next, we need to place the photo that we previously inserted into the sheet into the first element of the column "Product Image". To do this, hover the cursor over it and hold down the left mouse button. Then drag the photo to the target cell and place the image on it. Yes, this is not a mistake. A picture in Excel can be placed on top of a sheet element, rather than fit into it.
- It is unlikely that the image size will immediately coincide with the cell size. Most likely, the photo will either go beyond its boundaries or fall short of them. We adjust the size of the photo by dragging its borders, as we did above.

In this case, the picture should be slightly smaller size cells, that is, there should be a very small gap between the borders of the sheet element and the image.
- After that, in the same way we insert other pre-prepared product pictures into the corresponding elements of the column.


At this point, the creation of a price list with product images is considered complete. Now the price list can be printed or provided to customers in in electronic format, depending on the selected type of distribution.
Method 3: Create a Price List with Appearing Images
But, as we see, the images on the sheet take up a significant part of the space, increasing the size of the price list several times in height. In addition, to display pictures you have to add one additional column. If you do not plan to print the price list, but are going to use and provide it to clients only in electronic form, then you can kill two birds with one stone: return the table dimensions to those that were in Method 1, but at the same time leave the ability to view product photos. This can be achieved if we place the pictures not in a separate column, but in the notes of the cells containing the name of the model.
- Select the first cell in the column "Model" right-click on it. The context menu is launched. In it we select a position "Insert Note".
- After this, the notes window opens. Place the cursor over its border and right-click. When hovering, the cursor should transform into an icon in the form of arrows pointing in four directions. It is very important to aim specifically at the border, and not do it inside the note window, since in the latter case the formatting window will open not the same as we need in in this case. So, after the click has been made, the context menu is launched. In it we select a position "Note format...".
- The Note Format window opens. Moving to the tab "Colors and Lines". In the settings block "Fill" click on the field "Color". A list opens with a list of fill colors in the form of icons. But that's not what interests us. At the very bottom of the list is the parameter "Methods of filling...". We click on it.
- Another window opens called "Filling methods". Moving to the tab "Drawing". Next, click on the button "Drawing…", located on the plane of this window.
- The exact same picture selection window that we have already used when considering previous method drawing up a price list. Actually, the actions in it need to be performed completely similar: go to the directory where the images are located, select the desired picture(in this case, corresponding to the name of the first model in the list), click on the button "Insert".
- After this, the selected image will be displayed in the fill method window. Click on the button "OK" located at its bottom.
- After execution of this action We return again to the notes format window. Here you should also click on the button "OK" in order to specified settings were applied.
- Now when you hover over the first cell in a column "Model" The note will display an image of the corresponding device model.
- Next we will have to repeat all the above steps this method creating a price list for other models. Unfortunately, there is no way to speed up the procedure, since only a specific photo needs to be inserted into the note for a specific cell. So, if the price list consists of a large list of products, then get ready to spend a significant amount of time filling it with images. But in the end, you will receive an excellent electronic price list that will be both as compact and informative as possible.


Of course, we have not given examples of all possible options for creating price lists. The limiter in this case can only be human imagination. But also from those examples that were indicated in this lesson, it is clear that the price list or, as it is otherwise called, the price list can be either as simple and minimalistic as possible, or quite complex, with support for pop-up images when you hover the mouse cursor over them. Which method to choose depends on many things, but first of all, on who your potential customers are and how you are going to provide them with this price list: on paper or in the form of a spreadsheet.
Excel is often used to create price lists - tables that indicate the main characteristics of a product and its price. Creating a price list is not a difficult task, but it can become more complicated if the cost of the product depends on the exchange rate.
Let's consider what to do in this case, and also learn how to create beautiful price lists with images of products.
How to make a price list in Excel with pictures
There are two ways.
Price list with permanent pictures
Let's say we have a small prepared price list.
We will place pictures in the WHAT IT LOOKS column. On the INSERT tab, click FIGURE. A window appears asking you to select an image from your computer. Let's choose it. A huge picture appears, which can be reduced by pulling the corner, and also moved.
We make sure that the picture fits neatly into the desired cell. Although, it would be correct to say ON the cell, because in fact, if you click on C3, it will be empty. Load the rest of the images in the same way. We get a nice price.
Price list with pictures appearing
The second option is to create a price list in Excel with a photo. We will add notes to the price list, which will be presented in the form of images. And they will appear when you hover over the product name.
Standing on the cell with the name of the first product, right-click to call up the context menu and select INSERT NOTE. A window like this appears.

Right-click on the note frame (on the frame, not inside the window), select NOTE FORMAT - COLORS AND LINES. Open the COLOR column and select the lowest option: FILL METHODS.

Another window will appear in which, in the FIGURE tab, you need to select a picture from the computer files.

And click OK everywhere. We do the same for other products. As a result, a red triangle will appear in the corner of each cell with names. And when you hover over a cell, an image of the product will appear.

Price depending on exchange rates
Sometimes prices at an enterprise are very dependent on exchange rates. And during the sale of goods, the exchange rate that exists at that time is taken into account. How can I make sure that Excel always shows the current exchange rate?
Let's modify the table by putting prices in euros. Next to it there will be a column where the current price in rubles will be written. First, let's make a preparation.
On the DATA tab, select FROM THE INTERNET (in others Excel versions may be written FROM THE WEB).

In the browser that appears, type in search bar www.cbr.ru/currency_base/dynamics.aspx (website of the Central Bank of Russia). A website opens on which we need to find the CURRENCY RATES link and click on it. A window will open in which you need to select DYNAMICS OF THE OFFICIAL RATE OF THE SPECIFIED CURRENCY.

We select the desired currency and the interval for which we need data. Because We only care about current data, you can put, for example, from 02/27/2016 to 02/27/2016. But for clarity, we’ll take one week. Click GET DATA. A table appears that needs to be unloaded and synchronized. To do this, you first need to select this table using the icon in the form of a black arrow on a yellow background. We find the arrow that will highlight for us the required table(in some versions of Excel, the entire page is selected at once), and then click on SAVE REQUEST (in the upper right corner).

We save the request on the computer under a name, for example, CBR with the extension .IQY.
Now go to this folder (C:\Users\MyUserName\AppData\Roaming\Microsoft\Requests) and open the request using Notepad. A code will open in which it is important for us to replace the end date with a floating (dynamic) one. We give it the name of the field in which we will record the date in the future. Let it be called that - DATE.

Save the changes. Close the file. Let's return to Excel. On the DATA tab, select EXISTING CONNECTIONS. In the window that appears, click FIND OTHERS and select the query that we called cbr.iqy. Before connecting, the program will ask where to place the request (you can select any free cell) and ask you to indicate the value of the parameter that we changed in the notepad (in our case it is DATE).

As DATE, select any free cell where we will subsequently enter the date we need. Don’t forget to check the boxes so that the euro exchange rate value is updated every time you enter Excel.
Click OK, and information from the website cbr.ru appears on the sheet. We remove everything unnecessary, leaving only a sign with euro rates. And in cell D1, where we should have a dynamic date, we enter the formula.

Because the formula uses the TODAY function, Excel will automatically update the query from the Central Bank website every time the date changes. Those. New data will appear in the table every day. Because 02/28/2016 is Sunday, the Central Bank does not have new data, so final value is the euro exchange rate as of 02/27/2016.
How to use the price list
In order to use the obtained data, we will do one more thing additional action. To the right of the table with exchange rates we will make a blank. Let's write the date, for example, 02/27/2016, and in the adjacent cell a formula using the VLOOKUP function.

Now everything is ready to finally find out the price of the product in rubles. In cell D4, enter a formula that multiplies the price in euros by the exchange rate. Additionally, we use the ROUND command to round the resulting cost to rubles (without kopecks). We extend to the rest of the goods.

You can place a table that is updated every day anywhere on a sheet or book. You can also make blanks in different ways, create signatures or notes for them.
A list of goods or services indicating prices and characteristics is a price list. For a sample and recommendations for drafting, see this page.
Proper design of the price list will help increase sales. Often customers decide to buy a product or not after viewing the price list. Download our example price list, it can be supplemented if necessary. You can also create required document online and immediately send it to contractors - more on that later.
Download a free sample price list
We recommend making two documents at once: internal and for clients. In the working price list you can indicate, for example, information about suppliers and the cost of goods. Then you can easily calculate the discount and immediately see who to contact on a particular issue. The easiest way is to create a price list online in MySklad - the service can create several independent price lists at once.
Make a price list online
Price lists in MySklad can be filled out manually or automatically: from the list of goods loaded into the service. It's very easy to do this:
- Select the price type: purchase or sales.
- Add the necessary columns: for example, price for wholesalers and online store.
- Specify the size of the discount or markup.

That's all you need to do. MySklad will do the rest automatically: it will add all necessary information and will generate a document. If you already have a file with items, you can import it into the service and add data from it to the price list form. Ready document can be saved in Excel format, PDF or Open Office Calc, or you can send it to your counterparty by e-mail directly from MyWarehouse.
×
Make a price list online!
Register in the MoySklad online service - you will be able to: completely free of charge:
- Fill out and print the document online (this is very convenient)
- Download the required form in Excel or Word
To fill out the M-15 form, you need to connect an additional template.
Making a price list in MySklad gives you many advantages:
- massive price change (increase by %, decrease by %, etc.),
- convenient printing of a price list form, including mass printing or as part of a set of documents,
- sending a price list to the counterparty by mail,
- preparation of any number of price lists,
- pricing of documents using a price list.
There are many options on how to make a price list in excel, but only in MySklad you get ready-made solution in a couple of clicks. You can save up to 70% of your time on routine work!
To generate price lists, MyBusinessCatalog uses a template approach.
Those. Once entered, the list of products can be displayed in a suitable form simply by selecting the desired template. To display the price list, select the main menu item Catalog - Print price list .
.
After opening the generated price list, you can not only print it, but also save it in PDF, Excel and 20 other formats

And in order to choose in what form to display the price list, i.e. choose a suitable template,
open Template Manager - Reports button
To select a working price list template:
Click on the reports button of the main button menu.
select Price List from above (so that the selected template is attached specifically to the price list output)
enter “Price” into the filter
select and customize a suitable template
Review of price list templates Classic price list template

Template names:
01_PRICE-LIST_1COL_v6, 01_PRICE-LIST_2COL_v6, 01_PRICE-LIST_3COL_v6
1. Document title. Depends on the current interface language.
2. Name of the top-level group.
.
3. Current date
4. Logo. Installed in the template manager
5. Basic information about your company
6. Column Headings
7. Line with the name of the subgroup
10. 8. Actually, the goods are in the price list
9. Document footer. Configured in the template manager, you can specify the phone number, company name, whatever you want


Current page Examples of a simple price list in two and three columns. Choose the option that suits you best. .


You can also customize each price list option
according to your preferred color schemePrice list templates with pictures
Review of price list templates Such a price list, while maintaining the same compactness of information as a classic price list, looks more advantageous and attractive.


Presented in three versions - one, two and three columns. 01_PRICE-LIST-WITH-PHOTOS_1COL_v6, 01_PRICE-LIST-WITH-PHOTOS_3COL_v6, 01_PRICE-LIST-WITH-PHOTOS_3COL_v6 .


Possible options
color settingsGrouped price list templates Convenient in a situation where a group photo is used only for decoration or when a group includes similar products that differ only in characteristics, but not in appearance.
Review of price list templates Presented in three versions - one, two and three columns. Includes


