How to make identical columns in Word. How to make text in two columns in Word, and also delete blank pages
Date: November 6, 2017 Category:Hello, friends. I recently learned that one of my friends organizes columns in Word using tabs. Of course it is Possible Solution tasks, but only if you have little text. Then you can set up tabulation and arrange data in columns by pressing the Tab key.
If you are laying out an article for publication, where you need to arrange several pages of text in columns, tabulation will not help. Fortunately, there is a special tool in Word. We'll deal with it today.
How to make two columns in Word
Suppose we have long text. In order to improve readability, we decided to divide one passage into two columns.
Select it and click on the ribbon Page Layout – Columns – Two.

You can choose any other option from those offered. I decided not to stop there and make more detailed settings. I don't really like how the columns are aligned and there is too much space between them
Setting up columns in Word
Let's click "Columns" again and select "More Columns." A dialog box will open for detailed settings columns

Let's make the following changes to the current settings:
- Let's make sure it's selected Type – Two. You can choose a different number of columns at your discretion
- In the block " Width and spacing» set the width of the columns so that the distance between them is 0.1 cm (without taking into account indents). The minimum column width can be 1.27 cm. To make columns of different widths, uncheck “Columns” same width" I won't do this.
- Let's install "Separator" checkbox so that a vertical line appears between the columns. Click OK.
- Press Ctrl+J to install width alignment.
- To reduce the distance between words, let’s resolve automatic transfers . On the ribbon click Page Layout – Page Options – Hyphenation – Auto.
Admire the list now. It is much easier to read and is more pleasing to the eye.

You can divide the entire document or its individual parts into columns. Naturally, to break down a separate passage, it must first be highlighted.
Using markers on the ruler, you can specify the width of the columns. Simply drag the markers to the desired location with your mouse.
You can finish a column before you finish a sheet or text. To do this, place the cursor at the intended ending location and click on the ribbon Page Layout – Page Setup – Breaks – Column.
Take these techniques into account, let your layout be perfect, and the readability of documents increases with every blog post you read! And what awaits you is ahead. Believe me, it’s better to read this article, because tables perfectly structure data; there is no alternative to them. See you!
In the section on the question How to print in Word in two columns? given by the author slash the best answer is Write everything in one column, then select everything and click the "Columns" button on the toolbar.
Answer from Vadim good[newbie]
Good afternoon, enjoy the video, it shows how:
Answer from Sketch[guru]
You open Word.
At the top you click - "Format" - "Columns". You choose the quantity, adjust the width and print.
Answer from chevron[active]
What means horizontal columns? You probably mean landscape orientation pages? This can be done in the File-Page Options menu and select the “Landscape” orientation. »
To arrange text in two columns on this page, click the Columns button on standard panel tools (it looks just like two columns of text), and type the text.
Once the text in the first column has been typed, click Insert-Break-Start New Column. Then the cursor will move to the second column. This way you can type poems with the same number of quatrains in each column.
Answer from Not for nothing[master]
in Ikrnka - COLUMNS... there you can also specify the number of columns
Answer from User deleted[master]
You can use the function - insert a table - 2 columns, 1 row, and make the table borders invisible
Answer from Solo Studios[guru]
The easiest way is to Insert - table - one row and two columns. Or (if I understood the definition of "horizontal columns" correctly) vice versa. In general, you understand the principle, don’t you? 😉
Answer from WANDA[guru]
use a separator in settings
Answer from Victoria Kolocheva[master]
there is a bookmark, columns
Answer from Spirit-p[guru]
click on the "columns" icon on the work panel
Answer from 2 answers[guru]
The Word text editor allows you to format text in the most different ways. The latest versions of this program have become so overgrown various functions, that now there is practically nothing that this text editor cannot do. In this article we will talk about how to make text in two columns in Word.
The correct way to make text in two columns in Word
In order to make text in two columns in Word, you need to go to the “ tab Page layout" and click on the " Columns " button. After this, a drop-down menu will appear in which you can select the number of columns you want to place on this page.
The following options are available in this drop-down menu:
- one - one column, regular format pages in Word;
- two - two identical columns, a page with two columns;
- three – three identical columns, a page with three columns;
- left – narrow additional column on the left side of the page;
- on the right - a narrow additional column on the right side of the page;
In addition, in the drop-down menu there is an item “Other columns". This item opens additional window, in which you can adjust the width of the columns and the space between them.

You can also set the size of the columns using the ruler located above the page.

Wrong way to make text in two columns in Word
The second method of creating columns in Word can be considered incorrect, but it is often more convenient. For this method tables with invisible frames are used. Go to the “Insert” tab and use the “Table” button to create a table with two columns.

After the table is created, place the cursor inside the table and go to the “ Working with tables – Designer" Here you need to change the line type that is used to draw the table boundaries. To do this, open the drop-down menu and select “No border".
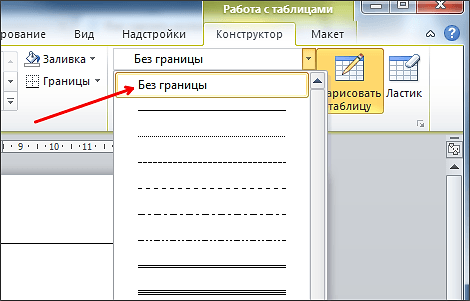

This line is visible when editing a document, but is not displayed when printing it.
How to make text in two columns in Word 2003
If you are using Word 2003, then in order to make text in two columns you need to open the menu " Format - Columns" After this, the “ Columns” window will appear.

In this window you need to select the number of columns and click on the “OK” button. If necessary, you can adjust the width of the columns, the spaces between them, and other parameters.
You can work with columns not only in Excel, but also in Word. Speakers are one of the most convenient ways clearly structure the data, organize it and distribute it into categories. In addition, columns are a popular method of organizing data, which is simply a sin not to use. So, below we will talk about how to work with columns in the Word text editor.
How to work with columns in Word 2003?
In one of the most archaic versions text editor In Word, you can split text into columns using a simple, incredibly accessible method.
Perhaps it will not be a secret to anyone that in Word any text can be divided into one, two, three or any other number of columns. It couldn't be easier to do this. Let's go to Top Menu“Format” and select the “Columns” sub-item.
A form of the same name appears, where we can select the number of resulting columns in the text we need, their mutual arrangement, width and space between them. Also in this form it is worth indicating to which part of the document we want the columns to be applied.

As a result of the manipulations performed, the text turns out to be divided, and you get the result you expected.

As you can see, you can figure out this technique in literally no time, without even making any effort. Let's see how things are in other versions of Word.
How to work with columns in Word 2007, Word 2010, Word 2013?
Split text into columns into more modern versions a text editor is possible without deviating at all from the principle described earlier. The only difference is that now the function we need is hidden in another category of the feed. In all other respects, we can completely repeat the previously described procedure. We go to the “Page Layout” section on the ribbon, then select the “Columns” item and set the number of columns into which we would like to divide the text. To set Extra options(such as the width of the columns and the space between them), select the “Other columns” sub-item.

Well, everything basic is simple. We too will learn these simplest approaches.
IN software products In Word 2010 and Word 2013, you can divide text into columns in the same way, even all ribbon sections and menu items have the same name. So let’s not wander around the tree, but rather let’s see how things stand with the most relevant version today word processor Word.
How to work with columns in Word 2016?
IN latest version Word's menu items have received slightly different names, which may be a little confusing and confusing at first. In all other respects, if you have already worked in Word, then analyzing the functionality will take indecently little time, which brings only positive emotions. Now the ribbon subsection we need is named “Layout”. One can only guess what prompted the developers to introduce new names into categories and menu sections. All we have to do is receive desired effect from the results of their work. So, go to the “Columns” function and repeat all the same steps: indicate the number of columns, set their width and the space between them, and also indicate to which part of the document the changes made will be applied. All basic operations are performed on the “Columns” form, which is called up by selecting the “Other Columns” menu item.

To understand how this function works, it will take at most half a minute. By using our instructions, you can save your time even more and speed up this process.
Instructions
Download to Microsoft Word document, the text of which needs to be reformatted into columns, and place the input cursor on desired page. If the entire contents of the document must be placed in columns, leave the cursor on the first page. You only need to select a section of text when dividing a limited fragment into columns, and if this option needs to be applied to entire pages, this is not necessary.
Go to the “Page Layout” tab and expand the “Columns” drop-down list in the “Page Setup” command group. It includes four column layout options - from one to three equal-width columns and two options for asymmetrical two-column text. Select one of them or use the “Other Columns” item to access the settings for constructing a custom split.
In the custom splitting settings window, set required quantity columns in the "Number of Columns" field. By default, the width of the columns and spaces between them will be set automatically, but you can change this setting and set the sizes of each of them yourself. To do this, first uncheck the “equal width columns” box. After this, you will be able to edit the values in the “width” and “spacing” boxes for each column - the corresponding table is placed above this checkbox. If you need to place in the spaces between the columns vertical line, put a check mark in the “Separator” field.
In the “Apply” drop-down list, select the scope of the specified column splitting settings. You can set them for the selection, for sections affected by the current selection, for current page, the entire document, or from the current page to the end of the document. Depending on whether text was selected before opening this dialog, some of the listed options may not appear in the list. When all necessary settings the splits will be set, click OK.
Sources:
- how to make two columns in Word
Today, a business card is an integral part of any businessman and any organization. And to create a unique presentation card for yourself, you don’t need to be a designer and have graphics programs. It is enough to use the program " Microsoft Word", which provides the ability to create business cards.
You will need
- - Microsoft Word program;
- -initial skills to work with it;
- - availability of a printer;
- - special paper.
- Now let's look at all the operations for creating a business card in Microsoft Word.
Instructions
Open Microsoft program Word, go to Tools and click on Letters and Mailings, click on Envelopes and Labels. At the top you will see two menus: Envelopes and Labels. Select Labels. In Labels Product, select Avery Standard. In the Product Number list, select the Avery sheet type (for example, the most popular 5960). In the “Address” field that appears, enter your coordinates.
Now create a style for your business card. Select the text in the Address line. Click right click mouse over the text and select “Font”. Edit the text, add your logo, picture, information. Resize your logo to fit your business card design. To remove unsuitable


