What to do if the Apple icon is blinking on your iPad. How to turn on your iPad for the first time
How the repair works:
- 1
We diagnose the imported goods for free
device received by you or our courier. - 2 We carry out repairs and also provide a guarantee on new installed parts. On average, repairs last 20-30 minutes.
- 3 You receive a working device yourself or call our courier.
If your iPad turns on and then turns off immediately while charging because the power is not working, the connector is most likely to blame charger or the battery has failed. It is damaged from negative mechanical effects. In other words, it swells.
Most often, the cause may be moisture getting inside the connector itself, as a result of which the contacts oxidize.
The tablet may not work if the cable has moved away from the contact chain, or if the battery has stopped charging and does not produce the required voltage.
How to bring your iPad back to life if it won't turn on or charge
First, you should try connecting the tablet to your native one. USB adapter. But you need to be sure that it is exactly right. Wait a few minutes, there is a possibility that the device is very discharged and there is not enough voltage in the battery for the gadget to “wake up”.
If nothing changes, you should try restarting the tablet while holding down the Home and Power buttons at the same time. If the device is working correctly, a charging indicator should appear on the display. This will mean that the device is receiving the necessary power.
If this does not happen, then most likely the iPad 2 is faulty and requires repair. If the iPad does not charge and does not turn on, one of the reasons for the breakdown is that the voltage regulation module has failed. As a rule, it fails due to severe voltage surges or shocks. Therefore, in addition to identifying current faults, a complete iPad 4 repair may be required.
In this case, we advise you to go to an Apple service center as soon as possible for preliminary diagnostics and determination of the causes of the malfunction. After this, you can entrust the device to specialists who will fix the problems in a matter of minutes.
If you come to the service center on time to troubleshoot problems, you will do a great service to your iPad 1. Since over time, repairing an iPad 3 may cost much more. Our workshop will carry out preliminary diagnostics in a few minutes free of charge.
We serve employees of these companies


We will help you restore your iPad if it won't turn on or charge.
First of all, this concerns our service centers in Moscow. Our specialists will first take the device for diagnostics, the procedure will take no more than three minutes. After identifying the reasons why the 3rd generation gadget and others stopped working, the technician will use special tools and equipment as a basis, performing repairs in a short time with high quality.
We only use original spare parts Therefore, we provide a warranty card for the work we carry out. After repairing the device, the technician will re-check its functionality. If he does not find any comments on the malfunction, the device is handed over to its rightful owner.
"Air" tablet Apple– one of the most desirable gadgets of 2015. If you purchased or received iPad Air or as a gift, but don’t know where to start - just read this article. From it you will learn everything you need to know about key settings, applications, accessories and customization.
In contact with
The setup process will take from 15 to 30 minutes, depending on which of these steps you decide to complete.
Initial setup of iPad Air / iPad Air 2
Most often, your iPad's battery is already partially charged, so you can safely turn it on. Press the power button on the top right edge (when iPad is in portrait mode, Home button- at the bottom). Charge it to 100% - either right now, or immediately after the tablet is set up.
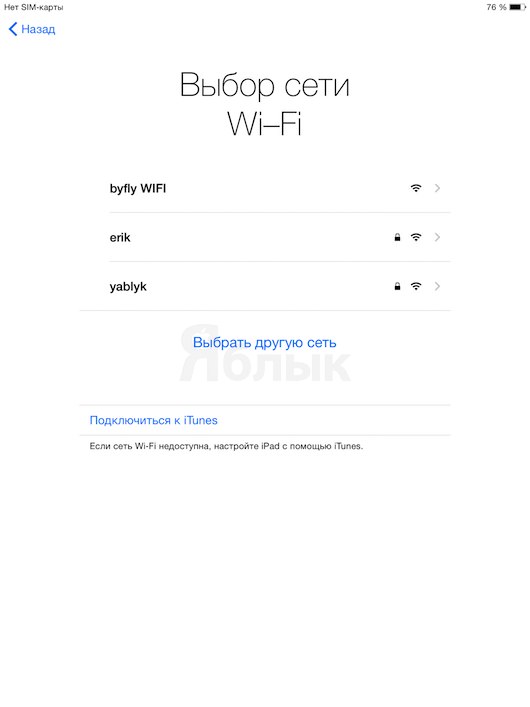
The tablet will turn on and greet you with the message Hello. Swipe from left to right on the screen (this movement is called “swiping”). Next, Apple will prompt you to select the appropriate settings: language, country of use, connection to wireless network Wi-Fi to activate the device.

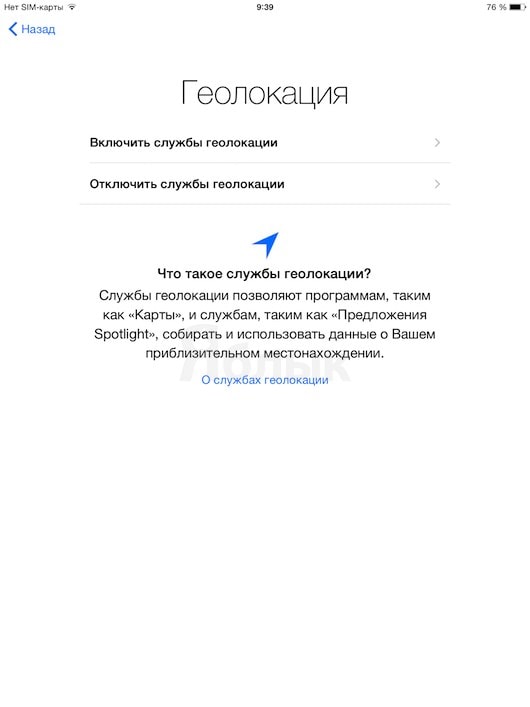
Should I enable geolocation? Yes, if you want to use yours iPad Air as a navigator in a car or are you afraid of losing it and want to use the service. If the tablet is at home all the time and nothing threatens it, it is better not to turn it on - this way you will save battery power.
Next, Apple will ask you if you want to set up your iPad as a new device or restore it from backup copy(iCloud or iTunes). If this is your first iPad, feel free to choose the option with a “new” device; if not, one of two restoration options will be preferable.
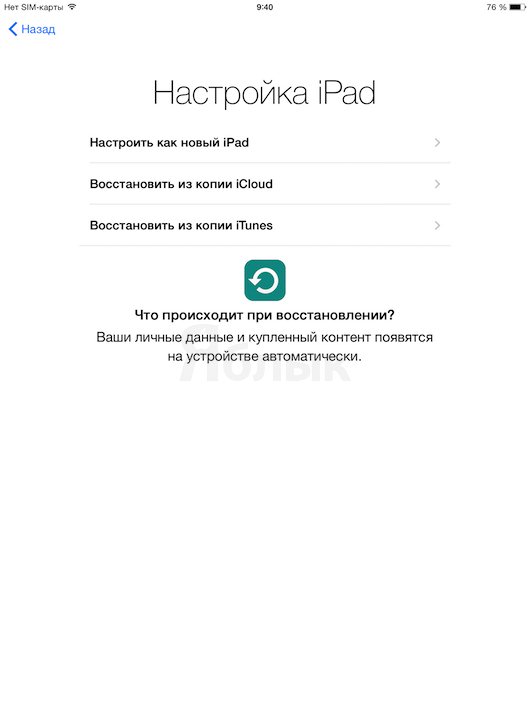
Ideally this should be copy of iTunes– with this option, you will get back all your content and all settings (only basic data is saved in iCloud). Article on the topic:
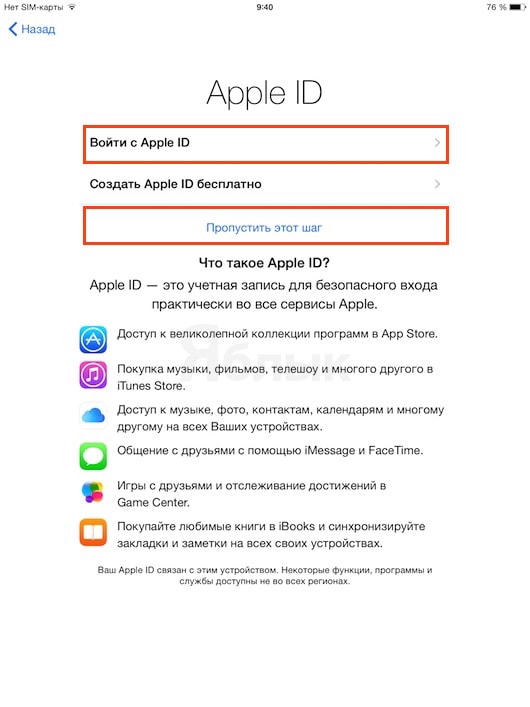
Now is the time to resolve the issue with. If you already owned a laptop, smartphone or Apple player, you probably know what we're talking about. This is the username (address Email) and password with which you buy games, programs and music from iTunes and App Store. So if you have an Apple ID, just select Sign in with Apple ID and enter your details, if not, skip this step and create an Apple ID later using.
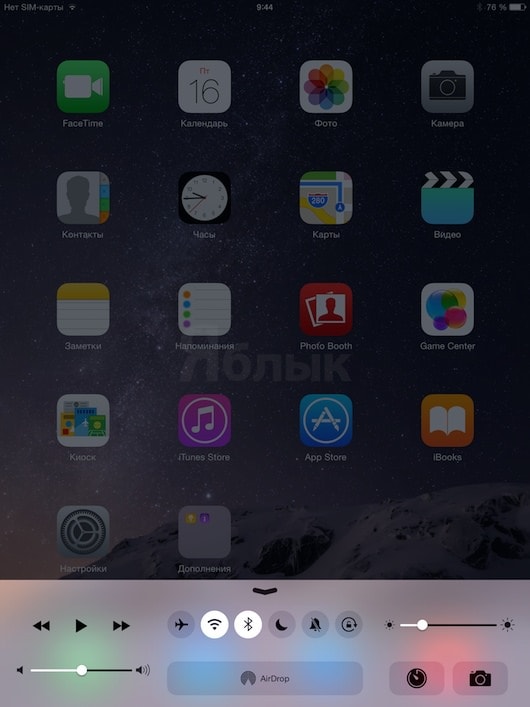
Here you can also adjust the screen brightness and volume, control the music playing and quickly access the tablet's camera. It is important to remember that what brighter screen, the faster your iPad's battery will drain. The charge will end much faster and when using Wi-Fi, Bluetooth and location services. If you don’t need them here and now, you should turn them off.
Another important thing - Notification Center. To get to it, swipe from the top edge of the screen towards the center. Here you will see notifications (messages about something important) from games and programs installed on the iPad Air / iPad Air 2 - messages from social networks, calendar entries and reminders. You can too (for example, a calculator, which is not on the iPad).
Basic Settings for iPad Air/iPad Air 2
Go to Settings tablet by clicking on the corresponding icon (dark color with “gears” drawn).
1
. Connect to Wi-Fi networks(own or located in public place). You may be required to enter a password.
2
. You can change the password for .
3
. Turn off notifications for unnecessary applications. For example, if you don't use the built-in calendar in iOS 8, you can avoid receiving “unnecessary” and distracting notifications. We also suggest that you read the article.
4
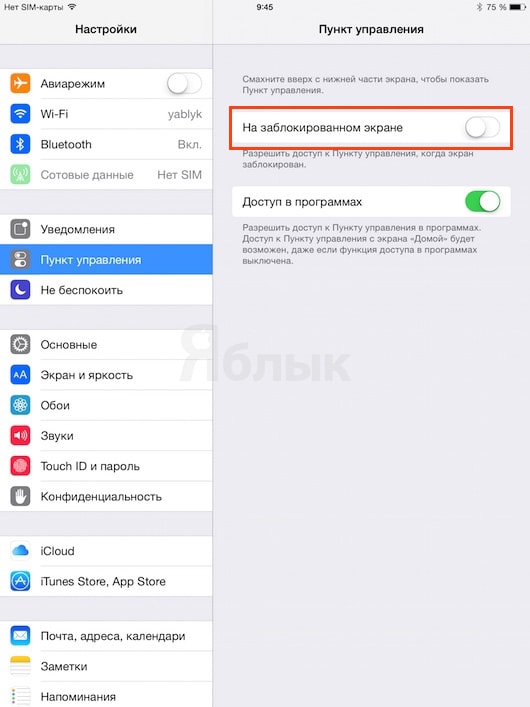
. If you think that Control Center should not work on a locked iPad screen– disable access ( Settings -> Command centre).
5
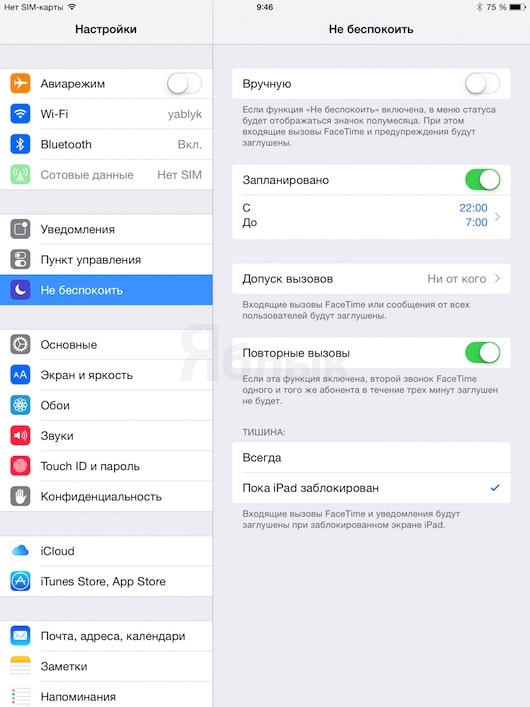
. Set up time intervals for the function Do not disturb. At the appointed time iPad time will not distract you from work or sleep with notifications. Select Scheduled and specify the time during which you cannot be disturbed - for example, from 22 to 7 am.
6
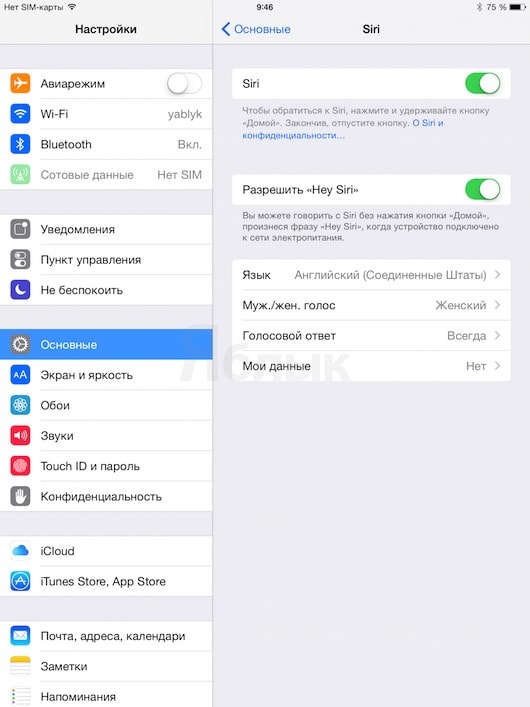
. In the settings section Basic choose what is convenient for you:
a) Enable or disable, allow startup voice assistant team Hey Siri, select a language (alas, there is no Russian; but perhaps you know English or other leading languages of the world?), male or female voice.
b) Read the information about multitasking gestures(sometimes, for example, in - very convenient!).

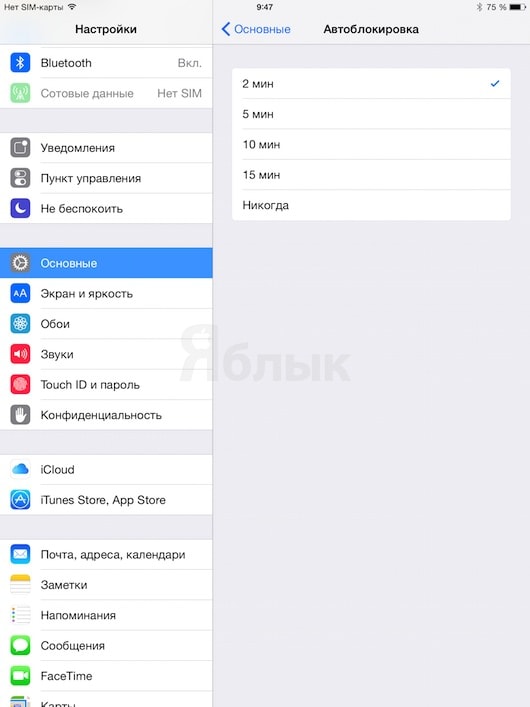
c) Set up auto blocking time(how quickly your iPad's screen will automatically lock). The default is 2 minutes.
G) Keyboard– you can add here third party keyboards for iOS 8.
e) Add (Keyboards -> Abbreviations). For example, if you often type your email address, you can have the system fill in the rest for you after typing the first few letters.
7
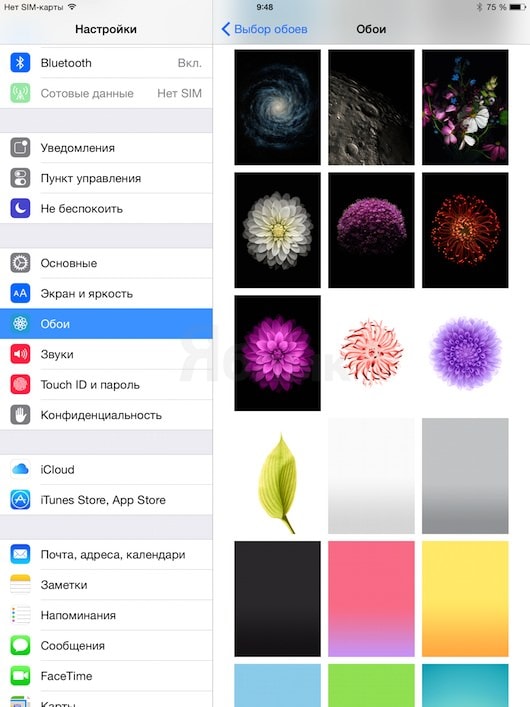
. You can also change the default ones wallpaper for new ones.
8
. ...And configure sounds.
9
. If you have an iPad Air 2, enter a password and create a Touch ID.
10
. Customize for yourself iTunes and App Store. Useful feature – automatic downloads
. If you activate the corresponding “sliders” (make them green, not gray), iPad will independently load new purchases made on other devices and download new versions of programs. Something to keep in mind: sometimes automatic update programs is undesirable, since developers can either deprive the program of its previous advantages, or accidentally “break” it, even to the point of losing its functionality. So the point Updates It’s better not to enable it - this way you can always read the description of the update to the game/program yourself and decide whether it’s worth updating.
11
. Settings individual applications Apple and (they will be located below) third-party games and programs. Browse the sections that interest you (for example, you'll almost certainly be interested in Mail, Addresses, Calendars, Safari, and Maps) and select the options that apply.
Update to the latest version of iOS
One of the things you should do right away is install iOS updates. The older the OS version, the fewer errors it will have. At the time of writing this article, the most current version– . Make sure your iPad Air / iPad Air 2 is connected to Wi-Fi and the battery is at least 50% charged, open Settings -> Basic -> Software Update.
Your iPad will try to find an update on Apple servers. If it is there, a window will appear with information about the update and a button Download and install. During the installation of new software, the tablet will reboot. Everything will take up to 15 minutes.
How to Add an Email Account, Contacts, and Calendars to iPad Air
Follow the appropriate instructions.
Few would have thought that turning on the iPad for the first time requires preliminary preparation. But it is so. So that you can save time when you first turning on iPad We invite you to read this article.
Let us note right away: in order to turn on the iPad you cannot do without using a computer, desktop or laptop. The fact is that you cannot freely record programs on the iPad via the USB port using file manager. To connect your tablet to a computer (PC or Mac), you will need iTunes, which is completely free and available for download on the Apple website.
iTunes provides the user with the following features:
- navigation through the multimedia library;
- performing a letter-by-letter search;
- organization of a multimedia library;
- creating folders and playlists;
- metadata editing: artist, cover, composer, etc.;
- import and burn songs from CDs;
- playing movies, music, podcasts;
- visualizer, multi-band equalizer, mini-player mode;
- listening to Internet radio;
- purchasing multimedia content on the Internet;
- synchronization with iPhone, iPod, Apple TV and iPad.
If you took out your brand new iPad, turned it on and saw a desktop on the screen with application icons on it, you should know that your tablet has already been turned on and registered.
When turning on absolute new iPad, a green icon with a USB plug is displayed on the screen.
If, nevertheless, your tablet was turned on, it’s okay. The only thing you need to do is make sure that there are no applications installed on it other than the standard applications.
Most users in our country have it installed on their computers. operating system Windows. Therefore, you need to download the iTunes program from the Apple website specifically for this operating system.
After installation iTunes programs You can connect your iPad using the cable that came with your tablet.
After downloading the program, you will be offered two options for subsequent actions: set up the iPad as a new device or restore information from a backup copy. In your case, you need to choose the first option. After a while, the tablet will turn on and you will see the operating system screen.
After this, you need to go through the registration process, which contains one underwater rock— if you do not have a MasterCard or VISA card, you will not be able to purchase programs in the AppStore. Although the AppStore has great amount free applications. In addition, some game and application manufacturers, as part of ongoing promotions, distribute their applications completely free of charge - no plastic card is required.
Let's look at the order of your actions in iTunes:
- 1. Go to iTunes section Store.
- 2. Find any program in the list free application(such applications are marked with a button that says FREE).
- 3. Click on it, and then click the INSTALL APP button.
- 4. After this you should see a login/registration window.
- 5. Click the “Create a new account” button, and then the “Next” button.
- 6. We agree with license agreement(Where would we be without this?). We fill in your email address and password to register a new account in the AppStore. Moreover, the password must be complex and must meet the following requirements:
- at least one letter must be capitalized;
- at least one letter must be capitalized;
- the password must contain numbers;
- the same character cannot be repeated more than three times;
- The password cannot be shorter than eight characters.
- 7. And most importantly: when the next window appears in the “ Credit card“You need to put a dot next to the word “None” or click on the button with the corresponding inscription. If this button or dot is missing, you know that you did something wrong.
To do this, you need to return to point 2 and go through all the steps again. - 8. After this, you must fill out all fields of the questionnaire. After this, you should receive confirmation of registration to the address you specified. email address. After you have received the letter, you need to follow the link specified in it to activate account. Congratulations - from now on you are a full user of the App Store and iTunes Store, and have the opportunity to download all free applications.
To avoid a situation where you have forgotten your password, you will be asked to select a security question and answer to it to be able to recover your password. After this, you need to refuse spam by unchecking the corresponding box and clicking the “Next” button.
And one more piece of advice: when registering a Russian or American account, remember that you can use the AppStore version specifically for these countries. The same applies to free distributions of programs - offers may only apply to certain countries. American version AppStore contains significantly more programs than the Russian one, but there are practically no Russian applications in it.
This is why you can register two accounts. You can do this as follows: suppose that you have registered a Russian account, and you need to create an American one. To do this, you must log out of your account (in the right top corner iTunes program, click on the triangle and click on the inscription “Sign Out”).
After that we go down iTunes windows Store (in the lower right corner) and find the flag icon Russian Federation. Click on it.
Appears a large number of different flags, find and select the American flag.
Click the “Login” button in the upper right corner and begin the registration procedure American account, which is no different from the registration procedure for any other account. Now you have two accounts.
For one and the other account, it is necessary for iTunes to have the following actions: menu - Store - Authorize this computer (in the window that opens, you must enter your login and password and click the “Authorize” button). After authorizing both accounts, you will be able to download games and programs from two different App Stores - Russian and American.


