AutoCAD program - what is it? How to work in the program. Mastering the AutoCAD program is largely a psychological task, the evidence will be
The question of how to work in AutoCAD may even cause some confusion for an experienced designer at first. I just want to answer with the words of the hero “Only old men go into battle”: “Happy!” What else can a newbie answer to this global question?
But the question is posed and requires reflection and an answer. So, let's try.
But most importantly, starting to work in this program requires some general internal attitude and approach even before launching it on your computer. Let's define these very approaches.
- The beginner is able to operate basic computers office programs. He understands the principles of their organization - each one has a main menu at the top, which provides access to all commands, and toolbars - through them access to frequently used commands is already available. Therefore, in order to perform some operation without knowing where to look for it, you need to carefully go through all the menu items. And you won’t have any difficulty finding where to insert a picture into a document in Word, or even a diagram in Excel.
- A beginner understands what the program is intended for.
AutoCAD is designed for drawing work, which means you have to depict all these elementary objects in the form of lines, circles, set dimensions, move objects, delete and copy them.
So launch AutoCAD, look at the screen, all these tools just catch your eye! It's kind of like working with Excel. Many people don’t even suspect that without ever launching this table processor, they know it very well - yes, Excel simply imitates all our work “on paper” with tables. And then, we launch Excel and see this very table before our eyes, we begin to enter data, before our eyes everyone we already know Word tools. There are nuances, of course, but there are not many of them, the main thing is the ability to simply and thoughtfully look at new things, in in this case- analyze what the screen offers you.
These conclusions are very important for any program, they can be expressed in a simple phrase - everything is much simpler than it seems. And we will continue - you just need to help yourself, not to be afraid of everything in advance, without even looking at the screen.
And these conclusions are fundamentally important for working in AutoCAD; whether it is version 2000, 2011 or 2017, it no longer matters.
Nuances of the approach
Among the nuances, we will determine the correct one and, what is very important, creativity to mastering.
Take your time, start small - first start mastering the principles of working with 2D elements, then advanced 3D will not seem so difficult. And then there will definitely be adjustment of light sources, tinting, and even connection with 3D Max.
There are a lot of commands, so it doesn’t hurt to create a library for yourself, sorting all the commands in it by importance rating - frequency of use.
Be sure to also create a separate library of AutoCAD configuration options - there are so many settings here that it will be enough for a dozen other applications. Studying the settings will greatly help in mastering the program.
Among these settings, of course, are toolbar settings. They need to be mastered from the very beginning. Firstly, the program has almost two dozen toolbars, but initially only 4 are displayed on the screen. Secondly, as for the tools, they are in front of your eyes by default, less than a fifth of what it would be nice to have, and constantly.

Thus, setting up panels (we do not take into account the not entirely successful version of the 2008–2010 versions) is almost one to one the same as setting up panels in Excel (this is about good general preparation for working with computer programs).
The nuances of organizing AutoCAD
Of course, AutoCAD itself offers some operating features that distinguish it from working in other programs.
The first feature is the presence of a command window. The fact is that there are a lot of commands and the vast majority of them are not just complex in terms of algorithm, they are just quite branched and offer several ways of implementation (for example, the same circle can be constructed in “dozens” of ways - by three points, by two, in the center and diameter, center and radius and many other techniques). To navigate all these nuances, the command window at the bottom of the screen is intended.
This window will not only guide us through the algorithm for executing commands, but will also help us understand the nuances of each one; all we need to do is look carefully at the screen and be smart. And without ingenuity, the problem of how to work in AutoCAD is not worth trying to solve, nothing will work, this program is not for those who completely deny themselves the pleasure of thinking.
Not to mention the fact that some commands in AutoCAD are simply not available outside their window - they must be entered “manually”. But this is already there, further, at an advanced stage of work.

The second feature is two operating modes: “Model” and “Sheet”. Moreover, the developer is provided with two “Sheets” at once. It is very important to understand the purpose of each mode and find a place for each in your discipline of using the program.
So, all design must (recommended, very important, please, in the end) be carried out only in the “Models” mode. You should not draw frames here, try to draw tables for specifications, place explanations - all these elements are intended only for printing, they only “contaminate” the entire development. We can say quite definitely - this is a bad style of using AutoCAD, when the same framework and specifications are depicted in the “Model”. No, the program will “tolerate” everything, it will forgive you for such work “with your left hand behind your right ear.” Whether the development will forgive is a big question!
We depict everything that is intended for printing in the future in AutoCAD in the “Sheet” mode - here we also prepare views of the project itself for drawing. And the frames!? So, look, when you just launched the program, from the very beginning it offered to select both the size of a sheet of paper (A1, A2, A3, A4), and a whole series of standard frames for each size. We choose, and the problem goes away by itself.

Okay, this choice is not necessary. And who’s stopping you from taking a ready-made design with a suitable frame, opening it in AutoCAD, deleting the project itself, but the frame will remain - that’s a simple solution to the problem “from beginners” - “where can I get the frame?” This problem can be solved simply and by itself, or rather there is no trace of it, it was invented by our inexperience, and more so by our reluctance to approach work creatively and inventively. We repeat once again - without this charge there is nothing to do in AutoCAD.

The third, most important feature is already from the category of specifics.
Remember how you used to carry out development at the same drawing board with a pencil and ruler in your hands. We took measurements, converted them into dimensions on the sheet, scaling them: your façade length is 50 meters, that’s 50,000 millimeters; on the sheet every meter is one centimeter, and so on and in the same spirit constant transformations"in the head." Torment, although, of course, a person gets used to everything.
A completely different approach is taken in this program. Here, the work with objects occurs one to one in size, and if you have a façade of 50 thousand units of measurement, then you will give exactly 50,000 as the size of the object in length. The only question that arises is where to get these 5,0000 dots on the screen?

Here we come to the primary and fundamental setting- drawing limits (“Drawing limits”). It is the limits that determine the maximum boundaries and sizes of our objects. Having set the limits, in the future there will be no problems with building in actual sizes real objects. This setting is made in the command window and called through the “Format” / “Drawing Limits” menu.
So, the setting is the most important, so in more detail:
- Immediately after launching the command, you are prompted to specify the coordinates of the lower left corner - “Specify lower left corner or<0.0000,0.0000>:". Here we simply press Enter, leaving the suggested “zeros”.
- Next we go to setting the coordinates of the upper right corner - “Specify upper right corner<420.0000,297.0000>:". These will be the limits. By default, we have an A3-format sheet - 420 by 297 millimeters, so we offer such limits that are quite suitable for some small details. If we have a house with a facade of 50 by 20 meters, then we set the limits “50000.20000” (note, without spaces) and then we can work, truly “happily”, setting the sizes of all objects one to one.
Nuances of subsequent work, in the very near future
We have provided those nuances without which a successful start to work in AutoCAD is impossible. But, of course, the program also has a lot of very important features, knowledge of which is indispensable, but this is not even advanced (minimum difficulties), but the next stage of work. Here and

But this will happen later, even half an hour after the first launch of the program, but then, when you look carefully at the screen and once again say to yourself - this is a program for drawing work, which means I should consider all the offered tools in this vein.
Yes, whatever you say, mastering almost all programs on a computer is largely a matter of psychology. Well, who told you that the AutoCAD course should last 2 months!? It's not like that at all! 10–20 hours and a program (I would like to say “at your feet”, no, not so disrespectful to this, one of the most outstanding programs on PC) in your head. But under one condition - you will be active in its perception, thoughtful and attentive.
Vira-ArtStroy -
50,000 rub....Requirements: Higher professional education;Work experience of 3 years;Confident PC user, knowledge of ArchiCAD, AutoCAD and Photoshop;...
Grammatically correct speech; Knowledge of normative
technical documentation
...in the field of architectural and construction design7 days ago(sections, facades, architectural concept); Development of working documentation, construction drawings; Making changes to project documentation: adjustment of drawings in AutoCAD format and text materials...
13 days ago
Marion Studio - Vorobyovy Gory metro station, Moscow
50,000 rub....basics of building structures.Experience working with classic facades.Knowledge of terminology....
Program knowledge: ArchiCAD or
AutoCAD, Photoshop; as a plus: 3dsMax+Vray, Corel Draw, manual graphics.
Responsibility, ability and desire to understand the subject and...3 days agoAltercasa -... ...Kyiv metro station, Moscow45,000 rub.Draftsman,...
assistant architect The company specializes in private construction of houses and interior decoration of residential and office buildings
according to contractual obligations.
Requirements: Knowledge...Autocad (in principle this is the program) High speed 15 hours agoDesign Formula - Moscow45,000 - 55,000 rub....
Responsibilities: Execute drawings in a competent manner
technical level in a programme
Responsibility, ability and desire to understand the subject and...AutoCAD. Drawings: plans, units, developments, technical units and elements.Maintaining project documentation.Requirements: Technical knowledge of project work.... ...Knowledge of materials12 days agoMFS -...
Polezhaevskaya metro station, Moscow
Vira-ArtStroy - medical equipment
, a specialist design engineer is required (...draftsman-visualizer).Main responsibilities: -...
working with projects in the medical field, - experience in designing
Autocad,
Revit(required), 3dMax.- experience of successfully passing an examination 4 days agoOktyabrskoye Pole metro station, Moscow50,000 - 150,000 rub....
Polezhaevskaya metro station, Moscow
1. Work experience: 1–3 years, completed projects required.
2. Higher technical education....3. Proficient in Archicad or7 days agoAutocad. 4. Introduction to automation and control systems (Control4, Iridium, Savant, KNX)., ... ...6. Knowledge of the range of necessary equipment6 days agoManacorLine - Moscow...
50,000 - 75,000 rub.
Job responsibilities : Measuring kitchen countertops, window sills Product drawing Requirements: Experience working with
40,000 - 50,000 rub....technical specifications Updating and creating working environment templates for design Requirements: Proficiency in ArchiCAD,7 days agoKnowledge of regulatory and technical documentation in the field of architectural and construction design Knowledge of design standards and rules...
5 days ago
Artstroytekhnologiya - Printers, Moscow
50,000 - 60,000 rub....teaching materials for the implementation of field, desk topographic, geodetic and cartographic works.Experience working with classic facades.Confident PC user (...
MC Office).
Personal qualities: responsibility, attentiveness, sociability, stress resistance, activity, 27 days ago
LLC "AST-technologies"- Moscow25,000 - 30,000 rub.Office near Semenovskaya metro station. Working hours: 5/2, from 9:00 to 18:00 Registration according to the Labor Code. Experience in the program...
AUTOCAD;
Communication skills, politeness, responsibility; Grammatically correct speech. - Processing of drawings in the AutoCAD program - Issue of RD - Development of drawings, approval
1 day ago...LLC "MosBochki" - MoscowExperience working with classic facades.40,000 - 45,000 rub....
Responsibilities: Execute drawings in a competent manner
Registration according to TC. Knowledge of your business, ability to come up with new directions for production (new furniture options). Knowledge of the programms Coral/ Vectors, Photoshop. Knowledge of 3d max and Vray programs will be an advantage. Preparation of technical documentation for the client and
LLC APM "ARSA" -metro station Ulitsa 1905 Goda, Moscow25,000 - 45,000 rub.Responsibilities: ~ Development of working drawings for the improvement of urban facilities (Gp, Ar).
Requirements: Stress tolerance.
Possession AutoCad,
Photoshop.Conditions: ~ On the employer's premises, by agreement it is possible to work remotely.
10 days ago MTL art-group - Novogireevo metro station, Moscow 50,000 - 80,000 rub. Have you read this phrase? Great! So it's time for us to say hello! Good day! We are very pleased to welcome you to our website. A separate section of which is devoted to one of the most popular programs in the construction industry around the world. In Russia, including from Autodesk. So, ?
About this software written great amount articles/notes/textbooks and other literature. Our site will not be the first to teach you how to start working in AutoCAD. Our articles and educational materials designed in such a way that
final result aimed at mastering all necessary functions
CAD AutoCAD
There are always people who ask: “?” Or they don’t know how to ask and where to start.
So, it's time to start our work. As we promised, there won't be a lot of unnecessary chatter and abstruse phrases from textbooks or other literature. Only "Question-Answer". And anticipating your first question: “ Where to get AutoCAD?”, - we answer: “We go to the site https://www.autodesk.ru” and register there to receive a fully functional version of AutoCAD for educational purposes absolutely free.
If you have problems registering or installing the program, be sure to read our article “Registration on the Autodesk Education Community website” and “”. In the meantime, we assume that AutoCAD version 2018 or lower is installed on your computer. But not lower than 2013.
How to start working in AutoCAD? Begin!
And so, look for a shortcut on the desktop to launch and launch it!
AutoCAD, quite complex and powerful program, but despite this, it can work on not entirely new computers. However, this depends on the complexity and size of the files you are working with.
In other words, if you have a large, complex drawing, it will require more computing power from the computer.
But launching a program is always a slow process. So be prepared to wait a bit.

You can speed up the launch of AutoCAD by installing the program on a modern high-speed solid state SSD disk.

After starting the program you will see the program window:
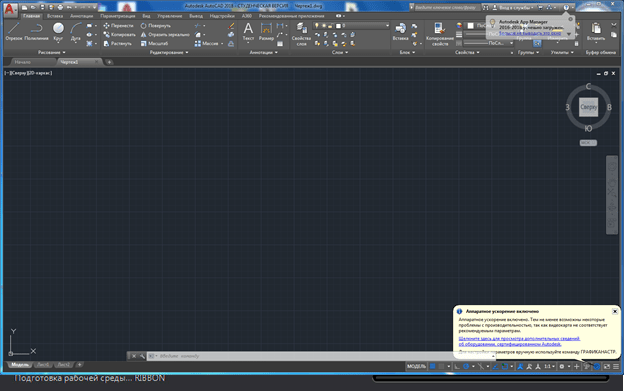
We have specially highlighted the most significant elements of the AutoCAD window interface in different colors and now we will tell you about each of them. Top/down, left/right and in order! J Let's go!

The red rectangle outlines the button for calling the main menu of the program, with which you can “Create a file”, Open an existing one, Save, Print or Export a drawing file to another format.
For example, in PDF format, for viewing on a computer that does not have AutoCAD installed. Or for demonstration to the customer. There is also a list of the latest files you worked with for quick and easy opening.

“Panel” is highlighted in green quick access", which contains commands from the "Main Menu", as well as other useful commands.
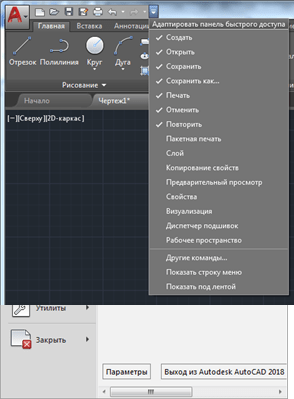
The contents of the panel can be customized; to do this, you need to click on the button with a small triangle at the end of the panel, pointing down.
The panel adaptation menu will open and by checking or unchecking the necessary “checkboxes” we add or remove command buttons from the panel.
The name of the program, license type and file name are displayed in the center of the title bar of the window. "Drawing 1.dwg" is the name AutoCAD file"default" and it will change when we save the file under our name. ".dwg" is the AutoCAD file extension. Because of this abbreviation, Russian-speaking users also call AutoCAD files “devegeshki”.
On the right side of the title window is the "Cloud Menu" which allows you to access reference information And " cloud services» Autodesk company.
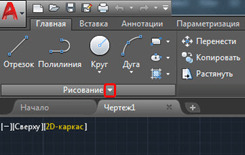
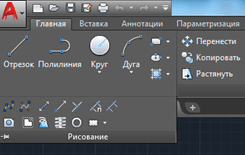
Below, in blue, the “Command Tape” is highlighted. AutoCAD, like many programs, has a modern “Ribbon Interface”, which allows you to optimize working space window.
By providing the user with access to the necessary commands in a minimum number of mouse clicks.
The name of the “active” command ribbon in the figure is underlined with a blue dotted line “Home”. Clicking on other tabs will activate navigation to them.
Each command ribbon is divided into "Areas". For example, in the figure blue The “Drawing” command area is highlighted in color.
The names of the areas were not chosen by chance. They tell the user which command buttons are collected in this area.
For example, the buttons in the “Drawing” command area are responsible for creating 2D primitives and other elements (circle, rectangle, arc...).
Button UI element
Separately, I would like to note the interface element of the command buttons, which is found on different areas at different buttons- this is a “small triangle” pointing downwards.
He tells us that this button is responsible for several logically united commands. Simply put, this button can perform not just one command, but several.
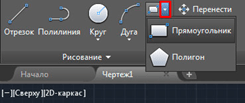
For example, clicking on the triangle/arrow next to the button with the command to construct a “Rectangle” opens access to the button for constructing a “Polygon” or, as it is now called in AutoCAD, “Polygon”.
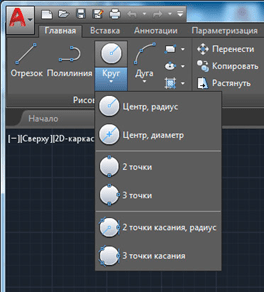
The number of additional command buttons may be small (a couple/three new commands). Or, as in the case of the “Circle” team, a rather impressive list of new teams will open before you.
The same small triangle/arrow that we saw earlier on the quick access panel. To open the panel adaptation menu, it is also found near the names of the command areas.
Clicking on it will give access to additional buttons, the commands of which are used less frequently than those that are always present in the area.
Yes, I would like to note the fact that not all commands are present on command ribbons and panels. Some commands can be run from the command line, but we'll talk about that later.
And so, we remind you that we are looking at the “Interface AutoCAD programs" using version 2018 as an example. Having studied the main elements of the upper part of the program window, we move on to the main workspace of the AutoCAD program.
The workspace begins immediately after the command ribbon. It is titled by labels or tabs open files. They are highlighted with an orange rectangle in our picture.
How many files can be used in AutoCAD at the same time?
AutoCAD can work with several files simultaneously. And instead of the tabs “Drawing1”, “Drawing2” you will have the names of these files.
The working field is represented by “infinite space” or “model space” divided into cells. It is here, in model space, that we will create 2D primitives, circles and rectangles. Use the “Polyline” tool and, by editing all this, get a finished drawing!
On the right top corner the working field has a “compass”. Or it is also called a “view cube”. It is circled in purple.
His job is to help us. Find your bearings in the model space, since in AutoCAD you can not only create 2D elements, but also model in 3D, but first things first.
Also, below the view cube, there is additional panel, which allows you to control the appearance of the workspace.
At the bottom of the window, there is one of the most important interface elements - the “Command Line” or “Command Line”.
She's highlighted yellow rectangle in our drawing. Here you can “manually”, using the keyboard, give AutoCAD commands to perform various actions, be it creating elements or editing them, and in general, system commands.
Also, yellow The rectangle marks the tabs for switching between “model space” and “sheet space”.
We will look at them in our next articles. As well as the panel highlighted in red, where there are buttons to turn on or off additional modes modeling.
This concludes our article. We looked at the AutoCAD program interface and got acquainted with the basic concepts of the program window.
And now we already know where and what to “press”! Now you can try to click the mouse yourself, selecting various commands building elements.
And in the next article we will look in detail at the commands for creating 2D drawing elements.
If you have scoured a bunch of sites for learning this program, watched a lot of AutoCAD video lessons, but still haven’t received desired result, then this article will definitely help you!!
All videos AutoCAD lessons, training courses, all articles and publications chew on every command and function, which becomes boring and uninteresting. I propose in principle new approach To AutoCAD training. After reading this article, you can get to work and do whatever you want!
This program is intended, first of all, for making drawings, because its development started back in 1982, and the first version was an ordinary electronic drawing board. Further, with the development of CAD systems computer-aided design) technologies and 3D modeling and 3D functions have been added. And many functions that have been eradicated routine operations. But, as in life, before we learn to run, we need to learn to walk, and even earlier, to stand on our feet.
If you decide create a drawing in autocad with your own hands, then you must have at least a small understanding of space and geometry, at least at school level. To draw a line, you need two points. To draw a circle, you need a center and a radius. Did you know this? Then everything else won't be too difficult!
You can read how to download and install AutoCAD here.
And so this wonderful beast is on your computer. Let's run it. We will work in AutoCAD 2014, almost keeping up with the times. Because at this moment there is already AutoCAD 2015. But I will tell you that starting from the version of AutoCAD 2010 there are no special differences. Therefore, having any version from 10 to 14 except for the LT versions (shortened edition), we continue.
The loading window looks nice and modern.

The first thing we see after launching is AutoCAD Assistant. We see expansion training blocks and those that I sometimes use - latest files, create and open, but we don’t need it for now. Let's close this window. Top right. All windows have a standard structure windows windows There are three buttons at the top right - close, minimize, and expand. Sometimes there are none if there is no point in doing them for a given window. After closing the assistant we see:

This is what the main AutoCAD window looks like. At the top is a ribbon interface, which makes it easier to work with unlike standard panel interfaces. If this is not the case for you, then in the lower right corner click on the gear icon and select “Drawing and Annotations”.

And so, now the fun part! Now you can draw!!
Decades of development of this program have made it alive in the truest sense of the word. If you are careful, he will answer all your questions himself.
To create a drawing of any complexity, about 15-25 commands are enough, which are located in three blocks in the most visible place.

Click on the inscriptions under the ribbon blocks and get expanded functions.

Under most buttons, there are triangles that also cause context menu.
We know that the world consists of molecules. Likewise, any drawing can be created from primitives. As soon as you click on any icon. Down in command line A dialog with the program will appear. Read carefully and everything will work out!!
For example, the command segment. Select the first point then the second point, all indicated on the command line.
The program is intuitive; if you hover the cursor over the button and wait a couple of seconds, a hint will appear showing how it works.
Esc-deselect, cancel action,
Del-delete the selection,
Ctrl+Z- go back a step,
Spin the wheel to zoom in, out,
Click on the wheel + move the mouse to move the drawing.
Read the command line, use these three panels and everything will work out! If you have drawn a segment that does not fit in the allocated space, enter the command REGEN in the command line and press Enter.
With these commands you can draw anything. I didn’t deceive you if YOU think so now. It will be long, difficult, tedious, but possible. If there is a desire,


