Moving Temp and TMP Directories
Transfer a folder Temp Windows 7 and what is the temp folder for?Programs that we regularly install on a computer create in it during their work temporary files designed to retrieve or archive data, simple software distributions, and even step-by-step saves work text editors. To prevent them from hanging around in confusion all over the computer, the programs that create them determine the location of such files in the Temp folder.
Theoretically, after work on programs is completed, such files should be deleted on their own, but this does not always happen.
Remember how often, in an attempt to resurrect a frozen system, you pulled the plug from the socket or incorrectly disabled a running program? Such actions in relation to our computer cannot take place without a trace: temporary files are “collected” in it constantly and overload the Temp folder, which is already filled to the top. And since we all know that free space is one of the keys to success efficient work PC, the Temp folder overloaded with “garbage”, accordingly, constantly slows down operating processes.
Step One: Search for Temp Folders
Similar file storages There may be several on a PC, but most often we have only two Temp folders. One is located in Windows folder, namely: in system partition PC, the second one can be easily found in the user profile by turning on hidden displays folders. So, in Windows system 7 must be followed by: Drive C: Users folder- Username - AppData - Local
If for some reason you do not find the Temp folder here, seek help from your trusty friend “Search” and the “Run” command. In the window that appears, simply enter the command %TEMP%, and it will automatically open before your eyes.
Stage two: making it more convenient
If there is a need to make working with folders more convenient, then both Temps with the temporary files stored in them can be combined into one or a completely new one can be created in another place convenient for you. Go to the Start menu, click on Computer and open system settings.
In the window that opens, change the path to the entered TEMP and TMP addresses to the created or selected folder. This is easy to do: left-click on each variable, then use the “Edit” function and type new way to the folder.
Confirm your selection with the "OK" key. As a result, you will get one folder storing temporary files in a place convenient for you.
Stage three: cleaning the Temp folder without harming the system
If you still have a question: “Is it possible to delete the Temp folder?”, We hasten to warn you that this is absolutely forbidden. But it must be cleaned regularly to free up disk space for work.
The easiest way to do this is to select the entire contents of the folder and delete it manually. However, if some of the files in it are involved in work (the system will warn you about this using pop-up windows), you will not be able to delete such files.
You can get rid of the “indigenous inhabitants” only by calling for help special utilities, such as: CCleaner. However, if there are few such files in the folder, then the easiest way would be to leave them alone and not touch them for the time being. Keep in mind: such robot assistants can also remove files from your computer that should not be removed under any circumstances. That is why developers include in cleaning programs the ability to create backup copy files.
Now let's look at the second method of cleaning the Temp folder, which is not inferior to the first in either efficiency or simplicity. So, in Windows 7 you will find special service called "Disk Cleanup": it is located in utilities“Start” and allows you to delete those temporary files that have not been used by the system for more than a week.
To do this you need to follow a few simple steps.
First, go: From the Start menu to Computer.
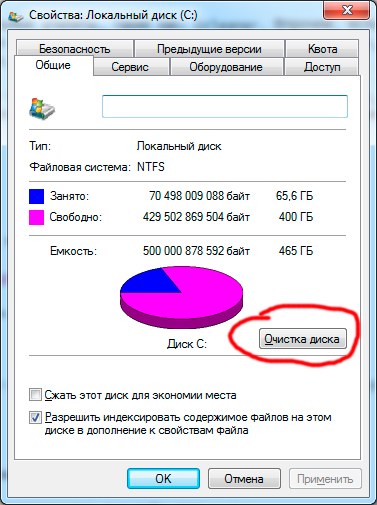
Right-click the system drive (usually the C:\ drive) and check “Properties”.
Place a checkmark next to the “Temporary files” item. After clicking Ok, a small window will appear that will “ask” you if you really want to do this. Just confirm your intentions.
If you want to try manually deleting temporary files, you will first need to find them yourself.
We remind you that if you have not previously combined the Temp folders into one, then they are located either here:
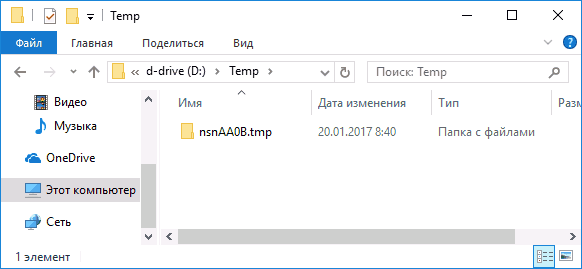
Here: drive C:\Users\AccountName\AppData\Local\Temp
There is another way to find Temp folders. Press the hot keys “Win + R”, open the “Run” window, enter the command “%TEMP%” and click Ok. The folder C:\Users\Name will open account\AppData\Local\Temp
There is another option that allows you to clear the Temp folder.
Go to notepad and write there next command: rmdir /s /q %temp% Save the document under some name. For example clean.bat
On startup this shortcut the Temp folder will clean itself. You can even set it up to automatically clean it, which will start immediately when you turn on the computer. To do this, simply add the file to startup.
Now temporary files will not clog up the system drive "C" and interfere with its operation. And this is, in fact, what we were striving for.
According to the site: " Computer courses for novice users."


After each installation of a new application in the temporary Temp folder system disk Temporary files may remain. These are the files that the program needs during installation. After installing the program, these files will not be used and can be deleted. Many applications clean up after themselves without leaving any temporary files, but some, unfortunately, do not.
Also, while the computer is running various applications Intermediate data is written to the temporary folder. These can be clone files created for backup recovery, intermediate calculation files, etc. After the program ends, they can be deleted, which is what happens most often. However, in the event of an emergency shutdown of the application, they will remain in Temp folder.
With time Temp folder can take up an impressive size; there have been cases where temporary files “ate up” up to 90GB of free space. Firstly, it reduces free place for storage indeed important information. And, secondly, a cluttered system partition dramatically affects the performance of your computer. This is why it is important to clean up temporary storage. It is enough to do this once or twice a month to maintain normal system health.
In Windows XP, the temporary folder was always located at the root of the system partition. Nose Windows release Vista and Windows 7 the folder for temporary storage of files has moved to the user folder. This began to create difficulties for programs written under Windows XP, which led to even more clutter on the system disk. The thing is that old programs clear their temporary files at C:Temp . Therefore, it is advisable to move the temporary folder to the root of the system disk. This will also allow you to quickly clean it manually.
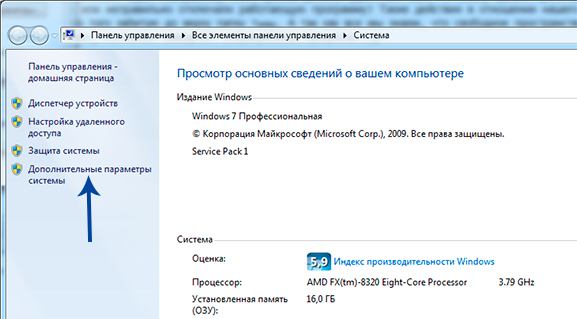
To move Temp folder go to the root of the system partition Control Panel. Open section "System" and click on the item “ Extra options systems».

You will see the system properties window, at the bottom click on the “ Environment Variables ».

In the window that appears, you should change the values of the environment variables for the TEMP and TMP variables. To do this, select these variables one by one and click on the button “ Change…" Enter the desired path where the temp folder will be located, for example: « C:Temp» . Save all changes by clicking the " OK».

Now all temporary files will be placed in a temporary folder located at the root of the disk C. To clean out a folder, you can simply delete all files and folders. If some files are used by the system, you cannot delete them, just skip them.
You can also use system utility disk cleaning. To do this, go to the properties of the system disk and on the “ Are common» click on the button « Disk Cleanup" The program will analyze the system partition and display a window asking you to delete certain groups of files. Temporary files are precisely those files that are located in Temp folder. Or you can use special
annotation
Initial conditions: Your system has more than one hard drive. One of them already has an operating system installed, and on the second you installed Windows 7. There is a need to remove it from the system HDD, on which Windows 7 is not installed. But it turned out that without this disk your system does not want to boot.
This happened because one of the three conditions for a successful download was no longer met:
- the partition from which the boot is performed must be active;
- boot sector partition must be compatible with bootmgr;
- The active partition must contain operating system boot files. For Windows 7 this is the file bootmgr and boot configuration data store ( BCD), located in the hidden and system folder Boot.
Let's look at the solution to the problem using the example configuration shown in the figure.
The Disk Management screenshot shows that the C: drive on which Windows 7 is installed is not active. The active drive is D:. Files Windows boot 7 (they are hidden and system) on drive C: will also not be detected. Task: transfer the bootloader from drive D: to drive C:, that is, ensure compliance with the above conditions.
Using a Windows 7 installation or recovery disc
If you have these disks, transfer boot files is not difficult. Physically disconnect the "unnecessary" hard drive, boot from the disk, setting it in the BIOS CD-DVD drive first boot device, sign in . After scanning and searching for installed operating systems is completed, perform Startup Repair. The recovery program will prepare in the right way hard drive and copy it to it necessary files. After a reboot, downloading will be restored.
If you don't have any installation disk, or a recovery disk, you can use the method described below.
Transferring boot files using the bcdboot.exe utility
Conventionally, we can divide the upcoming operation into three stages, corresponding to three necessary conditions successful download.
First: go to the "Disk Management" snap-in (Win + R, in the "Run" line type diskmgmt.msc and click OK) and see what letter is assigned to the first disk partition on the left that you plan to keep. It is this section that we will make bootable and active: click right click mouse over the selected section and select the context menu item "Make section active". Please note that this section must have a "primary" attribute.
Second: run command line with administrator rights. All commands discussed below will be executed sequentially without exiting the command line.
DISKPART list disk sel disk X list partition sel part 1 active exit
where X is the number of the disk that is supposed to be left in the list of disks (command list disk).
To do this you will need a utility bootsect.exe, which, in the absence of an installation disk, can be taken. Download and unpack it in advance, for example, into the root directory of the C: partition.
C:\bootsect /nt60 All /force
note: experience shows that if there are 2 or more HDD keys in the configuration /force necessary.
Bcdboot %Windir% /l ru-Ru /s C:
Key /l- selecting language settings for the download manager. If your system is not Russian-language, use other values for this key, for example, for English - en-Us, for German - de-DE, etc.
Key /s- specifies the volume letter assigned to the target system partition to which boot environment files are copied. This is the section that we have made active. Since the command firmware defaults to the current system partition (up to extracting hard disk - this is partition D:), using this key with the letter of the intended boot partition - Necessarily!
- Let's make the disk active. There are two ways to make the desired section active.
- We rewrite the boot sector (make it compatible with bootmgr):
- We transfer the BCD and the bootmgr file to the new active partition:
Checking and editing BCD
Run the command
Bcdedit /store C:\boot\bcd
Based on the results of the command, check the parameters (underlined in the screenshot):
- in the "Windows Boot Manager" section the option device must be equal to the letter of the new active partition, in our case - and osdevice must be equal to the letter of the partition on which the Windows directories are currently located. In our case, this is also C:.
- in case of discrepancy, enter necessary changes using commands:
Usually there is no need to run commands, but it doesn't hurt to check. Instead of an identifier (current), it can be (default), or even alphanumeric. Then in commands you need to use the one that is used for loading.
So, moving download files to another drive is not the same difficult task.
Instead of a conclusion, or "Russian-language multiboot menu"
Due to the fact that the startup recovery program running from the recovery environment uses the default parameters, the boot manager language becomes English. If there is one bootable system, this is not noticeable, but if there is a multiboot menu, it is noticeable. If you are not satisfied with this, run on the command line:
Bcdboot %Windir% /l ru-Ru
You need to run it after transferring the download files to the new partition.
Let's consider step by step guide transferring temporary files folders to another drive in Windows 7, 8 and 10 so that further programs formed their transient files there.
Moving the temporary files folder in Windows 10, 8 and Windows 7
The location of temporary files in Windows is created by environment variables, and there may be several such favors: system ones - C: WindowsTEMP and TMP, as well as others for users - C: Users AppData Local Temp and Tmp. The task is to change them so that transient files are transferred to another drive, for example, D.
To do this, you need to follow the following steps:
1. On the desired disk create a folder for temporary files, for example, D: Temp
2. Go to the operating system settings. In Windows 10, to do this, right-click on “Start” and then select “System”; in Windows 7, right-click on “My Computer” and select “Properties”.
3. On the left, in the system parameters, select “Advanced system parameters”.
4. In the “Advanced” tab, click the “Environment Variables” button.

5. It is worth paying attention to the environment variables called TEMP and TMP, not only in the upper list (user ones), but also in the lower list - system ones. Note: If you have multiple accounts on your PC, it may be prudent to create a D drive for each of them. separate folder temporary files, and do not change system variables.

6. For each of these variables: select it, click “Change” and specify a line on another disk to the new folder of temporary files.

7. After changing all the necessary variables, click OK.
After completing the steps, temporary program files should be saved in a user-selected folder on a companion drive, without taking up space on the system partition or on the system drive.
This documentation has been archived and is no longer maintained.
Moving Temp and TMP Directories
[IN this section Provides troubleshooting information for issues called out by the Exchange Analyzer Tool. Use this information to decide specific problems only on systems on which the Exchange Analyzer has been run. The Exchange Analyzer, which can be downloaded free of charge from the Internet, remotely collects configuration data from each server in the topology and automatically analyzes it. The final report records important information about incorrect settings, potential problems and parameters for which default values have been changed. By following Exchange Analyzer recommendations, you can improve the performance, scalability, and reliability of your Exchange Server and reduce downtime. additional information about the Exchange Analyzer and how to download it latest versions, see "Microsoft Exchange Analyzers" at http://go.microsoft.com/fwlink/?linkid=34707 (at English language).]
Last modified section: 2006-09-01
The Microsoft® Exchange Server Analyzer Tool has determined that the TEMP and TMP folders for the server cannot be positioned for optimal disk performance. For getting best results It is recommended to store the TEMP and TMP folders on a disk subsystem whose resources are not shared system folder or Exchange data files.
Bank service Microsoft data Exchange uses the TEMP and TMP folders as temporary storage during a variety of operations, such as message conversion, large attachments, and move operations. mailboxes. The TEMP and TMP folder environment variables are used to determine which folders in file system(e.g. which path) will be used by applications that require a temporary work area. The TEMP folder is typically used by applications such as Microsoft Exchange, and the TMP folder is typically used by development tools such as Microsoft Visual C++®. The path for each variable typically corresponds to the security context of the application or tool.
On a non-clustered Exchange server, the Exchange store uses SYSTEM folder(for example, Local System) applying an environment variable setting of %Systemroot%\Temp, both for the TEMP folder and for the TMP folder. Virtual servers Exchange running on a server cluster Microsoft Windows® apply environment variable settings to a Cluster service account that runs in the context of a specific user security principle. For user accounts, the default environment variable for the TEMP and TMP folders is set to %Userprofile%\Temp.
This section explains how to move the TEMP and TMP directories in clustered and non-clustered environments. Before you begin the procedures in this section, be aware the following recommendations:
- For achievement optimal performance For the TEMP and TMP folders used by the Exchange server, it is recommended not to use a drive containing operating system. Additionally, you should ensure that your environment variables are set to paths that include fast disk or disk subsystem, for example with a set of spindles RAID-0+1.
- We recommend that you do not use Exchange disk transaction logs for the TEMP and TMP folders you use.
Log on to the computer running Exchange Server with an account that has administrator rights.
Right click My computer Properties.
Select a tab Additionally.
Click Environment Variables.
In area System Variables select TEMP and then click Change.
In field Variable value enter the new path for the environment variable for the folder TEMP and then click the button OK.
In area System Variables select TMP and then click Change.
In field Variable value TMP and then click the button OK.
Click the button OK Environment Variables and then click the button OK to close the dialog box Properties of the system.
Reboot the server for all changes to take effect.
Log in to the node in the cluster using the Cluster service account.
Right click My computer and in context menu select Properties.
Click Additionally.
Click Environment Variables.
In area < account name> select TEMP and then click Change.
In field Variable value enter the new path for the folder environment variable TEMP and then click the button OK.
In area User variables for< account name> select TMP and then click Change.
In field Variable value enter the new path for the folder environment variable TMP and then click the button OK.
Click the button OK to close the dialog box Environment Variables, and then click the button OK to close the dialog box Properties of the system.
Restart the node for the change to take effect.
Repeat steps 1 through 10 for each cluster node.
Run Windows Explorer, locate and then right-click the folder that the TEMP variable or TMP variable points to, and then select Properties.
In the Temp Properties dialog box, click the Safety and then click Add.
In the Select: Users, Computers, or Groups dialog box, add the Authenticated Users group to the list of object names and click OK.
Click Additionally to access advanced security options.
Select Authenticated users on the list Name and then click the button Change to open the Enter Resolution dialog box.
Use the fields in the Permissions area to grant the following special permissions:
Browse Folders / Execute Files
Creating Files/Writing Data
Creating folders / Adding data
Click the button OK three times to apply the permissions and close the dialog box.
- For more information about Exchange server performance, see Exchange Server 2003 Application Performance and Scalability Guide(http://go.microsoft.com/fwlink/?LinkId=47576).
- For more information about troubleshooting Exchange server performance issues, see Troubleshoot performance issues Microsoft applications Exchange Server 2003(http://go.microsoft.com/fwlink/?LinkId=47588).


