How to set a password for a text document. Word file password
If you create Word document containing confidential information, intended for a certain circle of people, you can set a password to open the document. This way, only someone who knows the password can open the document. We'll show you two ways to do this.
The first way is using the Backstage view. Open the document for which you need to set a password to open it, and go to the tab File(File).

In the window Intelligence(Info) click Document protection(Protect Document) and select from the drop-down menu Encrypt using password(Encrypt with Password).

A dialog box will open Document encryption(Encrypt Document). Enter your password in the field Password(Password) and press OK.

In the dialog box that appears, enter the same password again and click OK.

Chapter Document protection(Protect Document) in the window Intelligence(Info) will be highlighted yellow, and you will be shown a message stating that a password is required to open the document.

The second way to create a password to open a Word document is using the dialog box Saving a document(Save As). Open the document for which you need to set a password to open, and go to the tab File(File). From the menu on the left, click Save as(Save As).

Select the folder in which you want to save the password-protected document. You can choose the option Current folder (Current Folder), a folder from the list Recent folders(Recent Folders) or use the button Review(Browse).


In the dialog box that appears, enter the password in the field Password to open the file(Password to open) and press OK.

In the dialog box Password confirmation(Confirm Password) enter the same password again and click OK.


Both methods allow you to create the same password. If you want to remove the password, open a Word document, call the dialog box Document encryption(Encrypt Document) or Common parameters (General Options) as described above and remove the password. Don't forget to save the document!
Question from a user
Hello.
Tell me how to password protect the folder in which I have my documents. The folder is on a flash drive, and you have to carry it with you and connect it to different PCs and laptops. I wouldn’t want anyone to see them or copy them to themselves.
A small addition: the password must be placed on the folder, and not on the flash drive itself. Those. To see specific folder- enter a password, and everything else is free and open for viewing. Thank you in advance!
Good day!
The task is quite doable, below I will give several options for how to put a password on your files (and based on the pros/cons of each method, you can choose best option for myself).
One moment!
Some users (especially beginners) set passwords for everything: movies, music, games, etc. As a rule, all these media files that you simply downloaded from the Internet are of little interest to anyone (except you), and it hardly makes sense to protect them (unless you want someone to know that you are interested in them) .
At the same time, we have to observe how lazily they treat passwords, personal data, scans of passports, tax identification numbers, etc. First of all, it is these documents that need to be protected!
To a file (document, notepad)
The simplest, fastest and effective method putting a password on your folders and files means sending them to a password-protected (and encrypted) archive. When you need to gain access to files and folders inside the archive, you need to enter a password for access and use them safely.
On the plus side: you can protect any files in this way: Word/Excel documents, pictures, text files(notepads), scans, etc. Also, archivers are available on any PC/laptop, which means you can open files on any computer!
There are, however, disadvantages: if you forget the password, it is very difficult to open such an archive (in some cases impossible); not convenient to work with large files(for example, with a video folder).
Below I will look at how to create such an encrypted archive in the popular archivers 7-Zip and WinRAR.
7-Zip
A very popular archiver that allows you to compress files stronger than its competitors: WinRAR, WinZIP, etc. The archiver is free, convenient and designed in a minimalist style (there is nothing superfluous). In general, it rightfully occupies a leading position...
After installing it, you will see a menu of the same name in Explorer: 7-Zip. Now, to create an archive, you just need to click right click mice by the required file or folder and select from the menu that appears "Add to archive..." (see screenshot below).

- (1) - must be specified name of your archive and the place where it will be stored. In general, the archive name can be anything, and it can later be renamed, just like a regular file;
- (2) - archive format. The best compression is provided by the 7-Zip format, which is what I recommend choosing;
- (3) - SFX archive - self-extracting archive. That is, if you check the box next to this item, an EXE file will be created (as regular program), by running which, you can extract files without using an archiver (a convenient thing for extracting files on any computer, even those without archivers at all);
- (4) entering a password - the password can be anything, here the archiver does not set any restrictions. However, remember that passwords like “12345”, “God”, “Love”, etc., associated with your name and date of birth, are very easy to hack! Install something more reliable (recommended 6-10 characters, with capitals and lowercase letters, numbers and specials. signs);
- (5) choosing an encryption method- I recommend leaving the default AES-256, and additionally checking the “Encrypt file names” checkbox. Thanks to this, your files in the archive not only cannot be opened, but you can’t even see what file names are hidden in the archive!
- (6) - start archiving.

Creating an archive // 7-Zip
After the archive is created, you can try to open it. For this action, any archiver (even not 7-Zip) will definitely ask you to enter a password for decryption. If you don’t know it or have forgotten it, then your files will remain inaccessible!

WinRAR
One of the most famous archivers, providing a good compression ratio. Allows you to open and extract files from all the most popular formats archives: ZIP, RAR, ACE, TAR, GZIP, etc.
To create an archive in WinRAR, just right-click on a file/folder and select "WinRAR/Add to Archive" (note: add to archive).
- (1) - set a name for the archive (Archive name), can be anything;
- (2) - select archive format (RAR recommended);
- (3) - select option "Set Password"(password setting) to encrypt the archive.

Then specify the password itself (line "Enter password", i.e. enter a password) and it is highly advisable to check the box "Encrypt file names"(i.e. encrypt file names).

After this you can start archiving. In general, the password-protected archive is ready - you can use it...
Password protection of Word/Excel documents, etc.
Documents created in Microsoft Office, can be encrypted regular means, without additional programs. It is very convenient when you often need to work with an encrypted document. By the way, you can also put pictures in such a document...
To set a password: open the menu FILE/INFORMATION . Then click on the function "Document Protection" and select what you want: encrypt using password (by the way, in addition to this, the document can, for example, be prohibited for editing, restrict access, etc.) .

Please note that the entered password (if you forget or lose it) is almost impossible to recover! By the way, the office itself is warned about this when it is assigned.

After the document is protected by entering the section "INTELLIGENCE", you will see a key and lock icon appear and a note saying that a password will be required to open the file. Actually, that’s it, the document is protected!

To folder/directory
It is not always convenient to set a password on specific file. For example, you have a catalog with pictures, personal photos, with which you often work (edit old ones, upload new ones, etc.), and which you would not want anyone to see without your permission. In this case, creating an archive every time is not convenient, and you have to resort to other tools. About them below...
♦
Protected Folder

Very convenient utility to protect and hide your files and folders from strangers. To protect a folder with a password, you just need to move it to a window (to the “safe”) - and everything in it will be reliably protected by your password.
Advantages:
- allows you to protect your personal and important information from theft of programs;
- there are several levels of protection;
- very convenient to use: just drag and drop the folder - and it is protected!
- entirely in Russian;
- Compatible with Windows 7/8/8.1/10 (32/64 bits).
Very simple and at the same time reliable program to protect encryption and password protection of any folders: be they on a hard drive, flash drive or any other removable media. Each folder, by the way, can be protected by its own separate password. The program is fully translated into Russian and is supported by all popular versions Windows.
Advantages:
- there is no need to keep it running all the time;
- does not install any special drivers to the system;
- simple, clear interface- even a complete novice PC user can figure it out;
- there are hot keys;
- the program is compact and does not take up much disk space;
- free for home use.
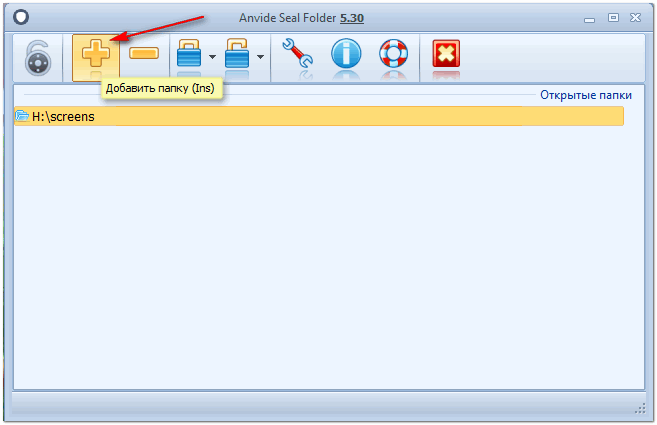
I’ll show you with an example how you can easily encrypt and close your folder from prying eyes. Install and run the program. Then add a folder (you can use the Ins key).
Now, even if you close or delete the program, your folder will remain inaccessible (an attempt to enter it (if you remember its name and address) will end in an error, as in the screenshot below).
By the way, the folder is not visible even if you boot into safe mode. In general, it is hidden reliably!

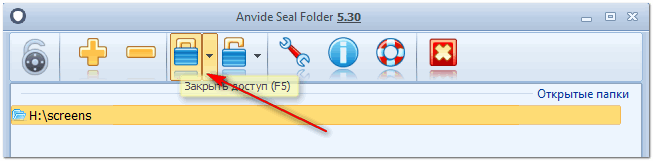
To decrypt a folder and the files in it, you need to run the utility again, click on the open padlock icon and enter the password.
To a flash drive
Method No. 1
The easiest way to put a password on an entire flash drive (or disk) is to use a feature that already exists in Windows - BitLocker. Allows you to reliably and quickly protect information on a flash drive
Note! BitLocker encryption not available in all Windows versions. If you have Windows 7 Ultimate or Enterprise, Windows 8/8.1/10 - most likely you should have it.
To protect a flash drive in this way, connect it to a USB port, open "My computer" (or “This PC”) and right-click on it, select from the menu that appears. Next, follow the wizard's instructions to set a password.

When the password is set, try removing the flash drive from the USB port and then plugging it in again - you will see that access to it is blocked (and its icon has become a closed padlock). Until you enter the unlock password, the information on the media is securely protected!

Unlocking a disk/flash drive
Method No. 2
A very simple and convenient utility for protecting flash drives (works in all versions of Windows). All you need to install protection on a flash drive is to download the utility and copy it to a USB drive (see screenshot below).

Action No. 1 - copied the program file to the USB flash drive
Then you can set a password.

Action No. 2 - launched the utility from the flash drive, formatted it and entered the password
ALL! Now when you connect a flash drive, it will appear empty (only the file will be visible in it USB programs Safeguard).
To see the files on it, you will need to run this file and enter the correct password. If you do this, a disk will appear Z, equal in volume to your flash drive - this is what you need to work with (and it is on this that all your files added for encryption will be located)...
In general, everything is simple, convenient and easy to use!
An analogue of a similar utility: Rohos Mini Drive.
ADDITION
You can also create a virtual encrypted disk (something like an image) to connect and view which you need to enter the correct password. Similar technology makes your files as secure as possible from outsiders. In addition, you can store absolutely any type of file on such a disk.
Examples of programs: TrueCrypt, CyberSafe, Rohos Disk, etc.
PS: don't forget your passwords! Otherwise, make the files so secure that you won’t even be able to look at them yourself...
Some documents you work with in Word may not be intended for other users. In this case, it is recommended to set a password for the document. After installing this, only those who know the password will be able to access the document and edit it.
Setting passwords for Microsoft Word files
Functional office suite allows you to block any document created in it user password. Download any additional programs no need. However, depending on Microsoft versions The Office lock installation process may be slightly different. Below we will look at how to set a password for a Word document in different versions programs.
Microsoft Word 2007
This version is already considered very outdated, but is still actively used by some users. Instructions for setting a document lock in Word 2007 are as follows:

Microsoft Word 2010
This version is also considered outdated, but is actively used by many users and institutions. The interface here is slightly different from the previously reviewed version, so the instructions will also look a little different:

Modern versions of MS Word
Starting from the 2013 version, the Word interface has undergone minor changes, so the instructions given below will be relevant for both versions 2013 and 2016 and later:

Alternative option
If you need to block access to several Word documents at once, you can use WinRAR capabilities- a famous program for creating and opening archives.
Instructions in in this case will look like this:

As you can see, there is nothing difficult about protecting this or that document Word password. If you forget it, you will be able to access the document, but this is the topic of a separate article.
Ensuring the security of one's own electronic data is the concern of every user. Today you can encounter many various applications and utilities for document protection. However, often the most the best way Ensuring the security of files and folders is by password-protecting them. But how can the corresponding operations be carried out? How to set a password for a Word document in Windows? Below we will present the simplest, but very reliable options for the development of events.
Old versions of MS Word
It is worth paying attention to the fact that the algorithm of actions will depend on the version of Office used. Many people still work in Word 2003. Therefore, let's start looking at the process with this application.
How to set a password for a Word document? Users of MS Word 2003 will have to proceed like this:
- Open the document you want to password protect.
- Click on the "File" button and click on "Save As".
- Select the "Service" option. It is located in the upper right part of the dialog box that appears.
- Click on the line "Security Settings...".
- Enter your invented passwords in the specially provided lines. You can prohibit editing the document or leave the password only for opening the file.
- Click on the "Install protection" button.
- Repeat passwords if the system requires it.
- Confirm the installation of document security features.
That's all. Now it’s clear how to set a password for a Word document to edit or open. But this is just the beginning!
Word 2007
Now let's look at the process using Word 2007 as an example. In this case, you will have to slightly change the procedure.
The thing is that new versions of "Office" have updated interface. Users of the 2003 build find it inconvenient. Some functions are quite difficult to find in the new Word.

How to set a password for a Word document? If the user works in MS Word 2007, he needs:
- Click on the "File" menu item.
- Go to the "Prepare" section.
- Select the "Encrypt document" operation. To limit editing, you will have to click on the “Limit permissions” block.
- Specify passwords for certain operations.
- Confirm the installation of security features.
Word 2010
How to set a password for a Word document? We have already studied several options for the development of events. What to do if the user works in Word 2010? Compared to the 2007 version of the application, the utility has certain interface changes.

To put a password on a file, you need to follow approximately the following instructions:
- Go to this or that document.
- Expand the "File" menu item.
- Switch to the "Details" section.
- In the menu that appears, click on “Protect Document”.
- Select the operation you want to perform. For example, "Encrypt with password."
- A password entry window will appear on the screen. Here you need to enter a secret code.
After confirming the actions taken, the changes will take effect. Depending on the selected options, a password will be required to open a Word document or edit it. Everything is very simple!
WinRar to the rescue
How to put a password on a Word file? Documents can be password protected using WinRar applications. In a similar way, the protection of certain folders on the computer is ensured.
In order to take advantage of this advice, you need:
- Right-click on the file or folder.
- Select the "Add to archive..." option. The corresponding command will be displayed if there is WinRar on the computer.
- In the window that appears, go to the “Advanced” tab.
- Click on the "Set password" button.
- Enter the secret code and confirm it.
- Create an archive with the selected parameters.
After completing the procedure, the user will see a Rar archive with certain documents. It can only be opened if the user has specified password.

Additional software
How to put a password on a folder with a Word document? Another good solution is to use free third party applications. For example, Password Protect is suitable.
The user will need to perform the following actions:
- Launch the application.
- Select the folders you want to password protect. To do this, just check the appropriate boxes.
- Click on the "Lock..." button.
- Specify data to gain access to files.
- Confirm the procedure.
Now it’s clear how to set a password for a Word document in one case or another. Each user will be able to complete the task in a few minutes!
Data security is a burning topic for many computer users, especially if we're talking about about PCs that are used by several people at once. Almost every computer is connected to the Internet, and it’s no secret that there are people wandering around the Internet. a large number of virus programs, some of which can transmit important information from the user’s computer to attacker servers. In addition, hackers are also capable of hacking someone else's cloud storage, where many people store data for comfortable work with them across multiple devices at once.
All of the above suggests that at any moment this or that file can be lost and fall into the “wrong hands”. If we are talking about a Word or Excel file, this may be an important document, the loss of which is undesirable and sometimes dangerous. Some users store in text documents important passwords, others create unique content(they write scripts or books), and all this may end up in the hands of attackers. To avoid similar situation, you can store documents in archives that have a password. But it is much more convenient to use built-in functions text editors, and from this article you will learn how to put a password on a Word or Excel document without using third-party programs.
We recommend reading:Setting a password in Word 2003 (Excel 2003)
The programs of the Microsoft Office 2003 suite have become very widespread, and many users still do not give up on them. They are often installed on low-power office computers, in schools, institutes and wherever necessary Word programs, Excel, PowerPoint and others with basic functions.
Exactly at Office applications In 2003, for the first time, it became possible to set a password for a Word or Excel document. To do this you need:

Please note that for each specific document created on a computer, you must set a password separately.
Setting a password in Word 2007 (Excel 2007)
The most common package in Russia office applications is Microsoft Office 2007. Over the years, it has not lost its popularity, and millions of people are accustomed to working with it. You can password protect Word or Excel documents from the 2007 office suite as follows:

Important: If you want to remove set password from the document, repeat the procedure for installing it, but instead of the entered password, leave a blank line and click “OK”. In this case, Microsoft Office will automatically detect that the user wants to remove the password from the Word (Excel) document and will not force him to repeat the command, as happens at the time of installation.
Setting a password in Word 2010, 2013, 2016 (Excel 2010, 2013, 2016)
The process of setting a password for a document in modern versions of office applications from Microsoft not much different from the version for Office 2007. However modern programs got new design, and it wouldn’t hurt to give an example:

Password deactivation process in Word 2010 and later later versions identical to how it occurs in Word 2007.
Important: If the Word or Excel file was encrypted in modern version Microsoft Office (after 2010) or online Office programs 365, the document cannot be opened in Word 2007 and earlier versions.


