How to take a screenshot on a Windows 10 laptop. Screenshot program “Scissors”. Taking Snapshots Using Game Bar
Let's consider how standard methods creating a screenshot, as well as the help of third-party programs.
5 Ways to Take a Screenshot on Windows 10
1. Combination Windows keys+ PrtSc
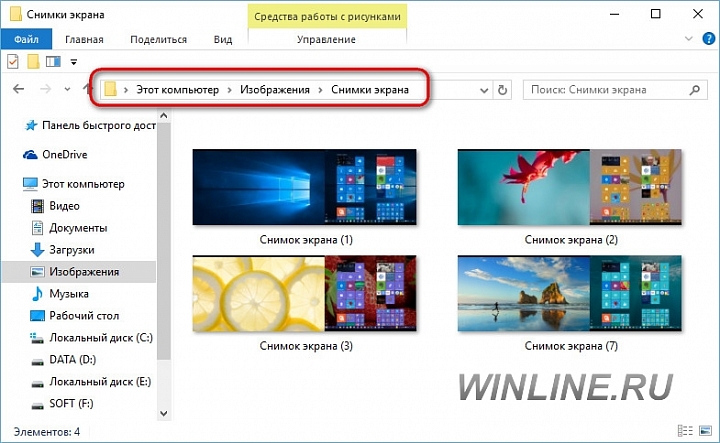
Known to many and, perhaps, the simplest method is a combination of the Windows and Printscreen keys (Prtsc). When you press this key combination, you take a screenshot of the screen, which is automatically saved in the “Screenshots” folder (path to the folder: “This PC” - “Pictures” - “Screenshots”). The image is saved in PNG format
2. Windows keys + H
The second method is less known, but more useful. Using the Windows + H key combination, you can take a screenshot with the ability to “share” it.
After clicking the treasured combination, a panel with applications will open on the right that will help you send a screenshot by mail or send it to Dropbox, OneNote, Twitter or other social networks. networks. A very convenient feature.
3. Prtsc key
Pressing the Prtsc (PrintScreen) key saves the screenshot to the clipboard, allowing you to open it in Paint.
You can insert a screenshot into Paint using combinations Ctrl+ V.
This allows you to edit the file as necessary and save it on your hard drive in a format convenient for you.
4. Built-in Scissors application
From simple to complex. Windows 10 allows you to use a built-in app called Snipping Tool.
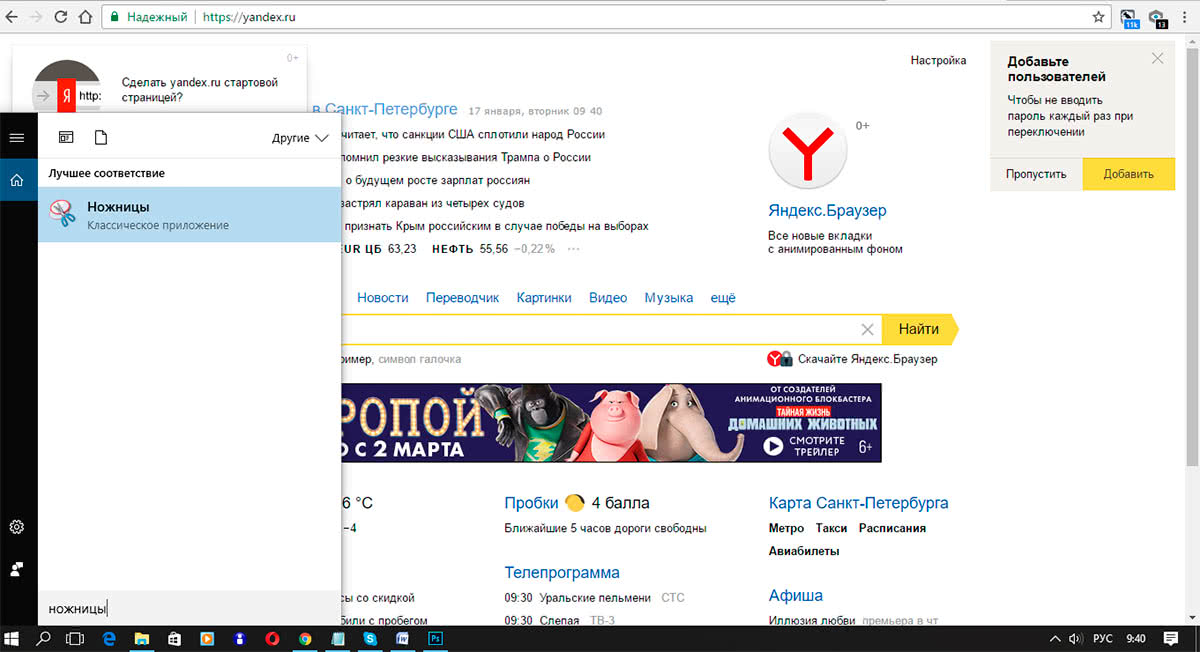
- In the bottom panel, through the search, enter the query “Scissors” and the system will show this application.
- IN open application you need to click on the “Create” section and you will have access to the screenshot mode.
The advantages of this application are that you can select your own custom area of the screen that you want to save.
After taking a screenshot, you will see it in a new application window, where you can make notes and send it via e-mail or save it on your computer.
5. Third-party service “Gyazo”
For a complete picture, we should talk about one of third party services for taking screenshots. The Gyazo service allows you to take pictures of individual areas of the screen and saves them in the cloud. This allows you to access them from any device and at any time.
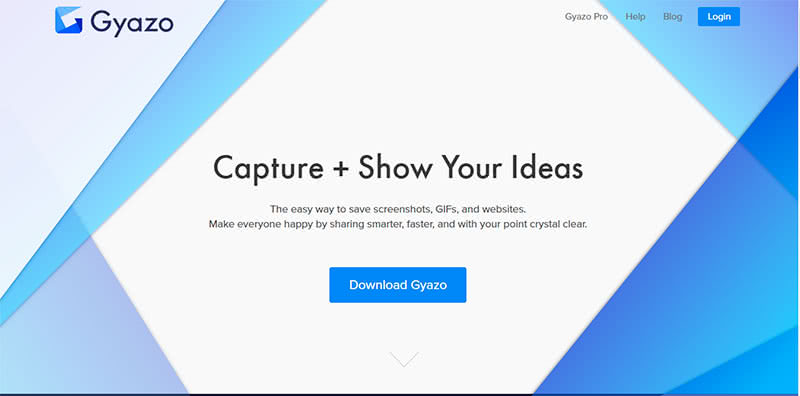
The service provides free software, which can be downloaded from their official website. There is also paid version, which provides advanced functionality.
So, we talked about the most common and convenient ways taking a screenshot in the Windows 10 operating system.
If the article was useful to you, we recommend posting it on your wall on social media. networks for further use.
Innovations in terms of creating screenshots regular means operating system Windows in its new version 10 minimum is just the ability to create screenshots with a delay of a few seconds added to the Snippings application. All other system tools for creating screenshots have migrated to new Windows 10 from predecessor versions. Let's look at them below.
PrintScreen and Alt+PrintScreen keys
The PrintScreen key to capture the entire screen and the Alt+PrintScreen combination to capture only active window- most old way take a screenshot on Windows. A screenshot placed on the clipboard can later be pasted in an image editor, office application, a notes application, or any other program that allows for the insertion of graphic objects.
Win+PrintScreen keys
From its predecessor Windows 8.1, the standard mechanism for taking a screenshot and instantly saving it to a PNG file using the Win+PrintScreen keys has migrated to the new Windows 10. Screenshots created in this way are stored in the “Screenshots” folder inside the user profile “Pictures” folder. Naturally, such the simplest way Creating a screenshot is limited by the lack of selection of the screen area to be captured, and in some cases, when several screens are connected to the computer, all of them will be present in the image.
Scissors app
The standard “Scissors” application, which appeared in Windows Vista, in system version 10, as mentioned, it acquired new feature Screenshot creation delay is up to 5 seconds.

The Snipping app still allows you to take pictures with selections various areas– entire screen, areas free form and active windows. Screenshots can be saved to PNG files, JPEG and GIF, after adding free-form annotations to the images using the pen and highlighter tools.


Third-party screenshot programs
Regular Windows tools 10 provide basic operations with screenshots, more advanced functionality should be found in third party programs. Let's briefly look at a few of them.
A functional screenshotter with its own graphic editor, which is very similar to standard utility for drawing Windows Paint.

Bug Shooting is also a functional screenshotter with a built-in graphic editor, a selection of objects for overlay, and the ability to instantly publish pictures to various web services.

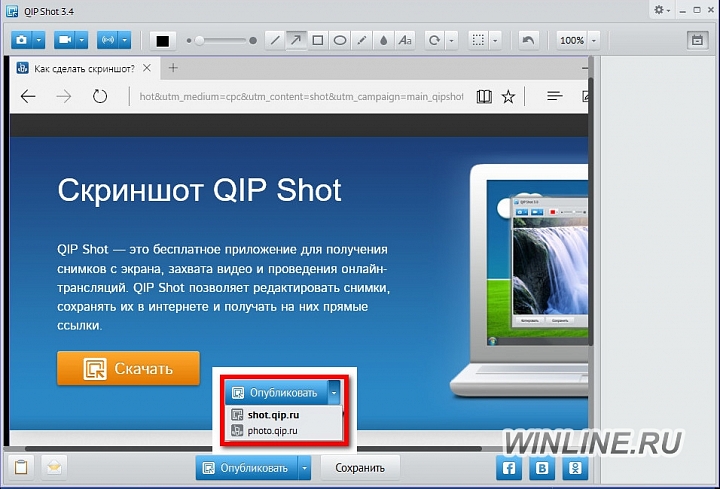
QIP Shot
A screenshotter with a simple image editor that also allows you to capture video from the monitor screen. Provides for instant publication of photographs taken on social networks and on free photo hosting sites web project Qip.Ru.
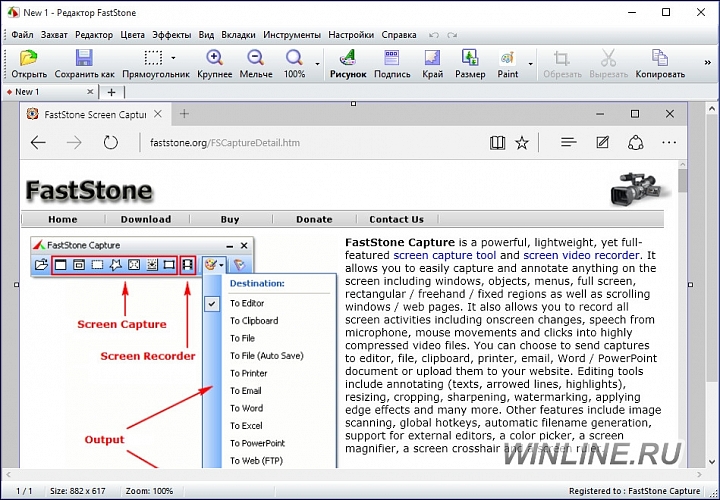
FastStone Capture
A functional screenshotter with a monitor screen capture function and its own graphic editor.
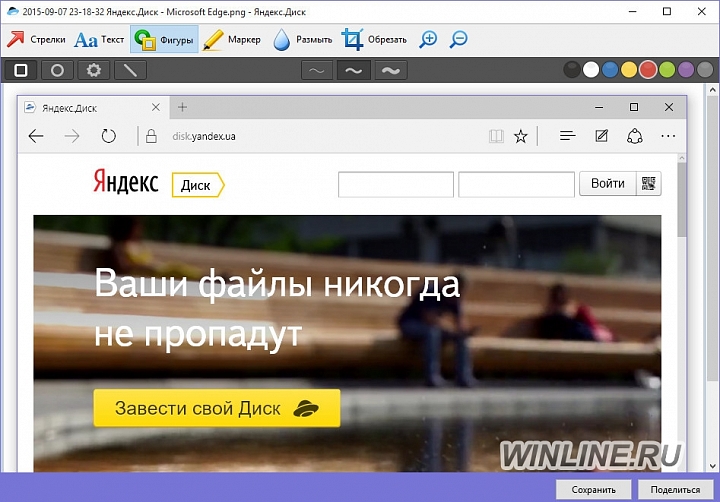
Yandex.Disk
Desktop client application popular cloud storage from Yandex, which includes a screenshotter with a minimalistic graphic editor. The created screenshots can be immediately saved in the cloud and the resulting link can be sent to the right people.
A screenshot or screenshot is an image taken from a PC at one point in time or another. Most often it is used to demonstrate what is happening on your computer or laptop to other users. Many users know how to take screenshots, but hardly anyone suspects that there are a huge number of ways to capture the screen.
As already mentioned, there are many ways to take a screenshot. Among them, two large groups can be distinguished: methods that use additional software and methods that involve only the built-in tools of Windows 10. Let's look at the most convenient of them.
Method 1: Ashampoo Snap
Ashampoo Snap is great software solution to capture images as well as record videos from your PC. With its help you can easily and quickly take screenshots, edit them, add Additional information. Ashampoo Snap has a clear Russian-language interface, which allows even an inexperienced user to cope with the application. Disadvantage of the program - paid license. But the user can always try the 30-day trial version of the product.
To take a screenshot using this method, follow these steps.
Method 2: LightShot
The process of capturing an image from using Snagit as follows.

Method 4: Built-in Tools
Key Print Screen
In Windows 10 OS, you can take a screenshot using built-in tools. The easiest way is to use the key Print Screen. On a PC or laptop keyboard, this button is usually located at the top and may have a shortened label PrtScn or Prtsc. When the user presses this key, a screenshot of the entire screen area is placed on the clipboard, from where it can be “pulled” to any graphics editor(for example Paint) using the command "Insert" ("Ctrl+V").
If you do not want to edit the image and deal with the clipboard, then you can use the keyboard shortcut "Win+Prtsc", after clicking which the captured image will be saved to the directory "Screenshots", located in the folder "Images".

Scissors
Windows 10 also has a standard application called “Scissors”, which allows you to quickly take pictures of different areas of the screen, including delayed screenshots, and then edit them and save them in a user-friendly format. To take a snapshot of an image this way, do the following sequence actions.
Very useful function Windows operating systems provide the ability to take screen photographs. Thanks to this function, the user can capture the ongoing process on the screen at any time. IN new ten The developers have slightly expanded the functionality of taking screenshots from the screen. In this article, we will detail examples of taking screenshots from the screen using the built-in functionality of Windows 10. In addition, we will describe how to take screenshots of the screen in Windows 10 when the built-in functionality refuses to work.
We create screenshots of the PC screen using the Print Screen key and its combinations with keys and modifiers
If we try to press the top left Print key Screen , then the system will take a photo work area screen and places it on the clipboard. Below we will demonstrate an example of how this key works in combination with the built-in graphical utility in Windows 10 called Paint. For this example, let's take a photo of the worker Windows table 10 keys Print Screen on which the calculator is open.
Now the saved image that is in the PC memory needs to be inserted into the program Paint. To do this, open the Paint application and paste an image from the buffer using the Insert button or using the keyboard shortcut Ctrl + V.

In the same way, you can insert pictures into other graphic editors and various programs. Below is the insertion of this screen into the graphic editor paint.net.

To take a screenshot active application in Windows 10, you need to type Alt combination+Print Screen. Below is an example of inserting an image of the active calculator window into Paint program.

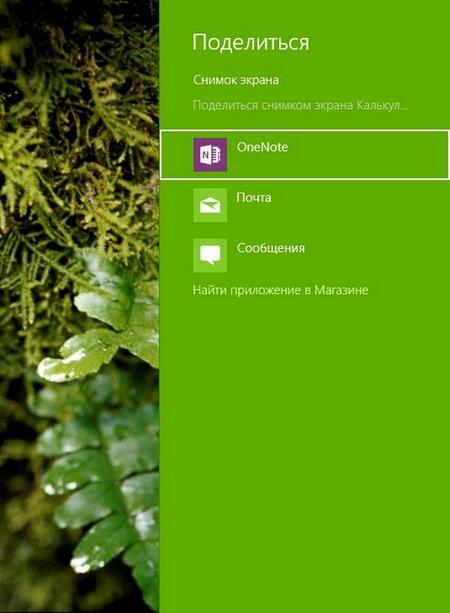
Now let's look at two keyboard shortcuts: WIN + Print Screen and WIN + H. The first combination does screenshot of the entire screen, but saves it not to the clipboard, but to a file. The folder where the pictures are saved is located in "C:\Users\Alex\Pictures\Screenshots" where Alex is the username. The second combination does transferring the image to applications that are used for messaging over the Internet. After completing this combination, a side window should open in which you can select the desired application.
Let's look at creating screenshots using the built-in Snipping utility.
Utility Scissors is standard application Windows 10. The utility is designed to easily take screenshots from your computer screen. After launching the utility, the user is given a choice of four modes for capturing images on the screen.

After capturing the image, it goes into the built-in editor of the utility Scissors.

In this editor the user can edit the image, send it by email and save it in the required format.
New program for Windows Snip
Utility Snip represents new development Microsoft, which is an extended analogue of Scissors. You can download the utility on the official website https://mix.office.com/snip. Once Snip is installed and launched, a panel should appear at the top of the screen when you hover over it.

After capturing an image using the utility Snip it will open in the main window of the utility.

In this window you can do multi-colored marks, audio annotations on the image and edit it. In addition, the utility can intercept key press Print Screen to move the image into your editor. Snip will especially appeal to users of tablet PCs and laptops with touch screens on Windows 10, as they are convenient for making graphic notes.
Taking a screenshot in Windows 10 store games
To capture images in the game, we will use the arcade racing game Asphalt 8: Take Off. This game can be downloaded for free from digital store Windows 10. Now open the game and run game level. During the game, the user has the opportunity to take a screenshot gameplay using the keyboard combination WIN + G. After completing this combination, a panel should open that allows you to take a snapshot of the game.
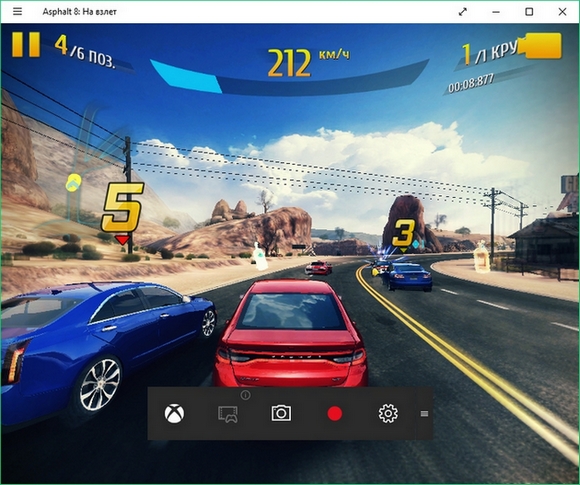
On this panel, you can take a photo with a button in the form of a camera icon. In addition to taking a snapshot of the game, you can also start a video recording of the gameplay with the red round button.
This method of creating game scripts is very convenient. The only limitation of this method is that it only allows you to take game shots in games that are installed from Windows Store 10.
If the game is not a store application, then in this case the panel will not open using the keyboard shortcut WIN + G.
In the next chapter, we will describe an example of creating game screenshots in games not from the Windows 10 Store.
Capturing screenshots in games not from the Windows 10 Store
The Windows 10 operating system is still quite young, so its store does not contain a very large catalog of games that can fully satisfy the modern gamer. Such digital services, How Steam And Origin, now contain thousands of gaming hits. Take a screenshot in these games using the panel that opens WIN combination+ G, it won't work. In this case, the utility will help us Fraps. This utility can be downloaded from its official website www.fraps.com. After downloading and installing Fraps let's launch it. IN running program let's go to the tab " Screenshots».

On this tab you can see that you can take a game screenshot using the F10 key. Also in this window you can set your hot button to take a photo. On this tab you can also set the path for saving game pictures and their format.
Now let's run the game as an example Serious Sam HD The Second Encounter. Evidence that Fraps works, is the value FPS, displayed in the upper left corner. IN running game Feel free to press the F10 button and save the game moment you need.
Another pleasant moment for game lovers is that the most popular game client Steam Allows you to take game screenshots while playing. Below is the screenshot downloader that opens after closing the game.

The screenshots themselves are created in Steam using the F12 key.
- Bandicam;
- Open Broadcaster Software;
- SimpleScreenRecorder.
Conclusion
In this article we examined all the possibilities of the operating room Windows systems 10 for taking screenshots from monitors and laptop screens. In addition, we considered third party utility Fraps, which allows you to take game shots in Windows 10. After reading this material, you can easily take screenshots of your computer, both in programs and in games.
Video on the topic
The new version of the Windows operating system has big amount functions than previous software. It is better adapted to work not only on personal computer, but also on a tablet and smartphone. The function of how to take a screenshot on Windows 10 is now available for all listed devices.
Ready-made images can be used for this and any other products: postcards, calendars, thematic collages.
The easiest way to take a screenshot
Step 1. Press key Print Screen(can be indicated on the keyboard as: Prt Sc), no visible changes will occur on the screen, the system will save the current screen image to the clipboard. Most often on laptops Prt Sc is located at the top of the keyboard and combined with Insert. To take a screenshot, you need to press it simultaneously with the key Fn(lower left corner).
Step 2. Download the distribution package of the Russian Photoshop program from our website and install it on your computer. Launch the utility, click the “Edit” tab and then “Paste”. Use the “File” menu to save the image (or click on the floppy disk icon at the top of the interface). The screenshot can be quickly exported to any of the formats (JPEG, BMP, PNG, GIF) by selecting the “Quick Export” function also in “File”.

Other ways to take a screenshot
There are several more ways to take a screenshot on Windows 10:
Method 1. Press the Win keys simultaneously (see image Windows icon) and Print Screen. The picture on the screen will freeze for a short time, and the picture will be saved not in the clipboard, but in the “Screenshots” folder (can be found through the search menu) as a file.
Method 2. Take a screenshot of a separate window. Click on the window to make it active, then simultaneously click Alt keys and Print Screen. Next, launch “Russian Photoshop”, click “Edit” and “Paste”.
Method 3. Take a screenshot of part of the screen. Through the search, find the “Scissors” program. Next “Create”, select the form for the screenshot, set the delay time. Once you take a photo, it will automatically open in the Snipping Tool window.
Method 4. Take a screenshot while playing. In Windows 10, when you press the Win+G keys, a special game panel opens. The photo button takes a screenshot and can also be used to record a video.
Method 5. How to take a screenshot on Windows 10 on your phone. A screenshot in phones running Windows OS is taken by simultaneously pressing the volume up and screen lock buttons. The function works in a similar way on a tablet.
How to edit a screenshot on Windows 10
The taken screenshot is quickly edited using the professional Photoshop utility in Russian. Add a screenshot to the utility, select the “Crop” function on the “Image” tab and crop the image. Through the same tab, open the defect removal menu and correct the picture.

Click on the “Add Frame” icon and select any of the options provided. Frames can be combined with each other, creating unique multilayer structures; read more about this function in the article:. Russian Photoshop contains many different improvements for your screenshots, photos, pictures, and any other graphic files.


